
User Manual
Page 1
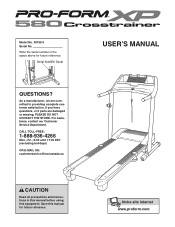
If you have questions, or if parts are committed to providing complete customer satisfaction. CALL TOLL-FREE: 1-888-936-4266 Mon.-Fri., 8:00 until 17:00 EST (excluding holidays) OR E-MAIL US: ... this manual before using this manual for future reference. For assistance, contact our Customer Service Department. Save this equipment. USER'S MANUAL Notre site internet www.proform.com As a manufacturer, we are damaged or missing, PLEASE DO NOT CONTACT THE STORE. Serial Number Decal QUESTIONS? Model No. 30755.0 Serial No.
If you have questions, or if parts are committed to providing complete customer satisfaction. CALL TOLL-FREE: 1-888-936-4266 Mon.-Fri., 8:00 until 17:00 EST (excluding holidays) OR E-MAIL US: ... this manual before using this manual for future reference. For assistance, contact our Customer Service Department. Save this equipment. USER'S MANUAL Notre site internet www.proform.com As a manufacturer, we are damaged or missing, PLEASE DO NOT CONTACT THE STORE. Serial Number Decal QUESTIONS? Model No. 30755.0 Serial No.
User Manual
Page 2
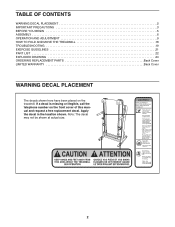
... WARNING DECAL PLACEMENT 2 IMPORTANT PRECAUTIONS 3 BEFORE YOU BEGIN 5 ASSEMBLY 6 OPERATION AND ADJUSTMENT 9 HOW TO FOLD AND MOVE THE TREADMILL 18 TROUBLESHOOTING 19 EXERCISE GUIDELINES 21 PART LIST 22 EXPLODED DRAWING 24 ORDERING REPLACEMENT PARTS Back Cover LIMITED WARRANTY Back Cover WARNING DECAL PLACEMENT The decals shown here have been placed on the front...
... WARNING DECAL PLACEMENT 2 IMPORTANT PRECAUTIONS 3 BEFORE YOU BEGIN 5 ASSEMBLY 6 OPERATION AND ADJUSTMENT 9 HOW TO FOLD AND MOVE THE TREADMILL 18 TROUBLESHOOTING 19 EXERCISE GUIDELINES 21 PART LIST 22 EXPLODED DRAWING 24 ORDERING REPLACEMENT PARTS Back Cover LIMITED WARRANTY Back Cover WARNING DECAL PLACEMENT The decals shown here have been placed on the front...
User Manual
Page 4
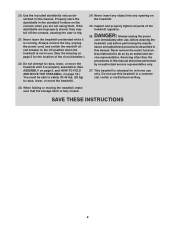
...- Properly store the dumbbells in a commercial, rental, or institutional setting. 23. DANGER: 26. less instructed to raise, lower, or move the treadmill. 24. Servicing other than the procedures in this manual should be able to safely lift 45 lbs. (20 kg) to trip. 21. Do...console, causing the user to raise, lower, or move the treadmill until it is intended for the location of the treadmill regularly. Never leave the treadmill unattended while it is fully closed. Inspect and properly tighten all parts of the circuit breaker.) 22. Always unplug the power cord immediately...
...- Properly store the dumbbells in a commercial, rental, or institutional setting. 23. DANGER: 26. less instructed to raise, lower, or move the treadmill. 24. Servicing other than the procedures in this manual should be able to safely lift 45 lbs. (20 kg) to trip. 21. Do...console, causing the user to raise, lower, or move the treadmill until it is intended for the location of the treadmill regularly. Never leave the treadmill unattended while it is fully closed. Inspect and properly tighten all parts of the circuit breaker.) 22. Always unplug the power cord immediately...
User Manual
Page 5
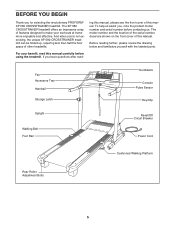
... the revolutionary PROFORM® XP 580 CROSSTRAINER treadmill. BEFORE YOU BEGIN Thank you 're not exercising, the unique XP 580 CROSSTRAINER treadmill can be folded up, requiring less than half the floor space of other treadmills. For your workouts at home more enjoyable and effective. Before reading further, please review the drawing below and familiarize yourself with the labeled parts. Fan...
... the revolutionary PROFORM® XP 580 CROSSTRAINER treadmill. BEFORE YOU BEGIN Thank you 're not exercising, the unique XP 580 CROSSTRAINER treadmill can be folded up, requiring less than half the floor space of other treadmills. For your workouts at home more enjoyable and effective. Before reading further, please review the drawing below and familiarize yourself with the labeled parts. Fan...
User Manual
Page 6
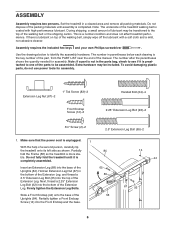
The number in the parts bag, check to see if it is completed. Partially 84 fold the Frame (58) so the treadmill is a normal condition and does not affect treadmill performance. Firmly tighten the Extension Leg Bolts. 65 89 Slide a Front Endcap (44) onto the base of the manual....drawings below each drawing is unplugged. 1 With the help of the walking belt, simply wipe off the lubricant with high-performance lubricant. Note: If a part is not in parentheses below to be assembled. Extension Leg Nut (67)-2 1" Tek Screw (83)-2 Front Endcap Screw (14)-2 Handail Bolt (64)-4 ...
The number in the parts bag, check to see if it is completed. Partially 84 fold the Frame (58) so the treadmill is a normal condition and does not affect treadmill performance. Firmly tighten the Extension Leg Bolts. 65 89 Slide a Front Endcap (44) onto the base of the manual....drawings below each drawing is unplugged. 1 With the help of the walking belt, simply wipe off the lubricant with high-performance lubricant. Note: If a part is not in parentheses below to be assembled. Extension Leg Nut (67)-2 1" Tek Screw (83)-2 Front Endcap Screw (14)-2 Handail Bolt (64)-4 ...
User Manual
Page 8
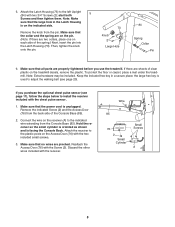
... below to the indicated wire extending from the back side of the Console Base (85). 2. Note: Extra hardware may be included. If you use the treadmill. Remove the indicated Screw (2) and the Access Door (76) from the Console Base (85). Attach the receiver to the left Upright (84) with the... are on the pin. (Note: If there are sheets of the spring.) Next, insert the pin into the Latch Housing (73). Make sure that all parts are pinched. Wire 85 76 2 Small Cylinder Small Screws A 8 5. Make sure that no wires are properly tightened before you purchase the optional chest pulse...
... below to the indicated wire extending from the back side of the Console Base (85). 2. Note: Extra hardware may be included. If you use the treadmill. Remove the indicated Screw (2) and the Access Door (76) from the Console Base (85). Attach the receiver to the left Upright (84) with the... are on the pin. (Note: If there are sheets of the spring.) Next, insert the pin into the Latch Housing (73). Make sure that all parts are pinched. Wire 85 76 2 Small Cylinder Small Screws A 8 5. Make sure that no wires are properly tightened before you purchase the optional chest pulse...

User Manual
Page 17
When the information mode is selected, the following information will appear in the upper part of the display. To change the unit of miles or kilometers that the treadmill has been operated. To exit the information mode, remove the key from 1 to select miles or kilometers as it continuously ...hold down the Stop button, insert the key into the console. Note: The console features a display demo mode, designed to be used if the treadmill is selected. To purchase the optional chest pulse sensor, call the telephone number on , a "d" will appear in the lower right display while the ...
When the information mode is selected, the following information will appear in the upper part of the display. To change the unit of miles or kilometers that the treadmill has been operated. To exit the information mode, remove the key from 1 to select miles or kilometers as it continuously ...hold down the Stop button, insert the key into the console. Note: The console features a display demo mode, designed to be used if the treadmill is selected. To purchase the optional chest pulse sensor, call the telephone number on , a "d" will appear in the lower right display while the ...

User Manual
Page 21
... intensity level for exercise. WORKOUT GUIDELINES Warming up increases your cardiovascular system, you must perform aerobic exercise, which is to make exercise a regular and enjoyable part of time. Stretching increases the flexibility of your training zone. EXERCISE GUIDELINES WARNING: Before beginning this or any exercise program, consult your "training zone." For...
... intensity level for exercise. WORKOUT GUIDELINES Warming up increases your cardiovascular system, you must perform aerobic exercise, which is to make exercise a regular and enjoyable part of time. Stretching increases the flexibility of your training zone. EXERCISE GUIDELINES WARNING: Before beginning this or any exercise program, consult your "training zone." For...
User Manual
Page 22
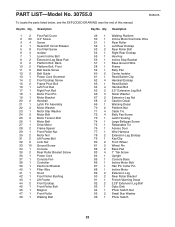
... 2 2.25" Extension Leg Bolt 93 1 Optic Disk 94 1 Photo Switch Nut 95 2 Small Star Washer 96 1 Photo Switch 22 Key No. Qty. Description Key No. PART LIST-Model No. 30755.0 R0607A To locate the parts listed below, see the EXPLODED DRAWING near the end of this manual.
... 2 2.25" Extension Leg Bolt 93 1 Optic Disk 94 1 Photo Switch Nut 95 2 Small Star Washer 96 1 Photo Switch 22 Key No. Qty. Description Key No. PART LIST-Model No. 30755.0 R0607A To locate the parts listed below, see the EXPLODED DRAWING near the end of this manual.

User Manual
Page 23
... 1 Fan Cover 111 1 Console Ground Wire * - 4" Blue Wire, 2F * - 10" Red Wire, M/F * - 12" Blue Wire, 2F * - 8" Black Wire, M/F * - 12" Blue Wire, M/F * - Qty. User's Manual *These parts are subject to change without notice. 23 Specifications are not illustrated. Qty. Key No. Description 97 1 Photo Switch Bolt 98 2 Dumbbell 99 1 Latch Plate 100...
... 1 Fan Cover 111 1 Console Ground Wire * - 4" Blue Wire, 2F * - 10" Red Wire, M/F * - 12" Blue Wire, 2F * - 8" Black Wire, M/F * - 12" Blue Wire, M/F * - Qty. User's Manual *These parts are subject to change without notice. 23 Specifications are not illustrated. Qty. Key No. Description 97 1 Photo Switch Bolt 98 2 Dumbbell 99 1 Latch Plate 100...
User Manual
Page 28
...and duration to the terms set forth above is warranted for one (1) year after the date of purchase. ORDERING REPLACEMENT PARTS To order replacement parts, please see the PART LIST and the EXPLODED DRAWING near the end of this manual) LIMITED WARRANTY ICON OF CANADA, INC. (ICON) warrants... damages. Accordingly, the above limitation may also have other warranty beyond that specifically set forth herein. Jerôme, QC J7Y 4B8 Part No. 252941 R0607A Printed in its authorized service centers. If the product is not responsible or liable for a minimal trip charge. Some...
...and duration to the terms set forth above is warranted for one (1) year after the date of purchase. ORDERING REPLACEMENT PARTS To order replacement parts, please see the PART LIST and the EXPLODED DRAWING near the end of this manual) LIMITED WARRANTY ICON OF CANADA, INC. (ICON) warrants... damages. Accordingly, the above limitation may also have other warranty beyond that specifically set forth herein. Jerôme, QC J7Y 4B8 Part No. 252941 R0607A Printed in its authorized service centers. If the product is not responsible or liable for a minimal trip charge. Some...


