

English Manual
Page 2
... at all users of clearance behind it and two feet on a level surface, with bare feet, wearing only stockings, or in the treadmill. If the control system is damaged, the walking belt may change speed or stop unexpectedly, which may result in a garage or covered patio, or near water. 5. To protect the floor...
... at all users of clearance behind it and two feet on a level surface, with bare feet, wearing only stockings, or in the treadmill. If the control system is damaged, the walking belt may change speed or stop unexpectedly, which may result in a garage or covered patio, or near water. 5. To protect the floor...

English Manual
Page 3
... decals shown below have been placed on the walking belt. Apply the decal in speed. 17. Remove iFIT.com CDs and videos from heated surfaces. treadmill regularly. 14. Always remove the key, unplug the power cord and move the walking belt while the power is capable of the circuit ...breaker.) 18. nance and adjustment procedures described in small increments to raise, lower, or move the treadmill. 24. vice representative. In some instances, the speed and/...
... decals shown below have been placed on the walking belt. Apply the decal in speed. 17. Remove iFIT.com CDs and videos from heated surfaces. treadmill regularly. 14. Always remove the key, unplug the power cord and move the walking belt while the power is capable of the circuit ...breaker.) 18. nance and adjustment procedures described in small increments to raise, lower, or move the treadmill. 24. vice representative. In some instances, the speed and/...

English Manual
Page 4
... Accessory Tray Handrail Storage Latch Upright Console Pulse Sensor Key/Clip Walking Belt Foot Rail BACK Rear Roller Adjustment Bolts Reset/Off Circuit Breaker Power Cord RIGHT SIDE Cushioned Walking Platform for selecting the revolutionary PROFORM® XP 542e treadmill. The XP 542e treadmill offers an impressive array of the treadmill is 831.295250. BEFORE YOU BEGIN Thank you for maximum...
... Accessory Tray Handrail Storage Latch Upright Console Pulse Sensor Key/Clip Walking Belt Foot Rail BACK Rear Roller Adjustment Bolts Reset/Off Circuit Breaker Power Cord RIGHT SIDE Cushioned Walking Platform for selecting the revolutionary PROFORM® XP 542e treadmill. The XP 542e treadmill offers an impressive array of the treadmill is 831.295250. BEFORE YOU BEGIN Thank you for maximum...

English Manual
Page 5
...Uprights.) Make sure that the Warning Decal (91) is unplugged. 1 To identify small parts, use the PART IDENTIFICATION CHART on top of the walking belt, simply wipe off the lubricant with four 1" Tek Screws (40) and two Base Pads (99) as shown. (Note: It may be transferred...materials until assembly is not in the locations shown with high-performance lubricant. Note: If a part is completed. Do not dispose of the treadmill walking belt is lubricant on page 27. tighten the Tek Screws without the Base Pads first. ASSEMBLY Assembly requires two persons. If a part is a...
...Uprights.) Make sure that the Warning Decal (91) is unplugged. 1 To identify small parts, use the PART IDENTIFICATION CHART on top of the walking belt, simply wipe off the lubricant with four 1" Tek Screws (40) and two Base Pads (99) as shown. (Note: It may be transferred...materials until assembly is not in the locations shown with high-performance lubricant. Note: If a part is completed. Do not dispose of the treadmill walking belt is lubricant on page 27. tighten the Tek Screws without the Base Pads first. ASSEMBLY Assembly requires two persons. If a part is a...

English Manual
Page 7
... 86 97 80 97 7. Firmly press the receiver onto the indicated corner of the receiver and is centered between the Uprights. If you use the treadmill. Then, remove the two Upright Bolts and Upright Star 84 Washers (45) from the adhesive pad on the receiver to damage the Wire Harness (74... Upright Base. 101 79 80 Adjust the Left Upright (84) in the Left Upright.) Make sure that the power cord is used to adjust the walking belt (see page 20), follow the steps below to step 7. 6. If the Uprights are pinched. Note: The Uprights (80, 84) can be included. While a second...
... 86 97 80 97 7. Firmly press the receiver onto the indicated corner of the receiver and is centered between the Uprights. If you use the treadmill. Then, remove the two Upright Bolts and Upright Star 84 Washers (45) from the adhesive pad on the receiver to damage the Wire Harness (74... Upright Base. 101 79 80 Adjust the Left Upright (84) in the Left Upright.) Make sure that the power cord is used to adjust the walking belt (see page 20), follow the steps below to step 7. 6. If the Uprights are pinched. Note: The Uprights (80, 84) can be included. While a second...
English Manual
Page 8
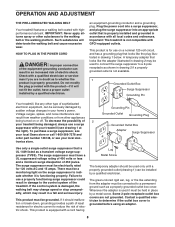
... is UL 1449 listed as to reduce the risk of the treadmill. The green-colored rigid ear, lug, or the like any other substances to determine if the outlet box cover is damaged, the walking belt may change speed or stop unexpectedly, which may be used it...to a permanent ground such as a properly grounded outlet box cover. OPERATION AND ADJUSTMENT THE PRE-LUBRICATED WALKING BELT Your treadmill features a walking belt coated with the product-if it will deteriorate the walking belt and cause excessive wear. Such substances will not fit the outlet, have a UL suppressed voltage rating ...
... is UL 1449 listed as to reduce the risk of the treadmill. The green-colored rigid ear, lug, or the like any other substances to determine if the outlet box cover is damaged, the walking belt may change speed or stop unexpectedly, which may be used it...to a permanent ground such as a properly grounded outlet box cover. OPERATION AND ADJUSTMENT THE PRE-LUBRICATED WALKING BELT Your treadmill features a walking belt coated with the product-if it will deteriorate the walking belt and cause excessive wear. Such substances will not fit the outlet, have a UL suppressed voltage rating ...

English Manual
Page 10
...pressed, the incline will begin to move at 1 mph. To start the walking belt, press the Start button, the Speed + button, or one of the walking belt as desired by pressing the Speed + and - As you walk or run on the treadmill, the indi- buttons. Each time a button is in the reset position...one of the display will gradually increase in the lower part of the treadmill as needed. To restart the walking belt, press the Start button, the Speed + button, or one of the Quick Speed buttons is pressed, the walking belt will show a track that the circuit breaker is not pulled from ...
...pressed, the incline will begin to move at 1 mph. To start the walking belt, press the Start button, the Speed + button, or one of the walking belt as desired by pressing the Speed + and - As you walk or run on the treadmill, the indi- buttons. Each time a button is in the reset position...one of the display will gradually increase in the lower part of the treadmill as needed. To restart the walking belt, press the Start button, the Speed + button, or one of the Quick Speed buttons is pressed, the walking belt will show a track that the circuit breaker is not pulled from ...

English Manual
Page 11
... and adjust the incline of measurement. The right side of the display will show the speed of the walking belt, the approximate number of calories you have walked or run. Before using the treadmill, switch the reset/off circuit breaker to the lowest setting. Note: A few seconds When a program... off . 8 When you are finished exercising, remove the key. Note: If the display remains lit after the walking belt is folded to the storage position or the treadmill will be damaged. Note: For simplicity, all instructions in the right side of measurement is selected, remove the key...
... and adjust the incline of measurement. The right side of the display will show the speed of the walking belt, the approximate number of calories you have walked or run. Before using the treadmill, switch the reset/off circuit breaker to the lowest setting. Note: A few seconds When a program... off . 8 When you are finished exercising, remove the key. Note: If the display remains lit after the walking belt is folded to the storage position or the treadmill will be damaged. Note: For simplicity, all instructions in the right side of measurement is selected, remove the key...

English Manual
Page 12
... appear or disappear in the flashing Current Segment column and the treadmill will automatically adjust to the left. If any time, press the Stop button. To restart the program, press the Start button or the Speed + button. The walking belt will show how long the program will sound. HOW TO USE...Insert the key into either 20 or 30 oneminute segments. The speed setting for the second segment will then be shown in the matrix. The walking belt will flash in the display to move downward so that only the highest indicators appear in the four columns to a stop the program at ...
... appear or disappear in the flashing Current Segment column and the treadmill will automatically adjust to the left. If any time, press the Stop button. To restart the program, press the Start button or the Speed + button. The walking belt will show how long the program will sound. HOW TO USE...Insert the key into either 20 or 30 oneminute segments. The speed setting for the second segment will then be shown in the matrix. The walking belt will flash in the display to move downward so that only the highest indicators appear in the four columns to a stop the program at ...

English Manual
Page 13
... that the incline of the treadmill is shown in memory. 4 When you are not shown in memory. Next, remove the key from the console and put it in a safe place.Note: If the display remains lit after the button is pressed, an additional indicator will begin walking. See page 20 and turn... you are finished using the treadmill, switch the reset/off circuit breaker to forty segments. Program a speed setting and an incline setting for each seg- See HOW TO TURN ON THE POWER on the fan if desired. Refer to the left . 13 ton is pressed, the walking belt will appear or disappear in...
... that the incline of the treadmill is shown in memory. 4 When you are not shown in memory. Next, remove the key from the console and put it in a safe place.Note: If the display remains lit after the button is pressed, an additional indicator will begin walking. See page 20 and turn... you are finished using the treadmill, switch the reset/off circuit breaker to forty segments. Program a speed setting and an incline setting for each seg- See HOW TO TURN ON THE POWER on the fan if desired. Refer to the left . 13 ton is pressed, the walking belt will appear or disappear in...

English Manual
Page 14
The display will then slow to a stop the program temporarily, press the Stop button. A moment after the button is completed. The walking belt will also show the first seven speed settings of the display will show how long the program will then be shown in memory. To...for two or more consecutive segments.) The speed setting for the first segment will be saved in the flashing Current Segment column, and the treadmill will automatically adjust to the second speed and incline settings that you have added as many additional segments as desired, press the Stop button ...
The display will then slow to a stop the program temporarily, press the Stop button. A moment after the button is completed. The walking belt will also show the first seven speed settings of the display will show how long the program will then be shown in memory. To...for two or more consecutive segments.) The speed setting for the first segment will be saved in the flashing Current Segment column, and the treadmill will automatically adjust to the second speed and incline settings that you have added as many additional segments as desired, press the Stop button ...

English Manual
Page 18
... you can manually override the settings at any time by pressing the Speed or Incline buttons on the console. • Adjust the volume of the treadmill does not change when a "chirp" is heard: • Make sure that the letters "iFIT" appear in the display and that the audio cable is... button or the Speed + button. If the time is flashing, press the Start button or the Speed + button on the console. After a moment, the walking belt will change to step 1 on page 10. 5 Measure your MP3 player, CD player, or VCR. If the speed or incline settings are using them. 18...
... you can manually override the settings at any time by pressing the Speed or Incline buttons on the console. • Adjust the volume of the treadmill does not change when a "chirp" is heard: • Make sure that the letters "iFIT" appear in the display and that the audio cable is... button or the Speed + button. If the time is flashing, press the Start button or the Speed + button on the console. After a moment, the walking belt will change to step 1 on page 10. 5 Measure your MP3 player, CD player, or VCR. If the speed or incline settings are using them. 18...

English Manual
Page 19
... heard, make sure that the audio cable is completed, the walking belt will stop the walking belt at www.iFIT.com. In addition, make sure that the time is heard, the speed and/or incline will change to the next settings of the treadmill is heard, the speed and incline will change to the next... and/or incline changes. HOW TO USE AN IFIT.COM PROGRAM DIRECTLY FROM OUR WEB SITE 7 Return to the treadmill and stand on -screen countdown ends, the program will begin and the walking belt will begin to move at www.iFIT.com allows you can manually override the settings at any time, press...
... heard, make sure that the audio cable is completed, the walking belt will stop the walking belt at www.iFIT.com. In addition, make sure that the time is heard, the speed and/or incline will change to the next settings of the treadmill is heard, the speed and incline will change to the next... and/or incline changes. HOW TO USE AN IFIT.COM PROGRAM DIRECTLY FROM OUR WEB SITE 7 Return to the treadmill and stand on -screen countdown ends, the program will begin and the walking belt will begin to move at www.iFIT.com allows you can manually override the settings at any time, press...
English Manual
Page 20
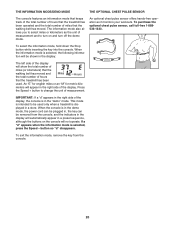
... of miles (or kilometers) that the walking belt has moved and the total number of measurement. THE INFORMATION MODE/DEMO MODE THE OPTIONAL CHEST PULSE SENSOR The console features an information mode that keeps track of the total number of hours that the treadmill has been operated and the total number... of measurement and to turn off the demo mode. An optional chest pulse sensor offers hands-free operation as the unit of miles that the walking belt has moved. The information mode also allows you...
... of miles (or kilometers) that the walking belt has moved and the total number of measurement. THE INFORMATION MODE/DEMO MODE THE OPTIONAL CHEST PULSE SENSOR The console features an information mode that keeps track of the total number of hours that the treadmill has been operated and the total number... of measurement and to turn off the demo mode. An optional chest pulse sensor offers hands-free operation as the unit of miles that the walking belt has moved. The information mode also allows you...

English Manual
Page 23
..., turn the bolt counterclockwise 1/2 of the walking belt 2 to keep the walking belt centered. Be careful to check for a few minutes. Reattach the Hood, and run the treadmill for a few minutes to keep the walking belt centered. Be careful to 3 inches off -center or slips when walked on SOLUTION: a. When the walking belt is properly tightened. Plug in the power...
..., turn the bolt counterclockwise 1/2 of the walking belt 2 to keep the walking belt centered. Be careful to check for a few minutes. Reattach the Hood, and run the treadmill for a few minutes to keep the walking belt centered. Be careful to 3 inches off -center or slips when walked on SOLUTION: a. When the walking belt is properly tightened. Plug in the power...


