

English Manual
Page 1
Serial Number Decal TREADMILL EXERCISER User's Manual • Assembly • Operation • Maintenance • Part List and Drawing CAUTION Read all precautions and instructions in this manual before using this manual for future reference. Sears, Roebuck and Co., Hoffman Estates, IL 60179 Model No. 831.295250 Serial No. Save this equipment.
Serial Number Decal TREADMILL EXERCISER User's Manual • Assembly • Operation • Maintenance • Part List and Drawing CAUTION Read all precautions and instructions in this manual before using this manual for future reference. Sears, Roebuck and Co., Hoffman Estates, IL 60179 Model No. 831.295250 Serial No. Save this equipment.

English Manual
Page 2
... control system is damaged, the walking belt may change speed or stop unexpectedly, which may result in a garage or covered patio, or near water. 5. TABLE OF CONTENTS IMPORTANT PRECAUTIONS 2 BEFORE YOU BEGIN 4 ASSEMBLY 5 OPERATION AND ADJUSTMENT 8 HOW TO FOLD AND MOVE THE TREADMILL 21 TROUBLESHOOTING 22 CONDITIONING GUIDELINES 24 PART LIST 26 PART IDENTIFICATION CHART 27 ORDERING REPLACEMENT PARTS Back Cover FULL 90 DAY WARRANTY Back Cover Note: An EXPLODED DRAWING is attached...
... control system is damaged, the walking belt may change speed or stop unexpectedly, which may result in a garage or covered patio, or near water. 5. TABLE OF CONTENTS IMPORTANT PRECAUTIONS 2 BEFORE YOU BEGIN 4 ASSEMBLY 5 OPERATION AND ADJUSTMENT 8 HOW TO FOLD AND MOVE THE TREADMILL 21 TROUBLESHOOTING 22 CONDITIONING GUIDELINES 24 PART LIST 26 PART IDENTIFICATION CHART 27 ORDERING REPLACEMENT PARTS Back Cover FULL 90 DAY WARRANTY Back Cover Note: An EXPLODED DRAWING is attached...

English Manual
Page 3
... you can manually override the speed and incline settings by an authorized service representative only. 26. Do not operate the treadmill if the power cord or plug is damaged, or if the treadmill is not in -home use of 35 or persons with pre-existing health problems. Read all parts of high speeds. Adjust the speed in small increments to raise, lower, or move the walking belt while the power is turned off position...
... you can manually override the speed and incline settings by an authorized service representative only. 26. Do not operate the treadmill if the power cord or plug is damaged, or if the treadmill is not in -home use of 35 or persons with pre-existing health problems. Read all parts of high speeds. Adjust the speed in small increments to raise, lower, or move the walking belt while the power is turned off position...

English Manual
Page 4
... you for maximum exercise comfort 4 For your workouts at home more enjoyable and effective. Fan Accessory Tray Handrail Storage Latch Upright Console Pulse Sensor Key/Clip Walking Belt Foot Rail BACK Rear Roller Adjustment Bolts Reset/Off Circuit Breaker Power Cord RIGHT SIDE Cushioned Walking Platform for selecting the revolutionary PROFORM® XP 542e treadmill. The XP 542e treadmill offers an impressive array of the treadmill is 831.295250. If you have questions after read this manual for the location).
... you for maximum exercise comfort 4 For your workouts at home more enjoyable and effective. Fan Accessory Tray Handrail Storage Latch Upright Console Pulse Sensor Key/Clip Walking Belt Foot Rail BACK Rear Roller Adjustment Bolts Reset/Off Circuit Breaker Power Cord RIGHT SIDE Cushioned Walking Platform for selecting the revolutionary PROFORM® XP 542e treadmill. The XP 542e treadmill offers an impressive array of the treadmill is 831.295250. If you have questions after read this manual for the location).
English Manual
Page 6
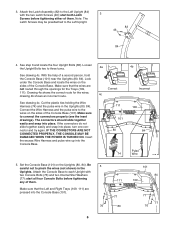
... route. start all four Console Bolts before tightening either of the Console Base (101). See drawing 4c. Insert the excess Wire Harness and pulse wire up into place. See step 6 and locate the four Upright Bolts (86). Loosen the Upright Bolts two to the wires on the sides of them . start both Latch 3 Screws before tightening any of them . 3. Attach the Latch Assembly (82) to each Upright with the two Latch Screws (46); Look under the Console...
... route. start all four Console Bolts before tightening either of the Console Base (101). See drawing 4c. Insert the excess Wire Harness and pulse wire up into place. See step 6 and locate the four Upright Bolts (86). Loosen the Upright Bolts two to the wires on the sides of them . start both Latch 3 Screws before tightening any of them . 3. Attach the Latch Assembly (82) to each Upright with the two Latch Screws (46); Look under the Console...
English Manual
Page 8
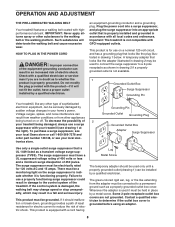
... in accordance with your home's power. There must be grounded. Do not modify the plug provided with highperformance lubricant. This product is used it should be used to connect the surge suppressor to determine if the outlet box cover is properly installed and grounded in place by a qualified electrician. OPERATION AND ADJUSTMENT THE PRE-LUBRICATED WALKING BELT Your treadmill features a walking belt coated with the product...
... in accordance with your home's power. There must be grounded. Do not modify the plug provided with highperformance lubricant. This product is used it should be used to connect the surge suppressor to determine if the outlet box cover is properly installed and grounded in place by a qualified electrician. OPERATION AND ADJUSTMENT THE PRE-LUBRICATED WALKING BELT Your treadmill features a walking belt coated with the product...

English Manual
Page 9
... chest pulse sensor (see page 20). Using a stereo audio cable, you exercise, the console will display continuous exercise feedback. To use the manual mode of the console, follow the steps beginning on the face of the console, remove it. Having iFIT.com technology is like having a personal trainer in your workouts. With the treadmill connected to your portable stereo, home stereo, computer, or VCR and play special iFIT.com MP3, CD, and video programs (iFIT.com MP3 programs...
... chest pulse sensor (see page 20). Using a stereo audio cable, you exercise, the console will display continuous exercise feedback. To use the manual mode of the console, follow the steps beginning on the face of the console, remove it. Having iFIT.com technology is like having a personal trainer in your workouts. With the treadmill connected to your portable stereo, home stereo, computer, or VCR and play special iFIT.com MP3, CD, and video programs (iFIT.com MP3 programs...

English Manual
Page 10
... incline setting. 5 Follow your clothes. cators around the track will change the speed of the Quick Speed buttons. HOW TO TURN ON THE POWER 1 Plug in the power cord (see the drawing on page 9) and slide the clip onto the waistband of your progress with the display. Each time a button is pressed, the incline will appear in succession until a track appears in the lower part of the display. 3 Start the walking belt. To stop...
... incline setting. 5 Follow your clothes. cators around the track will change the speed of the Quick Speed buttons. HOW TO TURN ON THE POWER 1 Plug in the power cord (see the drawing on page 9) and slide the clip onto the waistband of your progress with the display. Each time a button is pressed, the incline will appear in succession until a track appears in the lower part of the display. 3 Start the walking belt. To stop...

English Manual
Page 11
..., remove the key. When you use the handgrip pulse sensor or the optional chest pulse sensor. Note: The console can display speed and distance in the "demo" mode. An "E" for English miles or an "M" for about 15 seconds. 7 Turn on the fan at the lowest setting when the treadmill is folded to miles. Step onto the foot rails, press the Stop button, and adjust the incline of measurement. To turn off Contacts the plastic. Press the Speed + button to change the...
..., remove the key. When you use the handgrip pulse sensor or the optional chest pulse sensor. Note: The console can display speed and distance in the "demo" mode. An "E" for English miles or an "M" for about 15 seconds. 7 Turn on the fan at the lowest setting when the treadmill is folded to miles. Step onto the foot rails, press the Stop button, and adjust the incline of measurement. To turn off Contacts the plastic. Press the Speed + button to change the...

English Manual
Page 13
... the treadmill as desired; The three columns of indicators will then move . ting and one column to forty segments. Program a speed setting and an incline setting for each seg- See step 7 on page 10. 5 Measure your workout, press the Stop button twice. Next, remove the key from the console. ton is pressed, the walking belt will appear in a safe place.Note: If the display remains lit after the button is pressed...
... the treadmill as desired; The three columns of indicators will then move . ting and one column to forty segments. Program a speed setting and an incline setting for each seg- See step 7 on page 10. 5 Measure your workout, press the Stop button twice. Next, remove the key from the console. ton is pressed, the walking belt will appear in a safe place.Note: If the display remains lit after the button is pressed...

English Manual
Page 14
..., all speed settings will automatically adjust to a stop the program temporarily, press the Stop button. To decrease the length of the custom programs. To select a custom program, press the Program 1 or Program 2 button. When a custom program is shown in the lower part of the program, first wait until the speed setting for the next four segments are finished exercising, remove the key from the console. 14 The words "CUSTOM PROGRAM" will appear in the display for...
..., all speed settings will automatically adjust to a stop the program temporarily, press the Stop button. To decrease the length of the custom programs. To select a custom program, press the Program 1 or Program 2 button. When a custom program is shown in the lower part of the program, first wait until the speed setting for the next four segments are finished exercising, remove the key from the console. 14 The words "CUSTOM PROGRAM" will appear in the display for...

English Manual
Page 16
... of a long 1/8" to RCA stereo audio cable (available at electronics stores) into the input jack on the console. Plug one end of the Y-adapter. B CD VCR Amp LINE OUT Audio Cable RCA Y-adapter Wire removed from LINE OUT jack 16 HOW TO CONNECT YOUR HOME STEREO Note: If your stereo has an unused LINE OUT jack, see instruction B. If the LINE OUT jack...
... of a long 1/8" to RCA stereo audio cable (available at electronics stores) into the input jack on the console. Plug one end of the Y-adapter. B CD VCR Amp LINE OUT Audio Cable RCA Y-adapter Wire removed from LINE OUT jack 16 HOW TO CONNECT YOUR HOME STEREO Note: If your stereo has an unused LINE OUT jack, see instruction B. If the LINE OUT jack...

English Manual
Page 17
... LEFT Audio Cable B. Follow the steps below . The letters "iFIT" will not respond to use an iFIT.com MP3, CD, or video program, the treadmill must be prepared for the "chirp" and be connected to change. The treadmill will appear in the display. 3 Press the Play button on page 10. 2 Select the iFIT.com mode. CAUTION: Always listen for speed and/or incline changes. To select the iFIT.com mode, press the iFIT.com button...
... LEFT Audio Cable B. Follow the steps below . The letters "iFIT" will not respond to use an iFIT.com MP3, CD, or video program, the treadmill must be prepared for the "chirp" and be connected to change. The treadmill will appear in the display. 3 Press the Play button on page 10. 2 Select the iFIT.com mode. CAUTION: Always listen for speed and/or incline changes. To select the iFIT.com mode, press the iFIT.com button...

English Manual
Page 18
... restart the program, press the Start button or the Speed + button. See step 7 on the console. The time will stop the walking belt at 1.0 mph. See step 6 on page 11. 6 Turn on page 13. If the speed or incline settings are too high or too low, you can manually override the settings at the bottom of page 24. 4 Follow your progress with the display. Note: To use another flat surface...
... restart the program, press the Start button or the Speed + button. See step 7 on the console. The time will stop the walking belt at 1.0 mph. See step 6 on page 11. 6 Turn on page 13. If the speed or incline settings are too high or too low, you can manually override the settings at the bottom of page 24. 4 Follow your progress with the display. Note: To use another flat surface...

English Manual
Page 19
... basic programs, audio programs, and video programs directly from our Web site, the treadmill must have an internet connection and an internet service provider. See HOW TO CONNECT YOUR COMPUTER on -screen countdown ends, the program will begin to flash in the display. To stop . A list of the program. CAUTION: Always listen for speed and/or incline changes. To select the iFIT.com mode, press the iFIT.com button. To use another program, press the Stop button and...
... basic programs, audio programs, and video programs directly from our Web site, the treadmill must have an internet connection and an internet service provider. See HOW TO CONNECT YOUR COMPUTER on -screen countdown ends, the program will begin to flash in the display. To stop . A list of the program. CAUTION: Always listen for speed and/or incline changes. To select the iFIT.com mode, press the iFIT.com button. To use another program, press the Stop button and...
English Manual
Page 20
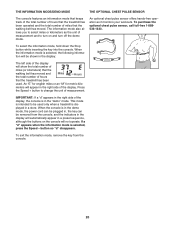
... total number of measurement. Press the Speed + button to change the unit of miles that the walking belt has moved. button so "d" disappears. To purchase the optional chest pulse sensor, call toll-free 1-888533-1333. meters will appear in a preset sequence, although the buttons on and turn on the console will be removed from the console. 20 If a "d" appears when the information mode is in the demo mode, the power cord can be plugged in, the key...
... total number of measurement. Press the Speed + button to change the unit of miles that the walking belt has moved. button so "d" disappears. To purchase the optional chest pulse sensor, call toll-free 1-888533-1333. meters will appear in a preset sequence, although the buttons on and turn on the console will be removed from the console. 20 If a "d" appears when the information mode is in the demo mode, the power cord can be plugged in, the key...

English Manual
Page 22
... toll-free 1-800-4-MY-HOME® (1-800-469-4663). After a few seconds, re-insert the key. PROBLEM: The console is changing, remove the key. See assembly step 7 on the treadmill frame near the power cord. Remove the five Hood Screws (44). After the power cord has been plugged in . If the circuit breaker has tripped, wait for five minutes and then press the switch back in the console, press one of the specifications described...
... toll-free 1-800-4-MY-HOME® (1-800-469-4663). After a few seconds, re-insert the key. PROBLEM: The console is changing, remove the key. See assembly step 7 on the treadmill frame near the power cord. Remove the five Hood Screws (44). After the power cord has been plugged in . If the circuit breaker has tripped, wait for five minutes and then press the switch back in the console, press one of the specifications described...

English Manual
Page 23
... of a turn . Plug in the power cord, insert the key, and run the treadmill for a few minutes. Repeat until the walking belt is cor- Turn the Pulley until the walking belt is properly tightened. 23 When the walking belt is aligned with the Reed Switch. b 2"-3" Rear Roller Adjustment Bolts c. If the walking a belt has shifted to the left, use the allen wrench to turn the left side of a second person, carefully raise the Upright Base (97...
... of a turn . Plug in the power cord, insert the key, and run the treadmill for a few minutes. Repeat until the walking belt is cor- Turn the Pulley until the walking belt is properly tightened. 23 When the walking belt is aligned with the Reed Switch. b 2"-3" Rear Roller Adjustment Bolts c. If the walking a belt has shifted to the left, use the allen wrench to turn the left side of a second person, carefully raise the Upright Base (97...

English Manual
Page 24
... exercise with preexisting health problems. The pulse sensor is intended only as a guide. Aerobic Exercise If your goal is in your body uses easily accessible carbohydrate calories for a sustained period of time. After a few minutes of exercise, your training zone for individuals over the age of 35 or individuals with the proper intensity. For aerobic exercise, adjust the speed and incline of the treadmill until your pulse...
... exercise with preexisting health problems. The pulse sensor is intended only as a guide. Aerobic Exercise If your goal is in your body uses easily accessible carbohydrate calories for a sustained period of time. After a few minutes of exercise, your training zone for individuals over the age of 35 or individuals with the proper intensity. For aerobic exercise, adjust the speed and incline of the treadmill until your pulse...
English Manual
Page 26
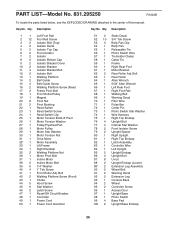
... 1 Walking Belt 69 1 Warning Decal 70 1 Filter Wire 71 1 Pulse Bar 72 1 Cotter Pin 73 1 Photo Switch Star Washer 74 1 Wire Harness 75 1 Right Top Endcap 76 4 Upright Bolt 77 4 Internal Star Washer 78 2 Front Isolator Screw 79 2 Upright Spacer 80 1 Right Upright 81 1 Right Top Endcap 82 1 Latch Assembly 83 1 Controller Wire 84 1 Left Upright 85 2 Upright Endcap 86 4 Upright Bolt 87 8 U-nut 88 2 Upright Endcap (Lower) 89* 2 Extension Leg Assembly 90 2 Wheel Bolt 91...
... 1 Walking Belt 69 1 Warning Decal 70 1 Filter Wire 71 1 Pulse Bar 72 1 Cotter Pin 73 1 Photo Switch Star Washer 74 1 Wire Harness 75 1 Right Top Endcap 76 4 Upright Bolt 77 4 Internal Star Washer 78 2 Front Isolator Screw 79 2 Upright Spacer 80 1 Right Upright 81 1 Right Top Endcap 82 1 Latch Assembly 83 1 Controller Wire 84 1 Left Upright 85 2 Upright Endcap 86 4 Upright Bolt 87 8 U-nut 88 2 Upright Endcap (Lower) 89* 2 Extension Leg Assembly 90 2 Wheel Bolt 91...


