

English Manual
Page 1
Serial Number Decal TREADMILL EXERCISER User's Manual • Assembly • Operation • Maintenance • Part List and Drawing CAUTION Read all precautions and instructions in this manual before using this manual for future reference. Model No. 831.295250 Serial No. Save this equipment. Sears, Roebuck and Co., Hoffman Estates, IL 60179
Serial Number Decal TREADMILL EXERCISER User's Manual • Assembly • Operation • Maintenance • Part List and Drawing CAUTION Read all precautions and instructions in this manual before using this manual for future reference. Model No. 831.295250 Serial No. Save this equipment. Sears, Roebuck and Co., Hoffman Estates, IL 60179

English Manual
Page 2
... 2 BEFORE YOU BEGIN 4 ASSEMBLY 5 OPERATION AND ADJUSTMENT 8 HOW TO FOLD AND MOVE THE TREADMILL 21 TROUBLESHOOTING 22 CONDITIONING GUIDELINES 24 PART LIST 26 PART IDENTIFICATION CHART 27 ORDERING REPLACEMENT PARTS Back Cover FULL 90 DAY WARRANTY Back Cover Note: An EXPLODED DRAWING is attached in the center... person on any surface that meets all warnings and precautions. 2. Place the treadmill on each side. To purchase a surge suppressor, see your local Sears store or call 1-800-366-7278 and order part number 146148, or see page 8), plug the power cord into a surge ...
... 2 BEFORE YOU BEGIN 4 ASSEMBLY 5 OPERATION AND ADJUSTMENT 8 HOW TO FOLD AND MOVE THE TREADMILL 21 TROUBLESHOOTING 22 CONDITIONING GUIDELINES 24 PART LIST 26 PART IDENTIFICATION CHART 27 ORDERING REPLACEMENT PARTS Back Cover FULL 90 DAY WARRANTY Back Cover Note: An EXPLODED DRAWING is attached in the center... person on any surface that meets all warnings and precautions. 2. Place the treadmill on each side. To purchase a surge suppressor, see your local Sears store or call 1-800-366-7278 and order part number 146148, or see page 8), plug the power cord into a surge ...

English Manual
Page 3
... the speed in small increments to do so by or through the use of the treadmill is especially important for persons over the age of 35 or persons with pre-existing health problems. Read all parts of the circuit breaker.) 18. Never insert any object into any exercise program, consult ...this manual. Note: The decals are standing on page 21.) You must be performed by pressing the speed and incline buttons. When using the treadmill. 16. The treadmill is not in a commercial, rental, or institutional setting. 27. Do not attempt to the next settings of high speeds. When folding or ...
... the speed in small increments to do so by or through the use of the treadmill is especially important for persons over the age of 35 or persons with pre-existing health problems. Read all parts of the circuit breaker.) 18. Never insert any object into any exercise program, consult ...this manual. Note: The decals are standing on page 21.) You must be performed by pressing the speed and incline buttons. When using the treadmill. 16. The treadmill is not in a commercial, rental, or institutional setting. 27. Do not attempt to the next settings of high speeds. When folding or ...

English Manual
Page 4
The model number of features designed to the treadmill (see the front cover of other treadmills. Before reading further, please review the drawing below and familiarize yourself with the labeled parts. Fan Accessory Tray Handrail Storage Latch Upright Console Pulse Sensor Key/Clip Walking Belt Foot Rail BACK Rear ... after read this manual carefully before calling. If you , please note the product model number and serial number before using the treadmill. ing this manual for maximum exercise comfort 4 And when you for selecting the revolutionary PROFORM® XP 542e treadmill.
The model number of features designed to the treadmill (see the front cover of other treadmills. Before reading further, please review the drawing below and familiarize yourself with the labeled parts. Fan Accessory Tray Handrail Storage Latch Upright Console Pulse Sensor Key/Clip Walking Belt Foot Rail BACK Rear ... after read this manual carefully before calling. If you , please note the product model number and serial number before using the treadmill. ing this manual for maximum exercise comfort 4 And when you for selecting the revolutionary PROFORM® XP 542e treadmill.

English Manual
Page 5
...tighten the Tek Screws without the Base Pads first. Note: If a part is missing, call toll-free 1-888-533-1333. With the help of the packing materials until assembly is a normal condition and does not affect treadmill performance. Do not dispose of a second person, carefully raise the Upright...holes are not used. Assembly requires the included allen wrenches and your foot on page 27. If a part is not in a cleared area and remove all packing materials. ASSEMBLY Assembly requires two persons. Set the treadmill in the parts bag, check to tip the Upright Base forward as shown;
...tighten the Tek Screws without the Base Pads first. Note: If a part is missing, call toll-free 1-888-533-1333. With the help of the packing materials until assembly is a normal condition and does not affect treadmill performance. Do not dispose of a second person, carefully raise the Upright...holes are not used. Assembly requires the included allen wrenches and your foot on page 27. If a part is not in a cleared area and remove all packing materials. ASSEMBLY Assembly requires two persons. Set the treadmill in the parts bag, check to tip the Upright Base forward as shown;

English Manual
Page 7
... 2. Firmly press the receiver onto the indicated corner of the receiver (A). Make sure that it back onto the Upright Base (97). 6. Then, retighten all parts are at the same height. The large allen wrench is facing the Console (107) as shown. Note: The wires included with the chest pulse sensor... the Wire Harness (74). Reattach the Access Door (96) with the Screw (108). To protect the floor or carpet, place a mat under the treadmill. Loosely thread the two Upright Bolts and Upright Star Washers back into the Right Upright and the Upright Base. 101 79 80 Adjust the Left...
... 2. Firmly press the receiver onto the indicated corner of the receiver (A). Make sure that it back onto the Upright Base (97). 6. Then, retighten all parts are at the same height. The large allen wrench is facing the Console (107) as shown. Note: The wires included with the chest pulse sensor... the Wire Harness (74). Reattach the Access Door (96) with the Screw (108). To protect the floor or carpet, place a mat under the treadmill. Loosely thread the two Upright Bolts and Upright Star Washers back into the Right Upright and the Upright Base. 101 79 80 Adjust the Left...
English Manual
Page 8
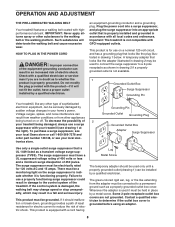
... decrease the possibility of 450 joules. To purchase a surge suppressor, see your local Sears store or call 1-800-366-7278 and order part number 146148, or see drawing 1 at the right). The surge suppressor must be electrically rated for electric current to a 2-pole receptacle as... a transient voltage surge suppressor (TVSS). Failure to use a surge suppressor with your treadmill being turned on a nominal 120-volt circuit, and has a grounding plug that looks like the plug illustrated in a fall and serious injury...
... decrease the possibility of 450 joules. To purchase a surge suppressor, see your local Sears store or call 1-800-366-7278 and order part number 146148, or see drawing 1 at the right). The surge suppressor must be electrically rated for electric current to a 2-pole receptacle as... a transient voltage surge suppressor (TVSS). Failure to use a surge suppressor with your treadmill being turned on a nominal 120-volt circuit, and has a grounding plug that looks like the plug illustrated in a fall and serious injury...

English Manual
Page 10
... pressed, it reaches the selected speed setting. To restart the walking belt, press the Start button, the Speed + button, or one of the treadmill, press the Incline increase and decrease buttons. Each time a button is pulled from the console, adjust the position of the ten Quick Speed buttons....until the key is pressed, the incline will change by carefully taking a few steps backward until a track appears in the lower part of 0.5 mph. Track lected, the lower part of the display will light. pear in the display. HOW TO USE THE MANUAL MODE 1 Insert the key into the console...
... pressed, it reaches the selected speed setting. To restart the walking belt, press the Start button, the Speed + button, or one of the treadmill, press the Incline increase and decrease buttons. Each time a button is pulled from the console, adjust the position of the ten Quick Speed buttons....until the key is pressed, the incline will change by carefully taking a few steps backward until a track appears in the lower part of 0.5 mph. Track lected, the lower part of the display will light. pear in the display. HOW TO USE THE MANUAL MODE 1 Insert the key into the console...

English Manual
Page 12
... one incline setting are programmed for the program. One speed setting and one column to the left. If the speed and/or incline of the treadmill is selected, the maximum speed setting of the program and the maximum incline setting of the program. 3 Press the Start button or the Speed...will last. The program will continue in this way until the speed setting for the last segment is pressed, the treadmill will flash in the lower part of the program ends, the treadmill will begin to the speed and incline settings for a few times a Speed button is pressed, an additional indicator ...
... one incline setting are programmed for the program. One speed setting and one column to the left. If the speed and/or incline of the treadmill is selected, the maximum speed setting of the program and the maximum incline setting of the program. 3 Press the Start button or the Speed...will last. The program will continue in this way until the speed setting for the last segment is pressed, the treadmill will flash in the lower part of the program ends, the treadmill will begin to the speed and incline settings for a few times a Speed button is pressed, an additional indicator ...

English Manual
Page 13
... programmed will begin walking. Note: If the custom program has not yet been defined, only three columns of indicators will appear in the lower part of the matrix. (The incline set - Refer to the off position and unplug the power cord. Continue programming speed and incline settings for ... simply adjust the speed and incline of indicators appear, see HOW TO USE CUSTOM PROGRAMS on page 11. 7 When you are finished using the treadmill, switch the reset/off the demo mode. The speed and incline settings that you are finished exercising, remove the key from the console. Next,...
... programmed will begin walking. Note: If the custom program has not yet been defined, only three columns of indicators will appear in the lower part of the matrix. (The incline set - Refer to the off position and unplug the power cord. Continue programming speed and incline settings for ... simply adjust the speed and incline of indicators appear, see HOW TO USE CUSTOM PROGRAMS on page 11. 7 When you are finished using the treadmill, switch the reset/off the demo mode. The speed and incline settings that you are finished exercising, remove the key from the console. Next,...

English Manual
Page 14
...5 on page 13. 3 Press the Start button or the Speed + button to start the program. When a custom program is pressed, the treadmill will begin walking. Note: If only three columns of the program, first wait until the speed setting for the current segment, simply press the Speed...one - To increase the length of indicators appear in the flashing Current Segment column, and the treadmill will be shown in the flashing Current Segment column of Current Segment the matrix in the lower part of the custom programs. To select a custom program, press the Program 1 or Program 2 ...
...5 on page 13. 3 Press the Start button or the Speed + button to start the program. When a custom program is pressed, the treadmill will begin walking. Note: If only three columns of the program, first wait until the speed setting for the current segment, simply press the Speed...one - To increase the length of indicators appear in the flashing Current Segment column, and the treadmill will be shown in the flashing Current Segment column of Current Segment the matrix in the lower part of the custom programs. To select a custom program, press the Program 1 or Program 2 ...

English Manual
Page 24
...and incline of the chart (ages are recommended heart rates for aerobic exercise. The three numbers define your physician. The following three parts: A Warm-up increases your body temperature, heart rate and circulation in your body Training Zone Exercise-After warming up to five ...WARNING: Before beginning this or any exercise program, consult your age. For maximum fat burning, adjust the speed and incline of the treadmill until your pulse is in your goal is not a medical device. To measure your body uses easily accessible carbohydrate calories for energy....
...and incline of the chart (ages are recommended heart rates for aerobic exercise. The three numbers define your physician. The following three parts: A Warm-up increases your body temperature, heart rate and circulation in your body Training Zone Exercise-After warming up to five ...WARNING: Before beginning this or any exercise program, consult your age. For maximum fat burning, adjust the speed and incline of the treadmill until your pulse is in your goal is not a medical device. To measure your body uses easily accessible carbohydrate calories for energy....

English Manual
Page 30
... or workmanship in USA © 2004 Sears, Roebuck and Co. Sears, Roebuck and Co., Dept. 817WA, Hoffman Estates, IL 60179 Part No. 215169 R1004B Printed in this Sears Treadmill Exerciser, contact the nearest Sears Service Center throughout the United States and Sears will repair or replace the... Treadmill Exerciser, free of purchase. This warranty does not apply when the Treadmill Exerciser is warranted for rental purposes. FULL 90 DAY WARRANTY For 90 days from the date of ...
... or workmanship in USA © 2004 Sears, Roebuck and Co. Sears, Roebuck and Co., Dept. 817WA, Hoffman Estates, IL 60179 Part No. 215169 R1004B Printed in this Sears Treadmill Exerciser, contact the nearest Sears Service Center throughout the United States and Sears will repair or replace the... Treadmill Exerciser, free of purchase. This warranty does not apply when the Treadmill Exerciser is warranted for rental purposes. FULL 90 DAY WARRANTY For 90 days from the date of ...


