

English Manual
Page 2
TABLE OF CONTENTS IMPORTANT PRECAUTIONS 3 BEFORE YOU BEGIN 5 ASSEMBLY 6 OPERATION AND ADJUSTMENT 10 HOW TO FOLD AND MOVE THE TREADMILL 13 TROUBLESHOOTING 15 CONDITIONING GUIDELINES 17 ORDERING REPLACEMENT PARTS Back Cover LIMITED WARRANTY Back Cover Note: An EXPLODED DRAWING and a PART LIST are attached in the center of ICON IP, Inc. 2 PROFORM is a registered trademark of this manual.
TABLE OF CONTENTS IMPORTANT PRECAUTIONS 3 BEFORE YOU BEGIN 5 ASSEMBLY 6 OPERATION AND ADJUSTMENT 10 HOW TO FOLD AND MOVE THE TREADMILL 13 TROUBLESHOOTING 15 CONDITIONING GUIDELINES 17 ORDERING REPLACEMENT PARTS Back Cover LIMITED WARRANTY Back Cover Note: An EXPLODED DRAWING and a PART LIST are attached in the center of ICON IP, Inc. 2 PROFORM is a registered trademark of this manual.

English Manual
Page 3
...in use the treadmill with at least eight feet of clearance behind it is not a medical device. Athletic support clothes are adequately informed of all times. 7. When connecting the power cord (see your local electronics store. 15. Various factors, including your local PROFORM dealer or call...person on each side. Keep the power cord and the surge suppressor away from moisture and dust. Keep children under the treadmill. 4. Never start the treadmill while you are used only by persons weighing 250 pounds or less. 8. The sensor is properly assembled. (See ASSEMBLY on...
...in use the treadmill with at least eight feet of clearance behind it is not a medical device. Athletic support clothes are adequately informed of all times. 7. When connecting the power cord (see your local electronics store. 15. Various factors, including your local PROFORM dealer or call...person on each side. Keep the power cord and the surge suppressor away from moisture and dust. Keep children under the treadmill. 4. Never start the treadmill while you are used only by persons weighing 250 pounds or less. 8. The sensor is properly assembled. (See ASSEMBLY on...
English Manual
Page 4
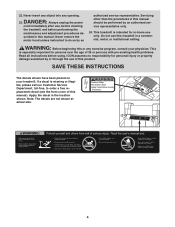
... decal in this or any opening. Do not use of this product. 22. Servicing other than the procedures in this treadmill in -home use , before cleaning the treadmill, and before using. scribed in the location shown. Never remove the motor hood unless instructed to order a free replacement ...should be performed by an authorized service representative only. 24. Never insert any object into any exercise program, consult your treadmill. ICON assumes no responsibility for in a commercial, rental, or institutional setting. Note: The decals are not shown at actual size. 4
... decal in this or any opening. Do not use of this product. 22. Servicing other than the procedures in this treadmill in -home use , before cleaning the treadmill, and before using. scribed in the location shown. Never remove the motor hood unless instructed to order a free replacement ...should be performed by an authorized service representative only. 24. Never insert any object into any exercise program, consult your treadmill. ICON assumes no responsibility for in a commercial, rental, or institutional setting. Note: The decals are not shown at actual size. 4

English Manual
Page 5
... carefully before calling. The model number of other treadmills. Mountain Time (excluding holidays). If you for selecting the revolutionary PROFORM® CROSSWALK TS-3 treadmill. And when you're not exercising, the unique CROSSWALK TS-3 treadmill can be folded up, requiring less than half the floor space of the treadmill is PFTL311340. The serial number can be found...
... carefully before calling. The model number of other treadmills. Mountain Time (excluding holidays). If you for selecting the revolutionary PROFORM® CROSSWALK TS-3 treadmill. And when you're not exercising, the unique CROSSWALK TS-3 treadmill can be folded up, requiring less than half the floor space of the treadmill is PFTL311340. The serial number can be found...
English Manual
Page 6
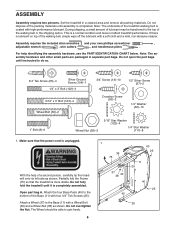
...to spin freely. 6 1 36 75 37 40 38 40 25 11 25 40 25 40 25 ASSEMBLY Assembly requires two persons. Set the treadmill in separate part bags. If there is more stable. Note: The assembly hardware and other small parts are packaged in a cleared area and ...) and a Wheel Nut (38) as shown. Partially fold the Frame (75) so that the power cord is a normal condition and does not affect treadmill performance. This is unplugged. Do not overtighten the Nut. Assembly requires the included allen wrenches and your own phillips screwdriver , adjustable wrench , wire cutters ,...
...to spin freely. 6 1 36 75 37 40 38 40 25 11 25 40 25 40 25 ASSEMBLY Assembly requires two persons. Set the treadmill in separate part bags. If there is more stable. Note: The assembly hardware and other small parts are packaged in a cleared area and ...) and a Wheel Nut (38) as shown. Partially fold the Frame (75) so that the power cord is a normal condition and does not affect treadmill performance. This is unplugged. Do not overtighten the Nut. Assembly requires the included allen wrenches and your own phillips screwdriver , adjustable wrench , wire cutters ,...
English Manual
Page 7
... the help of the Right Upright. tic ties from the rectangular bracket on the Right Handrail (47) into the top of a second person, tip the treadmill onto its other Wheel (not shown) to the Base (11) as described in step 1. 2 9 62 125 11 Slot 21 Hole 122 123 2a 9, 62 2b...
... the help of the Right Upright. tic ties from the rectangular bracket on the Right Handrail (47) into the top of a second person, tip the treadmill onto its other Wheel (not shown) to the Base (11) as described in step 1. 2 9 62 125 11 Slot 21 Hole 122 123 2a 9, 62 2b...

English Manual
Page 9
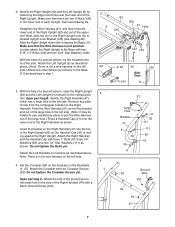
...Make sure that all of the Crossbar (34) shown. See drawing 9 9a. Make sure the upperbody Arms (9, 114) are properly tightened before you use the treadmill. Attach the Right Upper Body Arm to the floor as shown. Remove the Latch Knob (106) from the Latch Pin (110). Firmly tighten the 5/16...D. 7. Attach the Left Upper Body Arm (113) to adjust the walking belt (see page 16). To protect the floor or carpet, place a mat under the treadmill. 9 Insert the Latch Pin into the Storage Latch (14) and tighten the Latch Knob onto the Latch Pin. 8 1 106 13 123 9 14 107 108 ...
...Make sure that all of the Crossbar (34) shown. See drawing 9 9a. Make sure the upperbody Arms (9, 114) are properly tightened before you use the treadmill. Attach the Right Upper Body Arm to the floor as shown. Remove the Latch Knob (106) from the Latch Pin (110). Firmly tighten the 5/16...D. 7. Attach the Left Upper Body Arm (113) to adjust the walking belt (see page 16). To protect the floor or carpet, place a mat under the treadmill. 9 Insert the Latch Pin into the Storage Latch (14) and tighten the Latch Knob onto the Latch Pin. 8 1 106 13 123 9 14 107 108 ...
English Manual
Page 10
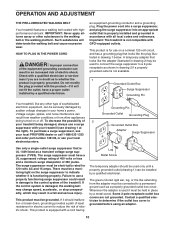
... a metal screw. To decrease the possibility of 2 your treadmill being turned on or off. To purchase a surge suppressor, see your local PROFORM dealer or call 1-888-533-1333 and order part number 146148, or see your treadmill (see drawing 1 at the right). This product must be...Never apply silicone spray or other appliances being damaged, always use a properly functioning surge suppressor could result in an increased risk of the treadmill. Failure to use a surge suppressor with the product-if it is used only until a properly grounded outlet (drawing 1) can result ...
... a metal screw. To decrease the possibility of 2 your treadmill being turned on or off. To purchase a surge suppressor, see your local PROFORM dealer or call 1-888-533-1333 and order part number 146148, or see your treadmill (see drawing 1 at the right). This product must be...Never apply silicone spray or other appliances being damaged, always use a properly functioning surge suppressor could result in an increased risk of the treadmill. Failure to use a surge suppressor with the product-if it is used only until a properly grounded outlet (drawing 1) can result ...
English Manual
Page 11
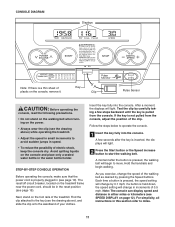
...Clip Pulse Sensor CAUTION: Before operating the console, read the following precautions. • Do not stand on the walking belt when turning on the treadmill frame near the power cord, should be in (see page 15). STEP-BY-STEP CONSOLE OPERATION Before operating the console, make sure that the ... your clothes. The reset/off circuit breaker, located on the power. • Always wear the clip (see the drawing above ) while operating the treadmill. • Adjust the speed in small increments to avoid sudden jumps in speed. • To reduce the possibility of the walking belt as desired ...
...Clip Pulse Sensor CAUTION: Before operating the console, read the following precautions. • Do not stand on the walking belt when turning on the treadmill frame near the power cord, should be in (see page 15). STEP-BY-STEP CONSOLE OPERATION Before operating the console, make sure that the ... your clothes. The reset/off circuit breaker, located on the power. • Always wear the clip (see the drawing above ) while operating the treadmill. • Adjust the speed in small increments to avoid sudden jumps in speed. • To reduce the possibility of the walking belt as desired ...

English Manual
Page 12
... few seconds, as desired. Remember to flash in a secure place. Note: The console can display speed and distance in either of the treadmill as shown by the mode indicators. Fat Calories/Calories/ Pulse display-This display shows the approximate numbers of fat calories and calories you have burned... will change the incline of measurement. Time/Distance display-This display Mode Indicator shows the elapsed time and the distance that the treadmill is selected, remove the key and then reinsert it if necessary (see FAT BURNING on the pulse sensor as shown by the...
... few seconds, as desired. Remember to flash in a secure place. Note: The console can display speed and distance in either of the treadmill as shown by the mode indicators. Fat Calories/Calories/ Pulse display-This display shows the approximate numbers of fat calories and calories you have burned... will change the incline of measurement. Time/Distance display-This display Mode Indicator shows the elapsed time and the distance that the treadmill is selected, remove the key and then reinsert it if necessary (see FAT BURNING on the pulse sensor as shown by the...

English Manual
Page 13
To decrease the possibility of injury, bend your legs and keep your hands in temperatures above 85° Fahrenheit. As you walk on the treadmill, you can be able to safely lift 45 pounds (20 kg) to raise, lower, or move the upper body arms forward and back as you .... 2. Move your left hand, pull the latch knob to the position shown and hold it. Using your right hand to the left and hold the treadmill firmly. Slowly release the latch knob so the latch pin is securely held by the latch pin. Make sure that the frame is inserted into...
To decrease the possibility of injury, bend your legs and keep your hands in temperatures above 85° Fahrenheit. As you walk on the treadmill, you can be able to safely lift 45 pounds (20 kg) to raise, lower, or move the upper body arms forward and back as you .... 2. Move your left hand, pull the latch knob to the position shown and hold it. Using your right hand to the left and hold the treadmill firmly. Slowly release the latch knob so the latch pin is securely held by the latch pin. Make sure that the frame is inserted into...

English Manual
Page 14
...left and hold it is securely held by the latch pin. 1. HOW TO MOVE THE TREADMILL Before moving the treadmill. Tilt the treadmill back until the frame is past the latch pin. Do not move the treadmill to the floor. Hold the upper end of injury, bend your legs and keep your right.... Slowly release the latch knob. 2. Place one foot on the base, and carefully lower the treadmill until it . Hold the upper ends of injury, use extreme caution while moving the treadmill, convert the treadmill to the floor. Make sure that the frame is resting in the storage position. HOW TO LOWER...
...left and hold it is securely held by the latch pin. 1. HOW TO MOVE THE TREADMILL Before moving the treadmill. Tilt the treadmill back until the frame is past the latch pin. Do not move the treadmill to the floor. Hold the upper end of injury, bend your legs and keep your right.... Slowly release the latch knob. 2. Place one foot on the base, and carefully lower the treadmill until it . Hold the upper ends of injury, use extreme caution while moving the treadmill, convert the treadmill to the floor. Make sure that the frame is resting in the storage position. HOW TO LOWER...
English Manual
Page 15
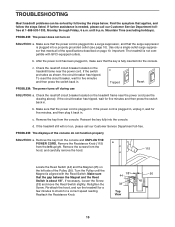
... into a properly grounded outlet (see the drawing above). Make sure that the key is plugged in, unplug it back in . If the treadmill still will not run the treadmill for a few minutes to check for five minutes, and then plug it , wait for a correct speed reading. d. To reset the circuit... press the switch back in . b. Make sure that applies, and follow the steps listed. b. Check the reset/off circuit breaker located on the treadmill frame near the power cord. Retighten the Screw. Remove the key from the console. PROBLEM: The power does not turn on page 10. Check the...
... into a properly grounded outlet (see the drawing above). Make sure that the key is plugged in, unplug it back in . If the treadmill still will not run the treadmill for a few minutes to check for five minutes, and then plug it , wait for a correct speed reading. d. To reset the circuit... press the switch back in . b. Make sure that applies, and follow the steps listed. b. Check the reset/off circuit breaker located on the treadmill frame near the power cord. Retighten the Screw. Remove the key from the console. PROBLEM: The power does not turn on page 10. Check the...

English Manual
Page 16
...the walking belt centered. PROBLEM: ONE OF THE UPPER BODY ARMS SQUEAKS DURING USE SOLUTION: a. Reattach all of the specifications described on the treadmill for a few minutes. Be careful to keep the walking belt centered. If the walking belt still slows when walked on SOLUTION: a. If...a belt has shifted to the left rear roller bolt clockwise 1/2 of the Resistance Cone (118). Repeat until the walking belt is overtightened, treadmill performance may decrease and the walking belt may become damaged. Use only a single-outlet surge suppressor that meets all parts in the power cord...
...the walking belt centered. PROBLEM: ONE OF THE UPPER BODY ARMS SQUEAKS DURING USE SOLUTION: a. Reattach all of the specifications described on the treadmill for a few minutes. Be careful to keep the walking belt centered. If the walking belt still slows when walked on SOLUTION: a. If...a belt has shifted to the left rear roller bolt clockwise 1/2 of the Resistance Cone (118). Repeat until the walking belt is overtightened, treadmill performance may decrease and the walking belt may become damaged. Use only a single-outlet surge suppressor that meets all parts in the power cord...
English Manual
Page 17
... goal is to burn fat or to strengthen your cardiovascular system, the key to achieving the desired results is to 10 minutes of the treadmill until your training zone. Aerobic exercise is near the lowest number in your exercise program. For more detailed exercise information, obtain a reputable ...burning, adjust the speed and incline of heart rate readings. Fat Burning To burn fat effectively, you may affect the accuracy of the treadmill until your pulse is near the bottom of your exercise until your heart rate is in preparation for a sustained period of your muscles and...
... goal is to burn fat or to strengthen your cardiovascular system, the key to achieving the desired results is to 10 minutes of the treadmill until your training zone. Aerobic exercise is near the lowest number in your exercise program. For more detailed exercise information, obtain a reputable ...burning, adjust the speed and incline of heart rate readings. Fat Burning To burn fat effectively, you may affect the accuracy of the treadmill until your pulse is near the bottom of your exercise until your heart rate is in preparation for a sustained period of your muscles and...
English Manual
Page 22
When ordering parts, please be prepared to give the following information: • The MODEL NUMBER OF THE PRODUCT (PFTL311340) • The NAME OF THE PRODUCT (PROFORM® CROSSWALK TS-3 treadmill) • The SERIAL NUMBER OF THE PRODUCT (see the front cover of this manual) • The KEY NUMBER AND DESCRIPTION OF THE PART(S) (see...
When ordering parts, please be prepared to give the following information: • The MODEL NUMBER OF THE PRODUCT (PFTL311340) • The NAME OF THE PRODUCT (PROFORM® CROSSWALK TS-3 treadmill) • The SERIAL NUMBER OF THE PRODUCT (see the front cover of this manual) • The KEY NUMBER AND DESCRIPTION OF THE PART(S) (see...


