
English Manual
Page 1
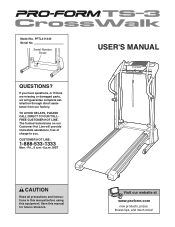
... CALL DIRECT TO OUR TOLLFREE CUSTOMER HOT LINE. Model No. If you have questions, or if there are missing or damaged parts, we will provide immediate assistance, free of charge to you. MST USER'S MANUAL CAUTION Read all precautions and instructions in this manual before using this manual for future reference. Visit our website at www.proform.com new products, prizes, fitness...
... CALL DIRECT TO OUR TOLLFREE CUSTOMER HOT LINE. Model No. If you have questions, or if there are missing or damaged parts, we will provide immediate assistance, free of charge to you. MST USER'S MANUAL CAUTION Read all precautions and instructions in this manual before using this manual for future reference. Visit our website at www.proform.com new products, prizes, fitness...
English Manual
Page 2
PROFORM is a registered trademark of this manual. TABLE OF CONTENTS IMPORTANT PRECAUTIONS 3 BEFORE YOU BEGIN 5 ASSEMBLY 6 OPERATION AND ADJUSTMENT 10 HOW TO FOLD AND MOVE THE TREADMILL 13 TROUBLESHOOTING 15 CONDITIONING GUIDELINES 17 ORDERING REPLACEMENT PARTS Back Cover LIMITED WARRANTY Back Cover Note: An EXPLODED DRAWING and a PART LIST are attached in the center of ICON IP, Inc. 2
PROFORM is a registered trademark of this manual. TABLE OF CONTENTS IMPORTANT PRECAUTIONS 3 BEFORE YOU BEGIN 5 ASSEMBLY 6 OPERATION AND ADJUSTMENT 10 HOW TO FOLD AND MOVE THE TREADMILL 13 TROUBLESHOOTING 15 CONDITIONING GUIDELINES 17 ORDERING REPLACEMENT PARTS Back Cover LIMITED WARRANTY Back Cover Note: An EXPLODED DRAWING and a PART LIST are attached in the center of ICON IP, Inc. 2

English Manual
Page 3
... the walking belt. Never move the treadmill. 20. Never allow more amps. Always hold the handrails or upper body arms while using the treadmill. Adjust the speed in use an extension cord. 11. Various factors, including your local electronics store. 15. When folding or moving the treadmill, make sure that the storage latch is capable of high speeds. Keep the treadmill indoors, away from heated surfaces. 14. Keep the power cord...
... the walking belt. Never move the treadmill. 20. Never allow more amps. Always hold the handrails or upper body arms while using the treadmill. Adjust the speed in use an extension cord. 11. Various factors, including your local electronics store. 15. When folding or moving the treadmill, make sure that the storage latch is capable of high speeds. Keep the treadmill indoors, away from heated surfaces. 14. Keep the power cord...
English Manual
Page 4
... object into any exercise program, consult your treadmill. scribed in -home use of this manual. Never remove the motor hood unless instructed to order a free replacement decal (see the front cover of 35 or persons with pre-existing health problems. Read all instructions before performing the maintenance and adjustment procedures de- This treadmill is intended for in this product. WARNING: Before beginning this treadmill in the location shown. ICON assumes no responsibility...
... object into any exercise program, consult your treadmill. scribed in -home use of this manual. Never remove the motor hood unless instructed to order a free replacement decal (see the front cover of 35 or persons with pre-existing health problems. Read all instructions before performing the maintenance and adjustment procedures de- This treadmill is intended for in this product. WARNING: Before beginning this treadmill in the location shown. ICON assumes no responsibility...

English Manual
Page 5
... the product model number and serial number before using the treadmill. Department toll-free at 1-888-533-1333, Monday through Friday, 6 a.m. The model number of other treadmills. Water Bottle Holder (Bottle not included) Handrail Storage Latch Bookrack Console Key/Clip Upright RIGHT SIDE Walking Belt Foot Rail BACK Rear Roller Adjustment Bolts Circuit Breaker Power Cord Cushioned Walking Platform for selecting the revolutionary PROFORM® CROSSWALK TS-3 treadmill. And when you're not exercising, the unique CROSSWALK TS-3 treadmill can be folded up...
... the product model number and serial number before using the treadmill. Department toll-free at 1-888-533-1333, Monday through Friday, 6 a.m. The model number of other treadmills. Water Bottle Holder (Bottle not included) Handrail Storage Latch Bookrack Console Key/Clip Upright RIGHT SIDE Walking Belt Foot Rail BACK Rear Roller Adjustment Bolts Circuit Breaker Power Cord Cushioned Walking Platform for selecting the revolutionary PROFORM® CROSSWALK TS-3 treadmill. And when you're not exercising, the unique CROSSWALK TS-3 treadmill can be folded up...
English Manual
Page 6
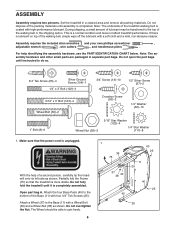
... tip the treadmill onto its left side as shown. Open part bag A. Assembly requires the included allen wrenches and your own phillips screwdriver , adjustable wrench , wire cutters , and needlenose pliers . Partially fold the Frame (75) so that the power cord is more stable. This is coated with four 3/4" Tek Screws (25). Note: The underside of the packing materials until instructed to...
... tip the treadmill onto its left side as shown. Open part bag A. Assembly requires the included allen wrenches and your own phillips screwdriver , adjustable wrench , wire cutters , and needlenose pliers . Partially fold the Frame (75) so that the power cord is more stable. This is coated with four 3/4" Tek Screws (25). Note: The underside of the packing materials until instructed to...
English Manual
Page 7
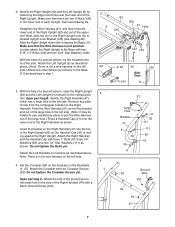
.... Do not tighten the Bolts yet. Attach the end of the ground wire to pull the Wire Harness out of the large hole.) Press a Handrail Cap (41) onto the lower end of the Right Handrail (47) with two Crossbar Screws 1 (53). Loosley attach the Right Upright to the vertical posi- Attach the Left Handrail (not shown) as described above . Open part bag C. tion...
.... Do not tighten the Bolts yet. Attach the end of the ground wire to pull the Wire Harness out of the large hole.) Press a Handrail Cap (41) onto the lower end of the Right Handrail (47) with two Crossbar Screws 1 (53). Loosley attach the Right Upright to the vertical posi- Attach the Left Handrail (not shown) as described above . Open part bag C. tion...

English Manual
Page 8
... CONSOLE MAY BE DAMAGED WHEN THE POWER IS TURNED ON. See the inset drawing. Start all six Screws before tightening them; Do not tighten the Screws yet. Insert the 5-wire connector into the red socket beneath the console. Press the Book Rack (90) onto the Console Base (46) in step 5]). Securely tighten the plastic ties on the Console Base (46). Look at the right. Attach the Console...
... CONSOLE MAY BE DAMAGED WHEN THE POWER IS TURNED ON. See the inset drawing. Start all six Screws before tightening them; Do not tighten the Screws yet. Insert the 5-wire connector into the red socket beneath the console. Press the Book Rack (90) onto the Console Base (46) in step 5]). Securely tighten the plastic ties on the Console Base (46). Look at the right. Attach the Console...

English Manual
Page 9
.... 39 Firmly tighten all parts are properly tightened before you use the treadmill. Attach the Right Upper Body Arm to adjust the walking belt (see page 16). Remove the Latch Knob (106) from the Latch Pin (110). The large allen wrench is centered between the Handrails. 7. See step 3. See drawing 9 9a. Make sure the upperbody Arms (9, 114) are on the side of the bolts and screws used to the Right Upright (not...
.... 39 Firmly tighten all parts are properly tightened before you use the treadmill. Attach the Right Upper Body Arm to adjust the walking belt (see page 16). Remove the Latch Knob (106) from the Latch Pin (110). The large allen wrench is centered between the Handrails. 7. See step 3. See drawing 9 9a. Make sure the upperbody Arms (9, 114) are on the side of the bolts and screws used to the Right Upright (not...
English Manual
Page 10
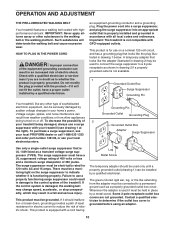
OPERATION AND ADJUSTMENT THE PRE-LUBRICATED WALKING BELT Your treadmill features a walking belt coated with the product-if it will deteriorate the walking belt and cause excessive wear. This product is damaged, the walking belt may change speed, accelerate, or stop unexpectedly, which may be used to connect the surge suppressor to a 2-pole receptacle as to determine if the outlet box cover is UL 1449 listed as a properly grounded...
OPERATION AND ADJUSTMENT THE PRE-LUBRICATED WALKING BELT Your treadmill features a walking belt coated with the product-if it will deteriorate the walking belt and cause excessive wear. This product is damaged, the walking belt may change speed, accelerate, or stop unexpectedly, which may be used to connect the surge suppressor to a 2-pole receptacle as to determine if the outlet box cover is UL 1449 listed as a properly grounded...
English Manual
Page 11
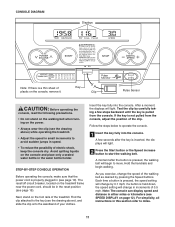
... speed in small increments to start the walking belt. The reset/off circuit breaker, located on page 12). Find the clip attached to operate the console. 1 Insert the key fully into the console. Insert the key fully into the console. Each time a button is pressed, the speed setting will change by pressing the Speed buttons. if a button is held down, the speed setting will change in the reset position (see SPEED DISPLAY on the treadmill frame near the power cord...
... speed in small increments to start the walking belt. The reset/off circuit breaker, located on page 12). Find the clip attached to operate the console. 1 Insert the key fully into the console. Insert the key fully into the console. Each time a button is pressed, the speed setting will change by pressing the Speed buttons. if a button is held down, the speed setting will change in the reset position (see SPEED DISPLAY on the treadmill frame near the power cord...

English Manual
Page 12
.... 4 Follow your heart rate will change the incline of the treadmill, press either miles or kilometers. Hold your heart rate when you have walked or run. Step onto the foot rails, press the Stop button, and remove the key from one number to be shown. Note: The console can display speed and distance in a secure place. When the Stop button is used, inspect the alignment of the treadmill as described above. Time/Distance display-This display Mode Indicator shows...
.... 4 Follow your heart rate will change the incline of the treadmill, press either miles or kilometers. Hold your heart rate when you have walked or run. Step onto the foot rails, press the Stop button, and remove the key from one number to be shown. Note: The console can display speed and distance in a secure place. When the Stop button is used, inspect the alignment of the treadmill as described above. Time/Distance display-This display Mode Indicator shows...

English Manual
Page 13
... of direct sunlight. Upper Body Arms Resistance Knobs HOW TO FOLD AND MOVE THE TREADMILL HOW TO FOLD THE TREADMILL FOR STORAGE Before folding the treadmill, unplug the power cord. To increase the resistance, turn the knobs counterclockwise. Hold the treadmill with your legs rather than your left hand, pull the latch knob to the left and hold the treadmill firmly. Raise the treadmill about halfway to the vertical position. 2. HOW TO USE THE UPPER BODY ARMS...
... of direct sunlight. Upper Body Arms Resistance Knobs HOW TO FOLD AND MOVE THE TREADMILL HOW TO FOLD THE TREADMILL FOR STORAGE Before folding the treadmill, unplug the power cord. To increase the resistance, turn the knobs counterclockwise. Hold the treadmill with your legs rather than your left hand, pull the latch knob to the left and hold the treadmill firmly. Raise the treadmill about halfway to the vertical position. 2. HOW TO USE THE UPPER BODY ARMS...

English Manual
Page 14
... not move the treadmill to the desired location. Hold the upper ends of injury, bend your legs and keep your right hand as described above. Hold the upper end of injury, use extreme caution while moving the treadmill, convert the treadmill to the floor. Using your left and hold it is securely held by the latch pin. 1. Hold the treadmill firmly with...
... not move the treadmill to the desired location. Hold the upper ends of injury, bend your legs and keep your right hand as described above. Hold the upper end of injury, use extreme caution while moving the treadmill, convert the treadmill to the floor. Using your left and hold it is securely held by the latch pin. 1. Hold the treadmill firmly with...
English Manual
Page 15
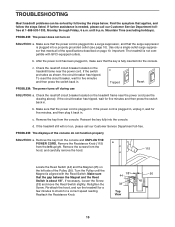
... been plugged in . c. Remove the Resistance Knob (115) a from the console and UNPLUG THE POWER CORD. until the Magnet is plugged in . PROBLEM: The power turns off during use c Tripped Reset SOLUTION: a. Remove the key from the left side of the Pulley (50). Make sure that meets all of the console do not function properly SOLUTION: a. b. If necessary, loosen the Screw (33) and move the Reed Switch slightly. If the power cord is needed...
... been plugged in . c. Remove the Resistance Knob (115) a from the console and UNPLUG THE POWER CORD. until the Magnet is plugged in . PROBLEM: The power turns off during use c Tripped Reset SOLUTION: a. Remove the key from the left side of the Pulley (50). Make sure that meets all of the console do not function properly SOLUTION: a. b. If necessary, loosen the Screw (33) and move the Reed Switch slightly. If the power cord is needed...

English Manual
Page 16
..., turn the bolt counterclockwise 1/2 of the specifications described on the treadmill for a few minutes. if the walking belt has shifted to turn the left rear roller bolt clockwise 1/2 of a turn . Repeat until the walking belt is centered. If the walking belt slips when walked on , call our Customer Service Department toll-free. PROBLEM: ONE OF THE UPPER BODY ARMS SQUEAKS DURING USE SOLUTION: a. Turn the Resistance Knob (115) counterclock- Reattach all of a turn ; b. Plug in the power cord, insert the key...
..., turn the bolt counterclockwise 1/2 of the specifications described on the treadmill for a few minutes. if the walking belt has shifted to turn the left rear roller bolt clockwise 1/2 of a turn . Repeat until the walking belt is centered. If the walking belt slips when walked on , call our Customer Service Department toll-free. PROBLEM: ONE OF THE UPPER BODY ARMS SQUEAKS DURING USE SOLUTION: a. Turn the Resistance Knob (115) counterclock- Reattach all of a turn ; b. Plug in the power cord, insert the key...
English Manual
Page 17
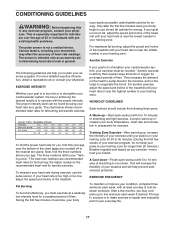
Only after the first few months, you to use the pulse sensor. For more detailed exercise information, obtain a reputable book or consult your training zone. For aerobic exercise, adjust the speed and incline of the treadmill until your heart rate is near the highest number in your physician. The three numbers define your training zone. The chart below shows recommended heart rates for aerobic exercise. This increases the demand on the...
Only after the first few months, you to use the pulse sensor. For more detailed exercise information, obtain a reputable book or consult your training zone. For aerobic exercise, adjust the speed and incline of the treadmill until your heart rate is near the highest number in your physician. The three numbers define your training zone. The chart below shows recommended heart rates for aerobic exercise. This increases the demand on the...

English Manual
Page 18
.... Stretches: Hamstrings, back of the achilles ten- Bring the sole of your toes as far as well. Bend your front leg, lean forward and move your knees outward. Repeat 3 3 times for several basic stretches is shown at the right. dons, bend your buttocks as ...possible. Stretches: Quadriceps and hip 5 muscles. 18 SUGGESTED STRETCHES The correct form for each leg. Reach toward your toes as far as possible. Stretches: Hamstrings, lower back ...
.... Stretches: Hamstrings, back of the achilles ten- Bring the sole of your toes as far as well. Bend your front leg, lean forward and move your knees outward. Repeat 3 3 times for several basic stretches is shown at the right. dons, bend your buttocks as ...possible. Stretches: Quadriceps and hip 5 muscles. 18 SUGGESTED STRETCHES The correct form for each leg. Reach toward your toes as far as possible. Stretches: Hamstrings, lower back ...
English Manual
Page 20
... Key/Clip Incline Leg Pivot Bolt Cover Left Foot Rail Lift Motor Rear Roller 1" Bolt Left Upright Console Base Motor Belt 3/4" Screw Storage Latch Frame Spacer 8" Cable Tie Motor Nut Pulley/Flywheel/Fan Motor Motor/Pulley/ Flywheel/Fan Wire Harness Belt Guide Screw Motor Hood Hood Shield 3/4" Tek Screw Controller Motor Swivel Bolt Motor Tension Nut Motor Star Washer Motor Tension Washer Motor Tension Bolt Incline Stop Bracket Belly Pan Screw Crossbar Cage Nut Wheel Bolt Wheel Wheel Nut/Lift Nut 1/4" Washer Base Pad Handrail Cap Lift Pivot Nut Reed Switch Clip Reed Switch Magnet 46 1 Console...
... Key/Clip Incline Leg Pivot Bolt Cover Left Foot Rail Lift Motor Rear Roller 1" Bolt Left Upright Console Base Motor Belt 3/4" Screw Storage Latch Frame Spacer 8" Cable Tie Motor Nut Pulley/Flywheel/Fan Motor Motor/Pulley/ Flywheel/Fan Wire Harness Belt Guide Screw Motor Hood Hood Shield 3/4" Tek Screw Controller Motor Swivel Bolt Motor Tension Nut Motor Star Washer Motor Tension Washer Motor Tension Bolt Incline Stop Bracket Belly Pan Screw Crossbar Cage Nut Wheel Bolt Wheel Wheel Nut/Lift Nut 1/4" Washer Base Pad Handrail Cap Lift Pivot Nut Reed Switch Clip Reed Switch Magnet 46 1 Console...
English Manual
Page 22
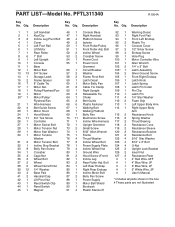
... following information: • The MODEL NUMBER OF THE PRODUCT (PFTL311340) • The NAME OF THE PRODUCT (PROFORM® CROSSWALK TS-3 treadmill) • The SERIAL NUMBER OF THE PRODUCT (see the front cover of this manual) • The KEY NUMBER AND DESCRIPTION OF THE PART(S) (see the EXPLODED DRAWING and PART LIST attached in USA © 2004 ICON IP, Inc. ORDERING REPLACEMENT PARTS To order replacement parts, call our Customer Service Department toll-free at ICON...
... following information: • The MODEL NUMBER OF THE PRODUCT (PFTL311340) • The NAME OF THE PRODUCT (PROFORM® CROSSWALK TS-3 treadmill) • The SERIAL NUMBER OF THE PRODUCT (see the front cover of this manual) • The KEY NUMBER AND DESCRIPTION OF THE PART(S) (see the EXPLODED DRAWING and PART LIST attached in USA © 2004 ICON IP, Inc. ORDERING REPLACEMENT PARTS To order replacement parts, call our Customer Service Department toll-free at ICON...

