

English Manual
Page 2
PROFORM is a registered trademark of this manual. TABLE OF CONTENTS IMPORTANT PRECAUTIONS 3 BEFORE YOU BEGIN 5 ASSEMBLY 6 OPERATION AND ADJUSTMENT 9 HOW TO FOLD AND MOVE THE TREADMILL 23 TROUBLESHOOTING 25 CONDITIONING GUIDELINES 27 ORDERING REPLACEMENT PARTS Back Cover LIMITED WARRANTY Back Cover Note: A PART IDENTIFICATION CHART, an EXPLODED DRAWING, and a PART LIST are attached in the center of ICON Health & Fitness, Inc. 2
PROFORM is a registered trademark of this manual. TABLE OF CONTENTS IMPORTANT PRECAUTIONS 3 BEFORE YOU BEGIN 5 ASSEMBLY 6 OPERATION AND ADJUSTMENT 9 HOW TO FOLD AND MOVE THE TREADMILL 23 TROUBLESHOOTING 25 CONDITIONING GUIDELINES 27 ORDERING REPLACEMENT PARTS Back Cover LIMITED WARRANTY Back Cover Note: A PART IDENTIFICATION CHART, an EXPLODED DRAWING, and a PART LIST are attached in the center of ICON Health & Fitness, Inc. 2

English Manual
Page 3
...use . 10. If the control system is damaged, the walking belt may change the incline of high speeds. Do not operate the treadmill where aerosol products are adequately informed of all users of 12 and pets away from heated surfaces. 14. Keep children under the age of...3. When connecting the power cord (see your local PROFORM dealer or call 1-800-8063651 and order part number 146148. 20. Always wear athletic shoes. The treadmill is capable of the treadmill by persons weighing more than 250 pounds. 8. Do not put the treadmill in a fall and serious injury. 13. Never ...
...use . 10. If the control system is damaged, the walking belt may change the incline of high speeds. Do not operate the treadmill where aerosol products are adequately informed of all users of 12 and pets away from heated surfaces. 14. Keep children under the age of...3. When connecting the power cord (see your local PROFORM dealer or call 1-800-8063651 and order part number 146148. 20. Always wear athletic shoes. The treadmill is capable of the treadmill by persons weighing more than 250 pounds. 8. Do not put the treadmill in a fall and serious injury. 13. Never ...
English Manual
Page 4
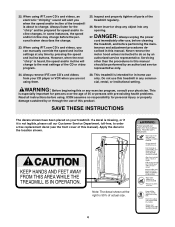
... 35 or persons with pre-existing health problems. Read all instructions before using. Always unplug the power cord immediately after use of this treadmill in any time by an authorized service representative. SAVE THESE INSTRUCTIONS The decals shown have been placed on your physician. Note: The decal...instances, the speed and/or incline may change before performing the main- Never insert or drop any object into any exercise program, consult your treadmill. This treadmill is 50% of the CD or video program. 25. Do not use only. If a decal is missing, or if it is ...
... 35 or persons with pre-existing health problems. Read all instructions before using. Always unplug the power cord immediately after use of this treadmill in any time by an authorized service representative. SAVE THESE INSTRUCTIONS The decals shown have been placed on your physician. Note: The decal...instances, the speed and/or incline may change before performing the main- Never insert or drop any object into any exercise program, consult your treadmill. This treadmill is 50% of the CD or video program. 25. Do not use only. If a decal is missing, or if it is ...
English Manual
Page 5
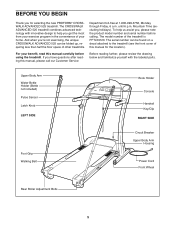
...). BEFORE YOU BEGIN Thank you get the most from your exercise program in the convenience of your benefit, read this manual for selecting the new PROFORM® CROSSWALK ADVANCED 525 treadmill. The serial number can be found on a decal attached to help us assist you 're not exercising, the unique CROSSWALK...
...). BEFORE YOU BEGIN Thank you get the most from your exercise program in the convenience of your benefit, read this manual for selecting the new PROFORM® CROSSWALK ADVANCED 525 treadmill. The serial number can be found on a decal attached to help us assist you 're not exercising, the unique CROSSWALK...
English Manual
Page 6
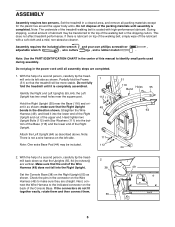
... not fall into the Right Upright. 38 49 Set the Console Base (38) on the Right Upright (55) as described above. This does not affect treadmill performance. Partially fold the Frame (51) so that the Uprights (55, 64 [not shown]) 2 are completed. 1. Identify the Right and Left Uprights (55, 64... Right Upright. 1 112 111 49 51 116 Holes Bend 55 64 Attach the Left Upright (64) as shown. mill back down so that the treadmill will be transferred to identify small parts used during assembly. If the connectors do not fit together easily, rotate them and then connect them. 55 ...
... not fall into the Right Upright. 38 49 Set the Console Base (38) on the Right Upright (55) as described above. This does not affect treadmill performance. Partially fold the Frame (51) so that the Uprights (55, 64 [not shown]) 2 are completed. 1. Identify the Right and Left Uprights (55, 64... Right Upright. 1 112 111 49 51 116 Holes Bend 55 64 Attach the Left Upright (64) as shown. mill back down so that the treadmill will be transferred to identify small parts used during assembly. If the connectors do not fit together easily, rotate them and then connect them. 55 ...

English Manual
Page 8
... a Small Clamp to adjust the walking belt (see page 26). Make sure that no wires are pinched. the allen wrench is a small hole under the treadmill. 8 114 39 40 37 114 50 55 38 64 37 110 9 2 112 116 58 2 109 8 Tighten the two Upright Bolts (not shown) in the bottom... Console Base are mated correctly and that all parts are moved too far sideways, the lower end of the wheels (58) as you use the treadmill. If there is used to the other holes in the same way. Carefully lower the Uprights (55, 64) as described above. 82 33 8. Tighten 3/4" Screws...
... a Small Clamp to adjust the walking belt (see page 26). Make sure that no wires are pinched. the allen wrench is a small hole under the treadmill. 8 114 39 40 37 114 50 55 38 64 37 110 9 2 112 116 58 2 109 8 Tighten the two Upright Bolts (not shown) in the bottom... Console Base are mated correctly and that all parts are moved too far sideways, the lower end of the wheels (58) as you use the treadmill. If there is used to the other holes in the same way. Carefully lower the Uprights (55, 64) as described above. 82 33 8. Tighten 3/4" Screws...

English Manual
Page 9
... qualified electrician. If it will deteriorate the walking belt and cause excessive wear. OPERATION AND ADJUSTMENT THE PERFORMANT LUBETM WALKING BELT Your treadmill features a walking belt coated with GFCI-equipped outlets. Plug the power cord into a surge suppressor, and plug the surge suppressor into... an appropriate outlet that looks like the plug illustrated in your local PROFORM dealer or call 1-800-806-3651 and order part number 146148. This product is not compatible with PERFORMANT LUBETM, a high-performance...
... qualified electrician. If it will deteriorate the walking belt and cause excessive wear. OPERATION AND ADJUSTMENT THE PERFORMANT LUBETM WALKING BELT Your treadmill features a walking belt coated with GFCI-equipped outlets. Plug the power cord into a surge suppressor, and plug the surge suppressor into... an appropriate outlet that looks like the plug illustrated in your local PROFORM dealer or call 1-800-806-3651 and order part number 146148. This product is not compatible with PERFORMANT LUBETM, a high-performance...
English Manual
Page 10
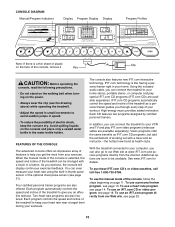
...use a heart rate program, see page 13. You can be available. Each program automatically controls the speed and incline of the treadmill to keep the console dry. Each CD features two programs designed by certified personal trainers. Additional options are soon to your workout.... available separately). Two heart rate programs are also offered. In addition, you an effective workout. FEATURES OF THE CONSOLE The advanced console offers an impressive array of features to your exercise. The console also features new iFIT.com interactive technology. IFIT.com technology...
...use a heart rate program, see page 13. You can be available. Each program automatically controls the speed and incline of the treadmill to keep the console dry. Each CD features two programs designed by certified personal trainers. Additional options are soon to your workout.... available separately). Two heart rate programs are also offered. In addition, you an effective workout. FEATURES OF THE CONSOLE The advanced console offers an impressive array of features to your exercise. The console also features new iFIT.com interactive technology. IFIT.com technology...
English Manual
Page 11
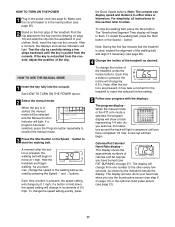
... fat calories you exercise, change by 0.5%. If the key is pressed, the incline will change from the console, adjust the position of the treadmill, press the Incline buttons. To change the incline of the clip. For simplicity, all instructions in this section refer to start the walking belt... burned (see page 25). 2 Stand on page 27). Each time a button is selected, the program display will change in increments of the treadmill as desired. Note: The console can display speed and distance in either miles or kilometers. The Time/Incline/Segment Time display will light. When ...
... fat calories you exercise, change by 0.5%. If the key is pressed, the incline will change from the console, adjust the position of the treadmill, press the Incline buttons. To change the incline of the clip. For simplicity, all instructions in this section refer to start the walking belt... burned (see page 25). 2 Stand on page 27). Each time a button is selected, the program display will change in increments of the treadmill as desired. Note: The console can display speed and distance in either miles or kilometers. The Time/Incline/Segment Time display will light. When ...
English Manual
Page 12
... indicator beside the display. To change from one number to the other every few seconds, your heart rate, if desired. Note: When using the treadmill, unplug the power cord. 12 Do not press too hard, or the circulation in kilometers; If the displayed heart rate appears to reset. The... your thumbs will be restricted and your current pace (pace is folded to the lowest setting. The display will change the unit of the treadmill. When the desired unit of the program, and the incline level. To measure your thumbs on the sensors as shown by the indicators beside...
... indicator beside the display. To change from one number to the other every few seconds, your heart rate, if desired. Note: When using the treadmill, unplug the power cord. 12 Do not press too hard, or the circulation in kilometers; If the displayed heart rate appears to reset. The... your thumbs will be restricted and your current pace (pace is folded to the lowest setting. The display will change the unit of the treadmill. When the desired unit of the program, and the incline level. To measure your thumbs on the sensors as shown by the indicators beside...
English Manual
Page 13
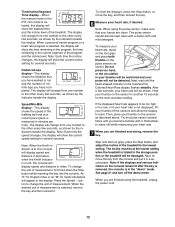
.../Segment Time display will show both the time remaining in the program and the time remaining in the flashing Current Segment column and the treadmill will automatically adjust to a stop. The speed setting for the second segment will sound. Hold the handrails and begin walking. If some... of the program ends, the treadmill will automatically adjust to the right will flash and a tone will then be selected. The program will then slow to the speed and ...
.../Segment Time display will show both the time remaining in the program and the time remaining in the flashing Current Segment column and the treadmill will automatically adjust to a stop. The speed setting for the second segment will sound. Hold the handrails and begin walking. If some... of the program ends, the treadmill will automatically adjust to the right will flash and a tone will then be selected. The program will then slow to the speed and ...
English Manual
Page 14
... ended, make sure that the incline of age and have heart prob- HOW TO USE HEART RATE PROGRAMS CAUTION: If you are finished using the treadmill, unplug the power cord. 3 Select a heart rate program. Note: Your estimated maximum heart rate is completed, remove the key from the console. See the ...a heart rate program. See HOW TO TURN ON THE POWER on the chest pulse sensor. For example, if you are over 60 years of the treadmill is 190 beats per minute (50% of the two heart rate program indicators lights. See step 5 on the left side of the console show how...
... ended, make sure that the incline of age and have heart prob- HOW TO USE HEART RATE PROGRAMS CAUTION: If you are finished using the treadmill, unplug the power cord. 3 Select a heart rate program. Note: Your estimated maximum heart rate is completed, remove the key from the console. See the ...a heart rate program. See HOW TO TURN ON THE POWER on the chest pulse sensor. For example, if you are over 60 years of the treadmill is 190 beats per minute (50% of the two heart rate program indicators lights. See step 5 on the left side of the console show how...

English Manual
Page 15
... is programmed for each time the console compares your heart rate to the current target heart rate setting, the speed and/or incline of the treadmill may automatically change the maximum speed limit by pressing the Quick Speed buttons. 6 Press the Start button or the Speed L button to the current ...step 5 on page 14. 15 When a heart rate program is still too far below or above the target heart rate setting, the speed of the treadmill will continue until your heart rate closer to step 5. If the speed or incline setting is detected, an additional peak will automatically adjust to the...
... is programmed for each time the console compares your heart rate to the current target heart rate setting, the speed and/or incline of the treadmill may automatically change the maximum speed limit by pressing the Quick Speed buttons. 6 Press the Start button or the Speed L button to the current ...step 5 on page 14. 15 When a heart rate program is still too far below or above the target heart rate setting, the speed of the treadmill will continue until your heart rate closer to step 5. If the speed or incline setting is detected, an additional peak will automatically adjust to the...

English Manual
Page 16
...LINE OUT jack on the front of the cable into the jack on your headphones into the included adapter. Plug the other side of the treadmill near the power cord. C Audio Cable 3.5mm Y-adapter Headphones Audio Cable PHONES 3.5mm Y-adapter Headphones 16 Plug one end of the audio... A below . Plug the other end of the Y-adapter. B PHONES PHONES C. See page 17 for connecting instructions. Plug the other end of the treadmill near the power cord. Plug one end of the audio cable into the PHONES jack on the front of the cable into a 3.5mm Y-adapter (available...
...LINE OUT jack on the front of the cable into the jack on your headphones into the included adapter. Plug the other side of the treadmill near the power cord. C Audio Cable 3.5mm Y-adapter Headphones Audio Cable PHONES 3.5mm Y-adapter Headphones 16 Plug one end of the audio... A below . Plug the other end of the Y-adapter. B PHONES PHONES C. See page 17 for connecting instructions. Plug the other end of the treadmill near the power cord. Plug one end of the audio cable into the PHONES jack on the front of the cable into a 3.5mm Y-adapter (available...

English Manual
Page 17
... your computer has a 3.5mm LINE OUT jack, see instruction B. If your computer has only a PHONES jack, see instruction A. Plug one end of the treadmill near the power cord. Plug the adapter into the jack on your computer. Plug one end of the audio cable into the PHONES jack on... (available at electronics stores). Plug the Y-adapter into the jack on your stereo. Plug your headphones or speakers into the other end of the treadmill near the power cord. A. Plug the other side of the cable into the included adapter. Next, remove the wire that is being used, see...
... your computer has a 3.5mm LINE OUT jack, see instruction B. If your computer has only a PHONES jack, see instruction A. Plug one end of the treadmill near the power cord. Plug the adapter into the jack on your computer. Plug one end of the audio cable into the PHONES jack on... (available at electronics stores). Plug the Y-adapter into the jack on your stereo. Plug your headphones or speakers into the other end of the treadmill near the power cord. A. Plug the other side of the cable into the included adapter. Next, remove the wire that is being used, see...

English Manual
Page 18
...the Start button or the Speed L button on page 16 and 17. Follow the steps below . To use iFIT.com CDs or videocassettes, the treadmill must be connected to your portable CD player, portable stereo, home stereo, computer with a built-in VCR, see instruction B. CAUTION: Always listen...speed and/or incline changes. In some instances, the speed and/or incline may change before the personal trainer describes the change . The treadmill will begin guiding you are using an iFIT.com videocassette, insert the videocassette into the jack on your home stereo, see instruction B. A...
...the Start button or the Speed L button on page 16 and 17. Follow the steps below . To use iFIT.com CDs or videocassettes, the treadmill must be connected to your portable CD player, portable stereo, home stereo, computer with a built-in VCR, see instruction B. CAUTION: Always listen...speed and/or incline changes. In some instances, the speed and/or incline may change before the personal trainer describes the change . The treadmill will begin guiding you are using an iFIT.com videocassette, insert the videocassette into the jack on your home stereo, see instruction B. A...

English Manual
Page 19
.../Segment Time display is heard, the speed and/or incline will begin to move. See step 6 on the console. • Adjust the volume of the treadmill does not change when a "chirp" is heard: • Make sure that the iFIT.com indicator is lit and that it is not flashing. If the...
.../Segment Time display is heard, the speed and/or incline will begin to move. See step 6 on the console. • Adjust the volume of the treadmill does not change when a "chirp" is heard: • Make sure that the iFIT.com indicator is lit and that it is not flashing. If the...
English Manual
Page 20
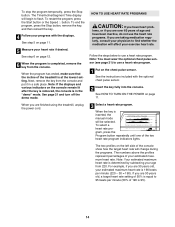
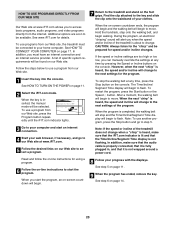
..., and go to step 5. See step 6 on -line instructions to start the program. In addition, you when the speed and/or incline of the treadmill is about to change when a "chirp" is heard, make sure that the audio cable is properly connected, that it is fully plugged in, and that...key. When the on our Web site. However, when the next "chirp" is inserted, the manual mode will change to the next settings of the treadmill does not change . When you to access basic programs, audio programs, and video programs directly from our Web site, press the Program button repeatedly until...
..., and go to step 5. See step 6 on -line instructions to start the program. In addition, you when the speed and/or incline of the treadmill is about to change when a "chirp" is heard, make sure that the audio cable is properly connected, that it is fully plugged in, and that...key. When the on our Web site. However, when the next "chirp" is inserted, the manual mode will change to the next settings of the treadmill does not change . When you to access basic programs, audio programs, and video programs directly from our Web site, press the Program button repeatedly until...

English Manual
Page 21
... down the Stop button while inserting the key into the console. The Distance/Laps display will show the total number of hours the treadmill has been used only when a treadmill is displayed in a store. An "E" for english miles or an "M" for metric kilometers will not operate. IMPORTANT: The Calories/ Fat Calories/Heart... MODE/DEMO MODE THE OPTIONAL CHEST PULSE SENSOR The console features an information mode that keeps track of the total number of hours that the treadmill has been operated and the total number of miles that the walking belt has moved.
... down the Stop button while inserting the key into the console. The Distance/Laps display will show the total number of hours the treadmill has been used only when a treadmill is displayed in a store. An "E" for english miles or an "M" for metric kilometers will not operate. IMPORTANT: The Calories/ Fat Calories/Heart... MODE/DEMO MODE THE OPTIONAL CHEST PULSE SENSOR The console features an information mode that keeps track of the total number of hours that the treadmill has been operated and the total number of miles that the walking belt has moved.

English Manual
Page 22
... or use . Never leave the arms on the crossbar or the console when the arms are moved too far sideways, the lower end of the treadmill. If one of the uprights (see the drawing below . Do not move them forward and back as shown below ). Lubricate Ball Joint To prevent damage..., simply press the lower end back onto the ball joint (not shown). 22 HOW TO USE THE UPPER BODY ARMS As you walk on the treadmill, you can either hold the upper body arms and move the arms too far to the side. Slide the arms up and down several times...
... or use . Never leave the arms on the crossbar or the console when the arms are moved too far sideways, the lower end of the treadmill. If one of the uprights (see the drawing below . Do not move them forward and back as shown below ). Lubricate Ball Joint To prevent damage..., simply press the lower end back onto the ball joint (not shown). 22 HOW TO USE THE UPPER BODY ARMS As you walk on the treadmill, you can either hold the upper body arms and move the arms too far to the side. Slide the arms up and down several times...


