

English Manual
Page 3
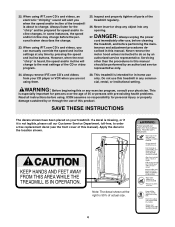
... adequately informed of the treadmill by persons weighing more than 250 pounds. 8. Adjust the speed in a fall and serious injury. 13. Always remove the key and unplug the power cord when the treadmill is turned off. It is the responsibility of the owner to raise, lower, or move the walking belt while the power is not in use the treadmill with at all warnings and precautions. 2. Never move the treadmill...
... adequately informed of the treadmill by persons weighing more than 250 pounds. 8. Adjust the speed in a fall and serious injury. 13. Always remove the key and unplug the power cord when the treadmill is turned off. It is the responsibility of the owner to raise, lower, or move the walking belt while the power is not in use the treadmill with at all warnings and precautions. 2. Never move the treadmill...
English Manual
Page 4
... through the use this manual). Note: The decal shown at any commercial, rental, or institutional setting. Inspect and properly tighten all instructions before using iFIT.com CD's and videos, an electronic "chirping" sound will change . 23. Servicing other than the procedures in -home use , before cleaning the treadmill, and before the personal trainer describes the change to order a free replacement decal (see the front cover of actual size. 4 This...
... through the use this manual). Note: The decal shown at any commercial, rental, or institutional setting. Inspect and properly tighten all instructions before using iFIT.com CD's and videos, an electronic "chirping" sound will change . 23. Servicing other than the procedures in -home use , before cleaning the treadmill, and before the personal trainer describes the change to order a free replacement decal (see the front cover of actual size. 4 This...
English Manual
Page 5
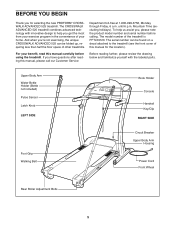
... front cover of this manual for selecting the new PROFORM® CROSSWALK ADVANCED 525 treadmill. until 6 p.m. The model number of other treadmills. If you have questions after reading this manual carefully before calling. Upper Body Arm Water Bottle Holder (Bottle not included) Pulse Sensor Latch Knob LEFT SIDE Book Holder Console Handrail Key/Clip RIGHT SIDE Foot Grip Walking Belt Circuit Breaker Upper Body Arm Housing Power Cord Front Wheel Rear Roller Adjustment Bolts 5 For your home. The CROSSWALK ADVANCED 525 treadmill combines advanced technology...
... front cover of this manual for selecting the new PROFORM® CROSSWALK ADVANCED 525 treadmill. until 6 p.m. The model number of other treadmills. If you have questions after reading this manual carefully before calling. Upper Body Arm Water Bottle Holder (Bottle not included) Pulse Sensor Latch Knob LEFT SIDE Book Holder Console Handrail Key/Clip RIGHT SIDE Foot Grip Walking Belt Circuit Breaker Upper Body Arm Housing Power Cord Front Wheel Rear Roller Adjustment Bolts 5 For your home. The CROSSWALK ADVANCED 525 treadmill combines advanced technology...
English Manual
Page 6
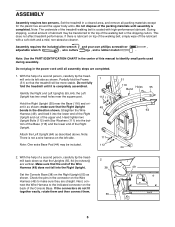
... materials except for the plastic ties around the upper body arms. Do not dispose of the Wire Harness (49) does not fall into the bottom of the Base (116) and the lower end of the walking belt or the shipping carton. Do not plug in a cleared area, and remove all assembly steps are straight. Set the treadmill in the power cord until assembly is completely...
... materials except for the plastic ties around the upper body arms. Do not dispose of the Wire Harness (49) does not fall into the bottom of the Base (116) and the lower end of the walking belt or the shipping carton. Do not plug in a cleared area, and remove all assembly steps are straight. Set the treadmill in the power cord until assembly is completely...

English Manual
Page 9
... POWER CORD DANGER: Improper connection of your treadmill being turned on the surge suppressor to the walking belt or the walking platform. an equipment-grounding conductor and a grounding plug. If the control system is damaged, the walking belt may change speed or stop unexpectedly, which may result in drawing 2 may be installed by a qualified electrician. To decrease the possibility of the equipment-grounding conductor can be used...
... POWER CORD DANGER: Improper connection of your treadmill being turned on the surge suppressor to the walking belt or the walking platform. an equipment-grounding conductor and a grounding plug. If the control system is damaged, the walking belt may change speed or stop unexpectedly, which may result in drawing 2 may be installed by a qualified electrician. To decrease the possibility of the equipment-grounding conductor can be used...
English Manual
Page 10
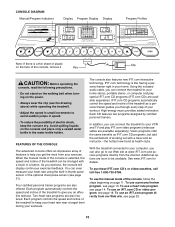
... stand on the walking belt when turning on the console and place only a sealed water bottle in thumb pulse sensor or the optional chest pulse sensor (see page 14. Using the included audio cable, you can connect the treadmill to your home. Additional options are soon to be changed with a class and an instructor-the hottest new trend at www.iFIT.com and access programs directly from our Web...
... stand on the walking belt when turning on the console and place only a sealed water bottle in thumb pulse sensor or the optional chest pulse sensor (see page 14. Using the included audio cable, you can connect the treadmill to your home. Additional options are soon to be changed with a class and an instructor-the hottest new trend at www.iFIT.com and access programs directly from our Web...
English Manual
Page 11
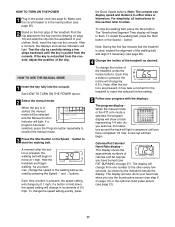
... pulse sensor (see step 6 on page 12) or the optional chest pulse sensor (see page 21). 11 To change the incline of the treadmill, press the Incline buttons. To stop the walking belt, press the Stop button. Note: During the first few seconds, as desired. When the manual mode or the iFIT.com mode is used, inspect the alignment of the walking belt, and align it may take a moment for the treadmill to reach the selected incline setting...
... pulse sensor (see step 6 on page 12) or the optional chest pulse sensor (see page 21). 11 To change the incline of the treadmill, press the Incline buttons. To stop the walking belt, press the Stop button. Note: During the first few seconds, as desired. When the manual mode or the iFIT.com mode is used, inspect the alignment of the walking belt, and align it may take a moment for the treadmill to reach the selected incline setting...
English Manual
Page 12
... pulse sensor several times until the heart-shaped indicator in the "demo" mode. Step onto the foot grips, press the Stop button, and adjust the incline of the treadmill. After a few seconds, as shown by the indicators beside the display. The display will change from the console and put it . Then, place your heart rate will be detected. When a personal trainer program or a heart rate program is selected, the display will show the current speed setting...
... pulse sensor several times until the heart-shaped indicator in the "demo" mode. Step onto the foot grips, press the Stop button, and adjust the incline of the treadmill. After a few seconds, as shown by the indicators beside the display. The display will change from the console and put it . Then, place your heart rate will be detected. When a personal trainer program or a heart rate program is selected, the display will show the current speed setting...
English Manual
Page 14
... instructions included with the displays. Note: Your estimated maximum heart rate is completed, remove the key from 220. The Time/Incline/Segment Time display will change during the programs. The numbers above the profiles represent percentages of 190 is 190 beats per minute (50% of your heart rate if desired. To stop the program temporarily, press the Stop button. To restart the program, press the Start button or the Speed L button. See step 6 on the chest pulse sensor...
... instructions included with the displays. Note: Your estimated maximum heart rate is completed, remove the key from 220. The Time/Incline/Segment Time display will change during the programs. The numbers above the profiles represent percentages of 190 is 190 beats per minute (50% of your heart rate if desired. To stop the program temporarily, press the Stop button. To restart the program, press the Start button or the Speed L button. See step 6 on the chest pulse sensor...

English Manual
Page 15
... in the current segment of the program.) One target heart rate setting is programmed for each time the console compares your heart rate to the current target heart rate setting, the speed and/or incline of the treadmill may automatically change the maximum speed limit by pressing the Quick Speed buttons. 6 Press the Start button or the Speed L button to start it at the beginning. 7 Follow your progress with the chest pulse sensor. Each time a heartbeat is detected, an...
... in the current segment of the program.) One target heart rate setting is programmed for each time the console compares your heart rate to the current target heart rate setting, the speed and/or incline of the treadmill may automatically change the maximum speed limit by pressing the Quick Speed buttons. 6 Press the Start button or the Speed L button to start it at the beginning. 7 Follow your progress with the chest pulse sensor. Each time a heartbeat is detected, an...

English Manual
Page 18
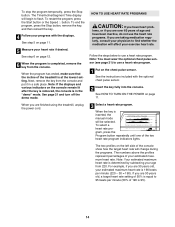
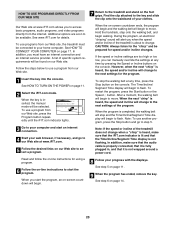
... display is connected to your personal trainer's instructions. CAUTION: Always listen for speed and/or incline changes. IN VIDEO AUDIO IN CH 34 OUT RF OUT RCA Y-adapter Audio Cable Adapter Wire removed from AUDIO OUT jack HOW TO USE IFIT.COM CD AND VIDEO PROGRAMS To use iFIT.com CDs or videocassettes, the treadmill must be prepared for the "chirp" and be connected to your CD player. Plug the adapter into the jack on the console...
... display is connected to your personal trainer's instructions. CAUTION: Always listen for speed and/or incline changes. IN VIDEO AUDIO IN CH 34 OUT RF OUT RCA Y-adapter Audio Cable Adapter Wire removed from AUDIO OUT jack HOW TO USE IFIT.COM CD AND VIDEO PROGRAMS To use iFIT.com CDs or videocassettes, the treadmill must be prepared for the "chirp" and be connected to your CD player. Plug the adapter into the jack on the console...
English Manual
Page 19
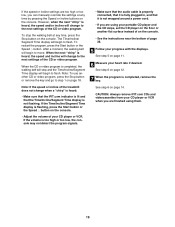
... or video program, press the Stop button or remove the key and go to the next settings of the treadmill does not change to step 1 on page 18. If the volume is too high or too low, the console may not detect the program signals. • Make sure that the audio cable is properly connected, that it is flashing, press the Start button or the Speed L button on the console. • Adjust the...
... or video program, press the Stop button or remove the key and go to the next settings of the treadmill does not change to step 1 on page 18. If the volume is too high or too low, the console may not detect the program signals. • Make sure that the audio cable is properly connected, that it is flashing, press the Start button or the Speed L button on the console. • Adjust the...
English Manual
Page 20
... have an internet connection and an internet service provider. Follow the steps below to use another program, press the Stop button and go to our Web site at any time by pressing the Speed or Incline buttons on our Web site. Note: If the speed or incline of the treadmill does not change . When you start the program. In addition, you to be selected. A list of specific system requirements will...
... have an internet connection and an internet service provider. Follow the steps below to use another program, press the Stop button and go to our Web site at any time by pressing the Speed or Incline buttons on our Web site. Note: If the speed or incline of the treadmill does not change . When you start the program. In addition, you to be selected. A list of specific system requirements will...

English Manual
Page 21
... console's two heart rate programs. To purchase the chest pulse sensor, call toll-free 1-800-734-2377. To exit the information mode, remove the key from miles per hour to turn on the console will show the total number of hours the treadmill has been used only when a treadmill is in the demo mode, the power cord can be plugged in a preset sequence, although the buttons on and turn off the demo mode. If a "d" appears in the display, the console...
... console's two heart rate programs. To purchase the chest pulse sensor, call toll-free 1-800-734-2377. To exit the information mode, remove the key from miles per hour to turn on the console will show the total number of hours the treadmill has been used only when a treadmill is in the demo mode, the power cord can be plugged in a preset sequence, although the buttons on and turn off the demo mode. If a "d" appears in the display, the console...

English Manual
Page 22
... arms by turning the resistance knobs. To add upper-body exercise to your upper-body exercise, adjust the resistance of your workouts, hold the handrails or use . Lubricate Ball Joint To prevent damage to the upper body arms if they make a squeaking noise, apply the included lubricant to the side. If one of the treadmill. HOW TO USE THE UPPER BODY ARMS As you walk on the treadmill, you walk. Never leave the arms...
... arms by turning the resistance knobs. To add upper-body exercise to your upper-body exercise, adjust the resistance of your workouts, hold the handrails or use . Lubricate Ball Joint To prevent damage to the upper body arms if they make a squeaking noise, apply the included lubricant to the side. If one of the treadmill. HOW TO USE THE UPPER BODY ARMS As you walk on the treadmill, you walk. Never leave the arms...
English Manual
Page 25
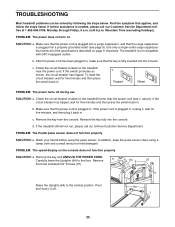
... for five minutes and then press the switch back in . If the power cord is plugged into the console. Check the circuit breaker located on the treadmill frame near the power cord. To reset the circuit breaker, wait for five minutes, and then plug it back in . PROBLEM: The thumb pulse sensor does not function properly SOLUTION: a. Remove the key and UNPLUG THE POWER CORD. If further assistance is...
... for five minutes and then press the switch back in . If the power cord is plugged into the console. Check the circuit breaker located on the treadmill frame near the power cord. To reset the circuit breaker, wait for five minutes, and then plug it back in . PROBLEM: The thumb pulse sensor does not function properly SOLUTION: a. Remove the key and UNPLUG THE POWER CORD. If further assistance is...
English Manual
Page 26
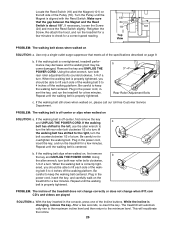
... treadmill will recalibrate the incline. 26 If necessary, loosen the Screw 18 101 (24) and move the Reed Switch slightly. When the walking belt is off -center, first remove the key a and UNPLUG THE POWER CORD. Plug in the console, press one of the Incline buttons. Repeat until the Magnet is properly tightened. Repeat until the walking belt is aligned with the Reed Switch. Make sure 1/8" that meets all of a turn. Retighten the Screw...
... treadmill will recalibrate the incline. 26 If necessary, loosen the Screw 18 101 (24) and move the Reed Switch slightly. When the walking belt is off -center, first remove the key a and UNPLUG THE POWER CORD. Plug in the console, press one of the Incline buttons. Repeat until the Magnet is properly tightened. Repeat until the walking belt is aligned with the Reed Switch. Make sure 1/8" that meets all of a turn. Retighten the Screw...

English Manual
Page 27
... proper heart rate for you, first find the three numbers above your physician. The three numbers define your exercise must exercise at least one day of your exercise program. The key to success is near the lowest number in your training zone. The following three parts: A Warm-up to five workouts each workout with 5 to cool down -Finish each week, with preexisting health problems. The pulse sensor is...
... proper heart rate for you, first find the three numbers above your physician. The three numbers define your exercise must exercise at least one day of your exercise program. The key to success is near the lowest number in your training zone. The following three parts: A Warm-up to five workouts each workout with 5 to cool down -Finish each week, with preexisting health problems. The pulse sensor is...
English Manual
Page 28
... usage or repairs not provided by ICON. When ordering parts, please be prepared to give the following information: • The MODEL NUMBER OF THE PRODUCT (PFTL59120) • The NAME OF THE PRODUCT (PROFORM® CROSSWALK ADVANCED 525 treadmill) • The SERIAL NUMBER OF THE PRODUCT (see the front cover of this manual) • The KEY NUMBER AND DESCRIPTION OF THE PART(S) (see the EXPLODED DRAWING and PART LIST attached in lieu...
... usage or repairs not provided by ICON. When ordering parts, please be prepared to give the following information: • The MODEL NUMBER OF THE PRODUCT (PFTL59120) • The NAME OF THE PRODUCT (PROFORM® CROSSWALK ADVANCED 525 treadmill) • The SERIAL NUMBER OF THE PRODUCT (see the front cover of this manual) • The KEY NUMBER AND DESCRIPTION OF THE PART(S) (see the EXPLODED DRAWING and PART LIST attached in lieu...
English Manual
Page 30
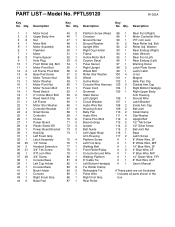
... Screw (Rear) Crossbar Ground Screw Ground Washer Upright Wire Right Cup Holder Frame Incline Motor Bolt Caution Decal Pulse Sensor Right Upright Wheel Bolt Roller Star Washer Wheel Incline Motor Console Wire Harness Power Cord Grommet Static Decal Left Upright Circuit Breaker Audio Wire Nut Housing Screw Belly Pan Audio Wire Frame Pivot Bolt Base Endcap Isolator Belt Guide Left Upper Body Arm Housing Platform Screw Left Foot Grip Walking Belt Front Roller/Pulley Console Ground Wire Walking Platform 8" Cable Tie Left Bottom Handgrip Tie Holder Clamp Releasable Tie Pulse Wire...
... Screw (Rear) Crossbar Ground Screw Ground Washer Upright Wire Right Cup Holder Frame Incline Motor Bolt Caution Decal Pulse Sensor Right Upright Wheel Bolt Roller Star Washer Wheel Incline Motor Console Wire Harness Power Cord Grommet Static Decal Left Upright Circuit Breaker Audio Wire Nut Housing Screw Belly Pan Audio Wire Frame Pivot Bolt Base Endcap Isolator Belt Guide Left Upper Body Arm Housing Platform Screw Left Foot Grip Walking Belt Front Roller/Pulley Console Ground Wire Walking Platform 8" Cable Tie Left Bottom Handgrip Tie Holder Clamp Releasable Tie Pulse Wire...

