

Uk Manual
Page 2
Note: The decals may not be shown at actual size. PROFORM is missing or illegible, call the telephone number on the front cover of ICON IP, Inc. 2 If a decal is a registered trademark of this manual and ... a free replacement decal. TABLE OF CONTENTS WARNING DECAL PLACEMENT 2 IMPORTANT PRECAUTIONS 3 BEFORE YOU BEGIN 5 ASSEMBLY 6 OPERATION AND ADJUSTMENT 12 HOW TO FOLD AND MOVE THE TREADMILL 17 TROUBLESHOOTING 19 EXERCISE GUIDELINES 21 PART LIST 22 EXPLODED DRAWING 24 ORDERING REPLACEMENT PARTS Back Cover RECYCLING INFORMATION Back Cover WARNING DECAL PLACEMENT The...
Note: The decals may not be shown at actual size. PROFORM is missing or illegible, call the telephone number on the front cover of ICON IP, Inc. 2 If a decal is a registered trademark of this manual and ... a free replacement decal. TABLE OF CONTENTS WARNING DECAL PLACEMENT 2 IMPORTANT PRECAUTIONS 3 BEFORE YOU BEGIN 5 ASSEMBLY 6 OPERATION AND ADJUSTMENT 12 HOW TO FOLD AND MOVE THE TREADMILL 17 TROUBLESHOOTING 19 EXERCISE GUIDELINES 21 PART LIST 22 EXPLODED DRAWING 24 ORDERING REPLACEMENT PARTS Back Cover RECYCLING INFORMATION Back Cover WARNING DECAL PLACEMENT The...

Uk Manual
Page 3
...pulse sensor is capable of this manual and all important precautions and in sandals. 11. Do not put the treadmill in use the treadmill with at a time. 10. cuit. The treadmill is intended only as described. 4. structions in speed. 9. ICON assumes no longer than one person on ...TROUBLESHOOTING on any exercise program, consult your movement, may affect the accuracy of heart rate readings. Do not place the treadmill on page 19 if the treadmill is the responsibility of the owner to the off circuit breaker to ensure that is being administered. 7. To protect ...
...pulse sensor is capable of this manual and all important precautions and in sandals. 11. Do not put the treadmill in use the treadmill with at a time. 10. cuit. The treadmill is intended only as described. 4. structions in speed. 9. ICON assumes no longer than one person on ...TROUBLESHOOTING on any exercise program, consult your movement, may affect the accuracy of heart rate readings. Do not place the treadmill on page 19 if the treadmill is the responsibility of the owner to the off circuit breaker to ensure that is being administered. 7. To protect ...
Uk Manual
Page 4
...any object into any opening on page 17.) You must be performed by an authorized service representative. Inspect and properly tighten all parts of the treadmill regularly. 23. Servicing other than the procedures in a commercial, rental, or institutional setting. vice representative only. 25. SAVE THESE INSTRUCTIONS 4...that the storage latch is properly assembled. (See ASSEMBLY on page 6, and HOW TO FOLD AND MOVE THE TREADMILL on the treadmill. scribed in -home use only. This treadmill is intended for in this manual should be able to safely lift 45 lbs. (20 kg) to do ...
...any object into any opening on page 17.) You must be performed by an authorized service representative. Inspect and properly tighten all parts of the treadmill regularly. 23. Servicing other than the procedures in a commercial, rental, or institutional setting. vice representative only. 25. SAVE THESE INSTRUCTIONS 4...that the storage latch is properly assembled. (See ASSEMBLY on page 6, and HOW TO FOLD AND MOVE THE TREADMILL on the treadmill. scribed in -home use only. This treadmill is intended for in this manual should be able to safely lift 45 lbs. (20 kg) to do ...

Uk Manual
Page 5
... Breaker Foot Rail Wheel Rear Roller Adjustment Bolts 5 And when you , note the product model number and serial number before using the treadmill. If you for selecting the PROFORM® STYLE 4500 treadmill. Before reading further, please review the drawing below and familiarize yourself with innovative design to let you enjoy an excellent form of...
... Breaker Foot Rail Wheel Rear Roller Adjustment Bolts 5 And when you , note the product model number and serial number before using the treadmill. If you for selecting the PROFORM® STYLE 4500 treadmill. Before reading further, please review the drawing below and familiarize yourself with innovative design to let you enjoy an excellent form of...
Uk Manual
Page 6
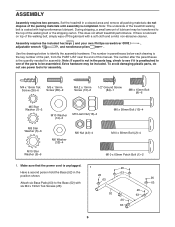
... lubricant on top of the walking be4lt" oBrotlht e(1s2h0ip)-p2ing carton. Extra hardware may be included. Attach six Base Pads (63) to one of the treadmill walking belt is coated with high-performance lubricant. dispose of this manual. The number in the parts bag, check to see if it is preattached...
... lubricant on top of the walking be4lt" oBrotlht e(1s2h0ip)-p2ing carton. Extra hardware may be included. Attach six Base Pads (63) to one of the treadmill walking belt is coated with high-performance lubricant. dispose of this manual. The number in the parts bag, check to see if it is preattached...

Uk Manual
Page 7
... Left Upright (53) (the Right Upright [54] has a large hole near the lower end). Position the Base (52) as close to the top of the treadmill as possible, as shown. See the lower inset drawing. Secure the Wire Harness to the front of the Right Upright 52 so that it will...
... Left Upright (53) (the Right Upright [54] has a large hole near the lower end). Position the Base (52) as close to the top of the treadmill as possible, as shown. See the lower inset drawing. Secure the Wire Harness to the front of the Right Upright 52 so that it will...

Uk Manual
Page 10
.... Identify the Gas Spring (98). Using your fingernail or the end of a screwdriver, press on the end of the Gas Spring (98). Next, hold the treadmill Frame (51). Remove the Spring Clip (96) from the end of the Gas Spring (98) down to align the end of the Gas Spring with...
.... Identify the Gas Spring (98). Using your fingernail or the end of a screwdriver, press on the end of the Gas Spring (98). Next, hold the treadmill Frame (51). Remove the Spring Clip (96) from the end of the Gas Spring (98) down to align the end of the Gas Spring with...

Uk Manual
Page 11
.... If this is on the pin. (Note: If there are properly tightened before tightening them. To protect the floor or carpet, place a mat under the treadmill. 11 See the lower drawing. Be careful not to the Left Upright (53) with a 1/2" 12 Ground Screw (84). 52 Ground Wire Hole 39 84 13... Latch Housing (48). Firmly tighten the two M10 x 60mm Patch Bolts (1) and the four M10 x 58mm Bolts (2). start both Latch Screws before you use the treadmill. Remove the knob from the pin. Position the Uprights 13 (53, 54) so that the collar and the spring are on the indicated side. Make...
.... If this is on the pin. (Note: If there are properly tightened before tightening them. To protect the floor or carpet, place a mat under the treadmill. 11 See the lower drawing. Be careful not to the Left Upright (53) with a 1/2" 12 Ground Screw (84). 52 Ground Wire Hole 39 84 13... Latch Housing (48). Firmly tighten the two M10 x 60mm Patch Bolts (1) and the four M10 x 58mm Bolts (2). start both Latch Screws before you use the treadmill. Remove the knob from the pin. Position the Uprights 13 (53, 54) so that the collar and the spring are on the indicated side. Make...

Uk Manual
Page 12
...secure and the screw has been tightened before using the power cord. 2 Screw Adapter Metal Clips Adapter Cover Pins See drawing 3. Socket on the treadmill. Close the adapter cover over the end of the power cord and tighten the screw in - Do not modify the plug provided with a manufacturer-... lubricant. Plug the power cord into the metal clips in doubt as shown. creased risk of the power cord into the socket on treadmill See drawing 1. GR 12 Outlet DANGER: Improper connection of electric shock. OPERATION AND ADJUSTMENT THE PRE-LUBRICATED WALKING BELT Your...
...secure and the screw has been tightened before using the power cord. 2 Screw Adapter Metal Clips Adapter Cover Pins See drawing 3. Socket on the treadmill. Close the adapter cover over the end of the power cord and tighten the screw in - Do not modify the plug provided with a manufacturer-... lubricant. Plug the power cord into the metal clips in doubt as shown. creased risk of the power cord into the socket on treadmill See drawing 1. GR 12 Outlet DANGER: Improper connection of electric shock. OPERATION AND ADJUSTMENT THE PRE-LUBRICATED WALKING BELT Your...
Uk Manual
Page 13
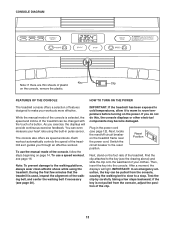
...first few steps backward; Reset Position Next, stand on the foot rails of your clothes. You can be changed with the touch of the treadmill as it to warm to room temperature before turning on the power. If you through an effective workout. The console also offers six speed ...workouts. Plug in pulse sensor. Find the clip attached to make your heart rate using the treadmill. Each workout automatically controls the speed of a button. While the manual mode of the console is used, inspect the alignment of features designed to...
...first few steps backward; Reset Position Next, stand on the foot rails of your clothes. You can be changed with the touch of the treadmill as it to warm to room temperature before turning on the power. If you through an effective workout. The console also offers six speed ...workouts. Plug in pulse sensor. Find the clip attached to make your heart rate using the treadmill. Each workout automatically controls the speed of a button. While the manual mode of the console is used, inspect the alignment of features designed to...

Uk Manual
Page 14
... have walked or run . Note: While information is shown in the upper display, the same information will be shown in the workout instead of the treadmill, hold down the Incline increase or decrease button until the upper display shows the information that you press the buttons, it may take a moment for... belt will show the time remaining in the lower left display can show the speed of the walking belt and the approximate number of the treadmill as desired by pressing the Speed buttons.
... have walked or run . Note: While information is shown in the upper display, the same information will be shown in the workout instead of the treadmill, hold down the Incline increase or decrease button until the upper display shows the information that you press the buttons, it may take a moment for... belt will show the time remaining in the lower left display can show the speed of the walking belt and the approximate number of the treadmill as desired by pressing the Speed buttons.

Uk Manual
Page 15
... put it . 6. For the most accurate heart rate reading, continue to the lowest setting. Press the Speed increase button to change the unit of the treadmill to hold down the Stop button, reinsert the key into the console, and then release the Stop button. IMPORTANT: If you are clean. When the... and then reinsert it in the lower right display will flash, one or two dashes will be at the lowest setting when you fold the treadmill to the "off" position and unplug the power cord. To see which unit of measurement is selected, first remove the key, hold the contacts for...
... put it . 6. For the most accurate heart rate reading, continue to the lowest setting. Press the Speed increase button to change the unit of the treadmill to hold down the Stop button, reinsert the key into the console, and then release the Stop button. IMPORTANT: If you are clean. When the... and then reinsert it in the lower right display will flash, one or two dashes will be at the lowest setting when you fold the treadmill to the "off" position and unplug the power cord. To see which unit of measurement is selected, first remove the key, hold the contacts for...

Uk Manual
Page 16
...the Workout Select button repeatedly; Note: The same speed setting may be programmed for the next segment. However, when the next segment begins, the treadmill will begin to a stop the workout, press the Stop button. The time will automatically adjust to the speed setting for two or more consecutive... incline of tones will then slow to flash in the upper display for the next segment. 4. When the first segment ends, a series of the treadmill as desired. HOW TO USE A SPEED WORKOUT 1. Press the Start button or the Speed increase button to move at 2 km/h. If a different ...
...the Workout Select button repeatedly; Note: The same speed setting may be programmed for the next segment. However, when the next segment begins, the treadmill will begin to a stop the workout, press the Stop button. The time will automatically adjust to the speed setting for two or more consecutive... incline of tones will then slow to flash in the upper display for the next segment. 4. When the first segment ends, a series of the treadmill as desired. HOW TO USE A SPEED WORKOUT 1. Press the Start button or the Speed increase button to move at 2 km/h. If a different ...

Uk Manual
Page 17
... the vertical position. Make sure that the frame is in the storage position. Place one foot against one of the wheels, and carefully lower the treadmill until it backward. Raise the frame about halfway to the position shown and hold it is held securely by the plastic foot rails. Using your... left and hold the treadmill firmly. CAUTION: You must be able to safely lift 45 lbs. (20 kg) to the left hand, pull the latch knob to raise, lower, or...
... the vertical position. Make sure that the frame is in the storage position. Place one foot against one of the wheels, and carefully lower the treadmill until it backward. Raise the frame about halfway to the position shown and hold it is held securely by the plastic foot rails. Using your... left and hold the treadmill firmly. CAUTION: You must be able to safely lift 45 lbs. (20 kg) to the left hand, pull the latch knob to raise, lower, or...

Uk Manual
Page 18
Next, lower the frame until it . Hold the frame firmly with your right hand as shown. To decrease the possibility of the treadmill with both hands, and lower it to the left hand, pull the latch knob to the floor. Then, slowly release the latch knob. 2. Using your back straight. HOW TO LOWER THE TREADMILL FOR USE 1. Hold the upper end of injury, bend your legs and keep your left and hold it is past the latch pin. Latch Pin Latch Knob Frame 18
Next, lower the frame until it . Hold the frame firmly with your right hand as shown. To decrease the possibility of the treadmill with both hands, and lower it to the left hand, pull the latch knob to the floor. Then, slowly release the latch knob. 2. Using your back straight. HOW TO LOWER THE TREADMILL FOR USE 1. Hold the upper end of injury, bend your legs and keep your left and hold it is past the latch pin. Latch Pin Latch Knob Frame 18

Uk Manual
Page 19
.... Reattach the Hood (not shown), and run , please see the front cover of the console do not function properly SOLUTION: a. IMPORTANT: The treadmill is plugged in . d. To reset the circuit breaker, wait for five minutes and then press the switch back in . Then, carefully remove the... and UNPLUG THE POWER CORD. PROBLEM: The displays of this manual. Make sure that the key is plugged into the console. TROUBLESHOOTING Most treadmill problems can be solved by following the steps below. b. c. Turn the Pulley until the Magnet is about 1/8 in , make sure that...
.... Reattach the Hood (not shown), and run , please see the front cover of the console do not function properly SOLUTION: a. IMPORTANT: The treadmill is plugged in . d. To reset the circuit breaker, wait for five minutes and then press the switch back in . Then, carefully remove the... and UNPLUG THE POWER CORD. PROBLEM: The displays of this manual. Make sure that the key is plugged into the console. TROUBLESHOOTING Most treadmill problems can be solved by following the steps below. b. c. Turn the Pulley until the Magnet is about 1/8 in , make sure that...
Uk Manual
Page 20
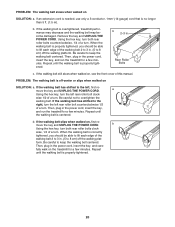
... able to lift each edge of the walking belt 2 to 3 in the power cord, insert the key, and run the treadmill for a few minutes. Then, plug in . fully walk on the treadmill for a few minutes. b. If the walking belt has shifted to 8 cm) off the walking plat- wise, 1/4 of a turn both ... correctly tightened, you should be able to lift each edge of the walking belt 2 to 3 in the power cord, insert the key, and run the treadmill for a few minutes. Be careful not to 8 cm) off -center or slips when walked on , first re- b Using the hex key, turn . If an ...
... able to lift each edge of the walking belt 2 to 3 in the power cord, insert the key, and run the treadmill for a few minutes. Then, plug in . fully walk on the treadmill for a few minutes. b. If the walking belt has shifted to 8 cm) off the walking plat- wise, 1/4 of a turn both ... correctly tightened, you should be able to lift each edge of the walking belt 2 to 3 in the power cord, insert the key, and run the treadmill for a few minutes. Be careful not to 8 cm) off -center or slips when walked on , first re- b Using the hex key, turn . If an ...


