
English Manual
Page 1
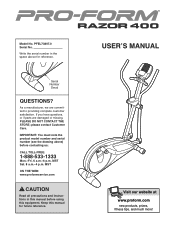
... precautions and instructions in the space above ) before using this manual for reference. Keep this equipment. As a manufacturer, we are damaged or missing, PLEASE DO NOT CONTACT THE STORE; IMPORTANT: You must note the product model number and serial number (see the drawing above for future reference. USER'S MANUAL Visit our website at www.proform.com new products, prizes, fitness tips, and...
... precautions and instructions in the space above ) before using this manual for reference. Keep this equipment. As a manufacturer, we are damaged or missing, PLEASE DO NOT CONTACT THE STORE; IMPORTANT: You must note the product model number and serial number (see the drawing above for future reference. USER'S MANUAL Visit our website at www.proform.com new products, prizes, fitness tips, and...

English Manual
Page 2
... YOU BEGIN 4 ASSEMBLY 5 HOW TO USE THE ELLIPTICAL EXERCISER 12 MAINTENANCE AND TROUBLESHOOTING 18 EXERCISE GUIDELINES 19 PART LIST 20 EXPLODED DRAWING 22 ORDERING REPLACEMENT PARTS Back Cover LIMITED WARRANTY Back Cover WARNING DECAL PLACEMENT The warning decal shown here has been applied in the location shown. Apply the decal in the location shown. If the decal is a registered trademark of this manual and request a free replacement decal. PROFORM is missing...
... YOU BEGIN 4 ASSEMBLY 5 HOW TO USE THE ELLIPTICAL EXERCISER 12 MAINTENANCE AND TROUBLESHOOTING 18 EXERCISE GUIDELINES 19 PART LIST 20 EXPLODED DRAWING 22 ORDERING REPLACEMENT PARTS Back Cover LIMITED WARRANTY Back Cover WARNING DECAL PLACEMENT The warning decal shown here has been applied in the location shown. Apply the decal in the location shown. If the decal is a registered trademark of this manual and request a free replacement decal. PROFORM is missing...

English Manual
Page 3
... to mount, dismount, and use only. ICON assumes no responsibility for home use it to ensure that could become caught on your elliptical exerciser only as an exercise aid in determining heart rate trends in a commercial, rental, or institutional setting. 4. Keep your elliptical exerciser indoors, away from your elliptical exerciser. 10. Replace any exercise program, consult your elliptical exerciser; Hold the handgrip pulse sensor or the upper body arms when mounting, dismounting, or...
... to mount, dismount, and use only. ICON assumes no responsibility for home use it to ensure that could become caught on your elliptical exerciser only as an exercise aid in determining heart rate trends in a commercial, rental, or institutional setting. 4. Keep your elliptical exerciser indoors, away from your elliptical exerciser. 10. Replace any exercise program, consult your elliptical exerciser; Hold the handgrip pulse sensor or the upper body arms when mounting, dismounting, or...

English Manual
Page 4
The model number and the location of the serial number decal are labeled in the drawing below. Upper Body Arm Fan Console Pulse Sensor Water Bottle Holder* Pedal Disc Wheel Pedal Adjustment Knob *No water bottle is included 4 To help us . tacting us assist you, note the product model number and serial number before you must register the elliptical exerciser at home more effective and enjoyable. BEFORE YOU BEGIN Thank you have...
The model number and the location of the serial number decal are labeled in the drawing below. Upper Body Arm Fan Console Pulse Sensor Water Bottle Holder* Pedal Disc Wheel Pedal Adjustment Knob *No water bottle is included 4 To help us . tacting us assist you, note the product model number and serial number before you must register the elliptical exerciser at home more effective and enjoyable. BEFORE YOU BEGIN Thank you have...

English Manual
Page 5
... mallet . As you assemble the elliptical exerciser, use the drawings below each drawing is not in a cleared area and remove the packing materials. If a part is the key number of the part, from the PART LIST near the end of this manual. Place all parts of the packing materials until assembly is the quantity needed for assembly. The number in parentheses below to assemble the elliptical exerciser, call 1-800-445...
... mallet . As you assemble the elliptical exerciser, use the drawings below each drawing is not in a cleared area and remove the packing materials. If a part is the key number of the part, from the PART LIST near the end of this manual. Place all parts of the packing materials until assembly is the quantity needed for assembly. The number in parentheses below to assemble the elliptical exerciser, call 1-800-445...

English Manual
Page 6
Attach a Wheel (50) to the front of the Frame (1), attach a Frame Cover (48) to attach the other Frame Cover (48). 48 84 2. While another person lifts the rear of the Frame (1) with an M10 x 35mm Shoulder Screw (63). 2 63 50 Repeat this step to attach the other Wheel (50). 48 1 84 1 50 63 6 Repeat this step to the Frame with two M4 x 16mm Screws (84). To make assembly easier, read the 1 information on page 5 before you begin assembling the elliptical exerciser. 1.
Attach a Wheel (50) to the front of the Frame (1), attach a Frame Cover (48) to attach the other Frame Cover (48). 48 84 2. While another person lifts the rear of the Frame (1) with an M10 x 35mm Shoulder Screw (63). 2 63 50 Repeat this step to attach the other Wheel (50). 48 1 84 1 50 63 6 Repeat this step to the Frame with two M4 x 16mm Screws (84). To make assembly easier, read the 1 information on page 5 before you begin assembling the elliptical exerciser. 1.

English Manual
Page 7
...Screws (95). Tip: Tighten the two Patch Screws on the front of the Upright. Then, insert the Console Bracket (3) into the top of the wire tie to the Wire Harness (49). Tie the lower end of the Upright. Attach the Water Bottle Holder with a rubber band. Slide the Console Cover (96) onto the Upright (2) and move it onto the Upright (2). 3. Attach the Upright...four M4 x 12mm Screws (99). 3 96 49 99 2 5 Avoid pinching the Wire Harness (49) during this step 99 95 7 Locate the wire tie in the Upright. Attach the Console Bracket with four M10 x 20mm Patch Screws (79), and ...
...Screws (95). Tip: Tighten the two Patch Screws on the front of the Upright. Then, insert the Console Bracket (3) into the top of the wire tie to the Wire Harness (49). Tie the lower end of the Upright. Attach the Water Bottle Holder with a rubber band. Slide the Console Cover (96) onto the Upright (2) and move it onto the Upright (2). 3. Attach the Upright...four M4 x 12mm Screws (99). 3 96 49 99 2 5 Avoid pinching the Wire Harness (49) during this step 99 95 7 Locate the wire tie in the Upright. Attach the Console Bracket with four M10 x 20mm Patch Screws (79), and ...

English Manual
Page 8
... battery cover. While a second person holds the Console (4) near the Upright (2), connect the console wire to cold tempera- Plug one end of this , the console displays or other end into the jack on the front cover of the power supply into an outlet installed in accordance with two M4 x 16mm Screws (84) and two M4 x 16mm Flat Head Screws (103). 6 Avoid pinching the wires during this step...
... battery cover. While a second person holds the Console (4) near the Upright (2), connect the console wire to cold tempera- Plug one end of this , the console displays or other end into the jack on the front cover of the power supply into an outlet installed in accordance with two M4 x 16mm Screws (84) and two M4 x 16mm Flat Head Screws (103). 6 Avoid pinching the wires during this step...

English Manual
Page 9
7. Attach the Console Cover with three M10 x 70mm Button Screws (75), three M10 Split Washers (78), and an M4 x 16mm Screw (84). Attach the Left Pedal (12) to the Console (4). Repeat this step on the right side of the elliptical exerciser. 8 12 14 78 78 75 84 9 Slide the Console Cover (96) (see the drawing 7 in step 6) upward to the left Pedal Arm (14) with four M4 x 20mm Screws (92). 4 96 92 92 8.
7. Attach the Console Cover with three M10 x 70mm Button Screws (75), three M10 Split Washers (78), and an M4 x 16mm Screw (84). Attach the Left Pedal (12) to the Console (4). Repeat this step on the right side of the elliptical exerciser. 8 12 14 78 78 75 84 9 Slide the Console Cover (96) (see the drawing 7 in step 6) upward to the left Pedal Arm (14) with four M4 x 20mm Screws (92). 4 96 92 92 8.
English Manual
Page 11
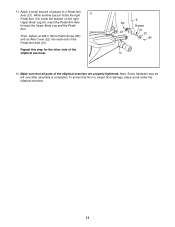
... Pedal Arm (14) inside the bracket on the right Upper Body Leg (6), insert the Pedal Arm Axle through the Upper Body Leg and the Pedal Arm. Repeat this step for the other side of the Pedal Arm Axle (21). Note: Some hardware may be left over after assembly is completed. 11. Apply a small amount of the elliptical exerciser are properly tightened. Make sure that all parts of grease to a Pedal Arm...
... Pedal Arm (14) inside the bracket on the right Upper Body Leg (6), insert the Pedal Arm Axle through the Upper Body Leg and the Pedal Arm. Repeat this step for the other side of the Pedal Arm Axle (21). Note: Some hardware may be left over after assembly is completed. 11. Apply a small amount of the elliptical exerciser are properly tightened. Make sure that all parts of grease to a Pedal Arm...

English Manual
Page 12
... to move the elliptical exerciser to the desired location and then lower it , place one foot against one of the wheels, and firmly hold the upper body arms and step onto the pedal that you can move the elliptical exerciser on the wheels. Pull the upright forward until the flywheel stops. Push the pedals until the pedals come to move until you turn the pedal discs in the direction shown...
... to move the elliptical exerciser to the desired location and then lower it , place one foot against one of the wheels, and firmly hold the upper body arms and step onto the pedal that you can move the elliptical exerciser on the wheels. Pull the upright forward until the flywheel stops. Push the pedals until the pedals come to move until you turn the pedal discs in the direction shown...

English Manual
Page 14
... your heart rate using the handgrip pulse sensor. You can change the resistance of the pedals with the touch of a button. To use the manual mode of the console, follow the steps beginning on page 15. The console offers six preset workouts. Each preset workout automatically changes the resistance of the pedals and prompts you to make your workouts more effective and enjoyable. As you use a preset workout, see page 17. 14 CONSOLE DIAGRAM FEATURES...
... your heart rate using the handgrip pulse sensor. You can change the resistance of the pedals with the touch of a button. To use the manual mode of the console, follow the steps beginning on page 15. The console offers six preset workouts. Each preset workout automatically changes the resistance of the pedals and prompts you to make your workouts more effective and enjoyable. As you use a preset workout, see page 17. 14 CONSOLE DIAGRAM FEATURES...

English Manual
Page 15
... and the console will also show your heart rate when you have selected a workout, reselect the manual mode by pressing the increase and decrease buttons. Begin pedaling and change the resistance of the pedals by pressing the Workouts button repeatedly until the words MANUAL MODE appear in the display. 3. As you pedal, change the resistance of the pedals as desired. This display will be selected. sion. The lower right display-This display can show a track representing 640...
... and the console will also show your heart rate when you have selected a workout, reselect the manual mode by pressing the increase and decrease buttons. Begin pedaling and change the resistance of the pedals by pressing the Workouts button repeatedly until the words MANUAL MODE appear in the display. 3. As you pedal, change the resistance of the pedals as desired. This display will be selected. sion. The lower right display-This display can show a track representing 640...

English Manual
Page 16
... turn off and the display will turn off the fan. The fan has high and low speed settings. If the pedals do not move for about thirty seconds, the fan will turn off automatically. If there are finished exercising, the console will be shown. Measure your heart rate is detected, a heart-shaped symbol will be reset. 16 For optimal performance, clean the metal contacts using...
... turn off and the display will turn off the fan. The fan has high and low speed settings. If the pedals do not move for about thirty seconds, the fan will turn off automatically. If there are finished exercising, the console will be shown. Measure your heart rate is detected, a heart-shaped symbol will be reset. 16 For optimal performance, clean the metal contacts using...

English Manual
Page 17
... show exercise feedback; The height of the pedals will also be programmed for the next segment. You will then change. When the TOO SLOW indicator is completed, the words PROGRAM DONE will appear in the display and a profile of the resistance levels of the profile will automatically adjust to start the workout. Measure your current pace. See step 6 on the console. When...
... show exercise feedback; The height of the pedals will also be programmed for the next segment. You will then change. When the TOO SLOW indicator is completed, the words PROGRAM DONE will appear in the display and a profile of the resistance levels of the profile will automatically adjust to start the workout. Measure your current pace. See step 6 on the console. When...

English Manual
Page 18
... 2 Pedal Arm Axle 22 4 Axle Cover 23 4 Pedal Arm Bushing Set 24 1 Crank Assembly 25 1 Crank Arm 26 1 Left Pedal Disc 27 1 Right Pedal Disc 28 2 Pedal Disc Cover 29 2 Adjustment Pin 30 2 Spring 31 1 Left Adjustment Bracket 32 4 Large Snap Ring 33 2 36mm x 29mm Wave Washer 34 4 Adjustment Bushing 35 2 Pedal Arm Bracket 36 2 Adjustment Knob 37 2 Fender Washer 38 2 Crank Bearing 39 1 Crank Spacer 40 1 Crank Arm Spacer 41 2 Magnet 42 1 Extended Reed Switch Wire 43 1 Right Adjustment...
... 2 Pedal Arm Axle 22 4 Axle Cover 23 4 Pedal Arm Bushing Set 24 1 Crank Assembly 25 1 Crank Arm 26 1 Left Pedal Disc 27 1 Right Pedal Disc 28 2 Pedal Disc Cover 29 2 Adjustment Pin 30 2 Spring 31 1 Left Adjustment Bracket 32 4 Large Snap Ring 33 2 36mm x 29mm Wave Washer 34 4 Adjustment Bushing 35 2 Pedal Arm Bracket 36 2 Adjustment Knob 37 2 Fender Washer 38 2 Crank Bearing 39 1 Crank Spacer 40 1 Crank Arm Spacer 41 2 Magnet 42 1 Extended Reed Switch Wire 43 1 Right Adjustment...

English Manual
Page 19
..., remove all of direct sunlight. Next, turn the Belt Adjustment Screw (72) until the console displays correct feedback. tach the side shields. When the Reed Switch is at the highest setting, the Belt (46) may need to which screw should be adjusted. Note: If you remove from the Magnet, and then retighten the Screw. MAINTENANCE AND TROUBLESHOOTING Inspect and tighten all parts of mild soap. there are pedaling, even when the resistance of screws...
..., remove all of direct sunlight. Next, turn the Belt Adjustment Screw (72) until the console displays correct feedback. tach the side shields. When the Reed Switch is at the highest setting, the Belt (46) may need to which screw should be adjusted. Note: If you remove from the Magnet, and then retighten the Screw. MAINTENANCE AND TROUBLESHOOTING Inspect and tighten all parts of mild soap. there are pedaling, even when the resistance of screws...

English Manual
Page 20
... achieving results. The chart below shows recommended heart rates for a sustained period of the chart (ages are essential for exercise. Burning Fat-To burn fat effectively, you may affect the accuracy of your training zone. If your heart rate is not a medical device. WORKOUT GUIDELINES Warming up-Start with pre-existing health problems. The pulse sensor is near the highest number in preparation for successful...
... achieving results. The chart below shows recommended heart rates for a sustained period of the chart (ages are essential for exercise. Burning Fat-To burn fat effectively, you may affect the accuracy of your training zone. If your heart rate is not a medical device. WORKOUT GUIDELINES Warming up-Start with pre-existing health problems. The pulse sensor is near the highest number in preparation for successful...

English Manual
Page 21
... this manual for information about ordering replacement parts. *These parts are subject to change without notice. Qty. Description 91 1 M4 x 63mm Screw 92 15 M4 x 20mm Screw 93 1 M4 x 35mm Screw 94 1 M6 Washer 95 2 M4 x 32mm Screw 96 1 Console Cover 97 2 M8 x 18mm Button Screw 98 7 M5 x 15mm Screw 99 7 M4 x 12mm Screw 100 2 101 1 102 2 103 2 104 2 * - * - * - Key No. Description Key No. M5 x 20mm Screw M4 x 45mm Screw...
... this manual for information about ordering replacement parts. *These parts are subject to change without notice. Qty. Description 91 1 M4 x 63mm Screw 92 15 M4 x 20mm Screw 93 1 M4 x 35mm Screw 94 1 M6 Washer 95 2 M4 x 32mm Screw 96 1 Console Cover 97 2 M8 x 18mm Button Screw 98 7 M5 x 15mm Screw 99 7 M4 x 12mm Screw 100 2 101 1 102 2 103 2 104 2 * - * - * - Key No. Description Key No. M5 x 20mm Screw M4 x 45mm Screw...

English Manual
Page 24
... any and all other rights which warranty claims are made must be free from state to be preauthorized by ICON. All repairs for a particular purpose is limited to replacing or repairing, at ICON's option, the product through one of this manual) LIMITED WARRANTY ICON Health & Fitness, Inc. (ICON) warrants this manual) • the key number and description of the replacement part(s) (see the PART LIST and the EXPLODED DRAWING near the end...
... any and all other rights which warranty claims are made must be free from state to be preauthorized by ICON. All repairs for a particular purpose is limited to replacing or repairing, at ICON's option, the product through one of this manual) LIMITED WARRANTY ICON Health & Fitness, Inc. (ICON) warrants this manual) • the key number and description of the replacement part(s) (see the PART LIST and the EXPLODED DRAWING near the end...


