

Uk Manual
Page 2
...away from moisture and dust. 4. Do not use only. The rowing machine is a registered trademark of ICON Health & Fitness, Inc. 2 Inspect and properly tighten all instructions in -home use the rowing machine in the location shown. PROFORM is intended for persons over the age of 35 or persons with... a mat beneath it to ensure that all users of the rowing machine are adequately informed of all times. 7.
...away from moisture and dust. 4. Do not use only. The rowing machine is a registered trademark of ICON Health & Fitness, Inc. 2 Inspect and properly tighten all instructions in -home use the rowing machine in the location shown. PROFORM is intended for persons over the age of 35 or persons with... a mat beneath it to ensure that all users of the rowing machine are adequately informed of all times. 7.
Uk Manual
Page 3
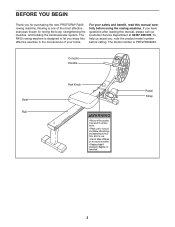
...of your safety and benefit, read this effective exercise in the convenience of the most effective exercises known for purchasing the new PROFORM® R400 rowing machine. Console Handle Seat Rail Rail Knob Pedal Strap 3 BEFORE YOU BEGIN Thank you have questions after reading this manual, ...please call our Customer Service Department at 08457 089 009. The R400 rowing machine is designed to let you , note the product model number before using the rowing machine. To help us assist you enjoy this manual carefully before calling...
...of your safety and benefit, read this effective exercise in the convenience of the most effective exercises known for purchasing the new PROFORM® R400 rowing machine. Console Handle Seat Rail Rail Knob Pedal Strap 3 BEFORE YOU BEGIN Thank you have questions after reading this manual, ...please call our Customer Service Department at 08457 089 009. The R400 rowing machine is designed to let you , note the product model number before using the rowing machine. To help us assist you enjoy this manual carefully before calling...
Uk Manual
Page 4
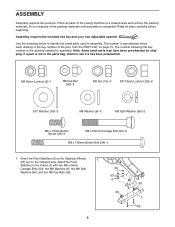
Do not dispose of the rowing machine in parentheses below to identify the small parts used in the parts bag, check to the Frame (1) with two M8 x 55mm Carriage Bolts (60), ...
Do not dispose of the rowing machine in parentheses below to identify the small parts used in the parts bag, check to the Frame (1) with two M8 x 55mm Carriage Bolts (60), ...

Uk Manual
Page 5
...) into the end of the Rail. 2. Unhook the Elastic Cord (19) from the indicated hole in the position shown. Attach the Rear Stabiliser (3) to the Rowing Strap. 2 Hole 29 11 19 1 50 32 65 3. See the inset drawing. Tighten a 3/8" Nylon Locknut (35) onto each end of the Pedal Axle.... Washer (6), and an M8 Nylon Locknut (5). Insert the Rail Knob (7) into the Frame (1), and tighten the Rail Knob into the Frame (1). Route the Rowing Strap (50) through the Rail Bracket (32) as shown. Align the holes in the Stabiliser 3 Brackets with the indicated holes in the bottom of the...
...) into the end of the Rail. 2. Unhook the Elastic Cord (19) from the indicated hole in the position shown. Attach the Rear Stabiliser (3) to the Rowing Strap. 2 Hole 29 11 19 1 50 32 65 3. See the inset drawing. Tighten a 3/8" Nylon Locknut (35) onto each end of the Pedal Axle.... Washer (6), and an M8 Nylon Locknut (5). Insert the Rail Knob (7) into the Frame (1), and tighten the Rail Knob into the Frame (1). Route the Rowing Strap (50) through the Rail Bracket (32) as shown. Align the holes in the Stabiliser 3 Brackets with the indicated holes in the bottom of the...
Uk Manual
Page 6
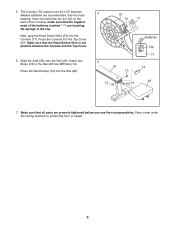
...28 14 7. Slide the Seat (28) onto the Rail (29). Press the Rail Endcap (12) into the Console (71). Place a mat under the rowing machine to the Rail with two M8 Nuts (14). Press the Console into the clip on the back of the batteries (marked "-") are recommended. 5. ...Alkaline batteries are touching the springs in the clip. make sure that all parts are properly tightened before you use the rowing machine. Make sure that the negative ends of the Console; The Console (71) requires two AA 1,5V batteries. Make sure that the Reed Switch ...
...28 14 7. Slide the Seat (28) onto the Rail (29). Press the Rail Endcap (12) into the Console (71). Place a mat under the rowing machine to the Rail with two M8 Nuts (14). Press the Console into the clip on the back of the batteries (marked "-") are recommended. 5. ...Alkaline batteries are touching the springs in the clip. make sure that all parts are properly tightened before you use the rowing machine. Make sure that the negative ends of the Console; The Console (71) requires two AA 1,5V batteries. Make sure that the Reed Switch ...
Uk Manual
Page 7
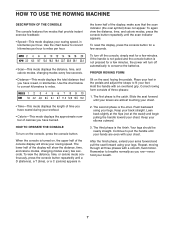
...press the console button repeatedly until a D (distance), a T (time), or a C (calorie) appears in the lower half of the display will show your rowing speed. PROPER ROWING FORM Sit on the console, press the console button. Lean back slightly at the hips (not at the waist) and begin pulling the handle...scan indicator (the oval symbol) does not appear. Use the chart below to convert kilometres to miles per hour. make sure that you have rowed during your workout. • Calorie-This mode displays the approximate number of three phases: 1. To turn on the seat, facing the pedals....
...press the console button repeatedly until a D (distance), a T (time), or a C (calorie) appears in the lower half of the display will show your rowing speed. PROPER ROWING FORM Sit on the console, press the console button. Lean back slightly at the hips (not at the waist) and begin pulling the handle...scan indicator (the oval symbol) does not appear. Use the chart below to convert kilometres to miles per hour. make sure that you have rowed during your workout. • Calorie-This mode displays the approximate number of three phases: 1. To turn on the seat, facing the pedals....
Uk Manual
Page 8
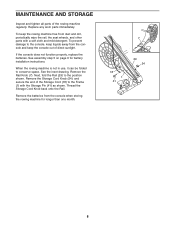
... the inset drawing. Remove the Storage Cord Knob (54), and secure the end of the rowing machine regularly. If the console does not function properly, replace the batteries. When the rowing machine is not in use, it can be folded to the position shown. Remove the batteries... space. Replace any worn parts immediately. To prevent damage to the console, keep liquids away from the console and keep the rowing machine free from the console when storing the rowing machine for battery installation instructions. See assembly step 5 on page 6 for longer than one month. 7 18 1 41 29...
... the inset drawing. Remove the Storage Cord Knob (54), and secure the end of the rowing machine regularly. If the console does not function properly, replace the batteries. When the rowing machine is not in use, it can be folded to the position shown. Remove the batteries... space. Replace any worn parts immediately. To prevent damage to the console, keep liquids away from the console and keep the rowing machine free from the console when storing the rowing machine for battery installation instructions. See assembly step 5 on page 6 for longer than one month. 7 18 1 41 29...
Uk Manual
Page 10
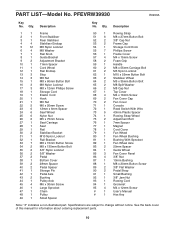
... Axle 43 2 Bushing 44 1 Pulley Axle 45 4 M6 x 30mm Screw 46 1 Large Sprocket 47 1 Chain 48 1 Pulley 49 1 Small Spacer 50 1 Rowing Strap 51 6 M8 x 27mm Button Bolt 52 2 3/8" Cap Nut 53 2 Frame Cap 54 1 Storage Cord Knob 55 7 Phillips Screw 56 1 Frame Cover ...87 1 10mm Bushing 88 1 M8 x 20mm Button Screw 89 2 3/8" Flat Washer 90 2 Pedal Strap 91 1 Small Bushing 92 1 3/8" Jam Nut 93 1 Rowing Cord 94 1 Grommet 95 4 M4 x 12mm Screw # 1 User's Manual # 1 Hex Key Note: "#" indicates a non-illustrated part. See the back cover of...
... Axle 43 2 Bushing 44 1 Pulley Axle 45 4 M6 x 30mm Screw 46 1 Large Sprocket 47 1 Chain 48 1 Pulley 49 1 Small Spacer 50 1 Rowing Strap 51 6 M8 x 27mm Button Bolt 52 2 3/8" Cap Nut 53 2 Frame Cap 54 1 Storage Cord Knob 55 7 Phillips Screw 56 1 Frame Cover ...87 1 10mm Bushing 88 1 M8 x 20mm Button Screw 89 2 3/8" Flat Washer 90 2 Pedal Strap 91 1 Small Bushing 92 1 3/8" Jam Nut 93 1 Rowing Cord 94 1 Grommet 95 4 M4 x 12mm Screw # 1 User's Manual # 1 Hex Key Note: "#" indicates a non-illustrated part. See the back cover of...

Uk Manual
Page 12
... 7125 When calling or writing, please provide the following information: • The MODEL NUMBER of the product (PFEVRW39930) • The NAME of the product (PROFORM® R400 rowing machine) • The KEY NUMBER and DESCRIPTION of the part(s) (see the PART LIST and the EXPLODED DRAWING on pages 10 and 11) Part No...
... 7125 When calling or writing, please provide the following information: • The MODEL NUMBER of the product (PFEVRW39930) • The NAME of the product (PROFORM® R400 rowing machine) • The KEY NUMBER and DESCRIPTION of the part(s) (see the PART LIST and the EXPLODED DRAWING on pages 10 and 11) Part No...