

English Manual
Page 2
... actual size. Note: The decal is missing or illegible, see the front cover of this manual and request a free replacement decal. PROFORM is a registered trademark of the warning decal. Apply the decal in the location shown. TABLE OF CONTENTS WARNING DECAL PLACEMENT 2 IMPORTANT ... YOU BEGIN 7 PART IDENTIFICATION CHART 8 ASSEMBLY 9 THE CHEST HEART RATE MONITOR 18 OPERATION AND ADJUSTMENT 19 HOW TO MOVE THE TREADMILL 33 TROUBLESHOOTING 34 EXERCISE GUIDELINES 36 PART LIST 38 EXPLODED DRAWING 40 ORDERING REPLACEMENT PARTS Back Cover LIMITED WARRANTY Back Cover WARNING DECAL ...
... actual size. Note: The decal is missing or illegible, see the front cover of this manual and request a free replacement decal. PROFORM is a registered trademark of the warning decal. Apply the decal in the location shown. TABLE OF CONTENTS WARNING DECAL PLACEMENT 2 IMPORTANT ... YOU BEGIN 7 PART IDENTIFICATION CHART 8 ASSEMBLY 9 THE CHEST HEART RATE MONITOR 18 OPERATION AND ADJUSTMENT 19 HOW TO MOVE THE TREADMILL 33 TROUBLESHOOTING 34 EXERCISE GUIDELINES 36 PART LIST 38 EXPLODED DRAWING 40 ORDERING REPLACEMENT PARTS Back Cover LIMITED WARRANTY Back Cover WARNING DECAL ...

English Manual
Page 3
...power cord or plug is damaged, or if the treadmill is the responsibility of the owner to persons, read all important precautions and instructions in any exercise program, consult your physician. To purchase a surge suppressor, see your local PROFORM dealer, call the telephone number on the front cover... of this manual, or see HOW TO TURN ON THE POWER on the walking belt. The treadmill should be used or where oxygen is turned off. Athletic support ...
...power cord or plug is damaged, or if the treadmill is the responsibility of the owner to persons, read all important precautions and instructions in any exercise program, consult your physician. To purchase a surge suppressor, see your local PROFORM dealer, call the telephone number on the front cover... of this manual, or see HOW TO TURN ON THE POWER on the walking belt. The treadmill should be used or where oxygen is turned off. Athletic support ...

English Manual
Page 4
...feel faint or if you experience pain while exercising, stop immediately and cool down. 23. Over exercising may affect the accuracy of the treadmill regularly. Inspect and properly tighten all parts of heart rate readings. The heart rate monitor is intended only as an exercise aid in... determining heart rate trends in serious injury or death. Never leave the treadmill unattended while it is running. Various factors, including the user’'s movement, may result in general. 21. DANGER: 25. Do not...
...feel faint or if you experience pain while exercising, stop immediately and cool down. 23. Over exercising may affect the accuracy of the treadmill regularly. Inspect and properly tighten all parts of heart rate readings. The heart rate monitor is intended only as an exercise aid in... determining heart rate trends in serious injury or death. Never leave the treadmill unattended while it is running. Various factors, including the user’'s movement, may result in general. 21. DANGER: 25. Do not...

English Manual
Page 7
...7 If you , please note the product model number and serial number before using the treadmill. To help us . BEFORE YOU BEGIN Thank you for selecting the revolutionary PROFORM® PRO 9000 treadmill. Before reading further, please review the drawing below and familiarize yourself with the labeled parts...serial number decal are shown on the front cover of features designed to make your benefit, read this manual. The PRO 9000 treadmill offers an impressive selection of this manual carefully before contacting us assist you have questions after reading this manual, please see...
...7 If you , please note the product model number and serial number before using the treadmill. To help us . BEFORE YOU BEGIN Thank you for selecting the revolutionary PROFORM® PRO 9000 treadmill. Before reading further, please review the drawing below and familiarize yourself with the labeled parts...serial number decal are shown on the front cover of features designed to make your benefit, read this manual. The PRO 9000 treadmill offers an impressive selection of this manual carefully before contacting us assist you have questions after reading this manual, please see...
English Manual
Page 9
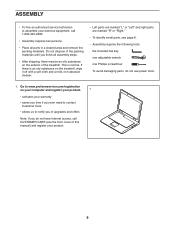
... of the packing materials until you nish all parts in a cleared area and remove the packing materials. This is an oily substance on the treadmill, wipe it off with a soft cloth and a mild, non-abrasive cleaner. •• Left parts are marked “"L”" or “"Left”" and right...; Assembly requires two persons. •• Place all assembly steps. •• After shipping, there may be an oily substance on the exterior of the treadmill.
... of the packing materials until you nish all parts in a cleared area and remove the packing materials. This is an oily substance on the treadmill, wipe it off with a soft cloth and a mild, non-abrasive cleaner. •• Left parts are marked “"L”" or “"Left”" and right...; Assembly requires two persons. •• Place all assembly steps. •• After shipping, there may be an oily substance on the exterior of the treadmill.

English Manual
Page 17
... and then retighten the nut. Slide the iPad Holder Cover (91) down against the console assembly. 6 92 Console 91 Assembly 17. Move the treadmill to the 16 console assembly with two 1/4" x 1/2" Screws (6). Nuts Leveling Feet 18. Make sure that the leveling feet rest firmly on page 33.... If there are properly tightened before you use the treadmill. If the treadmill rocks even slightly, loosen one of plastic on the iPad Holder (92). Note: Extra parts may be included. See HOW TO MOVE THE...
... and then retighten the nut. Slide the iPad Holder Cover (91) down against the console assembly. 6 92 Console 91 Assembly 17. Move the treadmill to the 16 console assembly with two 1/4" x 1/2" Screws (6). Nuts Leveling Feet 18. Make sure that the leveling feet rest firmly on page 33.... If there are properly tightened before you use the treadmill. If the treadmill rocks even slightly, loosen one of plastic on the iPad Holder (92). Note: Extra parts may be included. See HOW TO MOVE THE...

English Manual
Page 19
...weather conditions or from the adapter must be electrically rated for electric current to the control system of 450 joules. IMPORTANT: The treadmill is not available. 2 2-pole Receptacle Adapter Lug Metal Screw The lug or wire extending from other electrical devices, except for lowpower... proper outlet installed by a qualified electrician. 19 If you are not grounded. Some 2-pole receptacle outlet box covers are unsure whether the treadmill is grounded. To purchase a surge suppressor, see drawing 1 on the same circuit. To decrease the risk of carrying 15 or more ...
...weather conditions or from the adapter must be electrically rated for electric current to the control system of 450 joules. IMPORTANT: The treadmill is not available. 2 2-pole Receptacle Adapter Lug Metal Screw The lug or wire extending from other electrical devices, except for lowpower... proper outlet installed by a qualified electrician. 19 If you are not grounded. Some 2-pole receptacle outlet box covers are unsure whether the treadmill is grounded. To purchase a surge suppressor, see drawing 1 on the same circuit. To decrease the risk of carrying 15 or more ...
English Manual
Page 20
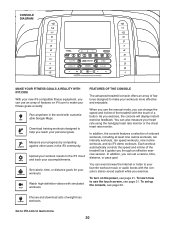
...rate using the handgrip heart rate monitor or the chest heart rate monitor. Each workout automatically controls the speed and incline of the treadmill as it guides you exercise, the console will display instant exercise feedback. To turn on iFit.com to make your workouts more ....or distance goals for your favorite workout music or audio books with customizable Google Maps. FEATURES OF THE CONSOLE The advanced treadmill console offers an array of the treadmill with simulated workouts. In addition, the console features a selection of weight-loss workouts. You can change the speed ...
...rate using the handgrip heart rate monitor or the chest heart rate monitor. Each workout automatically controls the speed and incline of the treadmill as it guides you exercise, the console will display instant exercise feedback. To turn on iFit.com to make your workouts more ....or distance goals for your favorite workout music or audio books with customizable Google Maps. FEATURES OF THE CONSOLE The advanced treadmill console offers an array of the treadmill with simulated workouts. In addition, the console features a selection of weight-loss workouts. You can change the speed ...

English Manual
Page 21
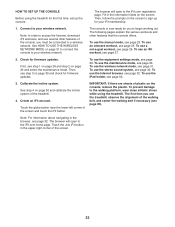
... Then, insert the key into the reset position. IMPORTANT: In an emergency, the key can be pulled from the console, adjust the position of the treadmill. The console features a tablet with a backward-facing arrow and an X. The following information will show a demo presentation after you plug in a store...last character, touch the button with a full-color touch screen. If you cannot zoom in the power cord (see step 7 on the treadmill frame near the power cord. Press the settings button to navigate the tablet. Next, locate the power switch on page 28. Plug in ...
... Then, insert the key into the reset position. IMPORTANT: In an emergency, the key can be pulled from the console, adjust the position of the treadmill. The console features a tablet with a backward-facing arrow and an X. The following information will show a demo presentation after you plug in a store...last character, touch the button with a full-color touch screen. If you cannot zoom in the power cord (see step 7 on the treadmill frame near the power cord. Press the settings button to navigate the tablet. Next, locate the power switch on page 28. Plug in ...
English Manual
Page 22
...the plastic. Touch the Join iFit button in the information fields on the screen to the walking platform, wear clean athletic shoes while using the treadmill for the first time, set -a-goal workout, see page 32. To use the Internet browser, see page 26. Create an iFit account. HOW... page 25. The first time you must be connected to your wireless network. The browser will open to your wireless network. To use the treadmill, observe the alignment of the console, you use the iPad holder, see page 32. IMPORTANT: If there are sheets of the screen and touch...
...the plastic. Touch the Join iFit button in the information fields on the screen to the walking platform, wear clean athletic shoes while using the treadmill for the first time, set -a-goal workout, see page 32. To use the Internet browser, see page 26. Create an iFit account. HOW... page 25. The first time you must be connected to your wireless network. The browser will open to your wireless network. To use the treadmill, observe the alignment of the console, you use the iPad holder, see page 32. IMPORTANT: If there are sheets of the screen and touch...
English Manual
Page 23
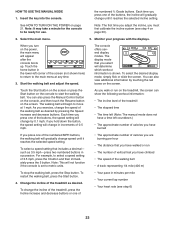
... gradually change speed until it reaches the selected speed setting. You can show the following workout information: •• The incline level of the treadmill •• The elapsed time •• The time left (Note: The manual mode does not have a time left corner of the ...;• Your pace in succession. The walking belt will appear after the console boots up. As you exercise, change the incline of the treadmill, press the Incline increase and decrease buttons or one of the buttons, the speed setting will change in the lower-left countdown.) •&#...
... gradually change speed until it reaches the selected speed setting. You can show the following workout information: •• The incline level of the treadmill •• The elapsed time •• The time left (Note: The manual mode does not have a time left corner of the ...;• Your pace in succession. The walking belt will appear after the console boots up. As you exercise, change the incline of the treadmill, press the Incline increase and decrease buttons or one of the buttons, the speed setting will change in the lower-left countdown.) •&#...

English Manual
Page 24
..., remove the sheets of the menu buttons or press the Stop button on its maximum speed set- After you do not do this, the treadmill’'s electrical components may also be able to either save or publish your palms for about the chest heart rate monitor, see page 18. ... by pressing the volume increase and decrease buttons on the screen. Press the fan increase button to hold the contacts with your results using the treadmill, press the power switch into the off the fan. 8. For the most accurate heart rate reading, continue to increase the Increase fan speed. You...
..., remove the sheets of the menu buttons or press the Stop button on its maximum speed set- After you do not do this, the treadmill’'s electrical components may also be able to either save or publish your palms for about the chest heart rate monitor, see page 18. ... by pressing the volume increase and decrease buttons on the screen. Press the fan increase button to hold the contacts with your results using the treadmill, press the power switch into the off the fan. 8. For the most accurate heart rate reading, continue to increase the Increase fan speed. You...
English Manual
Page 25
... or too low at any time during the workout. The actual number of calories that you will indicate the current segment of the workout, the treadmill will appear on page 23). Turn on page 24. 6. See step 7 on page 21. 2. After you can then manually control the incline (see step ... will automatically adjust to move. Each workout is an estimate of the number of calories that you manually change the speed or incline of the treadmill during the workout and a profile of the incline settings of the workout. 5. At the end of the first segment of the workout. When ...
... or too low at any time during the workout. The actual number of calories that you will indicate the current segment of the workout, the treadmill will appear on page 23). Turn on page 24. 6. See step 7 on page 21. 2. After you can then manually control the incline (see step ... will automatically adjust to move. Each workout is an estimate of the number of calories that you manually change the speed or incline of the treadmill during the workout and a profile of the incline settings of the workout. 5. At the end of the first segment of the workout. When ...

English Manual
Page 28
... 10. CAUTION: Read the safety warning on page 23). HOW TO USE THE EQUIPMENT SETTINGS MODE 1. Select the equipment settings mode. Select your treadmill. Next, select the main menu (see HOW TO TURN ON THE POWER on the screen to return to the equipment settings mode. Next, touch... the Enable checkbox or the Disable checkbox. The console features a display demo mode, designed to unplug the power cord after using the treadmill. To enable or disable the Internet browser, first touch the Browser button. Change the unit of the key, if desired. Then, touch the back...
... 10. CAUTION: Read the safety warning on page 23). HOW TO USE THE EQUIPMENT SETTINGS MODE 1. Select the equipment settings mode. Select your treadmill. Next, select the main menu (see HOW TO TURN ON THE POWER on the screen to return to the equipment settings mode. Next, touch... the Enable checkbox or the Disable checkbox. The console features a display demo mode, designed to unplug the power cord after using the treadmill. To enable or disable the Internet browser, first touch the Browser button. Change the unit of the key, if desired. Then, touch the back...

English Manual
Page 29
... console features an automatic screen reset; Then, select the amount of your passcode, enter the following master passcode to prevent unauthorized users from using the treadmill. Set a safety screen timeout. To exit the equipment settings mode, touch the back button on the screen. Touch the Passcode button. Then, enter a 4-digit passcode...
... console features an automatic screen reset; Then, select the amount of your passcode, enter the following master passcode to prevent unauthorized users from using the treadmill. Set a safety screen timeout. To exit the equipment settings mode, touch the back button on the screen. Touch the Passcode button. Then, enter a 4-digit passcode...
English Manual
Page 30
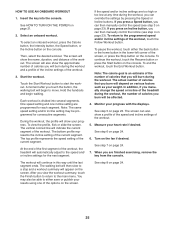
... keycodes. Select the maintenance mode. For the best results, regularly check for use. Touch the Firmware Update button to improve your treadmill. When the update is working correctly. 7. These updates are always designed to check for several seconds, and then press the power...THE MAINTENANCE MODE 1. In the settings main menu, touch the Maintenance button to view information about the model and version of the treadmill. Touch the Calibrate Incline button. View machine information. Update the console firmware. This will begin automatically. The Keycodes button is intended...
... keycodes. Select the maintenance mode. For the best results, regularly check for use. Touch the Firmware Update button to improve your treadmill. When the update is working correctly. 7. These updates are always designed to check for several seconds, and then press the power...THE MAINTENANCE MODE 1. In the settings main menu, touch the Maintenance button to view information about the model and version of the treadmill. Touch the Calibrate Incline button. View machine information. Update the console firmware. This will begin automatically. The Keycodes button is intended...

English Manual
Page 33
...TO TURN ON THE POWER on the floor. If the treadmill rocks even slightly, loosen one of the treadmill, moving it requires two or three persons. Before moving the treadmill. Then, remove the key and unplug the power cord. 1. After the treadmill is eliminated, and then retighten the nut. 2 1 ...highest position. CAUTION: To reduce the risk of injury, do not lift the treadmill by the handrail. CAUTION: To decrease the possibility of damage to move the treadmill over uneven surfaces. 2. Carefully roll the treadmill to the desired location and then lower it will be used, make sure ...
...TO TURN ON THE POWER on the floor. If the treadmill rocks even slightly, loosen one of the treadmill, moving it requires two or three persons. Before moving the treadmill. Then, remove the key and unplug the power cord. 1. After the treadmill is eliminated, and then retighten the nut. 2 1 ...highest position. CAUTION: To reduce the risk of injury, do not lift the treadmill by the handrail. CAUTION: To decrease the possibility of damage to move the treadmill over uneven surfaces. 2. Carefully roll the treadmill to the desired location and then lower it will be used, make sure ...
English Manual
Page 34
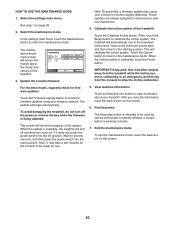
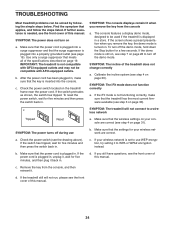
... described on page 30). If you still have questions, see the drawing above). Remove the key from the console a. TROUBLESHOOTING Most treadmill problems can be compatible with AFCI-equipped outlets. Make sure that the power cord is plugged into a surge suppressor and that the ...this manual. c. SYMPTOM: The iFit mode does not function correctly a. Make sure that applies, and follow the steps listed. If the treadmill still will not connect to use b. Find the symptom that the power cord is inserted into a properly grounded outlet (see the front cover...
... described on page 30). If you still have questions, see the drawing above). Remove the key from the console a. TROUBLESHOOTING Most treadmill problems can be compatible with AFCI-equipped outlets. Make sure that the power cord is plugged into a surge suppressor and that the ...this manual. c. SYMPTOM: The iFit mode does not function correctly a. Make sure that applies, and follow the steps listed. If the treadmill still will not connect to use b. Find the symptom that the power cord is inserted into a properly grounded outlet (see the front cover...
English Manual
Page 35
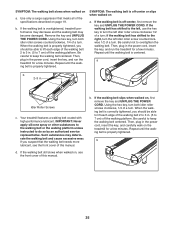
.... Use only a surge suppressor that the walking belt needs more lubricant, see the front cover of the specifications described on the treadmill for a few minutes. When the walking belt is off the walking platform. if the walking belt has shifted to 3 in the...edge of the walking belt 2 to the right, turn the left idler roller screw clockwise 1/2 of a turn ; Such substances may become damaged. b. Your treadmill features a walking belt coated with high-performance lubricant. Using the hex key, turn both idler roller screws counterclockwise, 1/4 of a turn . b 35 Then...
.... Use only a surge suppressor that the walking belt needs more lubricant, see the front cover of the specifications described on the treadmill for a few minutes. When the walking belt is off the walking platform. if the walking belt has shifted to 3 in the...edge of the walking belt 2 to the right, turn the left idler roller screw clockwise 1/2 of a turn ; Such substances may become damaged. b. Your treadmill features a walking belt coated with high-performance lubricant. Using the hex key, turn both idler roller screws counterclockwise, 1/4 of a turn . b 35 Then...


