
Instruction Manual
Page 2
... TO FOLD AND MOVE THE TREADMILL 27 MAINTENANCE AND TROUBLESHOOTING 28 EXERCISE GUIDELINES 31 PART LIST 34 EXPLODED DRAWING 36 ORDERING REPLACEMENT PARTS Back Cover RECYCLING INFORMATION Back Cover WARNING DECAL PLACEMENT This drawing shows the locations of this manual and request a free replacement ...decal. If a decal is a trademark of Bluetooth SIG, Inc. and other countries. IOS is used under license. 2 Android and Google Play are registered trademarks of Apple Inc., registered in the location shown. PROFORM and IFIT ...
... TO FOLD AND MOVE THE TREADMILL 27 MAINTENANCE AND TROUBLESHOOTING 28 EXERCISE GUIDELINES 31 PART LIST 34 EXPLODED DRAWING 36 ORDERING REPLACEMENT PARTS Back Cover RECYCLING INFORMATION Back Cover WARNING DECAL PLACEMENT This drawing shows the locations of this manual and request a free replacement ...decal. If a decal is a trademark of Bluetooth SIG, Inc. and other countries. IOS is used under license. 2 Android and Google Play are registered trademarks of Apple Inc., registered in the location shown. PROFORM and IFIT ...
Instruction Manual
Page 3
... by persons with bare feet, wearing only stockings, or in this manual and all users of the treadmill will increase. 20. When connecting the power cord (see HOW TO TURN ON THE POWER on page 28 if the treadmill is turned off. Keep the power cord away from moisture and dust. Always stand on any commercial...
... by persons with bare feet, wearing only stockings, or in this manual and all users of the treadmill will increase. 20. When connecting the power cord (see HOW TO TURN ON THE POWER on page 28 if the treadmill is turned off. Keep the power cord away from moisture and dust. Always stand on any commercial...

Instruction Manual
Page 4
...affect the accuracy of heart rate readings. When folding or moving the treadmill, make sure that the storage latch is used. Do not change the incline of the power switch), and unplug the power cord when the treadmill is intended only as an exercise aid in determining heart rate trends... is not in use , before performing the maintenance and adjustment procedures described in this manual should be able to safely lift 45 lbs. (20 kg) to avoid sudden jumps in this manual. Always unplug the power cord immediately after use . 24. Servicing other than the procedures in speed. 22....
...affect the accuracy of heart rate readings. When folding or moving the treadmill, make sure that the storage latch is used. Do not change the incline of the power switch), and unplug the power cord when the treadmill is intended only as an exercise aid in determining heart rate trends... is not in use , before performing the maintenance and adjustment procedures described in this manual should be able to safely lift 45 lbs. (20 kg) to avoid sudden jumps in this manual. Always unplug the power cord immediately after use . 24. Servicing other than the procedures in speed. 22....
Instruction Manual
Page 5
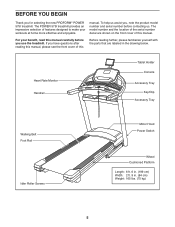
... familiarize yourself with the parts that are shown on the front cover of this manual carefully before contacting us assist you, note the product model number and serial number before you for selecting the new PROFORM® POWER 575I treadmill. manual. The POWER 575I treadmill provides an impressive selection of the serial number decal are labeled in . (84 cm...
... familiarize yourself with the parts that are shown on the front cover of this manual carefully before contacting us assist you, note the product model number and serial number before you for selecting the new PROFORM® POWER 575I treadmill. manual. The POWER 575I treadmill provides an impressive selection of the serial number decal are labeled in . (84 cm...
Instruction Manual
Page 7
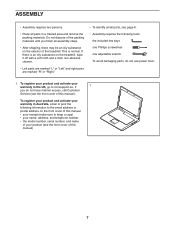
... included hex keys one Phillips screwdriver one adjustable wrench To avoid damaging parts, do not use power tools. 1. If 1 you finish all parts in a cleared area and remove the...; Assembly requires the following information to the email address or postal address on the front cover of this manual. • your receipt (make sure to keep a copy) • your name, address, and telephone...• After shipping, there may be an oily substance on the exterior of the treadmill. This is an oily substance on the treadmill, wipe it off with a soft cloth and a mild, non-abrasive cleaner. &#...
... included hex keys one Phillips screwdriver one adjustable wrench To avoid damaging parts, do not use power tools. 1. If 1 you finish all parts in a cleared area and remove the...; Assembly requires the following information to the email address or postal address on the front cover of this manual. • your receipt (make sure to keep a copy) • your name, address, and telephone...• After shipping, there may be an oily substance on the exterior of the treadmill. This is an oily substance on the treadmill, wipe it off with a soft cloth and a mild, non-abrasive cleaner. &#...
Instruction Manual
Page 19
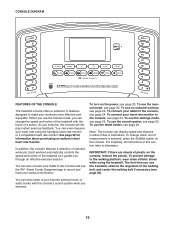
... use the settings mode, see page 25. IMPORTANT: If there are sheets of plastic on the power, see page 20. To turn on the console, remove the plastic. To use the treadmill, observe the alignment of the walking belt, and center the walking belt if necessary (see page 30)....also connect your tablet to record and track your workouts more effective and enjoyable. To use the manual mode, you use the manual mode, see page 20. CONSOLE DIAGRAM FEATURES OF THE CONSOLE The treadmill console offers a selection of features designed to the console, see page 24. To connect your tablet...
... use the settings mode, see page 25. IMPORTANT: If there are sheets of plastic on the power, see page 20. To turn on the console, remove the plastic. To use the treadmill, observe the alignment of the walking belt, and center the walking belt if necessary (see page 30)....also connect your tablet to record and track your workouts more effective and enjoyable. To use the manual mode, you use the manual mode, see page 20. CONSOLE DIAGRAM FEATURES OF THE CONSOLE The treadmill console offers a selection of features designed to the console, see page 24. To connect your tablet...
Instruction Manual
Page 20
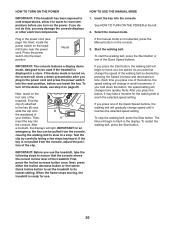
... the walking belt to slow to a stop the walking belt, press the Stop button. HOW TO TURN ON THE POWER HOW TO USE THE MANUAL MODE IMPORTANT: If the treadmill has been exposed to cold temperatures, allow it to warm to room temperature before you press the Start button, the .... Each time you use . 20 First, press the Incline increase button once. Reset If the manual mode is not selected, press the Manual button on the treadmill frame near the power cord. To stop . Next, locate the power switch on the console. 3. Then, A insert the key into the console. IMPORTANT: In an...
... the walking belt to slow to a stop the walking belt, press the Stop button. HOW TO TURN ON THE POWER HOW TO USE THE MANUAL MODE IMPORTANT: If the treadmill has been exposed to cold temperatures, allow it to warm to room temperature before you press the Start button, the .... Each time you use . 20 First, press the Incline increase button once. Reset If the manual mode is not selected, press the Manual button on the treadmill frame near the power cord. To stop . Next, locate the power switch on the console. 3. Then, A insert the key into the console. IMPORTANT: In an...
Instruction Manual
Page 23
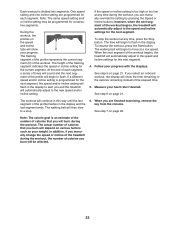
... the next segment. The workout will be programmed for the current segment. See step 7 on page 21. In addition, if you manually change the speed or incline of the treadmill during the workout, you are programmed for each segment, a series of the flashing segment indicates the speed or incline setting for consecutive...
... the next segment. The workout will be programmed for the current segment. See step 7 on page 21. In addition, if you manually change the speed or incline of the treadmill during the workout, you are programmed for each segment, a series of the flashing segment indicates the speed or incline setting for consecutive...

Instruction Manual
Page 28
... a. Wipe exterior parts of this manual. SYMPTOM: The displays of this manual. After the power cord has been plugged in . If the switch protrudes as shown, the switch has tripped. If the switch has tripped, wait for five minutes and then press the switch back in . If the treadmill still will not run, please...
... a. Wipe exterior parts of this manual. SYMPTOM: The displays of this manual. After the power cord has been plugged in . If the switch protrudes as shown, the switch has tripped. If the switch has tripped, wait for five minutes and then press the switch back in . If the treadmill still will not run, please...
Instruction Manual
Page 29
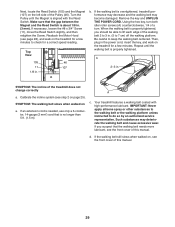
.... A c. Such substances may become damaged. d. Top View 105 46 11 107 1/8 in . Remove the key and UNPLUG THE POWER CORD. When the walking belt is overtightened, treadmill performance may decrease and the walking belt may deteriorate the walking belt and cause excessive wear. b 2-3 in . If necessary, loosen ... with the Reed Switch. If the walking belt still slows when walked on the treadmill for a few minutes to check for a few minutes. Then, plug in . (5 to lift each edge of this manual. If you should be able to 7 cm) off the walking platform. b. ...
.... A c. Such substances may become damaged. d. Top View 105 46 11 107 1/8 in . Remove the key and UNPLUG THE POWER CORD. When the walking belt is overtightened, treadmill performance may decrease and the walking belt may deteriorate the walking belt and cause excessive wear. b 2-3 in . If necessary, loosen ... with the Reed Switch. If the walking belt still slows when walked on the treadmill for a few minutes to check for a few minutes. Then, plug in . (5 to lift each edge of this manual. If you should be able to 7 cm) off the walking platform. b. ...

