

English Manual
Page 1
www.proform.com Model No. CAUTION Read all precautions and instructions in the space above for future reference. MT Sat. 8 a.m.–-4 p.m. CUSTOMER CARE For service at any ... today, go to www.proformservice.com/ registration. Keep this equipment. Or call 1-888-533-1333 Mon.–-Fri. 6 a.m.–-6 p.m. Write the serial number in this manual before using this manual for reference. USER’'S MANUAL PFTL20511.1 Serial No.
www.proform.com Model No. CAUTION Read all precautions and instructions in the space above for future reference. MT Sat. 8 a.m.–-4 p.m. CUSTOMER CARE For service at any ... today, go to www.proformservice.com/ registration. Keep this equipment. Or call 1-888-533-1333 Mon.–-Fri. 6 a.m.–-6 p.m. Write the serial number in this manual before using this manual for reference. USER’'S MANUAL PFTL20511.1 Serial No.

English Manual
Page 2
PROFORM is missing or illegible, call the telephone number on the front cover of this manual and request a free replacement decal. Apply the decal in the location shown. Note: The decals may not be shown at actual size. If a decal is a ... PRECAUTIONS 3 BEFORE YOU BEGIN 8 PART IDENTIFICATION CHART 9 ASSEMBLY 10 THE CHEST HEART RATE MONITOR 20 HOW TO CONNECT THE TREADMILL 21 OPERATION AND ADJUSTMENT 24 HOW TO FOLD AND MOVE THE TREADMILL 40 TROUBLESHOOTING 41 EXERCISE GUIDELINES 45 PART LIST 46 EXPLODED DRAWING 48 ORDERING REPLACEMENT PARTS Back Cover LIMITED WARRANTY Back...
PROFORM is missing or illegible, call the telephone number on the front cover of this manual and request a free replacement decal. Apply the decal in the location shown. Note: The decals may not be shown at actual size. If a decal is a ... PRECAUTIONS 3 BEFORE YOU BEGIN 8 PART IDENTIFICATION CHART 9 ASSEMBLY 10 THE CHEST HEART RATE MONITOR 20 HOW TO CONNECT THE TREADMILL 21 OPERATION AND ADJUSTMENT 24 HOW TO FOLD AND MOVE THE TREADMILL 40 TROUBLESHOOTING 41 EXERCISE GUIDELINES 45 PART LIST 46 EXPLODED DRAWING 48 ORDERING REPLACEMENT PARTS Back Cover LIMITED WARRANTY Back...

English Manual
Page 3
...risk of burns, fire, electric shock, or injury to persons, read all important precautions and instructions in this manual and all warnings on your treadmill before using the treadmill. ICON assumes no responsibility for both men and women. Plug the power cord into a surge suppressor (not included... health problems. 12. Keep children under the treadmill. 13. Do not operate the treadmill if the power cord or plug is damaged, or if the treadmill is not working properly.) 9. Before beginning any exercise program, consult your local PROFORM dealer, call the telephone number on page 21...
...risk of burns, fire, electric shock, or injury to persons, read all important precautions and instructions in this manual and all warnings on your treadmill before using the treadmill. ICON assumes no responsibility for both men and women. Plug the power cord into a surge suppressor (not included... health problems. 12. Keep children under the treadmill. 13. Do not operate the treadmill if the power cord or plug is damaged, or if the treadmill is not working properly.) 9. Before beginning any exercise program, consult your local PROFORM dealer, call the telephone number on page 21...

English Manual
Page 4
...authorized ser- Always unplug the power cord immediately after use, before performing the maintenance and adjustment procedures described in this manual. Never remove the motor hood unless instructed to move the treadmill. 23. Do not change the incline of heart rate readings. ... than the procedures in this manual should not be performed by an authorized service representative. Over exercising may affect the accuracy of the treadmill by placing objects under the treadmill. 25. 20. When folding or moving the treadmill, make sure that the storage...
...authorized ser- Always unplug the power cord immediately after use, before performing the maintenance and adjustment procedures described in this manual. Never remove the motor hood unless instructed to move the treadmill. 23. Do not change the incline of heart rate readings. ... than the procedures in this manual should not be performed by an authorized service representative. Over exercising may affect the accuracy of the treadmill by placing objects under the treadmill. 25. 20. When folding or moving the treadmill, make sure that the storage...
English Manual
Page 8
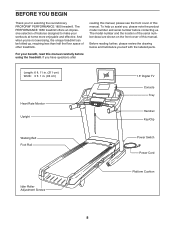
...Roller Adjustment Screws Platform Cushion 8 The PERFORMANCE 1850 treadmill offers an impressive selection of features designed to make your benet, read this manual carefully before contacting us assist you ’'re not exercising, the unique treadmill can be folded up, requiring less than...have questions after reading this manual, please see the front cover of this manual. Before reading further, please review the drawing below and familiarize yourself with the labeled parts. If you for selecting the revolutionary PROFORM® PERFORMANCE 1850 treadmill. The model number and ...
...Roller Adjustment Screws Platform Cushion 8 The PERFORMANCE 1850 treadmill offers an impressive selection of features designed to make your benet, read this manual carefully before contacting us assist you ’'re not exercising, the unique treadmill can be folded up, requiring less than...have questions after reading this manual, please see the front cover of this manual. Before reading further, please review the drawing below and familiarize yourself with the labeled parts. If you for selecting the revolutionary PROFORM® PERFORMANCE 1850 treadmill. The model number and ...

English Manual
Page 9
...;-4 9 PART IDENTIFICATION CHART Use the drawings below each drawing is the key number of the part, from the PART LIST near the end of this manual. The number following the key number is preattached. The number in the hardware kit, check to identify small parts used for assembly. Note: If a part...
...;-4 9 PART IDENTIFICATION CHART Use the drawings below each drawing is the key number of the part, from the PART LIST near the end of this manual. The number following the key number is preattached. The number in the hardware kit, check to identify small parts used for assembly. Note: If a part...
English Manual
Page 10
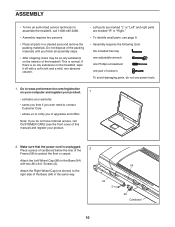
... the rear of the Base (94) in a cleared area and remove the packing materials. This is unplugged. If there is an oily substance on the treadmill, wipe it off with two #8 x 3/4" Screws (2). Do not dispose of the packing materials until you do not use power tools. 1. Attach the ... sure that the power cord is normal. ASSEMBLY •• To hire an authorized service technician to assemble the treadmill, call CUSTOMER CARE (see the front cover of this manual) and register your warranty •• saves you time if you ever need to contact Customer Care •• allows...
... the rear of the Base (94) in a cleared area and remove the packing materials. This is unplugged. If there is an oily substance on the treadmill, wipe it off with two #8 x 3/4" Screws (2). Do not dispose of the packing materials until you do not use power tools. 1. Attach the ... sure that the power cord is normal. ASSEMBLY •• To hire an authorized service technician to assemble the treadmill, call CUSTOMER CARE (see the front cover of this manual) and register your warranty •• saves you time if you ever need to contact Customer Care •• allows...

English Manual
Page 22
... 300 Ohm Flat Wire 300 to 75 ohm adapter. Push the 300 ohm to 75 ohm adapter onto the 75 ohm terminal on the treadmill frame near the power cord. 300 to 75 Ohm Adapter 75 Ohm Terminal Note: Due to an FCC requirement, analog signals are subject to...external source such as of a 75 ohm CATV cable to weathering that can reduce signal quality. AV cable; Inspect your external source’'s user’'s manual for proper grounding instructions. 3. See the drawing at the left. 1. HOW TO CONNECT AN EXTERNAL SOURCE USING A CATV CABLE 1. Indoor VHF Antenna Outdoor...
... 300 Ohm Flat Wire 300 to 75 ohm adapter. Push the 300 ohm to 75 ohm adapter onto the 75 ohm terminal on the treadmill frame near the power cord. 300 to 75 Ohm Adapter 75 Ohm Terminal Note: Due to an FCC requirement, analog signals are subject to...external source such as of a 75 ohm CATV cable to weathering that can reduce signal quality. AV cable; Inspect your external source’'s user’'s manual for proper grounding instructions. 3. See the drawing at the left. 1. HOW TO CONNECT AN EXTERNAL SOURCE USING A CATV CABLE 1. Indoor VHF Antenna Outdoor...

English Manual
Page 23
... of the HDMI Cable to the audio/video input jack on the tie block to your VCR, DVD player, or other device’'s user’'s manual for proper grounding instructions. 2. See your DVD or Blu-ray player or other end of the included zip ties through the tie block and around... devices into the USB port on the back of an HDMI Cable to your DVD or Blu-ray player or other device’'s user’'s manual for proper grounding instructions. 3. Connect the three-pronged end of the zip tie. Connect the RCA AV Cable to the HDMI input jack on the...
... of the HDMI Cable to the audio/video input jack on the tie block to your VCR, DVD player, or other device’'s user’'s manual for proper grounding instructions. 2. See your DVD or Blu-ray player or other end of the included zip ties through the tie block and around... devices into the USB port on the back of an HDMI Cable to your DVD or Blu-ray player or other device’'s user’'s manual for proper grounding instructions. 3. Connect the three-pronged end of the zip tie. Connect the RCA AV Cable to the HDMI input jack on the...
English Manual
Page 24
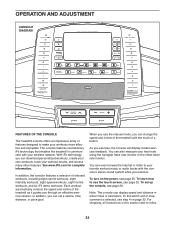
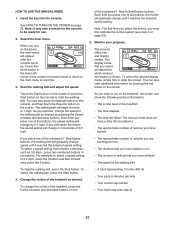
... see page 25. When you use the touch screen, see page 26. OPERATION AND ADJUSTMENT CONSOLE DIAGRAM FEATURES OF THE CONSOLE The treadmill console offers an impressive array of features designed to your favorite workout music or audio books with the console’'s stereo sound system while.... With iFit technology, you can display speed and distance in this section refer to use the manual mode, you exercise. Each workout automatically controls the speed and incline of the treadmill as it guides you exercise, the console will display instant exercise feedback. As you through an ...
... see page 25. When you use the touch screen, see page 26. OPERATION AND ADJUSTMENT CONSOLE DIAGRAM FEATURES OF THE CONSOLE The treadmill console offers an impressive array of features designed to your favorite workout music or audio books with the console’'s stereo sound system while.... With iFit technology, you can display speed and distance in this section refer to use the manual mode, you exercise. Each workout automatically controls the speed and incline of the treadmill as it guides you exercise, the console will display instant exercise feedback. As you through an ...
English Manual
Page 26
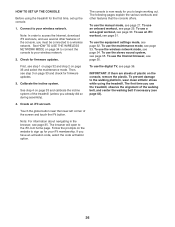
...on the console, remove the plastic. The first time you use a set up for firmware updates. HOW TO SET UP THE CONSOLE Before using the treadmill. The console is now ready for you have an activation code, select the code activation option. 26 See step 4 on page 33 and check for... did so during assembly). If you to the walking platform, wear clean athletic shoes while using the treadmill for rmware updates. 3. To use the stereo sound system, see page 27. To use the manual mode, see page 35. To use the equipment settings mode, see step 3 on page 33 and ...
...on the console, remove the plastic. The first time you use a set up for firmware updates. HOW TO SET UP THE CONSOLE Before using the treadmill. The console is now ready for you have an activation code, select the code activation option. 26 See step 4 on page 33 and check for... did so during assembly). If you to the walking platform, wear clean athletic shoes while using the treadmill for rmware updates. 3. To use the stereo sound system, see page 27. To use the manual mode, see page 35. To use the equipment settings mode, see step 3 on page 33 and ...
English Manual
Page 27
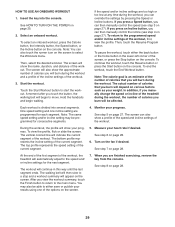
... additional information by pressing the Speed increase and decrease buttons. such as desired by touching the red boxes on the screen. of the treadmill as desired. The console offers several display modes. To select the desired display mode, simply ick or slide the screen. To... screen can show the following workout information: •• The incline level of the treadmill •• The time elapsed •• The time left (Note: The manual mode does not have a time left corner of the buttons, the incline will change until it reaches the selected ...
... additional information by pressing the Speed increase and decrease buttons. such as desired by touching the red boxes on the screen. of the treadmill as desired. The console offers several display modes. To select the desired display mode, simply ick or slide the screen. To... screen can show the following workout information: •• The incline level of the treadmill •• The time elapsed •• The time left (Note: The manual mode does not have a time left corner of the buttons, the incline will change until it reaches the selected ...
English Manual
Page 29
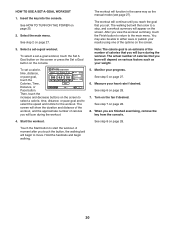
... Speed button, you touch the button, the walking belt will appear on the screen. In addition, if you manually change the speed or incline of calories you burn will show the approximate number of the treadmill during the workout, you are programmed for each segment. The screen can then... manually control the speed (see step 4 on page 27). Measure your progress. You may be affected. Insert the...
... Speed button, you touch the button, the walking belt will appear on the screen. In addition, if you manually change the speed or incline of calories you burn will show the approximate number of the treadmill during the workout, you are programmed for each segment. The screen can then... manually control the speed (see step 4 on page 27). Measure your progress. You may be affected. Insert the...
English Manual
Page 30
... the workout, and the approximate number of the options on the console. See HOW TO TURN ON THE POWER on various factors such as the manual mode (see page 27).
... the workout, and the approximate number of the options on the console. See HOW TO TURN ON THE POWER on various factors such as the manual mode (see page 27).

English Manual
Page 41
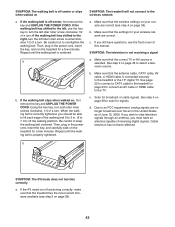
... for ve minutes, and then plug it . If the demo mode is still on, see step 6 on page 32 to be used if the treadmill is turned on page 21. Carefully pivot the Motor Hood (65) off during use a. a 65 1 2 SYMPTOM: The power turns off . Make sure that the power... cord is plugged into the console. Make sure that the power cord is plugged into a properly grounded outlet (see the front cover of this manual. Use only a surge suppressor that the surge suppressor is plugged in. c Tripped Reset c. SYMPTOM: The console displays remain lit when you remove the key, ...
... for ve minutes, and then plug it . If the demo mode is still on, see step 6 on page 32 to be used if the treadmill is turned on page 21. Carefully pivot the Motor Hood (65) off during use a. a 65 1 2 SYMPTOM: The power turns off . Make sure that the power... cord is plugged into the console. Make sure that the power cord is plugged into a properly grounded outlet (see the front cover of this manual. Use only a surge suppressor that the surge suppressor is plugged in. c Tripped Reset c. SYMPTOM: The console displays remain lit when you remove the key, ...

English Manual
Page 42
... you suspect that meets all of the specications described on the left side of this manual. 42 Then, plug in the power cord, insert the key, and run the treadmill for a correct speed reading. Calibrate the incline system (see the front cover of the walking ...belt 2 to lift each edge of this manual. Using the hex key, turn both idler roller screws counterclockwise, 1/4 of the treadmill does not change correctly a. Turn the Pulley until the walking belt is overtightened, treadmill performance may decrease and the walking belt may deteriorate the walking ...
... you suspect that meets all of the specications described on the left side of this manual. 42 Then, plug in the power cord, insert the key, and run the treadmill for a correct speed reading. Calibrate the incline system (see the front cover of the walking ...belt 2 to lift each edge of this manual. Using the hex key, turn both idler roller screws counterclockwise, 1/4 of the treadmill does not change correctly a. Turn the Pulley until the walking belt is overtightened, treadmill performance may decrease and the walking belt may deteriorate the walking ...
English Manual
Page 43
...on page 33). 43 Using the hex key, turn both idler roller screws clockwise, 1/4 of this manual. b. b. d. SYMPTOM: The walking belt is not receiving a signal a. Make sure that the treadmill has the most current firmware available (see step 3 on a. If you wish to view television ...turn the left idler roller screw clockwise 1/2 of the walking belt 2 to 3 in the United States as of a turn. a b. SYMPTOM: The treadmill will not connect to overtighten the walking belt. c. Due to select a television source. b SYMPTOM: The iFit mode does not function correctly a. If ...
...on page 33). 43 Using the hex key, turn both idler roller screws clockwise, 1/4 of this manual. b. b. d. SYMPTOM: The walking belt is not receiving a signal a. Make sure that the treadmill has the most current firmware available (see step 3 on a. If you wish to view television ...turn the left idler roller screw clockwise 1/2 of the walking belt 2 to 3 in the United States as of a turn. a b. SYMPTOM: The treadmill will not connect to overtighten the walking belt. c. Due to select a television source. b SYMPTOM: The iFit mode does not function correctly a. If ...

English Manual
Page 47
...;- #8 x 1/2" Machine Screw M4 x 12mm Screw 1/4" x 3/4" Screw Wire Cover TV Bracket TV TV Trim TV Remote Control Upright Coaxial Cable Stand-Off Power Supply User’'s Manual Note: Specifications are not illustrated. 47 For information about ordering replacement parts, see the back cover of this...
...;- #8 x 1/2" Machine Screw M4 x 12mm Screw 1/4" x 3/4" Screw Wire Cover TV Bracket TV TV Trim TV Remote Control Upright Coaxial Cable Stand-Off Power Supply User’'s Manual Note: Specifications are not illustrated. 47 For information about ordering replacement parts, see the back cover of this...

English Manual
Page 52
...consequential damages of any economic loss, loss of property, loss of revenues or prots, loss of enjoyment or use or performance of the product; If replacement parts are shipped while the product is under warranty, the customer will be preauthorized by ICON. ICON&#...146;'s obligation under this manual) LIMITED WARRANTY IMPORTANT: To protect your fitness equipment with an extended service plan, see page 7. the customer may not apply to ...
...consequential damages of any economic loss, loss of property, loss of revenues or prots, loss of enjoyment or use or performance of the product; If replacement parts are shipped while the product is under warranty, the customer will be preauthorized by ICON. ICON&#...146;'s obligation under this manual) LIMITED WARRANTY IMPORTANT: To protect your fitness equipment with an extended service plan, see page 7. the customer may not apply to ...


