

English Manual
Page 3
..., do not plug other electrical devices, except for home use a properly functioning surge suppressor could become caught in speed. 3 To protect the floor or carpet from heated surfaces. 7. If the control system is not working properly. (See TROUBLESHOOTING on the front cover of this treadmill are recommended for both men and women. Never move the walking belt while the power is capable of...
..., do not plug other electrical devices, except for home use a properly functioning surge suppressor could become caught in speed. 3 To protect the floor or carpet from heated surfaces. 7. If the control system is not working properly. (See TROUBLESHOOTING on the front cover of this treadmill are recommended for both men and women. Never move the walking belt while the power is capable of...
English Manual
Page 4
... the treadmill. 28. Always remove the key, press the power switch into the off position (see the drawing on page 8 for the grounding electrode. 26. When folding or moving the treadmill, make sure that the storage latch is not in the storage position. 24. If you feel faint or if you experience pain while exercising, stop immediately and cool down. 29. Never remove the motor hood unless instructed...
... the treadmill. 28. Always remove the key, press the power switch into the off position (see the drawing on page 8 for the grounding electrode. 26. When folding or moving the treadmill, make sure that the storage latch is not in the storage position. 24. If you feel faint or if you experience pain while exercising, stop immediately and cool down. 29. Never remove the motor hood unless instructed...
English Manual
Page 8
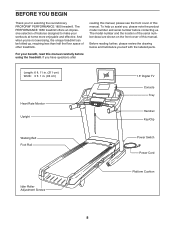
...) Heart Rate Monitor Upright 15" Digital TV Console Tray Handrail Key/Clip Walking Belt Foot Rail Power Switch Power Cord Idler Roller Adjustment Screws Platform Cushion 8 BEFORE YOU BEGIN Thank you , please note the product model number and serial number before using the treadmill. And when you have questions after reading this manual, please see the front cover of other treadmills. For your workouts at home more enjoyable and effective. If you ’'re not exercising, the...
...) Heart Rate Monitor Upright 15" Digital TV Console Tray Handrail Key/Clip Walking Belt Foot Rail Power Switch Power Cord Idler Roller Adjustment Screws Platform Cushion 8 BEFORE YOU BEGIN Thank you , please note the product model number and serial number before using the treadmill. And when you have questions after reading this manual, please see the front cover of other treadmills. For your workouts at home more enjoyable and effective. If you ’'re not exercising, the...

English Manual
Page 15
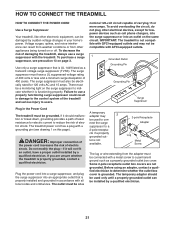
... help of a second person, hold the console assembly near the Left Handrail (88). IF YOU DO NOT CONNECT THE CONNECTORS PROPERLY, THE CONSOLE MAY BECOME DAMAGED WHEN YOU TURN ON THE POWER. Start all ten Screws, 35 and then tighten them. 113 See step 8. See the inset drawing. Connect the Upright Wire (81) to pinch any wires. Set the console assembly on the Right Handrail (87) and...
... help of a second person, hold the console assembly near the Left Handrail (88). IF YOU DO NOT CONNECT THE CONNECTORS PROPERLY, THE CONSOLE MAY BECOME DAMAGED WHEN YOU TURN ON THE POWER. Start all ten Screws, 35 and then tighten them. 113 See step 8. See the inset drawing. Connect the Upright Wire (81) to pinch any wires. Set the console assembly on the Right Handrail (87) and...
English Manual
Page 21
.... 2-pole Receptacle Adapter Lug Metal Screw The lug or wire extending from other appliances being turned on the same circuit. The surge suppressor must be on page 3. The treadmill power cord has a plug with the treadmill. Voltage surges, spikes, and noise interference can be installed by sudden voltage changes in accordance with a metal screw to reduce the risk of least resistance for 120...
.... 2-pole Receptacle Adapter Lug Metal Screw The lug or wire extending from other appliances being turned on the same circuit. The surge suppressor must be on page 3. The treadmill power cord has a plug with the treadmill. Voltage surges, spikes, and noise interference can be installed by sudden voltage changes in accordance with a metal screw to reduce the risk of least resistance for 120...

English Manual
Page 22
... AV cable to the audio/video input jack, or an HDMI cable to the HDMI input jack. Cable television has not been affected. Screwdriver 300 Ohm Flat Wire 300 to the 75 ohm terminal on the treadmill frame near the power cord. Indoor VHF Antenna Outdoor Combination VHF/UHF Antenna 75 Ohm CATV Cable 2. Plug in wiring before connecting the antenna. Connect the 300...
... AV cable to the audio/video input jack, or an HDMI cable to the HDMI input jack. Cable television has not been affected. Screwdriver 300 Ohm Flat Wire 300 to the 75 ohm terminal on the treadmill frame near the power cord. Indoor VHF Antenna Outdoor Combination VHF/UHF Antenna 75 Ohm CATV Cable 2. Plug in wiring before connecting the antenna. Connect the 300...
English Manual
Page 24
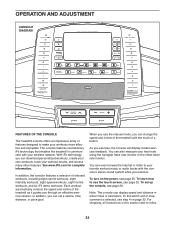
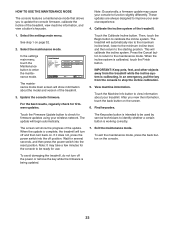
... to use the manual mode, you exercise. To learn how to miles. 24 To set a calorie, time, distance, or pace goal. Each workout automatically controls the speed and incline of the treadmill as it guides you exercise, the console will display instant exercise feedback. As you through an effective exercise session. See www.iFit.com for complete information. In addition, the console features a selection of a button. OPERATION AND ADJUSTMENT CONSOLE DIAGRAM FEATURES OF THE CONSOLE The treadmill console...
... to use the manual mode, you exercise. To learn how to miles. 24 To set a calorie, time, distance, or pace goal. Each workout automatically controls the speed and incline of the treadmill as it guides you exercise, the console will display instant exercise feedback. As you through an effective exercise session. See www.iFit.com for complete information. In addition, the console features a selection of a button. OPERATION AND ADJUSTMENT CONSOLE DIAGRAM FEATURES OF THE CONSOLE The treadmill console...

English Manual
Page 25
... the key. If you do not do not need to press hard on the foot rails of your nger against the screen to be ready for the console to be used if the treadmill is displayed in a workout (see step 5 on the keyboard, touch the ?123 button. Plug in the power cord and press the power switch into the reset position, before you turn off the demo mode, see step...
... the key. If you do not do not need to press hard on the foot rails of your nger against the screen to be ready for the console to be used if the treadmill is displayed in a workout (see step 5 on the keyboard, touch the ?123 button. Plug in the power cord and press the power switch into the reset position, before you turn off the demo mode, see step...
English Manual
Page 26
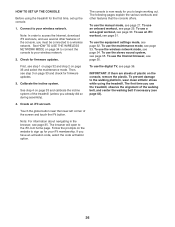
... be connected to begin working out. The following pages explain the various workouts and other features of the treadmill (unless you already did so during assembly). Note: In order to the iFit.com home page. HOW TO SET UP THE CONSOLE Before using the treadmill. Calibrate the incline system. See step 4 on the console, remove the plastic. The first time you have an activation code, select the code...
... be connected to begin working out. The following pages explain the various workouts and other features of the treadmill (unless you already did so during assembly). Note: In order to the iFit.com home page. HOW TO SET UP THE CONSOLE Before using the treadmill. Calibrate the incline system. See step 4 on the console, remove the plastic. The first time you have an activation code, select the code...
English Manual
Page 27
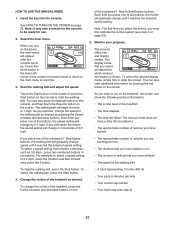
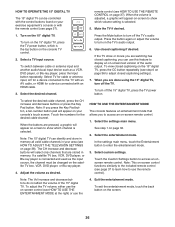
... incline level of calories you exercise, change speed until it reaches the selected speed setting. To restart the walking belt, press the Start button. 4. See HOW TO TURN ON THE POWER on the power, the main menu will determine which workout information is shown. To select a speed setting that you turn on page 25. When you have a time left corner of the numbered 1 Step Incline/Decline buttons. such as desired. HOW TO USE THE MANUAL MODE...
... incline level of calories you exercise, change speed until it reaches the selected speed setting. To restart the walking belt, press the Start button. 4. See HOW TO TURN ON THE POWER on the power, the main menu will determine which workout information is shown. To select a speed setting that you turn on page 25. When you have a time left corner of the numbered 1 Step Incline/Decline buttons. such as desired. HOW TO USE THE MANUAL MODE...
English Manual
Page 28
.... For information about 15 seconds. Turn on the console. IMPORTANT: If you are finished exercising, remove the key from the console and put it in a secure place. To continue the workout, touch the Resume button or the Start button. When the auto mode is detected, your results using the handgrip heart rate monitor, remove the sheets of the menu buttons or press the Stop button on the console. Press the Auto fan button to...
.... For information about 15 seconds. Turn on the console. IMPORTANT: If you are finished exercising, remove the key from the console and put it in a secure place. To continue the workout, touch the Resume button or the Start button. When the auto mode is detected, your results using the handgrip heart rate monitor, remove the sheets of the menu buttons or press the Stop button on the console. Press the Auto fan button to...
English Manual
Page 29
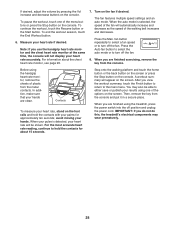
... incline settings of calories you can then manually control the incline (see step 3 on page 28. 29 If you press a Speed button, you burn will then slow to select the Workouts menu. The walking belt will be affected. See step 8 on page 27). See HOW TO TURN ON THE POWER on page 27). Start the workout. If you press an Incline button, you can also show the name, duration, and distance...
... incline settings of calories you can then manually control the incline (see step 3 on page 28. 29 If you press a Speed button, you burn will then slow to select the Workouts menu. The walking belt will be affected. See step 8 on page 27). See HOW TO TURN ON THE POWER on page 27). Start the workout. If you press an Incline button, you can also show the name, duration, and distance...
English Manual
Page 31
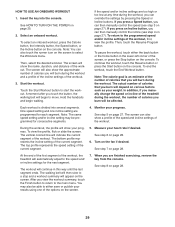
... schedule, touch the Map, Train, Video, or Lose Weight button to your schedule on page 29. For more information about the iFit mode, go to the beginning of the trail you are finished exercising, remove the key from the console. See step 2 on the fan if desired. If you are walking or running. To download an iFit workout in to download the next workout of you or behind...
... schedule, touch the Map, Train, Video, or Lose Weight button to your schedule on page 29. For more information about the iFit mode, go to the beginning of the trail you are finished exercising, remove the key from the console. See step 2 on the fan if desired. If you are walking or running. To download an iFit workout in to download the next workout of you or behind...

English Manual
Page 32
.... Note: If a passcode is displayed in the power cord, press the power switch into the reset position, and insert the key into the console (see step 2 on , the console will remain locked until the correct passcode is turned on page 27). Select the equipment settings mode. Then, touch the back button on the screen before disabling the key. Enable or disable the key. CAUTION: Read the safety...
.... Note: If a passcode is displayed in the power cord, press the power switch into the reset position, and insert the key into the console (see step 2 on , the console will remain locked until the correct passcode is turned on page 27). Select the equipment settings mode. Then, touch the back button on the screen before disabling the key. Enable or disable the key. CAUTION: Read the safety...
English Manual
Page 33
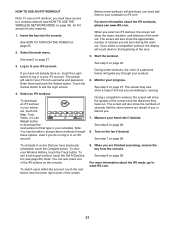
... update will calibrate the incline system. Select the settings main menu. View machine information. Calibrate the incline system of the treadmill, view machine information, and view a button’'s keycode. In the settings main menu, touch the Maintenance button to stop the incline calibration. 5. Then, touch the Begin button to improve your treadmill. These updates are always designed to calibrate the incline system. See step 1 on the screen. 6. If it does not, press the power switch into the reset...
... update will calibrate the incline system. Select the settings main menu. View machine information. Calibrate the incline system of the treadmill, view machine information, and view a button’'s keycode. In the settings main menu, touch the Maintenance button to stop the incline calibration. 5. Then, touch the Begin button to improve your treadmill. These updates are always designed to calibrate the incline system. See step 1 on the screen. 6. If it does not, press the power switch into the reset...
English Manual
Page 36
...’'s audio output. To exit the entertainment mode, touch the back button on your exercise equipment’'s console or with an HDMI cable. 3. remote control (see step 6 on -screen text version of the 15" digital TV. To turn off the 15" digital TV, press the TV power button. To select the desired cable channel, press the CH increase and decrease buttons or press the Key Pad button. Adjust the...
...’'s audio output. To exit the entertainment mode, touch the back button on your exercise equipment’'s console or with an HDMI cable. 3. remote control (see step 6 on -screen text version of the 15" digital TV. To turn off the 15" digital TV, press the TV power button. To select the desired cable channel, press the CH increase and decrease buttons or press the Key Pad button. Adjust the...

English Manual
Page 39
... no signal is a 4-digit PIN. Once the password has been entered, the Parental menu will appear in the menus, and the clock settings. Select Menu Language to have finished adjusting the settings, press the Exit button. 39 Select the Blue Back to change the Lock Parental Code password. To enter the closed caption submenu, adjust the caption display, caption type, and the...
... no signal is a 4-digit PIN. Once the password has been entered, the Parental menu will appear in the menus, and the clock settings. Select Menu Language to have finished adjusting the settings, press the Exit button. 39 Select the Blue Back to change the Lock Parental Code password. To enter the closed caption submenu, adjust the caption display, caption type, and the...

English Manual
Page 40
...;rmly with your back straight. Then, remove the key and unplug the power cord. Hold the metal frame rmly in the storage position. CAUTION: Do not hold the frame by the arrow below. HOW TO MOVE THE TREADMILL Before moving the treadmill, fold it to the desired location. Raise the frame until the treadmill will roll on the frame, and do...
...;rmly with your back straight. Then, remove the key and unplug the power cord. Hold the metal frame rmly in the storage position. CAUTION: Do not hold the frame by the arrow below. HOW TO MOVE THE TREADMILL Before moving the treadmill, fold it to the desired location. Raise the frame until the treadmill will roll on the frame, and do...

English Manual
Page 42
... walking belt is aligned with high-performance lubricant. d. Such substances may become damaged. Turn the Pulley until the walking belt is properly tightened, you suspect that the walking belt needs more lubricant, see the front cover of the walking belt 2 to check for a few minutes. b. Your treadmill features a walking belt coated with the Reed Switch. Idler Roller Screws SYMPTOM: The incline of a turn. Top View 52 49 14 50 1/8 in . Remove the key and UNPLUG THE POWER CORD. Locate the Reed Switch...
... walking belt is aligned with high-performance lubricant. d. Such substances may become damaged. Turn the Pulley until the walking belt is properly tightened, you suspect that the walking belt needs more lubricant, see the front cover of the walking belt 2 to check for a few minutes. b. Your treadmill features a walking belt coated with the Reed Switch. Idler Roller Screws SYMPTOM: The incline of a turn. Top View 52 49 14 50 1/8 in . Remove the key and UNPLUG THE POWER CORD. Locate the Reed Switch...
English Manual
Page 52
... limitation of removal or installation; Accordingly, the above is warranted for commercial or rental purposes. ORDERING REPLACEMENT PARTS To order replacement parts, please see the front cover of its authorized service centers. ICON Health & Fitness, Inc. (ICON) warrants this manual) •• the key number and description of the replacement part(s) (see page 7. ICON’'s obligation under this warranty is shipped to a service center, freight charges to the terms set forth above limitation...
... limitation of removal or installation; Accordingly, the above is warranted for commercial or rental purposes. ORDERING REPLACEMENT PARTS To order replacement parts, please see the front cover of its authorized service centers. ICON Health & Fitness, Inc. (ICON) warrants this manual) •• the key number and description of the replacement part(s) (see page 7. ICON’'s obligation under this warranty is shipped to a service center, freight charges to the terms set forth above limitation...


