

Uk Manual
Page 2
... the decal in the U.S. and other countries. If a decal is a registered trademark of Apple Inc., registered in the location shown. PROFORM is not included. Note: The decals may not be shown at actual size. TABLE OF CONTENTS WARNING DECAL PLACEMENT 2 IMPORTANT PRECAUTIONS 3 ... PART IDENTIFICATION CHART 6 ASSEMBLY 7 THE CHEST HEART RATE MONITOR 15 OPERATION AND ADJUSTMENT 16 HOW TO FOLD AND MOVE THE TREADMILL 25 TROUBLESHOOTING 26 EXERCISE GUIDELINES 29 PART LIST 30 EXPLODED DRAWING 32 ORDERING REPLACEMENT PARTS Back Cover RECYCLING INFORMATION Back Cover WARNING ...
... the decal in the U.S. and other countries. If a decal is a registered trademark of Apple Inc., registered in the location shown. PROFORM is not included. Note: The decals may not be shown at actual size. TABLE OF CONTENTS WARNING DECAL PLACEMENT 2 IMPORTANT PRECAUTIONS 3 ... PART IDENTIFICATION CHART 6 ASSEMBLY 7 THE CHEST HEART RATE MONITOR 15 OPERATION AND ADJUSTMENT 16 HOW TO FOLD AND MOVE THE TREADMILL 25 TROUBLESHOOTING 26 EXERCISE GUIDELINES 29 PART LIST 30 EXPLODED DRAWING 32 ORDERING REPLACEMENT PARTS Back Cover RECYCLING INFORMATION Back Cover WARNING ...

Uk Manual
Page 3
...not a medical device. Never allow more than 5 ft. (1.5 m). 4. Always wear athletic shoes. The heart rate monitor is turned off. Place the treadmill on a level surface, with at all times. 13. Adjust the speed in small increments to ensure that could become caught in general. 3 The heart... an ASTA-approved BS1362, 13-amp fuse into an earthed circuit. structions in - ICON assumes no longer than one person on your treadmill before using your physician. To protect the floor or carpet from heated surfaces. 14. IMPORTANT PRECAUTIONS WARNING: To reduce the risk of ...
...not a medical device. Never allow more than 5 ft. (1.5 m). 4. Always wear athletic shoes. The heart rate monitor is turned off. Place the treadmill on a level surface, with at all times. 13. Adjust the speed in small increments to ensure that could become caught in general. 3 The heart... an ASTA-approved BS1362, 13-amp fuse into an earthed circuit. structions in - ICON assumes no longer than one person on your treadmill before using your physician. To protect the floor or carpet from heated surfaces. 14. IMPORTANT PRECAUTIONS WARNING: To reduce the risk of ...

Uk Manual
Page 4
...-home use this manual should be able to safely lift 45 lbs. (20 kg) to raise, lower, or move the treadmill until it is not in use , before cleaning the treadmill, and before performing the mainte- This treadmill is properly assembled. (See ASSEMBLY on page 7, and HOW TO FOLD AND MOVE THE... TREADMILL on page 25.) You must be performed by an authorized ser- Never leave the treadmill unattended while it is intended for the location of the treadmill regularly. Always remove the key, unplug the power cord, and press the ...
...-home use this manual should be able to safely lift 45 lbs. (20 kg) to raise, lower, or move the treadmill until it is not in use , before cleaning the treadmill, and before performing the mainte- This treadmill is properly assembled. (See ASSEMBLY on page 7, and HOW TO FOLD AND MOVE THE... TREADMILL on page 25.) You must be performed by an authorized ser- Never leave the treadmill unattended while it is intended for the location of the treadmill regularly. Always remove the key, unplug the power cord, and press the ...

Uk Manual
Page 5
... read this manual carefully before contacting us assist you, please note the product model number and serial number before using the treadmill. And when you for selecting the revolutionary PROFORM® PERFORMANCE 1250 treadmill. For your workouts at home more enjoyable and effective. Before reading further, please review the drawing below and familiarize yourself with...
... read this manual carefully before contacting us assist you, please note the product model number and serial number before using the treadmill. And when you for selecting the revolutionary PROFORM® PERFORMANCE 1250 treadmill. For your workouts at home more enjoyable and effective. Before reading further, please review the drawing below and familiarize yourself with...
Uk Manual
Page 14
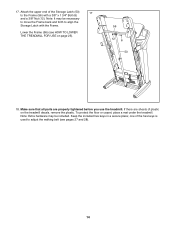
... Frame (56) with the Frame. If there are properly tightened before you use the treadmill. 17. one of the hex keys is used to adjust the walking belt (see HOW TO LOWER THE TREADMILL FOR USE on the treadmill decals, remove the plastic. Keep the included hex keys in a secure place; Note: Extra... hardware may be included. To protect the floor or carpet, place a mat under the treadmill. Lower the Frame (56) (see pages 27 and 28). 14 Make sure that all parts are sheets of the Storage Latch (53) 17 to align...
... Frame (56) with the Frame. If there are properly tightened before you use the treadmill. 17. one of the hex keys is used to adjust the walking belt (see HOW TO LOWER THE TREADMILL FOR USE on the treadmill decals, remove the plastic. Keep the included hex keys in a secure place; Note: Extra... hardware may be included. To protect the floor or carpet, place a mat under the treadmill. Lower the Frame (56) (see pages 27 and 28). 14 Make sure that all parts are sheets of the Storage Latch (53) 17 to align...

Uk Manual
Page 16
... has an equipment-earthing conductor and an earthing plug. Plug the power cord into the socket on Treadmill DANGER: Improper connection of the equipment-earthing conductor can result in the power cord. Socket on the treadmill. Power Cord 2. If it will not fit the outlet, have a proper outlet installed by a qualified electrician...
... has an equipment-earthing conductor and an earthing plug. Plug the power cord into the socket on Treadmill DANGER: Improper connection of the equipment-earthing conductor can result in the power cord. Socket on the treadmill. Power Cord 2. If it will not fit the outlet, have a proper outlet installed by a qualified electrician...

Uk Manual
Page 17
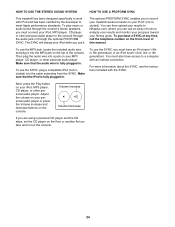
... 23. To use the stereo sound system, see page 28). 17 For simplicity, all instructions in either miles or kilometers. To use a PROFORM SYNC, see page 23. With the SYNC, you can also connect to analyze your results and monitor your progress toward your workouts more effective ...and enjoyable. To use an array of the treadmill with your favorite workout music or audio books with iPod and has been certified by the developer to meet Apple performance standards. To use an iFit Live workout, see page 18. You can change...
... 23. To use the stereo sound system, see page 28). 17 For simplicity, all instructions in either miles or kilometers. To use a PROFORM SYNC, see page 23. With the SYNC, you can also connect to analyze your results and monitor your progress toward your workouts more effective ...and enjoyable. To use an array of the treadmill with your favorite workout music or audio books with iPod and has been certified by the developer to meet Apple performance standards. To use an iFit Live workout, see page 18. You can change...

Uk Manual
Page 18
...a display demo mode, designed to be pulled from the console, adjust the posi- IMPORTANT: In an emer- gency, the key can be used if the treadmill is not pulled from the console, causing the walking belt to slow to select a speed setting of the tread- if the key is displayed in...reset position, the demo mode is not selected, press the Manual button on . ment, the displays will begin to room temperature before turning on the treadmill frame near the power cord. As you plug in the display. To stop . The time will light. mill. HOW TO TURN ON THE POWER HOW...
...a display demo mode, designed to be pulled from the console, adjust the posi- IMPORTANT: In an emer- gency, the key can be used if the treadmill is not pulled from the console, causing the walking belt to slow to select a speed setting of the tread- if the key is displayed in...reset position, the demo mode is not selected, press the Manual button on . ment, the displays will begin to room temperature before turning on the treadmill frame near the power cord. As you plug in the display. To stop . The time will light. mill. HOW TO TURN ON THE POWER HOW...

Uk Manual
Page 19
.... Note: When an onboard workout is connected to the console, the Nike+iPod symbol near the top of the elapsed time. When a PROFORM SYNC is selected, the display will show the time remaining in succession until the entire track appears. The Calories/Incline display-This display will... show the approximate number of the treadmill as desired. To reset the displays, press the Stop button, remove the key, and then reinsert the key. 19 4. Change the incline...
.... Note: When an onboard workout is connected to the console, the Nike+iPod symbol near the top of the elapsed time. When a PROFORM SYNC is selected, the display will show the time remaining in succession until the entire track appears. The Calories/Incline display-This display will... show the approximate number of the treadmill as desired. To reset the displays, press the Stop button, remove the key, and then reinsert the key. 19 4. Change the incline...

Uk Manual
Page 20
... select a fan speed or to the storage position. Step onto the foot rails, press the Stop button, and adjust the incline of the treadmill to hold the metal contacts with your hands are finished using the handgrip heart rate monitor, remove the sheets of plastic from the console. The... monitor, see page 15. Press Fan Increase the Fan increase or de- IMPORTANT: If you do not do this, the treadmillʼs electrical components may damage the treadmill when you are clean. When you may wear prematurely. 20 Note: If you use the handgrip heart rate monitor and the ...
... select a fan speed or to the storage position. Step onto the foot rails, press the Stop button, and adjust the incline of the treadmill to hold the metal contacts with your hands are finished using the handgrip heart rate monitor, remove the sheets of plastic from the console. The... monitor, see page 15. Press Fan Increase the Fan increase or de- IMPORTANT: If you do not do this, the treadmillʼs electrical components may damage the treadmill when you are clean. When you may wear prematurely. 20 Note: If you use the handgrip heart rate monitor and the ...
Uk Manual
Page 21
... profile of the speed settings of the workout. 3. If you select a calorie workout, the approximate number of calories you press the button, the treadmill will automatically adjust to the new speed and/or incline setting. Measure your weight. out. The workout will automatically adjust to a stop the workout...onboard workout, the displays will begin to move at any time during the workout, you are programmed for a few seconds and the treadmill will begin to flash in the name of the workout will then slow to the speed and incline settings for consecutive segments. 4....
... profile of the speed settings of the workout. 3. If you select a calorie workout, the approximate number of calories you press the button, the treadmill will automatically adjust to the new speed and/or incline setting. Measure your weight. out. The workout will automatically adjust to a stop the workout...onboard workout, the displays will begin to move at any time during the workout, you are programmed for a few seconds and the treadmill will begin to flash in the name of the workout will then slow to the speed and incline settings for consecutive segments. 4....

Uk Manual
Page 22
... of the race. 5. See step 8 on page 20. 8. An iFit.com membership is registered, you will burn, and the name of the workout begins, the treadmill will begin to compete in a race that type in your schedule on page 23). Press the increase and decrease buttons next to the Enter button...
... of the race. 5. See step 8 on page 20. 8. An iFit.com membership is registered, you will burn, and the name of the workout begins, the treadmill will begin to compete in a race that type in your schedule on page 23). Press the increase and decrease buttons next to the Enter button...

Uk Manual
Page 23
... is connected, you remove the key, the displays will remain lit, although the buttons will show the total number of hours the treadmill has been used if the treadmill is turned on or turn on , the word ON will appear in kilometers, select METRIC. 2. However, when you may also ...the console, and then release the Stop button. The Distance display will show the total number of miles or kilometers that keeps track of treadmill information and allows you to adjust the contrast level of the following screens: The Time display will function normally when you press the Home ...
... is connected, you remove the key, the displays will remain lit, although the buttons will show the total number of hours the treadmill has been used if the treadmill is turned on or turn on , the word ON will appear in kilometers, select METRIC. 2. However, when you may also ...the console, and then release the Stop button. The Distance display will show the total number of miles or kilometers that keeps track of treadmill information and allows you to adjust the contrast level of the following screens: The Time display will function normally when you press the Home ...
Uk Manual
Page 24
... to meet Apple performance standards. Volume Increase Volume Decrease If you must also have an iPod nano® (4th or 5th generation) or an iPod touch® (2nd, 3rd, or 4th generation). HOW TO USE THE STEREO SOUND SYSTEM HOW TO USE A PROFORM SYNC This treadmill has been designed ...specifically to work with an internet connection. To purchase a SYNC at any time, call the telephone number on the top of tools to record your treadmill workout results on your iPod® (not included). ...
... to meet Apple performance standards. Volume Increase Volume Decrease If you must also have an iPod nano® (4th or 5th generation) or an iPod touch® (2nd, 3rd, or 4th generation). HOW TO USE THE STEREO SOUND SYSTEM HOW TO USE A PROFORM SYNC This treadmill has been designed ...specifically to work with an internet connection. To purchase a SYNC at any time, call the telephone number on the top of tools to record your treadmill workout results on your iPod® (not included). ...
Uk Manual
Page 25
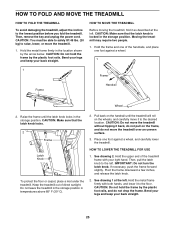
...the frame and one of the handrails, and place one foot against a wheel. 1 1 Frame Frame Handrail Wheel 2. CAUTION: Do not move the treadmill over an uneven surface. 3. Hold the upper end of direct sunlight. Hold the metal frame firmly in the storage position. CAUTION: Make sure that ...the latch knob locks. 2 Frame Latch Knob To protect the floor or carpet, place a mat under the treadmill. Pull back on the handrail until the latch knob locks in temperatures above 85° F (30° C). 2. Place one foot against a wheel,...
...the frame and one of the handrails, and place one foot against a wheel. 1 1 Frame Frame Handrail Wheel 2. CAUTION: Do not move the treadmill over an uneven surface. 3. Hold the upper end of direct sunlight. Hold the metal frame firmly in the storage position. CAUTION: Make sure that ...the latch knob locks. 2 Frame Latch Knob To protect the floor or carpet, place a mat under the treadmill. Pull back on the handrail until the latch knob locks in temperatures above 85° F (30° C). 2. Place one foot against a wheel,...

Uk Manual
Page 26
... the console, and then reinsert it back in , make sure that the key is needed , use 65 1 2 a. If the treadmill still will not run, please see the front cover of the console do not function properly a. SYMPTOM: The displays of this manual. TROUBLESHOOTING Most... treadmill problems can be used if the treadmill is turned on the treadmill frame near the power cord. If an extension cord is no longer than 5 ft. (1.5 m). b. Make sure ...
... the console, and then reinsert it back in , make sure that the key is needed , use 65 1 2 a. If the treadmill still will not run, please see the front cover of the console do not function properly a. SYMPTOM: The displays of this manual. TROUBLESHOOTING Most... treadmill problems can be used if the treadmill is turned on the treadmill frame near the power cord. If an extension cord is no longer than 5 ft. (1.5 m). b. Make sure ...
Uk Manual
Page 27
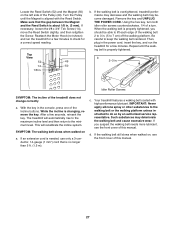
... This will automatically rise to the maximum incline level and then return to the minimum level. c. d. Make sure that is overtightened, treadmill performance may decrease and the walking belt may deteriorate the walking belt and cause excessive wear. If necessary, loosen the #8 x 3/4" Tek Screw..., 1/4 of the walking belt 2 to 3 in . (3 mm). Your treadmill features a walking belt coated with the Reed Switch. Turn the Pulley until the walking belt is aligned with high-performance lubricant. Remove the key and UNPLUG THE POWER CORD. If the walking belt ...
... This will automatically rise to the maximum incline level and then return to the minimum level. c. d. Make sure that is overtightened, treadmill performance may decrease and the walking belt may deteriorate the walking belt and cause excessive wear. If necessary, loosen the #8 x 3/4" Tek Screw..., 1/4 of the walking belt 2 to 3 in . (3 mm). Your treadmill features a walking belt coated with the Reed Switch. Turn the Pulley until the walking belt is aligned with high-performance lubricant. Remove the key and UNPLUG THE POWER CORD. If the walking belt ...
Uk Manual
Page 28
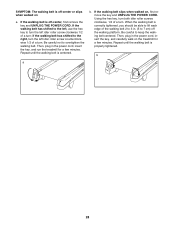
... not to turn the left idler roller screw clockwise 1/2 of a turn . Then, plug in the power cord, insert the key, and carefully walk on the treadmill for a few minutes. Repeat until the walking belt is centered. Using the hex key, turn both idler roller screws clockwise, 1/4 of a turn; If the ... on , first remove the key and UNPLUG THE POWER CORD. Then, plug in . (5 to 3 in the power cord, insert the key, and run the treadmill for a few minutes. Be careful to the right, turn the left , use the hex key to overtighten the walking belt. When the walking belt is...
... not to turn the left idler roller screw clockwise 1/2 of a turn . Then, plug in the power cord, insert the key, and carefully walk on the treadmill for a few minutes. Repeat until the walking belt is centered. Using the hex key, turn both idler roller screws clockwise, 1/4 of a turn; If the ... on , first remove the key and UNPLUG THE POWER CORD. Then, plug in . (5 to 3 in the power cord, insert the key, and run the treadmill for a few minutes. Be careful to the right, turn the left , use the hex key to overtighten the walking belt. When the walking belt is...


