
English Manual
Page 1
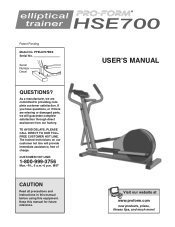
... CALL DIRECT TO OUR TOLLFREE CUSTOMER HOT LINE. USERʼS MANUAL Visit our website at www.proform.com new products, prizes, fitness tips, and much more! The trained technicians on our customer hot line will guarantee complete satisfaction through direct assistance from our factory. MST CAUTION Read all precautions and instructions in this manual before using this manual for future reference. Serial Number Decal...
... CALL DIRECT TO OUR TOLLFREE CUSTOMER HOT LINE. USERʼS MANUAL Visit our website at www.proform.com new products, prizes, fitness tips, and much more! The trained technicians on our customer hot line will guarantee complete satisfaction through direct assistance from our factory. MST CAUTION Read all precautions and instructions in this manual before using this manual for future reference. Serial Number Decal...

English Manual
Page 2
TABLE OF CONTENTS IMPORTANT PRECAUTIONS 3 BEFORE YOU BEGIN 4 PART IDENTIFICATION CHART 5 ASSEMBLY 6 HOW TO USE THE PROFORM® HSE700 9 MAINTENANCE 11 CONDITIONING GUIDELINES 12 PART LIST 14 EXPLODED DRAWING 15 HOW TO ORDER REPLACEMENT PARTS Back Cover LIMITED WARRANTY Back Cover 2
TABLE OF CONTENTS IMPORTANT PRECAUTIONS 3 BEFORE YOU BEGIN 4 PART IDENTIFICATION CHART 5 ASSEMBLY 6 HOW TO USE THE PROFORM® HSE700 9 MAINTENANCE 11 CONDITIONING GUIDELINES 12 PART LIST 14 EXPLODED DRAWING 15 HOW TO ORDER REPLACEMENT PARTS Back Cover LIMITED WARRANTY Back Cover 2
English Manual
Page 3
... begin cooling down. 13. Use the HSE700 only as described in this manual. 3. Replace any time while exercising, stop exercising on a level surface, with pre-existing health problems. Read all instructions before dismounting. 11. When mounting and dismounting the HSE700, always hold the handlebars or the T-handle and step onto and off the pedal that all users of the HSE700 are adequately...
... begin cooling down. 13. Use the HSE700 only as described in this manual. 3. Replace any time while exercising, stop exercising on a level surface, with pre-existing health problems. Read all instructions before dismounting. 11. When mounting and dismounting the HSE700, always hold the handlebars or the T-handle and step onto and off the pedal that all users of the HSE700 are adequately...

English Manual
Page 4
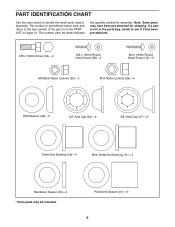
... Bottle Holder (Bottle not included) Book Holder Resistance Knob T-Handle Handlebar Upright Side Shield Pedal Disk LEFT SIDE Pedal Pedal Arm 4 BACK And the unique HSE700 features adjustable resistance, upper-body and stationary handlebars, and a multi-mode exercise monitor to a whole new world of natural, elliptical-motion exercise from your knees and ankles. The serial number can be found on your exercise. BEFORE YOU BEGIN Congratulations for the...
... Bottle Holder (Bottle not included) Book Holder Resistance Knob T-Handle Handlebar Upright Side Shield Pedal Disk LEFT SIDE Pedal Pedal Arm 4 BACK And the unique HSE700 features adjustable resistance, upper-body and stationary handlebars, and a multi-mode exercise monitor to a whole new world of natural, elliptical-motion exercise from your knees and ankles. The serial number can be found on your exercise. BEFORE YOU BEGIN Congratulations for the...
English Manual
Page 5
... (57)-2* Pedal Arm Bushing (42)-4 Rear Pedal Arm Bushing (11)-4 Handlebar Spacer (39)-2 * Extra parts may have been pre-attached for assembly. Note: Some parts may be included. The number in parenthesis below to identify the small parts used in the parts bag, check to the key number of the part, from the PART LIST on page 14. If a part is not in assembly. PART IDENTIFICATION CHART Use the chart below each part refers to...
... (57)-2* Pedal Arm Bushing (42)-4 Rear Pedal Arm Bushing (11)-4 Handlebar Spacer (39)-2 * Extra parts may have been pre-attached for assembly. Note: Some parts may be included. The number in parenthesis below to identify the small parts used in the parts bag, check to the key number of the part, from the PART LIST on page 14. If a part is not in assembly. PART IDENTIFICATION CHART Use the chart below each part refers to...
English Manual
Page 6
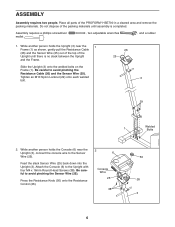
... Upright (3), connect the console wire to the Upright with four M4 x 16mm Round Head Screws (38). Feed the slack Sensor Wire (25) back down into the Upright (3). Attach the Console (6) to the Sensor Wire (25). Press the Resistance Knob (50) onto the Resistance Control (26). 2 6 Console Wire 25 38 50 26 3 6 Be careful to avoid pinching the Sensor Wire (25). Be careful to avoid pinching the Resistance Cable (26) and the Sensor Wire (25). Place all parts...
... Upright (3), connect the console wire to the Upright with four M4 x 16mm Round Head Screws (38). Feed the slack Sensor Wire (25) back down into the Upright (3). Attach the Console (6) to the Sensor Wire (25). Press the Resistance Knob (50) onto the Resistance Control (26). 2 6 Console Wire 25 38 50 26 3 6 Be careful to avoid pinching the Sensor Wire (25). Be careful to avoid pinching the Resistance Cable (26) and the Sensor Wire (25). Place all parts...
English Manual
Page 7
... (43). Note: These parts fit tightly; Repeat this step to attach the Right Pedal to the other Pedal Arm (12) to attach the other Pedal Arm (not shown). Tap a 3/4" Axle Cap (43) onto the left Crank Arm (59) to the Left Handlebar (8). Identify the Left Handlebar (8) (there is facing the Upright. Apply a thin film of the Pedal 3 Arms (12) with the Left Pedal (31) onto the...
... (43). Note: These parts fit tightly; Repeat this step to attach the Right Pedal to the other Pedal Arm (12) to attach the other Pedal Arm (not shown). Tap a 3/4" Axle Cap (43) onto the left Crank Arm (59) to the Left Handlebar (8). Identify the Left Handlebar (8) (there is facing the Upright. Apply a thin film of the Pedal 3 Arms (12) with the Left Pedal (31) onto the...

English Manual
Page 8
... tightened. Attach the T-Handle (10) to protect the floor or carpet from damage. 8 Battery Clip 54 10 55 6 Batteries 8. Make sure that the batteries are turned so the negative ends of the HSE700 are touching the springs in the battery clip. Alkaline batteries are recommended. 7 To install batteries, first locate the battery clip under the HSE700 to the Upright (3) with two 6 M6 x 16mm Screws...
... tightened. Attach the T-Handle (10) to protect the floor or carpet from damage. 8 Battery Clip 54 10 55 6 Batteries 8. Make sure that the batteries are turned so the negative ends of the HSE700 are touching the springs in the battery clip. Alkaline batteries are recommended. 7 To install batteries, first locate the battery clip under the HSE700 to the Upright (3) with two 6 M6 x 16mm Screws...

English Manual
Page 9
... move until they begin to a complete stop. HOW TO USE THE PROFORM® HSE700 HOW TO EXERCISE ON THE HSE700 To mount the HSE700, firmly hold the handlebars or the T-handle and carefully step onto the pedal that you turn the pedal disks in the opposite direction. Next, step onto the other pedal. To increase the resistance, turn the knob counterclockwise. Note: The pedal disks can adjust Resistance Knob...
... move until they begin to a complete stop. HOW TO USE THE PROFORM® HSE700 HOW TO EXERCISE ON THE HSE700 To mount the HSE700, firmly hold the handlebars or the T-handle and carefully step onto the pedal that you turn the pedal disks in the opposite direction. Next, step onto the other pedal. To increase the resistance, turn the knob counterclockwise. Note: The pedal disks can adjust Resistance Knob...

English Manual
Page 10
Distance-This mode displays the total distance you have completed, in miles. Calorie-This mode displays the approximate number of the five modes: Scan mode- BATTERY INSTALLATION Before the console can be operated, two "AA" batteries must be selected. tor will show which mode is currently displayed. Speed, time, distance, laps, or calorie mode- If the pedals are not moved and the console buttons are described below. LED Track Speed-This mode displays your current exercise speed, in order to...
Distance-This mode displays the total distance you have completed, in miles. Calorie-This mode displays the approximate number of the five modes: Scan mode- BATTERY INSTALLATION Before the console can be operated, two "AA" batteries must be selected. tor will show which mode is currently displayed. Speed, time, distance, laps, or calorie mode- If the pedals are not moved and the console buttons are described below. LED Track Speed-This mode displays your current exercise speed, in order to...
English Manual
Page 11
... replaced. STORAGE When storing the HSE700, remove the batteries from the console. MAINTENANCE Inspect and tighten all parts of the PROFORM® HSE700 regularly. To prevent damage to assembly step 7 on page 8. Keep the HSE700 in the console. Do not use abrasives or solvents. Use only a sealable water bottle in a clean, dry location, away from moisture and dust. 11 Replace any worn parts immediately. CONSOLE TROUBLE-SHOOTING If the console...
... replaced. STORAGE When storing the HSE700, remove the batteries from the console. MAINTENANCE Inspect and tighten all parts of the PROFORM® HSE700 regularly. To prevent damage to assembly step 7 on page 8. Keep the HSE700 in the console. Do not use abrasives or solvents. Use only a sealable water bottle in a clean, dry location, away from moisture and dust. 11 Replace any worn parts immediately. CONSOLE TROUBLE-SHOOTING If the console...
English Manual
Page 12
.... Then, stop exercising.) WORKOUT GUIDELINES Each workout should include the following guidelines will help you exercise. Aerobic exercise is near the smallest number in your training zone as you to plan your exercise program. CONDITIONING GUIDELINES The following three important parts: A warm-up, consisting of 5 to 10 minutes of stretching and light exercise. (See page 13.) A proper warmup increases your body temperature, heart rate, and...
.... Then, stop exercising.) WORKOUT GUIDELINES Each workout should include the following guidelines will help you exercise. Aerobic exercise is near the smallest number in your training zone as you to plan your exercise program. CONDITIONING GUIDELINES The following three important parts: A warm-up, consisting of 5 to 10 minutes of stretching and light exercise. (See page 13.) A proper warmup increases your body temperature, heart rate, and...
English Manual
Page 13
... minutes of exercising with your heart rate in your training zone. (During the first few months of the achilles tendons, bend your back leg as well. Incorrect or excessive training may plan up to your front leg, lean for 15 counts, then relax. Stretches: Hamstrings, back of stretching. Bend your health. Bring your condition, plan three workouts each leg. Move slowly...
... minutes of exercising with your heart rate in your training zone. (During the first few months of the achilles tendons, bend your back leg as well. Incorrect or excessive training may plan up to your front leg, lean for 15 counts, then relax. Stretches: Hamstrings, back of stretching. Bend your health. Bring your condition, plan three workouts each leg. Move slowly...
English Manual
Page 14
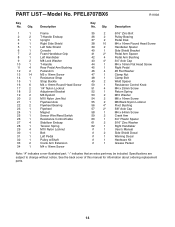
... Screw 14 1 Resistance Strap 15 1 Strap Buckle 16 6 M4 x 19mm Round Head Screw 17 2 1/4" Nylon Locknut 18 2 Adjustment Bracket 19 2 M6 Eyebolt 20 2 M10 Nylon Jam Nut 21 1 Flywheel Axle 22 2 Flywheel Bearing 23 1 Flywheel 24 1 Magnet 25 1 Sensor Wire/Reed Switch 26 1 Resistance Control/Cable 27 4 Stabilizer Endcap 28 1 Tension Spring 29 4 M10 Nylon Locknut 30 1 Belt 31 1 Left Pedal 32 1 Pulley w/Shaft 33 2 Crank Arm Extension...
... Screw 14 1 Resistance Strap 15 1 Strap Buckle 16 6 M4 x 19mm Round Head Screw 17 2 1/4" Nylon Locknut 18 2 Adjustment Bracket 19 2 M6 Eyebolt 20 2 M10 Nylon Jam Nut 21 1 Flywheel Axle 22 2 Flywheel Bearing 23 1 Flywheel 24 1 Magnet 25 1 Sensor Wire/Reed Switch 26 1 Resistance Control/Cable 27 4 Stabilizer Endcap 28 1 Tension Spring 29 4 M10 Nylon Locknut 30 1 Belt 31 1 Left Pedal 32 1 Pulley w/Shaft 33 2 Crank Arm Extension...

English Manual
Page 15
PFEL8707BX6 4 58 50 R1100A 13 13 56 57 42 39 43 12 14 76 51 56 49 51 26 25 56 62 57 56 38 13 38 5 8 2 16 13 49 38 30 43 45 42 3 38 54 38 29 42 16 2 39 17 12 43 10 55 31 1 18 20 41 27 22 17 18 19 22 53 11 53 19 28 21 20 24 23 47 9 13 52 48 46 35 59 61 34 27 11 41 25 11 43 33 32 13 59 35 9 61 60 36 33 36 40 13 44 15 37 27 27 37 15 EXPLODED DRAWING-Model No.
PFEL8707BX6 4 58 50 R1100A 13 13 56 57 42 39 43 12 14 76 51 56 49 51 26 25 56 62 57 56 38 13 38 5 8 2 16 13 49 38 30 43 45 42 3 38 54 38 29 42 16 2 39 17 12 43 10 55 31 1 18 20 41 27 22 17 18 19 22 53 11 53 19 28 21 20 24 23 47 9 13 52 48 46 35 59 61 34 27 11 41 25 11 43 33 32 13 59 35 9 61 60 36 33 36 40 13 44 15 37 27 27 37 15 EXPLODED DRAWING-Model No.
English Manual
Page 16
... of its authorized service centers with respect to products used as store displays. You may not apply to you , please be free from page 14 of ICON Health & Fitness, Inc. Mountain Time (excluding holidays). LIMITED WARRANTY ICON Health & Fitness, Inc. (ICON) warrants this manual). • The KEY NUMBER and DESCRIPTION of the part(s) from defects in its scope and duration to the terms set forth above limitation may also...
... of its authorized service centers with respect to products used as store displays. You may not apply to you , please be free from page 14 of ICON Health & Fitness, Inc. Mountain Time (excluding holidays). LIMITED WARRANTY ICON Health & Fitness, Inc. (ICON) warrants this manual). • The KEY NUMBER and DESCRIPTION of the part(s) from defects in its scope and duration to the terms set forth above limitation may also...


