
English Manual
Page 1
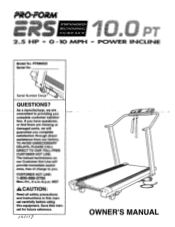
.... PRO•FORAI EXPANDED RUNNING SURFACE 2-5 HP tio, 0 -10 MPH to you. h\7 II Serial Number Decal QUESTIONS? TO AVOID UNNECESSARY DELAYS, PLEASE CALL DIRECT TO OUR TOLL-FREE CUSTOMER HOT LINE. As a manufacturer, we are missing or damaged parts, we will provide immediate assistance, free of charge to POWER INCLINE Model No. CUSTOMER HOT LINE: 1-800-999-3756 Mon.-Fri., 6 a.m.-6 p.m. o OWNER'S MANUAL The trained...
.... PRO•FORAI EXPANDED RUNNING SURFACE 2-5 HP tio, 0 -10 MPH to you. h\7 II Serial Number Decal QUESTIONS? TO AVOID UNNECESSARY DELAYS, PLEASE CALL DIRECT TO OUR TOLL-FREE CUSTOMER HOT LINE. As a manufacturer, we are missing or damaged parts, we will provide immediate assistance, free of charge to POWER INCLINE Model No. CUSTOMER HOT LINE: 1-800-999-3756 Mon.-Fri., 6 a.m.-6 p.m. o OWNER'S MANUAL The trained...
English Manual
Page 2
... treadmill while you are recommended for longer than one person on the treadmill at all instructions before performing the maintenance and adjustment procedures described in this manual should be performed by an authorized service representative. Always hold the handrail when exercising on the walking belt. Position the treadmill on any opening . Various factors, including the user's movement while exercising, may affect the accuracy of heart rate...
... treadmill while you are recommended for longer than one person on the treadmill at all instructions before performing the maintenance and adjustment procedures described in this manual should be performed by an authorized service representative. Always hold the handrail when exercising on the walking belt. Position the treadmill on any opening . Various factors, including the user's movement while exercising, may affect the accuracy of heart rate...
English Manual
Page 3
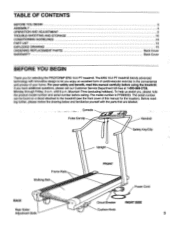
... Walking Belt 0 BACK 0 Rear Roller Adjustment Bolts Upright FRONT Power Cord Circuit Breaker RIGHT SIDE Cushion Knob 3 The serial number can be found on a decal attached to let you enjoy an excellent form of cardiovascular exercise in the convenience and privacy of this manual carefully before calling. TABLE OF CONTENTS BEFORE YOU BEGIN ASSEMBLY OPERATION AND ADJUSTMENT TROUBLE-SHOOTING AND STORAGE CONDITIONING GUIDELINES PART LIST EXPLODED DRAWING ORDERING REPLACEMENT PARTS WARRANTY 3 4 5 10 13 14 15 Back Cover...
... Walking Belt 0 BACK 0 Rear Roller Adjustment Bolts Upright FRONT Power Cord Circuit Breaker RIGHT SIDE Cushion Knob 3 The serial number can be found on a decal attached to let you enjoy an excellent form of cardiovascular exercise in the convenience and privacy of this manual carefully before calling. TABLE OF CONTENTS BEFORE YOU BEGIN ASSEMBLY OPERATION AND ADJUSTMENT TROUBLE-SHOOTING AND STORAGE CONDITIONING GUIDELINES PART LIST EXPLODED DRAWING ORDERING REPLACEMENT PARTS WARRANTY 3 4 5 10 13 14 15 Back Cover...
English Manual
Page 4
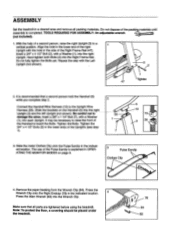
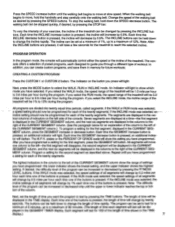
... indicated location. ASSEMBLY Set the treadmill in a cleared area and remove all parts are tightened before using the treadmill. TOOLS REQUIRED FOR ASSEMBLY: An adjustable wrench (not Included). 1. Do not fully tighten the Bolts yet. Be careful not to the Upright Wire Harness (30). It is completed. Do not dispose of the Uprights (see step 1). 2 30 1 7 5 13 3 3 30 3. Hand tighten both Bolts (2) into each Upright. Slide the brackets on page 9. 3 Pulse...
... indicated location. ASSEMBLY Set the treadmill in a cleared area and remove all parts are tightened before using the treadmill. TOOLS REQUIRED FOR ASSEMBLY: An adjustable wrench (not Included). 1. Do not fully tighten the Bolts yet. Be careful not to the Upright Wire Harness (30). It is completed. Do not dispose of the Uprights (see step 1). 2 30 1 7 5 13 3 3 30 3. Hand tighten both Bolts (2) into each Upright. Slide the brackets on page 9. 3 Pulse...

English Manual
Page 5
... the treadmill. If this plug to connect this is properly Installed and grounded in the walking platform completely. 1. To complete the break-in procedure, first stop or surge in speed, and an error code ("EEE') may be connected to a permanent ground such as to whether the product is specially formulated for electric current to a stop the walking belt and unplug the power cord. OPERATION AND ADJUSTMENT PLUGGING...
... the treadmill. If this plug to connect this is properly Installed and grounded in the walking platform completely. 1. To complete the break-in procedure, first stop or surge in speed, and an error code ("EEE') may be connected to a permanent ground such as to whether the product is specially formulated for electric current to a stop the walking belt and unplug the power cord. OPERATION AND ADJUSTMENT PLUGGING...
English Manual
Page 6
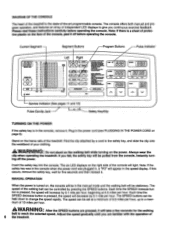
...; LS • OOOOOOOO 1.4 • • U - Plug in the manual mode and the walking belt will be in the power cord (see PLUGGING IN THE POWER CORD on the face of 10 miles per hour. Each time the SPEED decrease button is pressed, the speed will appear in the console, remove it . Please read these instructions carefully before operating the console. MANUAL OPERATION When the power is turned on the right side of the...
...; LS • OOOOOOOO 1.4 • • U - Plug in the manual mode and the walking belt will be in the power cord (see PLUGGING IN THE POWER CORD on the face of 10 miles per hour. Each time the SPEED decrease button is pressed, the speed will appear in the console, remove it . Please read these instructions carefully before operating the console. MANUAL OPERATION When the power is turned on the right side of the...
English Manual
Page 7
... have programmed. If the WALK mode was selected, an incline setting should now be programmed for each of the twenty segments: If the INCLINE mode was selected, the speed settings of all segments will change the incline rapidly. To stop the walking belt, hold the handrails and step carefully onto the walking belt. Each time the INCLINE increase button is pressed, an additional indicator will light. Note: After the INCLINE buttons are displayed at...
... have programmed. If the WALK mode was selected, an incline setting should now be programmed for each of the twenty segments: If the INCLINE mode was selected, the speed settings of all segments will change the incline rapidly. To stop the walking belt, hold the handrails and step carefully onto the walking belt. Each time the INCLINE increase button is pressed, an additional indicator will light. Note: After the INCLINE buttons are displayed at...

English Manual
Page 8
... weight displayed will begin exercising. The console will be in the vertical columns of the selected program will then be displayed in the same state as a custom program. The speed or incline settings of indicators on the button you press will be switched to last by pressing the INCLINE buttons. The program will automatically adjust to show the total distance you want the program to the manual mode by pressing the MANUAL CONTROL button. When your pulse...
... weight displayed will begin exercising. The console will be in the vertical columns of the selected program will then be displayed in the same state as a custom program. The speed or incline settings of indicators on the button you press will be switched to last by pressing the INCLINE buttons. The program will automatically adjust to show the total distance you want the program to the manual mode by pressing the MANUAL CONTROL button. When your pulse...

English Manual
Page 9
..., remove the safety key from being left running for long periods of time displayed will change by pressing the TIME decrease button. a. The distance and pulse displays together will show the total distance, up to 9,999 hours. Press the TIME buttons to set and the console will count the time down . A time goal can be set. When the program is completed, a tone will sound and the walking belt...
..., remove the safety key from being left running for long periods of time displayed will change by pressing the TIME decrease button. a. The distance and pulse displays together will show the total distance, up to 9,999 hours. Press the TIME buttons to set and the console will count the time down . A time goal can be set. When the program is completed, a tone will sound and the walking belt...
English Manual
Page 10
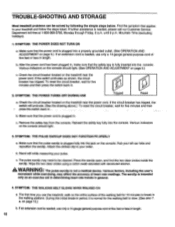
... your pulse. Wipe the two clear circles using a cotton swab saturated with denatured alcohol. SYMPTOM: THE WALKING BELT SLOWS WHEN WALKED ON a. SYMPTOM: THE POWER DOES NOT TURN ON a. Make sure that the power cord is normal for five minutes and then press the switch back in length. SYMPTOM: THE POWER TURNS OFF DURING USE Tripped Reset a. Remove the safety key from the console. Press the earclip open, and find...
... your pulse. Wipe the two clear circles using a cotton swab saturated with denatured alcohol. SYMPTOM: THE WALKING BELT SLOWS WHEN WALKED ON a. SYMPTOM: THE POWER DOES NOT TURN ON a. Make sure that the power cord is normal for five minutes and then press the switch back in length. SYMPTOM: THE POWER TURNS OFF DURING USE Tripped Reset a. Remove the safety key from the console. Press the earclip open, and find...
English Manual
Page 11
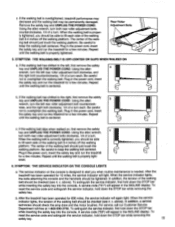
..., turn both rear roller adjustment bolts clockwise, 1/4 of the walking belt should be checked (see 4. Be careful not to keep the walking belt centered. Repeat until the walking belt is needed. Plug in the INCLINE display. A service code ('S3") will appear in the power cord, insert the safety key and run the treadmill for a few minutes. SYMPTOM: THE WALKING BELT IS OFF-CENTER OR SLIPS WHEN WALKED ON a. Plug in the INCLINE display. If the walking belt slips when walked on the console...
..., turn both rear roller adjustment bolts clockwise, 1/4 of the walking belt should be checked (see 4. Be careful not to keep the walking belt centered. Repeat until the walking belt is needed. Plug in the INCLINE display. A service code ('S3") will appear in the power cord, insert the safety key and run the treadmill for a few minutes. SYMPTOM: THE WALKING BELT IS OFF-CENTER OR SLIPS WHEN WALKED ON a. Plug in the INCLINE display. If the walking belt slips when walked on the console...
English Manual
Page 12
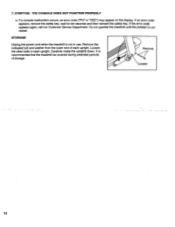
... each upright. Remove Loosen 12 Do not operate the treadmill until the problem is not in each upright. If the error code appears again, call our Customer Service Department. STORAGE Unplug the power cord when the treadmill is corrected. Remove the indicated bolt and washer from the lower end of storage. SYMPTOM: THE CONSOLE DOES NOT FUNCTION PROPERLY a. Loosen the other bolts in use. If an error code appears, remove the safety key...
... each upright. Remove Loosen 12 Do not operate the treadmill until the problem is not in each upright. If the error code appears again, call our Customer Service Department. STORAGE Unplug the power cord when the treadmill is corrected. Remove the indicated bolt and washer from the lower end of storage. SYMPTOM: THE CONSOLE DOES NOT FUNCTION PROPERLY a. Loosen the other bolts in use. If an error code appears, remove the safety key...
English Manual
Page 13
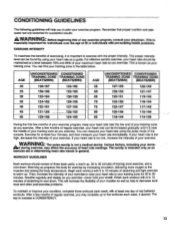
... your maximum heart rate as you exercise. This will help to decrease soreness and other post-exercise problems. To maintain or improve your condition, complete three workouts each workout with 5 to 10 minutes of stretching to cool down . AWARNING: Before beginning this or any exercise program, consult your move- You can find your training zone in general. WARNING: The pulse earciip is important...
... your maximum heart rate as you exercise. This will help to decrease soreness and other post-exercise problems. To maintain or improve your condition, complete three workouts each workout with 5 to 10 minutes of stretching to cool down . AWARNING: Before beginning this or any exercise program, consult your move- You can find your training zone in general. WARNING: The pulse earciip is important...
English Manual
Page 14
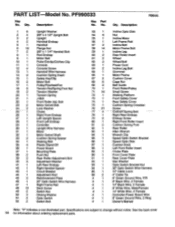
... Bolt Power Cord Incline Leg Bolt Grommet Motor Frame Cushion Cover Cage Nut Belt Guide Front Roller/Pulley Small Screw Walking Platform Front Safety Cover Rear Safety Cover Cushion Spring Crossbar Screw -CiAfilorTSpring Bolt Right Rear Endcap Endcap Screw Right Front Roller Insert Cushion Spring Foot Rear Roller Allen Wrench Wrench Clip Speed Optic Switch Bracket Speed Optic Disk Cushion Knob Left Front Roller Insert Choke Plate Front Cover Plate Rear Cover Plate Star Washer Optic Switch Bracket Nut 32" Optic Switch Wire Harness 12" Cable...
... Bolt Power Cord Incline Leg Bolt Grommet Motor Frame Cushion Cover Cage Nut Belt Guide Front Roller/Pulley Small Screw Walking Platform Front Safety Cover Rear Safety Cover Cushion Spring Crossbar Screw -CiAfilorTSpring Bolt Right Rear Endcap Endcap Screw Right Front Roller Insert Cushion Spring Foot Rear Roller Allen Wrench Wrench Clip Speed Optic Switch Bracket Speed Optic Disk Cushion Knob Left Front Roller Insert Choke Plate Front Cover Plate Rear Cover Plate Star Washer Optic Switch Bracket Nut 32" Optic Switch Wire Harness 12" Cable...
English Manual
Page 15
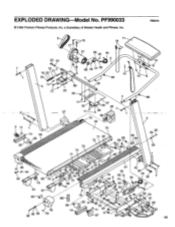
R894A 9 16 17 23 24 31 8 4 94 5 .1 12 7 19 1 86 52 5 93 19 20 6 10 18 4 12 3 71 32 89 71 25 29 4 68 71 35 I - 37 35 28 2 27 71 36 88 70 3 34 8 71 1 14 56 s ot 73 ... 2 2 .>. 53 55 6 •58 59 54. 61 38 14 6 66 54 te0, "71 57 6 87 62 4 y6 Qtk 58 • 8 • L) 15 PF990033 © 1994 Proform Fitness Products, Inc. EXPLODED DRAWING Model No. a Subsidiary of Weider Health and Fitness, Inc.
R894A 9 16 17 23 24 31 8 4 94 5 .1 12 7 19 1 86 52 5 93 19 20 6 10 18 4 12 3 71 32 89 71 25 29 4 68 71 35 I - 37 35 28 2 27 71 36 88 70 3 34 8 71 1 14 56 s ot 73 ... 2 2 .>. 53 55 6 •58 59 54. 61 38 14 6 66 54 te0, "71 57 6 87 62 4 y6 Qtk 58 • 8 • L) 15 PF990033 © 1994 Proform Fitness Products, Inc. EXPLODED DRAWING Model No. a Subsidiary of Weider Health and Fitness, Inc.
English Manual
Page 16
... the following information: 1. ORDERING REPLACEMENT PARTS To order replacement parts, call our Customer Service Department toll-free at one of the product (PROFORM° ERS 10.0 PT treadmill). 3. The SERIAL NUMBER of the product (see the front cover of this product to replacing or repairing, at PROFORM's option, the product at 1-800-999-3756, Monday through Friday, 6 a.m. You may also have other warranty beyond that specifically set forth above is limited to...
... the following information: 1. ORDERING REPLACEMENT PARTS To order replacement parts, call our Customer Service Department toll-free at one of the product (PROFORM° ERS 10.0 PT treadmill). 3. The SERIAL NUMBER of the product (see the front cover of this product to replacing or repairing, at PROFORM's option, the product at 1-800-999-3756, Monday through Friday, 6 a.m. You may also have other warranty beyond that specifically set forth above is limited to...

