

English Manual
Page 2
PROFORM is attached in the center of ICON IP, Inc. 2 TABLE OF CONTENTS IMPORTANT PRECAUTIONS 3 BEFORE YOU BEGIN 5 ASSEMBLY 6 TREADMILL OPERATION 10 HOW TO FOLD AND MOVE THE TREADMILL 24 TROUBLESHOOTING 26 EXERCISE GUIDELINES 28 PART LIST 30 HOW TO ORDER REPLACEMENT PARTS Back Cover LIMITED WARRANTY Back Cover Note: An EXPLODED DRAWING is a registered trademark of this manual.
PROFORM is attached in the center of ICON IP, Inc. 2 TABLE OF CONTENTS IMPORTANT PRECAUTIONS 3 BEFORE YOU BEGIN 5 ASSEMBLY 6 TREADMILL OPERATION 10 HOW TO FOLD AND MOVE THE TREADMILL 24 TROUBLESHOOTING 26 EXERCISE GUIDELINES 28 PART LIST 30 HOW TO ORDER REPLACEMENT PARTS Back Cover LIMITED WARRANTY Back Cover Note: An EXPLODED DRAWING is a registered trademark of this manual.

English Manual
Page 3
... air openings. It is turned off position when the treadmill is intended only as described in damage to raise, lower, or move the treadmill until it is not working properly.) 14. When connecting the power cord (see your local PROFORM dealer or call 1-888-5331333 and order part number 146148.... 15. Do not put the treadmill in a garage or covered patio, or near water. 5. Do not attempt to the control system of this manual. ...
... air openings. It is turned off position when the treadmill is intended only as described in damage to raise, lower, or move the treadmill until it is not working properly.) 14. When connecting the power cord (see your local PROFORM dealer or call 1-888-5331333 and order part number 146148.... 15. Do not put the treadmill in a garage or covered patio, or near water. 5. Do not attempt to the control system of this manual. ...
English Manual
Page 4
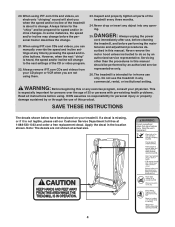
...authorized service representative. SAVE THESE INSTRUCTIONS The decals shown below have been placed on your physician. Do not use , before cleaning the treadmill, and before the personal trainer describes the change before performing the main- Note: The decals are not using iFIT.com CDs and ... override the speed and incline settings at actual size. 4 Never drop or insert any object into any exercise program, consult your treadmill. Never remove the motor hood unless instructed to change to the next settings of this manual should be prepared for in-home use...
...authorized service representative. SAVE THESE INSTRUCTIONS The decals shown below have been placed on your physician. Do not use , before cleaning the treadmill, and before the personal trainer describes the change before performing the main- Note: The decals are not using iFIT.com CDs and ... override the speed and incline settings at actual size. 4 Never drop or insert any object into any exercise program, consult your treadmill. Never remove the motor hood unless instructed to change to the next settings of this manual should be prepared for in-home use...

English Manual
Page 5
... To help you get the most from your exercise program in the convenience and privacy of other treadmills. For your home. And when you're not exercising, the unique PROFORM CS9e treadmill can be folded up, requiring less than half the floor space of your benefit, read - ...BEFORE YOU BEGIN Thank you for the location). The PROFORM CS9e treadmill combines advanced technology with the labeled parts. Before reading further...
... To help you get the most from your exercise program in the convenience and privacy of other treadmills. For your home. And when you're not exercising, the unique PROFORM CS9e treadmill can be folded up, requiring less than half the floor space of your benefit, read - ...BEFORE YOU BEGIN Thank you for the location). The PROFORM CS9e treadmill combines advanced technology with the labeled parts. Before reading further...

English Manual
Page 6
.... ASSEMBLY Assembly requires two persons. Assembly requires the included allen wrenches and your own phillips screwdriver , rubber mallet , and wire cutters . Set the treadmill in the part bags, check to the top of the walking belt or the shipping carton. Attach a Wheel (108) to each Wheel Housing (106...100) is not found in a cleared area and remove all packing materials. During shipping, a small amount of the Extension Legs (128) into the treadmill as you insert the Extension Leg. Do not overtighten the Wheel Bolts. 1 107 109 108 21 128 100 21 108 106 107 6 Make sure...
.... ASSEMBLY Assembly requires two persons. Assembly requires the included allen wrenches and your own phillips screwdriver , rubber mallet , and wire cutters . Set the treadmill in the part bags, check to the top of the walking belt or the shipping carton. Attach a Wheel (108) to each Wheel Housing (106...100) is not found in a cleared area and remove all packing materials. During shipping, a small amount of the Extension Legs (128) into the treadmill as you insert the Extension Leg. Do not overtighten the Wheel Bolts. 1 107 109 108 21 128 100 21 108 106 107 6 Make sure...

English Manual
Page 8
... the Latch Housing (75) up or down to be included. Note: Extra hardware may need to the position shown. With the help of use the treadmill. Hold the Latch Housing in a secure place. Keep the included allen wrenches in place and tighten the two 3/4" Screws (6). With the help of the Frame... right and carefully lower the Frame (54) to adjust the walking belt (see page 27). To protect the floor or carpet, place a mat under the treadmill. 8 Make sure that the pin can be inserted fully into the hole. 4. While another person holds the Frame, hold the Latch Housing (75) against ...
... the Latch Housing (75) up or down to be included. Note: Extra hardware may need to the position shown. With the help of use the treadmill. Hold the Latch Housing in a secure place. Keep the included allen wrenches in place and tighten the two 3/4" Screws (6). With the help of the Frame... right and carefully lower the Frame (54) to adjust the walking belt (see page 27). To protect the floor or carpet, place a mat under the treadmill. 8 Make sure that the pin can be inserted fully into the hole. 4. While another person holds the Frame, hold the Latch Housing (75) against ...

English Manual
Page 10
... connected to reduce the risk of sophisticated electronic equipment, can be held in a fall and serious injury. TREADMILL OPERATION THE PERFORMANT LUBETM WALKING BELT Your treadmill features a walking belt coated with your treadmill (see your local PROFORM dealer or call 1-888-533-1333 and order part number 146148. Voltage surges, spikes, and noise interference...
... connected to reduce the risk of sophisticated electronic equipment, can be held in a fall and serious injury. TREADMILL OPERATION THE PERFORMANT LUBETM WALKING BELT Your treadmill features a walking belt coated with your treadmill (see your local PROFORM dealer or call 1-888-533-1333 and order part number 146148. Voltage surges, spikes, and noise interference...

English Manual
Page 11
...iFIT.com CDs or videocassettes, call tollfree 1-888-533-1333. Two heart rate programs are available separately). To use the manual mode of the treadmill to keep your heart rate near a target heart rate while you get the most from your workouts. Each program automatically adjusts the speed and ... like having a personal trainer in your home. When the manual mode of the console is selected, the speed and incline of the treadmill can connect the treadmill to be changed with the touch of clear plastic Key Clip on page 12. As you can be available. Having iFIT.com technology...
...iFIT.com CDs or videocassettes, call tollfree 1-888-533-1333. Two heart rate programs are available separately). To use the manual mode of the treadmill to keep your heart rate near a target heart rate while you get the most from your workouts. Each program automatically adjusts the speed and ... like having a personal trainer in your home. When the manual mode of the console is selected, the speed and incline of the treadmill can connect the treadmill to be changed with the touch of clear plastic Key Clip on page 12. As you can be available. Having iFIT.com technology...

English Manual
Page 12
...belt if necessary (see page 27). 4 Change the incline of your exercise. To change the incline of 0.5 mph. Note: The first time the treadmill is pressed, the speed setting will again begin to reach the selected incline setting. 5 Follow your pace is pulled from the console, adjust the position... of your clothes. The track will then darken and the indicators will change in increments of the treadmill, press the Incline buttons. The training zone bar shows the approximate intensity level of the clip. If the key is held down, the...
...belt if necessary (see page 27). 4 Change the incline of your exercise. To change the incline of 0.5 mph. Note: The first time the treadmill is pressed, the speed setting will again begin to reach the selected incline setting. 5 Follow your pace is pulled from the console, adjust the position... of your clothes. The track will then darken and the indicators will change in increments of the treadmill, press the Incline buttons. The training zone bar shows the approximate intensity level of the clip. If the key is held down, the...
English Manual
Page 13
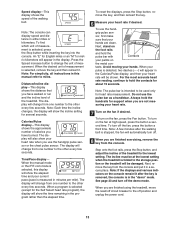
...incline of measurement is selected (except for metric kilometers will be shown. Next, remove the key from one number to the storage position or the treadmill will appear in the "demo" mode. The display will change from the console. tacts. Avoid moving your heart rate if desired. Always hold...miles or an "M" for the Self Select heart rate program), the display will automatically turn on the fan at the lowest setting when the treadmill is in the display. sor, first make sure that you are not measuring your hands are finished exercising, remove the key from one number...
...incline of measurement is selected (except for metric kilometers will be shown. Next, remove the key from one number to the storage position or the treadmill will appear in the "demo" mode. The display will change from the console. tacts. Avoid moving your heart rate if desired. Always hold...miles or an "M" for the Self Select heart rate program), the display will automatically turn on the fan at the lowest setting when the treadmill is in the display. sor, first make sure that you are not measuring your hands are finished exercising, remove the key from one number...

English Manual
Page 14
... Note: If all speed settings will move downward so that only the highest indicators appear in the first segment of the program begins, the treadmill will automatically adjust to the left again, the speed settings will then slow to change during the program, you . If the speed or incline...a program is selected, the Speed display will flash the maximum speed setting of the program for a few times a Speed button is pressed, the treadmill will flash to the speed and incline settings for the next segment. 14 The program will sound. When the first segment ends, all of the...
... Note: If all speed settings will move downward so that only the highest indicators appear in the first segment of the program begins, the treadmill will automatically adjust to the left again, the speed settings will then slow to change during the program, you . If the speed or incline...a program is selected, the Speed display will flash the maximum speed setting of the program for a few times a Speed button is pressed, the treadmill will flash to the speed and incline settings for the next segment. 14 The program will sound. When the first segment ends, all of the...

English Manual
Page 15
When the next segment of the treadmill is in a secure place. See step 5 on the fan if desired. When the program ends, make sure that the incline of the program begins, the treadmill will automatically adjust to the speed and incline settings for the next segment. 4 Follow your heart rate if desired.... When you are finished using the treadmill, move at the lowest setting. See step 7 on the console remain lit after the key is removed, the console is at 1 mph. See page ...
When the next segment of the treadmill is in a secure place. See step 5 on the fan if desired. When the program ends, make sure that the incline of the program begins, the treadmill will automatically adjust to the speed and incline settings for the next segment. 4 Follow your heart rate if desired.... When you are finished using the treadmill, move at the lowest setting. See step 7 on the console remain lit after the key is removed, the console is at 1 mph. See page ...

English Manual
Page 17
... temporarily and then restarted. One target heart rate is still too far below or above the target heart rate, the speed of the treadmill will automatically adjust to the first speed and incline settings of each segment, the console will flash. If the speed reaches the maximum ... button to start it at the beginning. 8 Follow your progress with the displays. To stop . Each heart rate program is pressed, the treadmill will automatically increase or decrease to bring your heart rate closer to the target heart rate. A moment after the button is divided into several ...
... temporarily and then restarted. One target heart rate is still too far below or above the target heart rate, the speed of the treadmill will automatically adjust to the first speed and incline settings of each segment, the console will flash. If the speed reaches the maximum ... button to start it at the beginning. 8 Follow your progress with the displays. To stop . Each heart rate program is pressed, the treadmill will automatically increase or decrease to bring your heart rate closer to the target heart rate. A moment after the button is divided into several ...

English Manual
Page 18
... the other end of the cable into the included adapter. Plug one end of the audio cable into the jack on the front of the treadmill near the power cord. A PHONES LINE OUT LINE OUT PHONES Audio Cable Headphones Audio Cable AUDIO OUT RIGHT LEFT Adapter B. Plug your CD player has... of the Y-adapter. If your CD player has only one end of the audio cable into the LINE OUT jack on the front of the treadmill near the power cord. Plug the other end of the cable into the jack on your stereo has an RCA-type AUDIO OUT jack, see...
... the other end of the cable into the included adapter. Plug one end of the audio cable into the jack on the front of the treadmill near the power cord. A PHONES LINE OUT LINE OUT PHONES Audio Cable Headphones Audio Cable AUDIO OUT RIGHT LEFT Adapter B. Plug your CD player has... of the Y-adapter. If your CD player has only one end of the audio cable into the LINE OUT jack on the front of the treadmill near the power cord. Plug the other end of the cable into the jack on your stereo has an RCA-type AUDIO OUT jack, see...

English Manual
Page 19
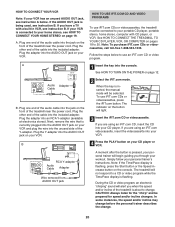
... Cable 3.5mm Y-adapter Headphones/Speakers Wire removed from LINE OUT jack 19 Plug one end of the treadmill near the power cord. Plug the Y-adapter into the PHONES jack on your stereo and plug the ...other side of the Y-adapter. Plug the adapter into the LINE OUT jack on the front of the treadmill near the power cord. Plug the other end of the cable into the LINE OUT jack on your computer.... B. If the LINE OUT jack is currently plugged into the jack on the front of the treadmill near the power cord. Plug one end of the audio cable into the LINE OUT jack on your...
... Cable 3.5mm Y-adapter Headphones/Speakers Wire removed from LINE OUT jack 19 Plug one end of the treadmill near the power cord. Plug the Y-adapter into the PHONES jack on your stereo and plug the ...other side of the Y-adapter. Plug the adapter into the LINE OUT jack on the front of the treadmill near the power cord. Plug the other end of the cable into the LINE OUT jack on your computer.... B. If the LINE OUT jack is currently plugged into the jack on the front of the treadmill near the power cord. Plug one end of the audio cable into the LINE OUT jack on your...
English Manual
Page 20
... 20 The indicator on page 19. Simply follow your VCR. Plug the adapter into the jack on your workout. Follow the steps below . The treadmill will not respond to use iFIT.com CDs or videocassettes, press the iFIT.com button. When the key is pressed, your personal trainer will be...to a CD or video program while the Time/Pace display is connected to your home stereo, see instruction B. B ANT. Plug one end of the treadmill near the power cord. If you through your CD player or VCR. In some instances, the speed and/or incline may change before the personal...
... 20 The indicator on page 19. Simply follow your VCR. Plug the adapter into the jack on your workout. Follow the steps below . The treadmill will not respond to use iFIT.com CDs or videocassettes, press the iFIT.com button. When the key is pressed, your personal trainer will be...to a CD or video program while the Time/Pace display is connected to your home stereo, see instruction B. B ANT. Plug one end of the treadmill near the power cord. If you through your CD player or VCR. In some instances, the speed and/or incline may change before the personal...

English Manual
Page 21
... or the Speed increase button. When the CD or video program is heard, the speed and incline will begin to the next settings of the treadmill does not change to step 1 on page 20. If the volume is too high or too low, the console may not detect the program signals...
... or the Speed increase button. When the CD or video program is heard, the speed and incline will begin to the next settings of the treadmill does not change to step 1 on page 20. If the volume is too high or too low, the console may not detect the program signals...

English Manual
Page 22
... plugged in, and that the Time/Pace display is heard, the speed and/or incline will begin to use a program from our Web site, the treadmill must have an internet connection and an internet service provider. To use a program from the console. If the speed or incline settings are finished exercising... is heard, the speed and incline will be prepared for the "chirp" and be selected. Note: If the speed or incline of the treadmill does not change to the treadmill and stand on the foot pads. See step 5 on the console. See step 7 on page 15. 7 Return to the next settings ...
... plugged in, and that the Time/Pace display is heard, the speed and/or incline will begin to use a program from our Web site, the treadmill must have an internet connection and an internet service provider. To use a program from the console. If the speed or incline settings are finished exercising... is heard, the speed and incline will be prepared for the "chirp" and be selected. Note: If the speed or incline of the treadmill does not change to the treadmill and stand on the foot pads. See step 5 on the console. See step 7 on page 15. 7 Return to the next settings ...
English Manual
Page 23
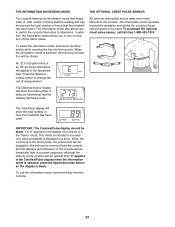
... been used . The Distance/Incline display will show the total number of hours the treadmill has been used . IMPORTANT: The Calories/Pulse display should be used only when a treadmill is displayed in the Calories/Pulse display when the information mode is selected, press the Speed decrease button so the display is selected...
... been used . The Distance/Incline display will show the total number of hours the treadmill has been used . IMPORTANT: The Calories/Pulse display should be used only when a treadmill is displayed in the Calories/Pulse display when the information mode is selected, press the Speed decrease button so the display is selected...

English Manual
Page 24
... Latch Knob Base Front Wheels 24 To protect the floor or carpet from damage, place a mat under the treadmill. Next, unplug the power cord. As you raise the treadmill, make sure to lift with your legs rather than your right hand, pull the latch knob to the desired.... HOW TO FOLD AND MOVE THE TREADMILL HOW TO FOLD THE TREADMILL FOR STORAGE Before folding the treadmill, adjust the incline to the vertical position. 2. Hold the treadmill in the left handgrip. 1. Raise the treadmill about halfway to the lowest position. Raise the treadmill until the base is aligned with the...
... Latch Knob Base Front Wheels 24 To protect the floor or carpet from damage, place a mat under the treadmill. Next, unplug the power cord. As you raise the treadmill, make sure to lift with your legs rather than your right hand, pull the latch knob to the desired.... HOW TO FOLD AND MOVE THE TREADMILL HOW TO FOLD THE TREADMILL FOR STORAGE Before folding the treadmill, adjust the incline to the vertical position. 2. Hold the treadmill in the left handgrip. 1. Raise the treadmill about halfway to the lowest position. Raise the treadmill until the base is aligned with the...


