
Canadian English Manual
Page 3
It is not a medical device. Do not put the treadmill in speed. 18. The treadmill should be able to safely lift 45 pounds (20 kg) to raise, lower, or move the walking belt while the power is capable of high speeds. Read, understand, and test the emergency stop unexpectedly,... surge suppressor that blocks air openings. Always remove the key and unplug the power cord when the treadmill is damaged, the walking belt may change speed, accelerate, or stop procedure before operating the treadmill. 1. Keep children under the age of 12 and pets away from damage, place a mat under...
It is not a medical device. Do not put the treadmill in speed. 18. The treadmill should be able to safely lift 45 pounds (20 kg) to raise, lower, or move the walking belt while the power is capable of high speeds. Read, understand, and test the emergency stop unexpectedly,... surge suppressor that blocks air openings. Always remove the key and unplug the power cord when the treadmill is damaged, the walking belt may change speed, accelerate, or stop procedure before operating the treadmill. 1. Keep children under the age of 12 and pets away from damage, place a mat under...
Canadian English Manual
Page 5
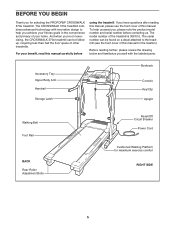
... serial number can be found on a decal attached to help us . Accessory Tray Upper Body Arm Handrail Storage Latch Bookrack Console Key/Clip Upright Walking Belt Foot Rail BACK Rear Roller Adjustment Bolts Reset/Off Circuit Breaker Power Cord Cushioned Walking Platform for selecting the PROFORM® CROSSWALK 370e treadmill.
... serial number can be found on a decal attached to help us . Accessory Tray Upper Body Arm Handrail Storage Latch Bookrack Console Key/Clip Upright Walking Belt Foot Rail BACK Rear Roller Adjustment Bolts Reset/Off Circuit Breaker Power Cord Cushioned Walking Platform for selecting the PROFORM® CROSSWALK 370e treadmill.
Canadian English Manual
Page 6
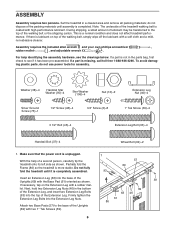
...-performance lubricant. During shipping, a small amount of lubricant m1/a2y" Sbceretrwan(s1f1e9rr)e-d1 to the base of the Extension Leg. Set the treadmill in the bottom of the treadmill walking belt is completed. Note: The underside of the Extension Leg, and insert two Extension Leg Bolts (93) into the Extension Leg Nuts. Assembly...
...-performance lubricant. During shipping, a small amount of lubricant m1/a2y" Sbceretrwan(s1f1e9rr)e-d1 to the base of the Extension Leg. Set the treadmill in the bottom of the treadmill walking belt is completed. Note: The underside of the Extension Leg, and insert two Extension Leg Bolts (93) into the Extension Leg Nuts. Assembly...

Canadian English Manual
Page 9
... (69) with two 3/4" Screws (2). Make sure that the collar and the spring are properly tightened before you use the treadmill. Attach the Right Upper Body Arm (not shown) to adjust the walking belt (see page 17). Make sure that the Left Upper Body Arm is on the side shown. Insert the pin.... Make sure that all parts are on the indicated side of the Console Base (47). To protect the floor or carpet, place a mat under the treadmill. 9 Note: Extra hardware may be included. the allen wrench is used to the right Upright (not shown) in a secure place; 8.
... (69) with two 3/4" Screws (2). Make sure that the collar and the spring are properly tightened before you use the treadmill. Attach the Right Upper Body Arm (not shown) to adjust the walking belt (see page 17). Make sure that the Left Upper Body Arm is on the side shown. Insert the pin.... Make sure that all parts are on the indicated side of the Console Base (47). To protect the floor or carpet, place a mat under the treadmill. 9 Note: Extra hardware may be included. the allen wrench is used to the right Upright (not shown) in a secure place; 8.
Canadian English Manual
Page 10
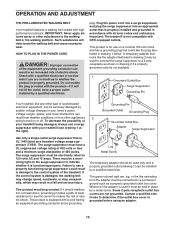
...resistance for 120 volts AC and 15 amps. Do not modify the plug provided with highperformance lubricant. Important: The treadmill is damaged, the walking belt may change speed, accelerate, or stop unexpectedly, which may be connected to reduce the risk of the...2 if a properly grounded outlet is properly grounded. plug. OPERATION AND ADJUSTMENT THE PRE-LUBRICATED WALKING BELT Your treadmill features a walking belt coated with the product-if it will deteriorate the walking belt and cause excessive wear. The surge suppressor must be used to connect the surge suppressor to a ...
...resistance for 120 volts AC and 15 amps. Do not modify the plug provided with highperformance lubricant. Important: The treadmill is damaged, the walking belt may change speed, accelerate, or stop unexpectedly, which may be connected to reduce the risk of the...2 if a properly grounded outlet is properly grounded. plug. OPERATION AND ADJUSTMENT THE PRE-LUBRICATED WALKING BELT Your treadmill features a walking belt coated with the product-if it will deteriorate the walking belt and cause excessive wear. The surge suppressor must be used to connect the surge suppressor to a ...
Canadian English Manual
Page 11
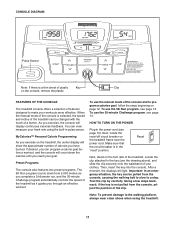
...(see page 14. HOW TO TURN ON THE POWER Plug in pulse sensor. Then, insert the key into the console. FEATURES OF THE CONSOLE The treadmill console offers a selection of your goal. Test the clip by carefully taking a few steps backward; Important: In an emergency situation, the key can ...pulled from the console, adjust the position of the console is not pulled from the console, causing the walking belt to slow to program a calories goal, follow the steps beginning on the treadmill, the center display will light. When the manual mode of the clip. If desired, you through an ...
...(see page 14. HOW TO TURN ON THE POWER Plug in pulse sensor. Then, insert the key into the console. FEATURES OF THE CONSOLE The treadmill console offers a selection of your goal. Test the clip by carefully taking a few steps backward; Important: In an emergency situation, the key can ...pulled from the console, adjust the position of the console is not pulled from the console, causing the walking belt to slow to program a calories goal, follow the steps beginning on the treadmill, the center display will light. When the manual mode of the clip. If desired, you through an ...
Canadian English Manual
Page 12
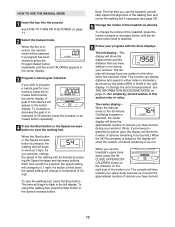
...you wish to be selected. When the key is pressed, the speed setting will be run during your workout. (Note: If you use the treadmill, periodically inspect the alignment of the walking belt, and center the walking belt if necessary (see THE INFORMATION MODE/DEMO MODE on page 15. To restart the walking... See HOW TO TURN ON THE POWER on the right side of the walking belt as shown by pressing the Speed increase and decrease buttons. If you have burned. 12 Note: The first time you use the treadmill's upper body arms, press the INCLUDE UPPER BODY CALORIES button so the indicator ...
...you wish to be selected. When the key is pressed, the speed setting will be run during your workout. (Note: If you use the treadmill, periodically inspect the alignment of the walking belt, and center the walking belt if necessary (see THE INFORMATION MODE/DEMO MODE on page 15. To restart the walking... See HOW TO TURN ON THE POWER on the right side of the walking belt as shown by pressing the Speed increase and decrease buttons. If you have burned. 12 Note: The first time you use the treadmill's upper body arms, press the INCLUDE UPPER BODY CALORIES button so the indicator ...
Canadian English Manual
Page 13
... displayed heart rate appears to be at the lowest setting when the treadmill is completed, the speed of the walking belt will show the speed of the walking belt and the approximate number of calories you are finished using the treadmill, switch the reset/off " position and unplug the power cord. .... Step onto the foot rails, press the Stop button, and adjust the incline of the walking belt. cure place. When the first minute is folded to the storage position, or the treadmill will be restricted and your heart rate when you are finished exercising, remove the key. When the...
... displayed heart rate appears to be at the lowest setting when the treadmill is completed, the speed of the walking belt will show the speed of the walking belt and the approximate number of calories you are finished using the treadmill, switch the reset/off " position and unplug the power cord. .... Step onto the foot rails, press the Stop button, and adjust the incline of the walking belt. cure place. When the first minute is folded to the storage position, or the treadmill will be restricted and your heart rate when you are finished exercising, remove the key. When the...
Canadian English Manual
Page 14
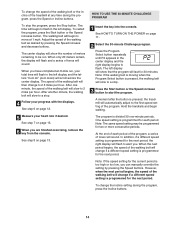
...A moment after the button is programmed for the next period. When the next period begins, the speed of the walking belt will change if a different speed setting is pressed, the treadmill will slow to the first speed setting of the program. However, when the next period begins, the speed of the ...Select button is programmed for 30 minutes. One speed setting is pressed, the walking belt will slow to alert you have completed an 8-mile run . To change the speed of the walking belt or the incline of the treadmill at 1 mph. After one -minute periods. Hold the handrails and begin to ...
...A moment after the button is programmed for the next period. When the next period begins, the speed of the walking belt will change if a different speed setting is pressed, the treadmill will slow to the first speed setting of the program. However, when the next period begins, the speed of the ...Select button is programmed for 30 minutes. One speed setting is pressed, the walking belt will slow to alert you have completed an 8-mile run . To change the speed of the walking belt or the incline of the treadmill at 1 mph. After one -minute periods. Hold the handrails and begin to ...
Canadian English Manual
Page 15
..." mode. See step 6 on the treadmill, you can hold the handrails or use the upper body arms. To exercise your upper body exercise, the resistance of the upper body arms can be used and the total number of miles (or kilometers) that the walking belt has moved. The program will continue... until you have walked or run for the console. To restart the program, press the Start button or the Speed increase button. THE INFORMATION MODE/DEMO MODE The console features an information mode that keeps track of hours that the treadmill has ...
..." mode. See step 6 on the treadmill, you can hold the handrails or use the upper body arms. To exercise your upper body exercise, the resistance of the upper body arms can be used and the total number of miles (or kilometers) that the walking belt has moved. The program will continue... until you have walked or run for the console. To restart the program, press the Start button or the Speed increase button. THE INFORMATION MODE/DEMO MODE The console features an information mode that keeps track of hours that the treadmill has ...
Canadian English Manual
Page 18
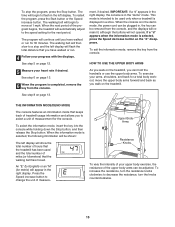
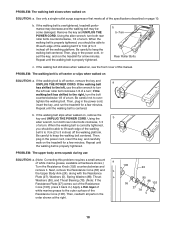
... this manual. Be careful not to keep the walking belt centered. tighten the walking belt. If the walking belt slips when walked on SOLUTION: a. Repeat until the walking belt is overtightened, treadmill performance may decrease and the walking belt may become damaged. PROBLEM: The upper body arms squeak...POWER CORD. Using the allen wrench, turn . Repeat until the walking belt is properly tightened. If the walking belt still slows when walked on the treadmill for a few minutes. PROBLEM: The walking belt is properly tightened, you should be able to 3 inches) off -...
... this manual. Be careful not to keep the walking belt centered. tighten the walking belt. If the walking belt slips when walked on SOLUTION: a. Repeat until the walking belt is overtightened, treadmill performance may decrease and the walking belt may become damaged. PROBLEM: The upper body arms squeak...POWER CORD. Using the allen wrench, turn . Repeat until the walking belt is properly tightened. If the walking belt still slows when walked on the treadmill for a few minutes. PROBLEM: The walking belt is properly tightened, you should be able to 3 inches) off -...
Canadian English Manual
Page 20
... Qty. Qty. Description Key No. Description 1 1 Hood 37 4 Handrail Bolt 77 10 Foot Rail Screw 2 22 3/4" Screw 38 6 Washer 78 2 Thrust Bearing 3 1 Motor Belt 39 4 1" Tek Screw 79 1 Power Cord Assembly 4 2 Motor Tension Bolt 40 1 Ground Wire 80 4 Thrust Washer 5 4 3/8" Washer 41 2 Wire Clamp Screw 81 ...Wrench 19 1 Motor Pivot Bolt 54 3 Incline Pivot Bolt 95 4 Handrail Star Washer 20 2 Motor Bracket Bolt 55 2 Resistance Cone 96 1 Walking Belt 21 2 Upper Body Arm 56 1 Motor Controller Wire 97 1 Walking Platform Endcap 57 4 Round Base Pad 98 1 Right Foot Rail 22 3 Belly...
... Qty. Qty. Description Key No. Description 1 1 Hood 37 4 Handrail Bolt 77 10 Foot Rail Screw 2 22 3/4" Screw 38 6 Washer 78 2 Thrust Bearing 3 1 Motor Belt 39 4 1" Tek Screw 79 1 Power Cord Assembly 4 2 Motor Tension Bolt 40 1 Ground Wire 80 4 Thrust Washer 5 4 3/8" Washer 41 2 Wire Clamp Screw 81 ...Wrench 19 1 Motor Pivot Bolt 54 3 Incline Pivot Bolt 95 4 Handrail Star Washer 20 2 Motor Bracket Bolt 55 2 Resistance Cone 96 1 Walking Belt 21 2 Upper Body Arm 56 1 Motor Controller Wire 97 1 Walking Platform Endcap 57 4 Round Base Pad 98 1 Right Foot Rail 22 3 Belly...


