

English Manual
Page 1
Serial Number Decal • Assembly • Operation • Maintenance • Part List and Drawing BIKE EXERCISER User's Manual CAUTION Read all precautions and instructions in this manual before using this manual for future reference. Keep this equipment. Patent Pending Sears, Roebuck and Co., Hoffman Estates, IL 60179 Model No. 831.283180 Serial No.
Serial Number Decal • Assembly • Operation • Maintenance • Part List and Drawing BIKE EXERCISER User's Manual CAUTION Read all precautions and instructions in this manual before using this manual for future reference. Keep this equipment. Patent Pending Sears, Roebuck and Co., Hoffman Estates, IL 60179 Model No. 831.283180 Serial No.
English Manual
Page 2
...responsibility of the owner to ensure that could cause the crosstrainer to tip, resulting in this manual before using the weight bench, always adjust the seat to the farthest forward position. Keep the crosstrainer indoors, away from the crosstrainer at all times. 7. When you feel pain or ...immediately and begin cooling down. If you stop . 6. Always wear shoes for home use of all instructions in injury. 10. The crosstrainer is especially important for personal injury or property damage sustained by persons weighing more than 250 pounds. 13. Keep your back. 11. ...
...responsibility of the owner to ensure that could cause the crosstrainer to tip, resulting in this manual before using the weight bench, always adjust the seat to the farthest forward position. Keep the crosstrainer indoors, away from the crosstrainer at all times. 7. When you feel pain or ...immediately and begin cooling down. If you stop . 6. Always wear shoes for home use of all instructions in injury. 10. The crosstrainer is especially important for personal injury or property damage sustained by persons weighing more than 250 pounds. 13. Keep your back. 11. ...
English Manual
Page 3
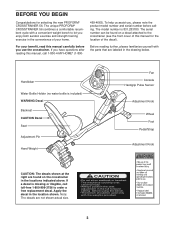
... your home. To help us assist you, please note the product model number and serial number before you have questions after reading this manual for selecting the new PROFORM® CROSSTRAINER 56. CAUTION •Do not sit on seatback or headrest The machince could tip over, causing injury. •Always position the seat adjustment...
... your home. To help us assist you, please note the product model number and serial number before you have questions after reading this manual for selecting the new PROFORM® CROSSTRAINER 56. CAUTION •Do not sit on seatback or headrest The machince could tip over, causing injury. •Always position the seat adjustment...

English Manual
Page 9
... use an iFIT.com CD or videocassette, see page 13. To use a Heart Rate program, see page 17. To use the manual mode of the pedals can connect the crosstrainer to your computer, you can even measure your home. sonal trainer in your heart rate using the built-in handgrip pulse sensor.... With the crosstrainer connected to your home stereo, portable stereo, computer, or VCR and play special iFIT.com CD and video programs (iFIT.com CDs and videocassettes are ...
... use an iFIT.com CD or videocassette, see page 13. To use a Heart Rate program, see page 17. To use the manual mode of the pedals can connect the crosstrainer to your computer, you can even measure your home. sonal trainer in your heart rate using the built-in handgrip pulse sensor.... With the crosstrainer connected to your home stereo, portable stereo, computer, or VCR and play special iFIT.com CD and video programs (iFIT.com CDs and videocassettes are ...
English Manual
Page 10
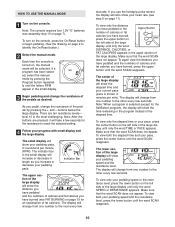
...of the large display. The indicator bar in the small display will increase or decrease in revolutions per mile). HOW TO USE THE MANUAL MODE 1 Turn on , the manual mode will be selected. To turn on the console, press the On/Reset button or begin pedaling. (See the drawing on ...pedaling speed or the resistance level, press the lower button on page 19 for the resistance to identify the On/Reset button.) 2 Select the manual mode. To view both the elapsed time and your pedaling speed and the resistance level. buttons below the large display. To view only the elapsed...
...of the large display. The indicator bar in the small display will increase or decrease in revolutions per mile). HOW TO USE THE MANUAL MODE 1 Turn on , the manual mode will be selected. To turn on the console, press the On/Reset button or begin pedaling. (See the drawing on ...pedaling speed or the resistance level, press the lower button on page 19 for the resistance to identify the On/Reset button.) 2 Select the manual mode. To view both the elapsed time and your pedaling speed and the resistance level. buttons below the large display. To view only the elapsed...
English Manual
Page 12
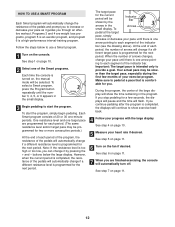
... programmed for the next period. Follow the steps below the large display. To start the program. However, when the current period is turned on, the manual mode will continue to provide a goal. The target pace for two or more consecutive periods.) At the end of each segment of the Smart programs...
... programmed for the next period. Follow the steps below the large display. To start the program. However, when the current period is turned on, the manual mode will continue to provide a goal. The target pace for two or more consecutive periods.) At the end of each segment of the Smart programs...
English Manual
Page 13
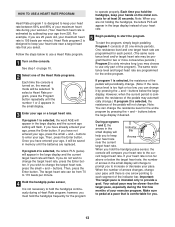
... target heart rate may automatically change.) If program 2 is selected, the resistance of the Heart Rate programs. Each time the console is turned on, the manual mode will not change the resistance level for the entire program by subtracting your age from 70 to 170 beats per minute.) Heart Rate program...
... target heart rate may automatically change.) If program 2 is selected, the resistance of the Heart Rate programs. Each time the console is turned on, the manual mode will not change the resistance level for the entire program by subtracting your age from 70 to 170 beats per minute.) Heart Rate program...
English Manual
Page 17
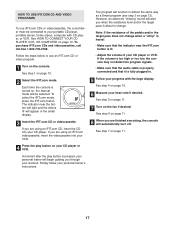
..., the console may not detect the program signals. • Make sure that the audio cable is about to use iFIT.com CDs or videocassettes, the crosstrainer must be selected. See step 1 on page 11. 8 When you are using an iFIT.com videocassette, insert the videocassette into your CD player or ...VCR. Simply follow your workout. See step 6 on page 10. 2 Select the iFIT.com mode. See step 7 on , the manual mode will automatically turn off. The indicator near the iFIT.com button is turned on page 11. 17 Note: If the resistance of your CD...
..., the console may not detect the program signals. • Make sure that the audio cable is about to use iFIT.com CDs or videocassettes, the crosstrainer must be selected. See step 1 on page 11. 8 When you are using an iFIT.com videocassette, insert the videocassette into your CD player or ...VCR. Simply follow your workout. See step 6 on page 10. 2 Select the iFIT.com mode. See step 7 on , the manual mode will automatically turn off. The indicator near the iFIT.com button is turned on page 11. 17 Note: If the resistance of your CD...
English Manual
Page 18
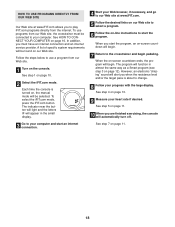
... on page 16. When you start the program, an on our Web site. However, an electronic "chirping" sound will begin. 7 Return to the crosstrainer and begin . A list of specific system requirements will be found on -screen countdown will alert you must be selected. See step 1 on , the... manual mode will begin pedaling. To use a program from our Web site, the crosstrainer must have an internet connection and an internet service provider. In addition, you when the resistance level and/...
... on page 16. When you start the program, an on our Web site. However, an electronic "chirping" sound will begin. 7 Return to the crosstrainer and begin . A list of specific system requirements will be found on -screen countdown will alert you must be selected. See step 1 on , the... manual mode will begin pedaling. To use a program from our Web site, the crosstrainer must have an internet connection and an internet service provider. In addition, you when the resistance level and/...
English Manual
Page 22
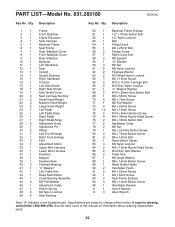
...2 Seat Bushing 50 1 Backrest Frame Endcap 51 1 1/2" x 70mm Button Bolt 52 1 1/2" Nylon Locknut 53 1 Belt 54 1 Pulley/Crank 55 1 M6 x 25mm Bolt 56 2 Flange Screw 57 1 Right Crank Arm 58 2 M6 Eyebolt 59 1 "U" Bracket 60 4 M6 Nut 61 5 M8 Nylon Locknut 62 2 Flywheel Washer 63 2 M10 Black... 91 2 M4 x 22mm Screw 92 1 M4 x 8mm Screw 93 2 Seat Frame Endcap 94 4 M8 x 12mm Button Screw 95 1 Handlebar Bracket # 1 User's Manual # 3 Allen Wrench Note: "#" indicates a non-illustrated part. Specifications are subject to change without notice.
...2 Seat Bushing 50 1 Backrest Frame Endcap 51 1 1/2" x 70mm Button Bolt 52 1 1/2" Nylon Locknut 53 1 Belt 54 1 Pulley/Crank 55 1 M6 x 25mm Bolt 56 2 Flange Screw 57 1 Right Crank Arm 58 2 M6 Eyebolt 59 1 "U" Bracket 60 4 M6 Nut 61 5 M8 Nylon Locknut 62 2 Flywheel Washer 63 2 M10 Black... 91 2 M4 x 22mm Screw 92 1 M4 x 8mm Screw 93 2 Seat Frame Endcap 94 4 M8 x 12mm Button Screw 95 1 Handlebar Bracket # 1 User's Manual # 3 Allen Wrench Note: "#" indicates a non-illustrated part. Specifications are subject to change without notice.


