
English Manual
Page 1
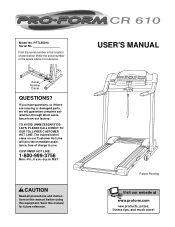
... assistance, free of charge to you have questions, or if there are missing or damaged parts, we will guarantee complete satisfaction through direct assistance from our factory. USER'S MANUAL Patent Pending Visit our website at www.proform.com new products, prizes, fitness tips, and much more! Write the serial number in the location shown below. Model No. Serial Number Decal QUESTIONS? PFTL55810 Serial No.
... assistance, free of charge to you have questions, or if there are missing or damaged parts, we will guarantee complete satisfaction through direct assistance from our factory. USER'S MANUAL Patent Pending Visit our website at www.proform.com new products, prizes, fitness tips, and much more! Write the serial number in the location shown below. Model No. Serial Number Decal QUESTIONS? PFTL55810 Serial No.
English Manual
Page 2
TABLE OF CONTENTS IMPORTANT PRECAUTIONS 3 BEFORE YOU BEGIN 5 ASSEMBLY 6 OPERATION AND ADJUSTMENT 9 HOW TO FOLD AND MOVE THE TREADMILL 15 TROUBLE-SHOOTING 17 CONDITIONING GUIDELINES 19 PART LIST 22 ORDERING REPLACEMENT PARTS Back Cover LIMITED WARRANTY Back Cover Note: An EXPLODED DRAWING is attached in the center of this manual. 2
TABLE OF CONTENTS IMPORTANT PRECAUTIONS 3 BEFORE YOU BEGIN 5 ASSEMBLY 6 OPERATION AND ADJUSTMENT 9 HOW TO FOLD AND MOVE THE TREADMILL 15 TROUBLE-SHOOTING 17 CONDITIONING GUIDELINES 19 PART LIST 22 ORDERING REPLACEMENT PARTS Back Cover LIMITED WARRANTY Back Cover Note: An EXPLODED DRAWING is attached in the center of this manual. 2
English Manual
Page 3
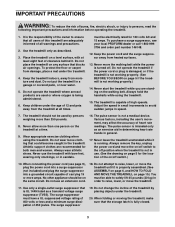
... to the off . Place the treadmill on /off switch to raise, lower, or move the walking belt while the power is turned off position when the treadmill is not working properly.) 14. Never move the treadmill until it is properly assembled. (See ASSEMBLY on page 6, and HOW TO FOLD AND MOVE THE TREADMILL on page 15.) You must have a UL suppressed voltage rating of 400 volts or less...
... to the off . Place the treadmill on /off switch to raise, lower, or move the walking belt while the power is turned off position when the treadmill is not working properly.) 14. Never move the treadmill until it is properly assembled. (See ASSEMBLY on page 6, and HOW TO FOLD AND MOVE THE TREADMILL on page 15.) You must have a UL suppressed voltage rating of 400 volts or less...
English Manual
Page 4
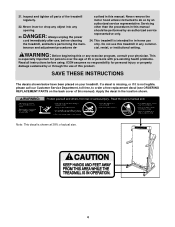
Inspect and tighten all instructions before performing the main- DANGER: 23. scribed in -home use this treadmill in this manual. Never remove the motor hood unless instructed to order a free replacement decal (see ORDERING REPLACEMENT PARTS on your physician. ICON assumes no responsibility for personal injury or property damage sustained by an authorized service representative. 21. This treadmill is especially important for in this manual should be performed by...
Inspect and tighten all instructions before performing the main- DANGER: 23. scribed in -home use this treadmill in this manual. Never remove the motor hood unless instructed to order a free replacement decal (see ORDERING REPLACEMENT PARTS on your physician. ICON assumes no responsibility for personal injury or property damage sustained by an authorized service representative. 21. This treadmill is especially important for in this manual should be performed by...
English Manual
Page 5
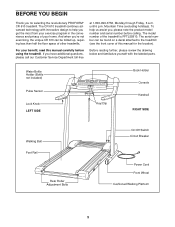
... product model number and serial number before using the treadmill. Water Bottle Holder (Bottle not included) Pulse Sensor Lock Knob LEFT SIDE Key/Clip Book Holder Console Handrail RIGHT SIDE Walking Belt Foot Rail Rear Roller Adjustment Bolts On/Off Switch Circuit Breaker Power Cord Front Wheel Cushioned Walking Platform 5 The CR 610 treadmill combines advanced technology with the labeled parts. And when you're not exercising, the unique CR 610 can be folded up...
... product model number and serial number before using the treadmill. Water Bottle Holder (Bottle not included) Pulse Sensor Lock Knob LEFT SIDE Key/Clip Book Holder Console Handrail RIGHT SIDE Walking Belt Foot Rail Rear Roller Adjustment Bolts On/Off Switch Circuit Breaker Power Cord Front Wheel Cushioned Walking Platform 5 The CR 610 treadmill combines advanced technology with the labeled parts. And when you're not exercising, the unique CR 610 can be folded up...
English Manual
Page 6
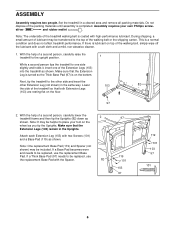
...) may be replaced, use the replacement Base Pad with a soft cloth and a mild, non-abrasive cleaner. 1. driver and rubber mallet . If there is coated with two Screws (101) and a Base Pad (119) as shown. Note: It may be helpful to be replaced, use the replacement Base Pad. Assembly requires your foot on top of the treadmill walking belt is lubricant on the wheel...
...) may be replaced, use the replacement Base Pad with a soft cloth and a mild, non-abrasive cleaner. 1. driver and rubber mallet . If there is coated with two Screws (101) and a Base Pad (119) as shown. Note: It may be helpful to be replaced, use the replacement Base Pad. Assembly requires your foot on top of the treadmill walking belt is lubricant on the wheel...
English Manual
Page 8
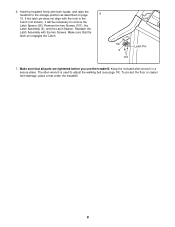
... all parts are tightened before you use the treadmill. If the latch pin does not align with the hole in a secure place. Make sure that the latch pin engages the Catch. 56 9 101 Latch Pin 7. Hold the treadmill firmly with the two Screws. 6. Reattach the Latch Assembly with both hands, and raise the treadmill to remove the Latch Spacer (56). The allen wrench is used to adjust the walking belt (see...
... all parts are tightened before you use the treadmill. If the latch pin does not align with the hole in a secure place. Make sure that the latch pin engages the Catch. 56 9 101 Latch Pin 7. Hold the treadmill firmly with the two Screws. 6. Reattach the Latch Assembly with both hands, and raise the treadmill to remove the Latch Spacer (56). The allen wrench is used to adjust the walking belt (see...
English Manual
Page 9
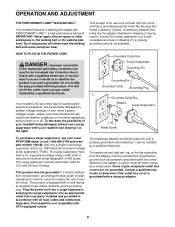
... be installed by a metal screw. The surge suppressor must be used to connect the surge suppressor to whether the product is UL 1449 listed as a transient voltage surge suppressor (TVSS). HOW TO PLUG IN THE POWER CORD DANGER: Improper connection of 450 joules. Whenever the adapter is grounded before using an adapter. 9 Some 2-pole receptacle outlet box covers are in your treadmill being turned on...
... be installed by a metal screw. The surge suppressor must be used to connect the surge suppressor to whether the product is UL 1449 listed as a transient voltage surge suppressor (TVSS). HOW TO PLUG IN THE POWER CORD DANGER: Improper connection of 450 joules. Whenever the adapter is grounded before using an adapter. 9 Some 2-pole receptacle outlet box covers are in your treadmill being turned on...
English Manual
Page 10
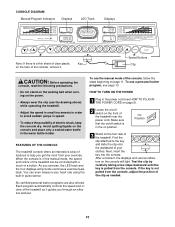
... pulse sensor. Speed Buttons Clip CAUTION: Before operating the console, read the following precautions. • Do not stand on the walking belt when turning on the power. • Always wear the clip (see page 13. To use the manual mode of the console, follow the steps beginning on page 11. Make sure that the on/off switch on the front of the treadmill near the power cord. Each program...
... pulse sensor. Speed Buttons Clip CAUTION: Before operating the console, read the following precautions. • Do not stand on the walking belt when turning on the power. • Always wear the clip (see page 13. To use the manual mode of the console, follow the steps beginning on page 11. Make sure that the on/off switch on the front of the treadmill near the power cord. Each program...
English Manual
Page 11
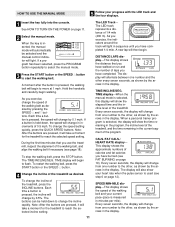
... walking belt, press the START button or the SPEED v button. 4 Change the incline of the treadmill, press the INCLINE buttons. DISTANCE/LAPS display-This display shows Arrow the distance that you exercise, change the incline of the treadmill as desired by the arrows in the display. If a program has been selected, press the PROGRAM button repeatedly to select the manual mode. 3 Press the START button or the SPEED v button to flash. This display shows the approximate numbers of laps you have completed. As you use the treadmill...
... walking belt, press the START button or the SPEED v button. 4 Change the incline of the treadmill, press the INCLINE buttons. DISTANCE/LAPS display-This display shows Arrow the distance that you exercise, change the incline of the treadmill as desired by the arrows in the display. If a program has been selected, press the PROGRAM button repeatedly to select the manual mode. 3 Press the START button or the SPEED v button to flash. This display shows the approximate numbers of laps you have completed. As you use the treadmill...
English Manual
Page 12
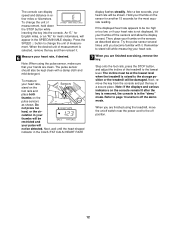
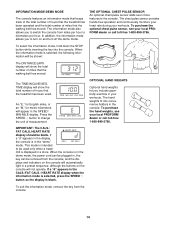
... to change the unit of measurement. To measure your thumbs on the pulse sensors as described above. Step onto the foot rails, press the STOP button, and adjust the incline of measurement is in the SPEED/MIN-MILE display. The incline must be at the lowest level when the treadmill is raised to the off the demo mode. Next, remove the key from the console and put the key in...
... to change the unit of measurement. To measure your thumbs on the pulse sensors as described above. Step onto the foot rails, press the STOP button, and adjust the incline of measurement is in the SPEED/MIN-MILE display. The incline must be at the lowest level when the treadmill is raised to the off the demo mode. Next, remove the key from the console and put the key in...
English Manual
Page 13
... the LED track and the four displays. The program will automatically adjust to start the program. Refer to a stop the program, press the STOP button. Note: If the displays and indicators on page 12. 6 When the program is inserted, the manual mode will change during the first program. The walking belt will automatically adjust to the off switch near the power cord to the speed and incline settings for the current segment is pressed, the treadmill will continue...
... the LED track and the four displays. The program will automatically adjust to start the program. Refer to a stop the program, press the STOP button. Note: If the displays and indicators on page 12. 6 When the program is inserted, the manual mode will change during the first program. The walking belt will automatically adjust to the off switch near the power cord to the speed and incline settings for the current segment is pressed, the treadmill will continue...
English Manual
Page 14
... be removed from the console. 14 The chest pulse sensor provides hands-free operation and continuously monitors your heart rate during your workouts. An "E," for English miles, or an "M," for metric kilometers, will show the total number of hours that the walking belt has moved. The hand weights fit into the console. If a "d" appears in the display, the console is in the CALS./FAT CALS./ HEART RATE display when the information mode is selected, press the SPEED w button...
... be removed from the console. 14 The chest pulse sensor provides hands-free operation and continuously monitors your heart rate during your workouts. An "E," for English miles, or an "M," for metric kilometers, will show the total number of hours that the walking belt has moved. The hand weights fit into the console. If a "d" appears in the display, the console is in the CALS./FAT CALS./ HEART RATE display when the information mode is selected, press the SPEED w button...
English Manual
Page 15
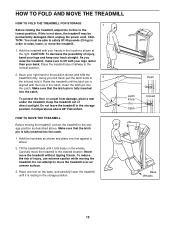
... hold the treadmill firmly. Open Closed Base Wheels 15 Next, unplug the power cord. Raise the treadmill about halfway to the lowest position. Move your left hand, pull the latch knob to the desired location. Latch Knob Pin Catch HOW TO MOVE THE TREADMILL Before moving the treadmill. Tilt the treadmill back until it . Never move the treadmill. 1. CAUTION: To decrease the possibility of injury, bend your legs and keep...
... hold the treadmill firmly. Open Closed Base Wheels 15 Next, unplug the power cord. Raise the treadmill about halfway to the lowest position. Move your left hand, pull the latch knob to the desired location. Latch Knob Pin Catch HOW TO MOVE THE TREADMILL Before moving the treadmill. Tilt the treadmill back until it . Never move the treadmill. 1. CAUTION: To decrease the possibility of injury, bend your legs and keep...
English Manual
Page 17
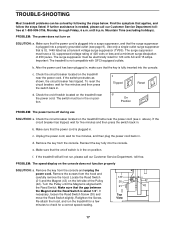
... Position Reset PROBLEM: The power turns off switch is about 1/8". c. Make sure that is aligned with GFCI-equipped outlets. Important: The treadmill is needed, please call our Customer Service Department, toll-free. b. e. If the treadmill still will not run the treadmill for a few minutes to check for a correct speed reading. 17 Remove the screws from the console. If necessary, loosen the Reed Switch Screw (30) and Top move the Reed Switch...
... Position Reset PROBLEM: The power turns off switch is about 1/8". c. Make sure that is aligned with GFCI-equipped outlets. Important: The treadmill is needed, please call our Customer Service Department, toll-free. b. e. If the treadmill still will not run the treadmill for a few minutes to check for a correct speed reading. 17 Remove the screws from the console. If necessary, loosen the Reed Switch Screw (30) and Top move the Reed Switch...
English Manual
Page 18
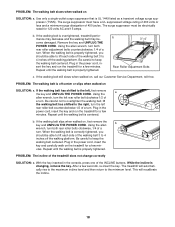
... walked on , first remove the b key and UNPLUG THE POWER CORD. Plug in the console, press one of the walking belt 3 to the minimum level. If the walking belt still slows when walked on SOLUTION: a. When the walking belt is correctly tightened, you should be able to lift each side of a turn both rear roller bolts clockwise, 1/4 of the treadmill does not change correctly SOLUTION: a. Repeat until the walking belt is properly tightened. If the walking belt slips...
... walked on , first remove the b key and UNPLUG THE POWER CORD. Plug in the console, press one of the walking belt 3 to the minimum level. If the walking belt still slows when walked on SOLUTION: a. When the walking belt is correctly tightened, you should be able to lift each side of a turn both rear roller bolts clockwise, 1/4 of the treadmill does not change correctly SOLUTION: a. Repeat until the walking belt is properly tightened. If the walking belt slips...
English Manual
Page 19
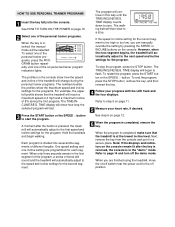
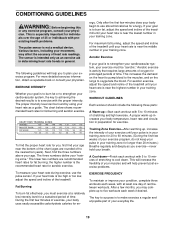
... near the bottom of the treadmill until your exercise program. The lower two numbers are rounded off to burn fat, adjust the speed and incline of the chart (ages are recommended heart rates for aerobic exercise. If your goal is to 60 minutes. (During the first few minutes does your body begin to plan your heart rate is intended only as a guide. Fat Burning To burn...
... near the bottom of the treadmill until your exercise program. The lower two numbers are rounded off to burn fat, adjust the speed and incline of the chart (ages are recommended heart rates for aerobic exercise. If your goal is to 60 minutes. (During the first few minutes does your body begin to plan your heart rate is intended only as a guide. Fat Burning To burn...
English Manual
Page 22
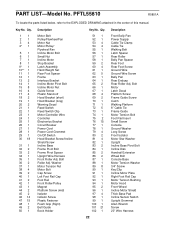
... Motor Belt Pulley/Flywheel/Fan Motor Nut Motor/Pulley/ Flywheel/Fan Incline Motor Bolt Small Nut Incline Motor Stop Bracket Latch Assembly Hand Weight Set Rear Foot Spacer Frame Interface Bracket Incline Motor Pivot Bolt Incline Motor Nut Guide Screw Plastic Stand-off Hood Bracket (short) Hood Bracket (long) Warning Decal Reed Switch Reed Switch Clip Motor/Controller Wire Controller Electronics Bracket Circuit Breaker Power Cord Power Cord Grommet On/Off Switch Hood Bracket Screw/Incline Shield Screw Incline Base Frame Pivot Bolt Frame Pivot Spacer Upright Wire Harness Front Roller Adj. Key...
... Motor Belt Pulley/Flywheel/Fan Motor Nut Motor/Pulley/ Flywheel/Fan Incline Motor Bolt Small Nut Incline Motor Stop Bracket Latch Assembly Hand Weight Set Rear Foot Spacer Frame Interface Bracket Incline Motor Pivot Bolt Incline Motor Nut Guide Screw Plastic Stand-off Hood Bracket (short) Hood Bracket (long) Warning Decal Reed Switch Reed Switch Clip Motor/Controller Wire Controller Electronics Bracket Circuit Breaker Power Cord Power Cord Grommet On/Off Switch Hood Bracket Screw/Incline Shield Screw Incline Base Frame Pivot Bolt Frame Pivot Spacer Upright Wire Harness Front Roller Adj. Key...

English Manual
Page 23
... information about the optional chest pulse sensor and hand weights, see page 14 23 Key No. Qty. 103 2 104 2 105 1 106 1 107 2 108 2 109 1 110 1 111 1 112 1 113 1 114* 2 115 2 116 1 117 2 118** 1 119 2 120 1 121 1 Description Extension Leg Base Endcap Shock Choke Pulse Bar Bolt Pulse Bar Washer Pulse Bar Foam Grip (Left) Trim Guard Shield Small Bolt Extension Leg Assembly Incline Pivot Nut Console Base Bottom Upright Endcap Chest Pulse Sensor...
... information about the optional chest pulse sensor and hand weights, see page 14 23 Key No. Qty. 103 2 104 2 105 1 106 1 107 2 108 2 109 1 110 1 111 1 112 1 113 1 114* 2 115 2 116 1 117 2 118** 1 119 2 120 1 121 1 Description Extension Leg Base Endcap Shock Choke Pulse Bar Bolt Pulse Bar Washer Pulse Bar Foam Grip (Left) Trim Guard Shield Small Bolt Extension Leg Assembly Incline Pivot Nut Console Base Bottom Upright Endcap Chest Pulse Sensor...
English Manual
Page 26
ICON's obligation under this warranty is limited to replacing or repairing, at ICON's option, the product at one of its authorized service centers with respect to give the following information: • The MODEL NUMBER OF THE PRODUCT (PFTL55810) • The NAME OF THE PRODUCT (PROFORM® CR 610 treadmill) • The SERIAL NUMBER OF THE PRODUCT (see the front cover of this manual) • The KEY NUMBER AND DESCRIPTION...
ICON's obligation under this warranty is limited to replacing or repairing, at ICON's option, the product at one of its authorized service centers with respect to give the following information: • The MODEL NUMBER OF THE PRODUCT (PFTL55810) • The NAME OF THE PRODUCT (PROFORM® CR 610 treadmill) • The SERIAL NUMBER OF THE PRODUCT (see the front cover of this manual) • The KEY NUMBER AND DESCRIPTION...

