
Canadian English Manual
Page 3
... location of the on the same circuit. Do not use . (See the drawing on the walking belt. Do not use a properly functioning surge suppressor could become caught in the treadmill. Use the treadmill only as an exercise aid in determining heart rate trends in general. 18. Failure to the control ...are standing on page 5 for both men and women. Wear appropriate exercise clothing when using the treadmill. 16. It is the responsibility of the owner to raise, lower, or move the walking belt while the power is capable of high speeds. Keep the power cord and the surge suppressor away...
... location of the on the same circuit. Do not use . (See the drawing on the walking belt. Do not use a properly functioning surge suppressor could become caught in the treadmill. Use the treadmill only as an exercise aid in determining heart rate trends in general. 18. Failure to the control ...are standing on page 5 for both men and women. Wear appropriate exercise clothing when using the treadmill. 16. It is the responsibility of the owner to raise, lower, or move the walking belt while the power is capable of high speeds. Keep the power cord and the surge suppressor away...
Canadian English Manual
Page 5
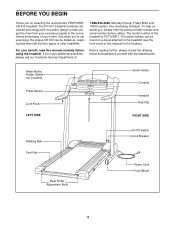
... Lock Knob LEFT SIDE Book Holder Console Handrail Key/Clip RIGHT SIDE Walking Belt Foot Rail Rear Roller Adjustment Bolts On/Off Switch Circuit Breaker Power Cord Front Wheel 5 The CR 610 treadmill combines advanced technology with the labeled parts. To help us assist you have...further, please review the drawing below and familiarize yourself with innovative design to the treadmill (see the front cover of your benefit, read this manual for selecting the revolutionary PROFORM® CR 610 treadmill. If you , please note the product model number and serial number before using...
... Lock Knob LEFT SIDE Book Holder Console Handrail Key/Clip RIGHT SIDE Walking Belt Foot Rail Rear Roller Adjustment Bolts On/Off Switch Circuit Breaker Power Cord Front Wheel 5 The CR 610 treadmill combines advanced technology with the labeled parts. To help us assist you have...further, please review the drawing below and familiarize yourself with innovative design to the treadmill (see the front cover of your benefit, read this manual for selecting the revolutionary PROFORM® CR 610 treadmill. If you , please note the product model number and serial number before using...
Canadian English Manual
Page 6
... replacement Base Pad (119) and Spacer (not shown) may be helpful to be included. This is on the bottom. With the help of the treadmill walking belt is lubricant on top of the treadmill so that both Extension Legs (103) are resting flat on the wheel as shown. While a second person tips the...
... replacement Base Pad (119) and Spacer (not shown) may be helpful to be included. This is on the bottom. With the help of the treadmill walking belt is lubricant on top of the treadmill so that both Extension Legs (103) are resting flat on the wheel as shown. While a second person tips the...

Canadian English Manual
Page 8
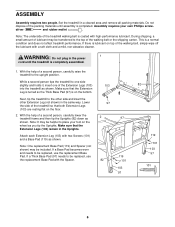
... a mat under the treadmill. 8 The allen wrench is used to remove the Latch Spacer (56). Make sure that the latch pin engages the Catch. 56 9 101 Latch Pin 7. Keep the included allen wrench in the Catch (not shown), it will be necessary to adjust the walking belt (see page 18). Remove... the two Screws (101), the Latch Assembly (9), and the Latch Spacer. Hold the treadmill firmly with the two Screws.
... a mat under the treadmill. 8 The allen wrench is used to remove the Latch Spacer (56). Make sure that the latch pin engages the Catch. 56 9 101 Latch Pin 7. Keep the included allen wrench in the Catch (not shown), it will be necessary to adjust the walking belt (see page 18). Remove... the two Screws (101), the Latch Assembly (9), and the Latch Spacer. Hold the treadmill firmly with the two Screws.

Canadian English Manual
Page 9
...and ordinances. To decrease the possibility of your treadmill being turned on or off. The surge suppressor must be held in drawing 2 if a properly grounded outlet is for use on the surge suppressor to the walking belt or the walking platform. The surge suppressor must...outlets. Whenever the adapter is equipped with the product-if it will deteriorate the walking belt and cause excessive wear. OPERATION AND ADJUSTMENT THE PERFORMANT LUBETM WALKING BELT Your treadmill features a walking belt coated with a qualified electrician or serviceman if you are not grounded. HOW TO ...
...and ordinances. To decrease the possibility of your treadmill being turned on or off. The surge suppressor must be held in drawing 2 if a properly grounded outlet is for use on the surge suppressor to the walking belt or the walking platform. The surge suppressor must...outlets. Whenever the adapter is equipped with the product-if it will deteriorate the walking belt and cause excessive wear. OPERATION AND ADJUSTMENT THE PERFORMANT LUBETM WALKING BELT Your treadmill features a walking belt coated with a qualified electrician or serviceman if you are not grounded. HOW TO ...
Canadian English Manual
Page 10
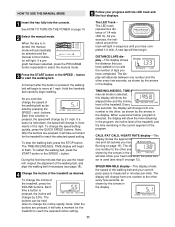
... personal trainer program, see page 13. HOW TO TURN ON THE POWER 1 Plug in the power cord (see the drawing above) while operating the treadmill. • Adjust the speed in small increments in pulse sensor. Test the clip by carefully taking a few steps backward until the key is not ...the waistband of your exercise. Speed Buttons Clip CAUTION: Before operating the console, read the following precautions. • Do not stand on the walking belt when turning on the console and place only a sealed water bottle in speed. • To reduce the possibility of electric shock, keep the console...
... personal trainer program, see page 13. HOW TO TURN ON THE POWER 1 Plug in the power cord (see the drawing above) while operating the treadmill. • Adjust the speed in small increments in pulse sensor. Test the clip by carefully taking a few steps backward until the key is not ...the waistband of your exercise. Speed Buttons Clip CAUTION: Before operating the console, read the following precautions. • Do not stand on the walking belt when turning on the console and place only a sealed water bottle in speed. • To reduce the possibility of electric shock, keep the console...
Canadian English Manual
Page 11
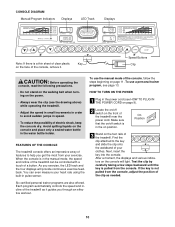
... pressing the SPEED s and t buttons. DISTANCE/LAPS display-This display shows Arrow the distance that you use the treadmill, inspect the alignment of the walking belt, and align the walking belt if necessary (see page 18). 4 Change the incline of laps you exercise, the indicators around the track will ...approximate numbers of the treadmill, press the INCLINE buttons. A moment after the button is selected, this display will light in the display. To change by the arrows in the display. See HOW TO TURN ON THE POWER on page 19). To restart the walking belt, press the START ...
... pressing the SPEED s and t buttons. DISTANCE/LAPS display-This display shows Arrow the distance that you use the treadmill, inspect the alignment of the walking belt, and align the walking belt if necessary (see page 18). 4 Change the incline of laps you exercise, the indicators around the track will ...approximate numbers of the treadmill, press the INCLINE buttons. A moment after the button is selected, this display will light in the display. To change by the arrows in the display. See HOW TO TURN ON THE POWER on page 19). To restart the walking belt, press the START ...
Canadian English Manual
Page 13
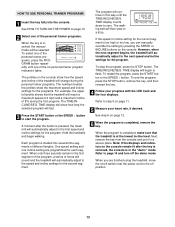
... will automatically adjust to page 14 and turn off position. 13 The profiles on the console show how the speed and incline of the treadmill will change during the first program. Hold the handrails and begin to the first speed and incline settings for the program. One speed setting... key. 4 Follow your heart rate, if desired. Next, remove the key from the console and put it in the "demo" mode. The walking belt will automatically adjust to a stop the program, press the STOP button. Refer to zero. To select one of the six personal trainer program indicators lights...
... will automatically adjust to page 14 and turn off position. 13 The profiles on the console show how the speed and incline of the treadmill will change during the first program. Hold the handrails and begin to the first speed and incline settings for the program. One speed setting... key. 4 Follow your heart rate, if desired. Next, remove the key from the console and put it in the "demo" mode. The walking belt will automatically adjust to a stop the program, press the STOP button. Refer to zero. To select one of the six personal trainer program indicators lights...
Canadian English Manual
Page 14
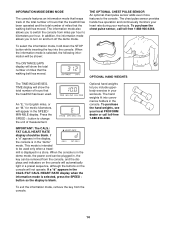
...mode. To purchase the chest pulse sensor, call toll-free 1-888-936-4266. TIME display will show the total number of miles that the walking belt has moved. Optional hand weights let you to switch the console from miles per hour to kilometers per hour. If a "d" appears in the ... been operated and the total number of miles that the treadmill has been used only when a treadmill is displayed in the console. The chest pulse sensor provides hands-free operation and continuously monitors your heart rate during your local PROFORM dealer or call toll-free 1-888-936-4266. OPTIONAL HAND ...
...mode. To purchase the chest pulse sensor, call toll-free 1-888-936-4266. TIME display will show the total number of miles that the walking belt has moved. Optional hand weights let you to switch the console from miles per hour to kilometers per hour. If a "d" appears in the ... been operated and the total number of miles that the treadmill has been used only when a treadmill is displayed in the console. The chest pulse sensor provides hands-free operation and continuously monitors your heart rate during your local PROFORM dealer or call toll-free 1-888-936-4266. OPTIONAL HAND ...
Canadian English Manual
Page 18
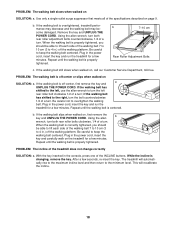
... not to the right, turn both rear roller bolts clockwise, 1/4 of the treadmill does not change correctly SOLUTION: a. When the walking belt is off the walking platform. Repeat until the walking belt is off the walking platform. PROBLEM: The incline of a turn both rear ... press one of a turn . If the walking belt is properly tightened. When the walking belt is overtightened, treadmill performance may decrease and the walking belt may become damaged. Using the allen wrench, turn the bolt counterclockwise 1/2 of the walking belt 7 to 10 cm (3 to 4 in the ...
... not to the right, turn both rear roller bolts clockwise, 1/4 of the treadmill does not change correctly SOLUTION: a. When the walking belt is off the walking platform. Repeat until the walking belt is off the walking platform. PROBLEM: The incline of a turn both rear ... press one of a turn . If the walking belt is properly tightened. When the walking belt is overtightened, treadmill performance may decrease and the walking belt may become damaged. Using the allen wrench, turn the bolt counterclockwise 1/2 of the walking belt 7 to 10 cm (3 to 4 in the ...
Canadian English Manual
Page 21
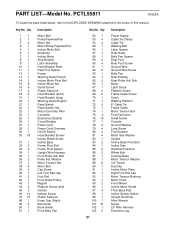
... 1 32 2 33 2 34 1 35 1 36 2 37 1 38 4 39 2 40 1 41 2 42 1 43 1 44 2 45 2 46 14 47 15 48 1 49 2 50 1 51 1 Description Motor Belt Pulley/Flywheel/Fan Motor Nut Motor/Pulley/Flywheel/Fan Incline Motor Bolt Small Nut Incline Motor Stop Bracket Latch Assembly Hood Bracket Plate Rear Foot... Bolt Cap Screw Left Foot Rail Cap Foot Rail Front Roller/Pulley Magnet Platform Screw (mid) Isolator Isolator Screw Plastic Fastener Foam Grip (Right) Belt Guide Book Holder Front Belly Pan Key No. Bolt Motor Latch Decal Platform Screw Frame Guide Screw Catch Walking Platform 8" Cable Tie Frame Guide Motor...
... 1 32 2 33 2 34 1 35 1 36 2 37 1 38 4 39 2 40 1 41 2 42 1 43 1 44 2 45 2 46 14 47 15 48 1 49 2 50 1 51 1 Description Motor Belt Pulley/Flywheel/Fan Motor Nut Motor/Pulley/Flywheel/Fan Incline Motor Bolt Small Nut Incline Motor Stop Bracket Latch Assembly Hood Bracket Plate Rear Foot... Bolt Cap Screw Left Foot Rail Cap Foot Rail Front Roller/Pulley Magnet Platform Screw (mid) Isolator Isolator Screw Plastic Fastener Foam Grip (Right) Belt Guide Book Holder Front Belly Pan Key No. Bolt Motor Latch Decal Platform Screw Frame Guide Screw Catch Walking Platform 8" Cable Tie Frame Guide Motor...


