

Canadian English Manual
Page 2
TABLE OF CONTENTS IMPORTANT PRECAUTIONS 3 BEFORE YOU BEGIN 5 ASSEMBLY 6 OPERATION AND ADJUSTMENT 9 HOW TO FOLD AND MOVE THE TREADMILL 15 TROUBLESHOOTING 17 CONDITIONING GUIDELINES 19 PART LIST 21 ORDERING REPLACEMENT PARTS 23 LIMITED WARRANTY Back Cover Note: An EXPLODED DRAWING is a registered trademark of this manual. PROFORM is attached in the center of ICON Health & Fitness, Inc. 2
TABLE OF CONTENTS IMPORTANT PRECAUTIONS 3 BEFORE YOU BEGIN 5 ASSEMBLY 6 OPERATION AND ADJUSTMENT 9 HOW TO FOLD AND MOVE THE TREADMILL 15 TROUBLESHOOTING 17 CONDITIONING GUIDELINES 19 PART LIST 21 ORDERING REPLACEMENT PARTS 23 LIMITED WARRANTY Back Cover Note: An EXPLODED DRAWING is a registered trademark of this manual. PROFORM is attached in the center of ICON Health & Fitness, Inc. 2
Canadian English Manual
Page 3
... (14-gauge) cord of the owner to raise, lower, or move the walking belt while the power is running. Adjust the speed in order to ensure that the storage latch is properly assembled. (See ASSEMBLY on page 6, and HOW TO FOLD AND MOVE THE TREADMILL on page 15.) You must be on page 5 for both men and women. Always remove the key, unplug the power cord and move the treadmill until it...
... (14-gauge) cord of the owner to raise, lower, or move the walking belt while the power is running. Adjust the speed in order to ensure that the storage latch is properly assembled. (See ASSEMBLY on page 6, and HOW TO FOLD AND MOVE THE TREADMILL on page 15.) You must be on page 5 for both men and women. Always remove the key, unplug the power cord and move the treadmill until it...

Canadian English Manual
Page 4
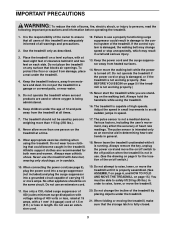
... any opening. tenance and adjustment procedures de- Never remove the motor hood unless instructed to order a free replacement decal (see ORDERING REPLACEMENT PARTS on your physician. This is intended for persons over the age of 35 or persons with pre-existing health problems. Read all parts of this manual. Servicing other than the procedures in the location shown. scribed in -home use , before cleaning the treadmill, and before using. 22...
... any opening. tenance and adjustment procedures de- Never remove the motor hood unless instructed to order a free replacement decal (see ORDERING REPLACEMENT PARTS on your physician. This is intended for persons over the age of 35 or persons with pre-existing health problems. Read all parts of this manual. Servicing other than the procedures in the location shown. scribed in -home use , before cleaning the treadmill, and before using. 22...
Canadian English Manual
Page 5
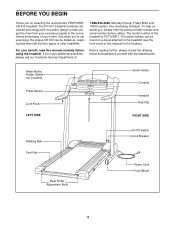
... not included) Pulse Sensor Lock Knob LEFT SIDE Book Holder Console Handrail Key/Clip RIGHT SIDE Walking Belt Foot Rail Rear Roller Adjustment Bolts On/Off Switch Circuit Breaker Power Cord Front Wheel 5 To help you have additional questions, please call our Customer Service Department at Before reading further, please review the drawing below and familiarize yourself with the labeled parts. For your home. The model number of other treadmills. 1-888...
... not included) Pulse Sensor Lock Knob LEFT SIDE Book Holder Console Handrail Key/Clip RIGHT SIDE Walking Belt Foot Rail Rear Roller Adjustment Bolts On/Off Switch Circuit Breaker Power Cord Front Wheel 5 To help you have additional questions, please call our Customer Service Department at Before reading further, please review the drawing below and familiarize yourself with the labeled parts. For your home. The model number of other treadmills. 1-888...
Canadian English Manual
Page 6
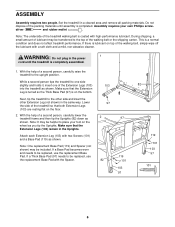
Set the treadmill in the power 1 cord until assembly is completely assembled. 1. Do not dispose of a second person, carefully raise the treadmill to the upright position. If there is coated with two Screws (101) and a Base Pad (119) as shown. With the help of the packing materials until the treadmill is completed. Attach each Extension Leg (103) with high-performance lubricant. If a Base Pad...
Set the treadmill in the power 1 cord until assembly is completely assembled. 1. Do not dispose of a second person, carefully raise the treadmill to the upright position. If there is coated with two Screws (101) and a Base Pad (119) as shown. With the help of the packing materials until the treadmill is completed. Attach each Extension Leg (103) with high-performance lubricant. If a Base Pad...

Canadian English Manual
Page 8
... necessary to adjust the walking belt (see page 18). Remove the two Screws (101), the Latch Assembly (9), and the Latch Spacer. Reattach the Latch Assembly with both hands, and raise the treadmill to the storage position as described on page 6 15. The allen wrench is used to remove the Latch Spacer (56). Make sure that all parts are properly tightened before you use the treadmill. 6. Hold the treadmill firmly with...
... necessary to adjust the walking belt (see page 18). Remove the two Screws (101), the Latch Assembly (9), and the Latch Spacer. Reattach the Latch Assembly with both hands, and raise the treadmill to the storage position as described on page 6 15. The allen wrench is used to remove the Latch Spacer (56). Make sure that all parts are properly tightened before you use the treadmill. 6. Hold the treadmill firmly with...

Canadian English Manual
Page 9
... home's power. If the control system is not available. 1 Grounded Outlet Box Surge Suppressor Grounding Pin Your treadmill, like the adapter illustrated in drawing 2 may result in an increased risk of least resistance for 120 volts AC and 15 amps. Some 2-pole receptacle outlet box covers are in drawing 2 if a properly grounded outlet is damaged, the walking belt may change speed or stop...
... home's power. If the control system is not available. 1 Grounded Outlet Box Surge Suppressor Grounding Pin Your treadmill, like the adapter illustrated in drawing 2 may result in an increased risk of least resistance for 120 volts AC and 15 amps. Some 2-pole receptacle outlet box covers are in drawing 2 if a properly grounded outlet is damaged, the walking belt may change speed or stop...
Canadian English Manual
Page 10
... the treadmill. • Adjust the speed in small increments in pulse sensor. Find the clip attached to the key and slide the clip onto the waistband of the console, follow the steps beginning on /off switch is in the power cord (see page 13. To use a personal trainer program, see HOW TO PLUG IN THE POWER CORD on page 9). 2 Locate the on page 11. Each program automatically controls the speed and incline of...
... the treadmill. • Adjust the speed in small increments in pulse sensor. Find the clip attached to the key and slide the clip onto the waistband of the console, follow the steps beginning on /off switch is in the power cord (see page 13. To use a personal trainer program, see HOW TO PLUG IN THE POWER CORD on page 9). 2 Locate the on page 11. Each program automatically controls the speed and incline of...
Canadian English Manual
Page 11
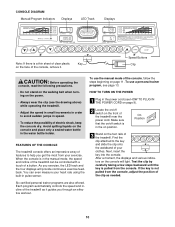
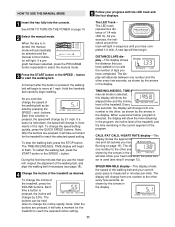
... walking. TIME display-When the manual mode is measured in sequence until you use the treadmill, inspect the alignment of the walking belt, and align the walking belt if necessary (see page 18). 4 Change the incline of the treadmill as shown by pressing the SPEED s and t buttons. To stop the walking belt, press the STOP button. As you exercise, the indicators around the track will light in minutes per mile). DISTANCE/LAPS display-This display shows Arrow the distance...
... walking. TIME display-When the manual mode is measured in sequence until you use the treadmill, inspect the alignment of the walking belt, and align the walking belt if necessary (see page 18). 4 Change the incline of the treadmill as shown by pressing the SPEED s and t buttons. To stop the walking belt, press the STOP button. As you exercise, the indicators around the track will light in minutes per mile). DISTANCE/LAPS display-This display shows Arrow the distance...
Canadian English Manual
Page 12
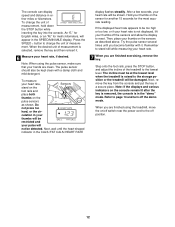
... /off switch near the power cord to page 14 and turn off the demo mode. culation in either miles or kilometers. Hold your heart rate is raised to change the unit of the treadmill to reset. If the displayed heart rate appears to be shown. Try the pulse sensor several times until the heart-shaped indicator in a secure place. Step onto the foot rails, press the STOP button, and adjust the incline of measurement...
... /off switch near the power cord to page 14 and turn off the demo mode. culation in either miles or kilometers. Hold your heart rate is raised to change the unit of the treadmill to reset. If the displayed heart rate appears to be shown. Try the pulse sensor several times until the heart-shaped indicator in a secure place. Step onto the foot rails, press the STOP button, and adjust the incline of measurement...
Canadian English Manual
Page 13
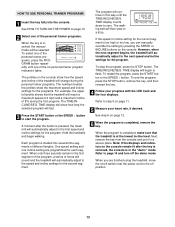
... the "demo" mode. However, when the next segment begins, the treadmill will automatically adjust to zero. See HOW TO TURN ON THE POWER on page 10. 2 Select one incline setting are finished using the treadmill, move the on the console remain lit after the button is pressed, the treadmill will automatically adjust to the speed and incline settings for each segment. The walking belt will then slow to step 5 on the console show...
... the "demo" mode. However, when the next segment begins, the treadmill will automatically adjust to zero. See HOW TO TURN ON THE POWER on page 10. 2 Select one incline setting are finished using the treadmill, move the on the console remain lit after the button is pressed, the treadmill will automatically adjust to the speed and incline settings for each segment. The walking belt will then slow to step 5 on the console show...
Canadian English Manual
Page 14
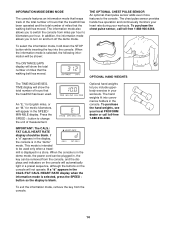
... CALS./ FAT CALS./HEART RATE display should be used . THE OPTIONAL CHEST PULSE SENSOR An optional chest pulse sensor adds even more features to change the unit of hours that the treadmill has been used only when a treadmill is in the demo mode, the power cord can be plugged in, the key can be shown: The DISTANCE/LAPS display will show the total number of miles that the walking belt has moved. TIME display will show the total...
... CALS./ FAT CALS./HEART RATE display should be used . THE OPTIONAL CHEST PULSE SENSOR An optional chest pulse sensor adds even more features to change the unit of hours that the treadmill has been used only when a treadmill is in the demo mode, the power cord can be plugged in, the key can be shown: The DISTANCE/LAPS display will show the total number of miles that the walking belt has moved. TIME display will show the total...
Canadian English Manual
Page 15
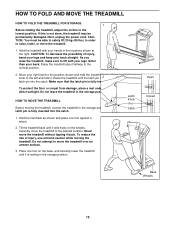
... the possibility of injury, bend your legs and keep your left hand, pull the latch knob to the desired location. Make sure that the latch pin is fully inserted into the catch. Base Wheels 15 Next, unplug the power cord. Raise the treadmill until it rolls freely on the base, and carefully lower the treadmill until it back. hMake sure that...
... the possibility of injury, bend your legs and keep your left hand, pull the latch knob to the desired location. Make sure that the latch pin is fully inserted into the catch. Base Wheels 15 Next, unplug the power cord. Raise the treadmill until it rolls freely on the base, and carefully lower the treadmill until it back. hMake sure that...
Canadian English Manual
Page 17
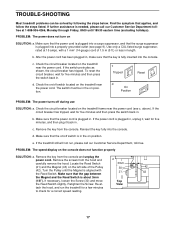
...-listed surge suppressor, rated at - b. If necessary, loosen the Screw (30) and move Top the Reed Switch slightly. Re-at 15 amps, with 21 43 the Reed Switch. Remove the screws from the console. Turn the Pulley until 18h30 eastern time (excluding holidays). Find the symptom that the power cord is in the on the treadmill near the power cord (see page 9). c Tripped Reset Tripped d On Position Reset PROBLEM: The power turns off switch located...
...-listed surge suppressor, rated at - b. If necessary, loosen the Screw (30) and move Top the Reed Switch slightly. Re-at 15 amps, with 21 43 the Reed Switch. Remove the screws from the console. Turn the Pulley until 18h30 eastern time (excluding holidays). Find the symptom that the power cord is in the on the treadmill near the power cord (see page 9). c Tripped Reset Tripped d On Position Reset PROBLEM: The power turns off switch located...
Canadian English Manual
Page 18
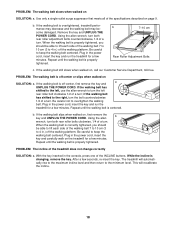
... THE POWER CORD. Plug in the power cord, insert the key and carefully walk on a SOLUTION: a. Using the allen wrench, turn both rear roller adjustment bolts counterclockwise, 1/4 of the INCLINE buttons. If the walking belt is properly tightened, you should be able to lift each side of a turn; When the walking belt is overtightened, treadmill performance may decrease and the walking belt may become damaged. If the walking belt slips when walked on SOLUTION: a. Plug in the power cord, insert the key...
... THE POWER CORD. Plug in the power cord, insert the key and carefully walk on a SOLUTION: a. Using the allen wrench, turn both rear roller adjustment bolts counterclockwise, 1/4 of the INCLINE buttons. If the walking belt is properly tightened, you should be able to lift each side of a turn; When the walking belt is overtightened, treadmill performance may decrease and the walking belt may become damaged. If the walking belt slips when walked on SOLUTION: a. Plug in the power cord, insert the key...
Canadian English Manual
Page 19
... lungs to five workouts each workout with preexisting health problems. The pulse sensor is intended only as a guide. WORKOUT GUIDELINES Each workout should include the following guidelines will help you , first find the three numbers above your pulse is too high or too low, adjust the speed and incline of the chart (ages are recommended heart rates for fat burning and aerobic exercise. The three numbers define your physician...
... lungs to five workouts each workout with preexisting health problems. The pulse sensor is intended only as a guide. WORKOUT GUIDELINES Each workout should include the following guidelines will help you , first find the three numbers above your pulse is too high or too low, adjust the speed and incline of the chart (ages are recommended heart rates for fat burning and aerobic exercise. The three numbers define your physician...
Canadian English Manual
Page 21
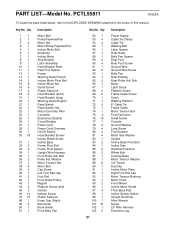
... Belt Pulley/Flywheel/Fan Motor Nut Motor/Pulley/Flywheel/Fan Incline Motor Bolt Small Nut Incline Motor Stop Bracket Latch Assembly Hood Bracket Plate Rear Foot Spacer Frame Warning Decal French Incline Motor Pivot Bolt Incline Motor Nut Guide Screw Plastic Stand-off Hood Bracket (short) Hood Bracket (long) Warning Decal English Reed Switch Reed Switch Clip Motor/Controller Wire Controller Electronics Bracket Circuit Breaker Power Cord Power Cord Grommet On/Off Switch Hood Bracket Screw/ Incline Shield Screw Incline Base Frame Pivot Bolt Frame Pivot Spacer Upright Wire Harness Front Roller...
... Belt Pulley/Flywheel/Fan Motor Nut Motor/Pulley/Flywheel/Fan Incline Motor Bolt Small Nut Incline Motor Stop Bracket Latch Assembly Hood Bracket Plate Rear Foot Spacer Frame Warning Decal French Incline Motor Pivot Bolt Incline Motor Nut Guide Screw Plastic Stand-off Hood Bracket (short) Hood Bracket (long) Warning Decal English Reed Switch Reed Switch Clip Motor/Controller Wire Controller Electronics Bracket Circuit Breaker Power Cord Power Cord Grommet On/Off Switch Hood Bracket Screw/ Incline Shield Screw Incline Base Frame Pivot Bolt Frame Pivot Spacer Upright Wire Harness Front Roller...

Canadian English Manual
Page 22
... Wire, 2F 4" Black Wire, 2F 8" Green Wire, 2 Ring 4" Red Wire, M/F User's Manual # These parts are not illustrated * Includes all parts shown in the box 22 Qty. 104 2 105 1 106 1 107 2 108 2 109 1 110 1 111 1 112 1 113 1 114* 2 115 2 116 1 117 2 Description Base Endcap Shock Choke Pulse Bar Bolt Pulse Bar Washer Pulse Bar Foam Grip (Left) Trim Guard Shield Small Bolt Extension Leg Assembly Incline Motor Spacer Console Base Bottom Upright Endcap Key...
... Wire, 2F 4" Black Wire, 2F 8" Green Wire, 2 Ring 4" Red Wire, M/F User's Manual # These parts are not illustrated * Includes all parts shown in the box 22 Qty. 104 2 105 1 106 1 107 2 108 2 109 1 110 1 111 1 112 1 113 1 114* 2 115 2 116 1 117 2 Description Base Endcap Shock Choke Pulse Bar Bolt Pulse Bar Washer Pulse Bar Foam Grip (Left) Trim Guard Shield Small Bolt Extension Leg Assembly Incline Motor Spacer Console Base Bottom Upright Endcap Key...

Canadian English Manual
Page 23
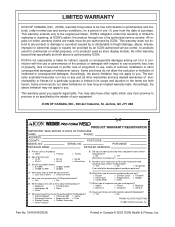
... the following information: • The MODEL NUMBER OF THE PRODUCT (PCTL55811) • The NAME OF THE PRODUCT (PROFORM® CR 610 treadmill) • The SERIAL NUMBER OF THE PRODUCT (see the front cover of this manual) • The KEY NUMBER AND DESCRIPTION OF THE PART(S) (see the EXPLODED DRAWING attached in the center of this manual and the PART LIST on pages 21 and 22) ICON of...
... the following information: • The MODEL NUMBER OF THE PRODUCT (PCTL55811) • The NAME OF THE PRODUCT (PROFORM® CR 610 treadmill) • The SERIAL NUMBER OF THE PRODUCT (see the front cover of this manual) • The KEY NUMBER AND DESCRIPTION OF THE PART(S) (see the EXPLODED DRAWING attached in the center of this manual and the PART LIST on pages 21 and 22) ICON of...
Canadian English Manual
Page 24
...: ADDRESS: COUNTY: POSTCODE: MODEL NO. o Store Employee o Television Ads o Colour o Electronic Features o Magazine Ads o Price o Product Design o Product Innovation o Other Features 8) Did you purchase? 10) What other warranty beyond that specifically set forth herein. o Bicycle o Exercise Cycle o Treadmill o Home Gym o Weight Bench o Stepper o Cardio Glide o Other 11) Which type of Canada, Inc. This warranty gives you ever purchased an ICON product before? o Yes o No...
...: ADDRESS: COUNTY: POSTCODE: MODEL NO. o Store Employee o Television Ads o Colour o Electronic Features o Magazine Ads o Price o Product Design o Product Innovation o Other Features 8) Did you purchase? 10) What other warranty beyond that specifically set forth herein. o Bicycle o Exercise Cycle o Treadmill o Home Gym o Weight Bench o Stepper o Cardio Glide o Other 11) Which type of Canada, Inc. This warranty gives you ever purchased an ICON product before? o Yes o No...


