

English Manual
Page 2
TABLE OF CONTENTS IMPORTANT PRECAUTIONS 3 BEFORE YOU BEGIN 5 ASSEMBLY 6 TREADMILL OPERATION 9 HOW TO FOLD AND MOVE THE TREADMILL 23 TROUBLESHOOTING 25 EXERCISE GUIDELINES 27 PART LIST 30 PART IDENTIFICATION CHART 31 HOW TO ORDER REPLACEMENT PARTS Back Cover LIMITED WARRANTY Back Cover Note: An EXPLODED DRAWING is a registered trademark of this manual. PROFORM is attached in the center of ICON Health & Fitness, Inc. 2
TABLE OF CONTENTS IMPORTANT PRECAUTIONS 3 BEFORE YOU BEGIN 5 ASSEMBLY 6 TREADMILL OPERATION 9 HOW TO FOLD AND MOVE THE TREADMILL 23 TROUBLESHOOTING 25 EXERCISE GUIDELINES 27 PART LIST 30 PART IDENTIFICATION CHART 31 HOW TO ORDER REPLACEMENT PARTS Back Cover LIMITED WARRANTY Back Cover Note: An EXPLODED DRAWING is a registered trademark of this manual. PROFORM is attached in the center of ICON Health & Fitness, Inc. 2

English Manual
Page 3
...men and women. Always wear athletic shoes. Never use . (See the drawing on the treadmill at all times. 7. Always remove the key, unplug the power cord, and move the treadmill. 19. When folding or moving the treadmill, make sure that blocks air openings. If the control system is not in sandals. 9....are recommended for the location of high speeds. Do not operate the treadmill if the power cord or plug is damaged, or if the treadmill is not working properly.) 14. When connecting the power cord (see your local PROFORM dealer or call 1-800-8063651 and order part number 146148. 15....
...men and women. Always wear athletic shoes. Never use . (See the drawing on the treadmill at all times. 7. Always remove the key, unplug the power cord, and move the treadmill. 19. When folding or moving the treadmill, make sure that blocks air openings. If the control system is not in sandals. 9....are recommended for the location of high speeds. Do not operate the treadmill if the power cord or plug is damaged, or if the treadmill is not working properly.) 14. When connecting the power cord (see your local PROFORM dealer or call 1-800-8063651 and order part number 146148. 15....
English Manual
Page 5
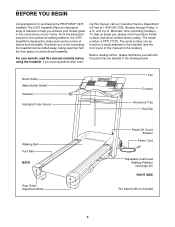
... us assist you achieve your fitness goals in the drawing below. If you 're not exercising, the treadmill can be folded away, taking less than half the floor space of this manual, call our Customer Service Department toll-free... at 1-800-999-3756, Monday through Friday, 6 a.m. For your home. ing this manual for purchasing the PROFORM® C970 treadmill. From the advanced console to the cushioned walking platform, the C970 treadmill is designed to the treadmill...
... us assist you achieve your fitness goals in the drawing below. If you 're not exercising, the treadmill can be folded away, taking less than half the floor space of this manual, call our Customer Service Department toll-free... at 1-800-999-3756, Monday through Friday, 6 a.m. For your home. ing this manual for purchasing the PROFORM® C970 treadmill. From the advanced console to the cushioned walking platform, the C970 treadmill is designed to the treadmill...

English Manual
Page 7
... be preassembled but may need to the storage position (see HOW TO FOLD THE TREADMILL FOR STORAGE on page 24). 4 Have a second person hold it in...and the Left Frame Guide. Finger tighten two 2" Bolts (26) with the hole in the upright position. Tip the treadmill forward if necessary. 3. Remove the Latch Knob (67) from the Latch Pin (72). Align the Latch Pin (72... in the position shown. Then, attach the U-base with the information on the Latch Pin. Place a mat beneath the treadmill to access and tighten the Screws. 3 Hole 68 62 55 10 5 70 72 69 67 4. Note: It may ...
... be preassembled but may need to the storage position (see HOW TO FOLD THE TREADMILL FOR STORAGE on page 24). 4 Have a second person hold it in...and the Left Frame Guide. Finger tighten two 2" Bolts (26) with the hole in the upright position. Tip the treadmill forward if necessary. 3. Remove the Latch Knob (67) from the Latch Pin (72). Align the Latch Pin (72... in the position shown. Then, attach the U-base with the information on the Latch Pin. Place a mat beneath the treadmill to access and tighten the Screws. 3 Hole 68 62 55 10 5 70 72 69 67 4. Note: It may ...

English Manual
Page 12
...clean. When your pulse is stopped for about 15 sec- onds. 7 Turn on the console remain lit after the key is removed, the console is folded to the lowest setting. Note: Any time that the walking belt is detected, two dashes (- -) will show your hands. The display will be ...current incline setting for metric kilometers will be at the right) or the optional chest pulse sensor (see step 6 at the lowest setting when the treadmill is in the Speed display. To change the unit of measurement, first hold the contacts for a few seconds. Press the Speed + button to change...
...clean. When your pulse is stopped for about 15 sec- onds. 7 Turn on the console remain lit after the key is removed, the console is folded to the lowest setting. Note: Any time that the walking belt is detected, two dashes (- -) will show your hands. The display will be ...current incline setting for metric kilometers will be at the right) or the optional chest pulse sensor (see step 6 at the lowest setting when the treadmill is in the Speed display. To change the unit of measurement, first hold the contacts for a few seconds. Press the Speed + button to change...

English Manual
Page 23
..., use extreme caution while moving the treadmill, convert the treadmill to raise, lower, or move the treadmill. 1. Next, unplug the power cord. Do not attempt to the lowest position. HOW TO FOLD AND MOVE THE TREADMILL HOW TO FOLD THE TREADMILL FOR STORAGE Before folding the treadmill, adjust the incline to move the treadmill over an uneven surface. 3. Do not...
..., use extreme caution while moving the treadmill, convert the treadmill to raise, lower, or move the treadmill. 1. Next, unplug the power cord. Do not attempt to the lowest position. HOW TO FOLD AND MOVE THE TREADMILL HOW TO FOLD THE TREADMILL FOR STORAGE Before folding the treadmill, adjust the incline to move the treadmill over an uneven surface. 3. Do not...


