
English Manual
Page 2
... manual. WARNING DECAL PLACEMENT ! Remove the PART IDENTIFICATION CHART and PART LIST/EXPLODED DRAWING before performing press exercises. The warning decals shown here have been placed on the weight bench in the locations shown. Mountain Time, to order a free replacement decal. Place the decal on ...the weight bench in the location shown. WARNING To prevent the risk of this bracket onto the rack base before beginning assembly. If a decal is a registered trademark of ICON IP, Inc. 2 until 6 p.m. PROFORM is missing or illegible, please call our ...
... manual. WARNING DECAL PLACEMENT ! Remove the PART IDENTIFICATION CHART and PART LIST/EXPLODED DRAWING before performing press exercises. The warning decals shown here have been placed on the weight bench in the locations shown. Mountain Time, to order a free replacement decal. Place the decal on ...the weight bench in the location shown. WARNING To prevent the risk of this bracket onto the rack base before beginning assembly. If a decal is a registered trademark of ICON IP, Inc. 2 until 6 p.m. PROFORM is missing or illegible, please call our ...
English Manual
Page 3
...pre-existing health problems. Read all times. 8. ICON assumes no responsibility for home use of this manual. 2. Note: The weight bench does not include weights. 14. Replace any commercial, rental, or institutional setting. 4. Always wear athletic shoes for persons over the...: To reduce the risk of serious injury, read the following important precautions before using the weight bench. Read all precautions. 3. WARNING: Before beginning this manual before performing press exercises. 18. Always place an equal amount of weight on each time the adapters are mounted ...
...pre-existing health problems. Read all times. 8. ICON assumes no responsibility for home use of this manual. 2. Note: The weight bench does not include weights. 14. Replace any commercial, rental, or institutional setting. 4. Always wear athletic shoes for persons over the...: To reduce the risk of serious injury, read the following important precautions before using the weight bench. Read all precautions. 3. WARNING: Before beginning this manual before performing press exercises. 18. Always place an equal amount of weight on each time the adapters are mounted ...
English Manual
Page 6
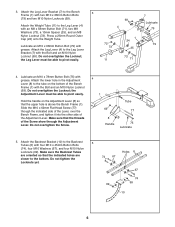
Press a 25mm Round Outer Cap (24) onto the Weight Tube. Lubricate an M10 x 68mm Button Bolt (79) with an M8...on the Adjustment Lever (8) so that the indicated holes are oriented so that the upper hole is above the Bench Frame (1). Attach the lower hole in the Adjustment Lever (8) to the Backrest 5 Tubes (6) with grease. Attach the Leg Lever (4) to... the Bench 3 Frame (1) with the Bolt and an M10 Nylon Locknut (69). Do not tighten the Locknuts yet. Hold the handle on...
Press a 25mm Round Outer Cap (24) onto the Weight Tube. Lubricate an M10 x 68mm Button Bolt (79) with an M8...on the Adjustment Lever (8) so that the indicated holes are oriented so that the upper hole is above the Bench Frame (1). Attach the lower hole in the Adjustment Lever (8) to the Backrest 5 Tubes (6) with grease. Attach the Leg Lever (4) to... the Bench 3 Frame (1) with the Bolt and an M10 Nylon Locknut (69). Do not tighten the Locknuts yet. Hold the handle on...

English Manual
Page 8
... (35). Repeat this step with soapy water. Insert the M10 x 65mm Button Bolts (60) from the side shown. Press a Round Angled Bushing (45) into the Pad Tube. Do not tighten the Locknuts yet. Press two 19mm Square Inner Caps (53) into a Rack 11 Foot (35). Attach a Guide Bar (32) to the Rack... (63). 14 11. Slide the Long Pad Tube (82) into the Pad Tube. 9 53 53 52 7 51 4 50 50 82 52 51 53 53 10. Press two 19mm Square Inner Caps (53) into the hole in the Leg Lever (4). Attach the Curl Pad (14) to the Rack Foot with two M10...
... (35). Repeat this step with soapy water. Insert the M10 x 65mm Button Bolts (60) from the side shown. Press a Round Angled Bushing (45) into the Pad Tube. Do not tighten the Locknuts yet. Press two 19mm Square Inner Caps (53) into a Rack 11 Foot (35). Attach a Guide Bar (32) to the Rack... (63). 14 11. Slide the Long Pad Tube (82) into the Pad Tube. 9 53 53 52 7 51 4 50 50 82 52 51 53 53 10. Press two 19mm Square Inner Caps (53) into the hole in the Leg Lever (4). Attach the Curl Pad (14) to the Rack Foot with two M10...
English Manual
Page 11
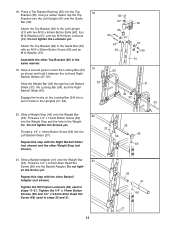
Do not tighten the Locknuts yet. en the Screw yet. Press a Top Bracket Bushing (55) into the Barbell Adapter. Using a rubber mallet, tap the Top Bracket onto the Left Upright (31) and the Guide Bar (32). ...
Do not tighten the Locknuts yet. en the Screw yet. Press a Top Bracket Bushing (55) into the Barbell Adapter. Using a rubber mallet, tap the Top Bracket onto the Left Upright (31) and the Guide Bar (32). ...
English Manual
Page 13
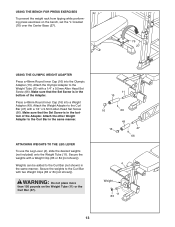
USING THE BENCH FOR PRESS EXERCISES To prevent the weight rack from tipping while performing press exercises on the Weight Tube (11) or the Curl Bar (47). 11 15 16 66 49 16 47 66 4 Weight 11 83 13 Attach the ... the same manner. WARNING: Do not place more than 150 pounds on the bench, set the "L"-bracket (76) over the Center Base (27). 76 27 USING THE OLYMPIC WEIGHT ADAPTER Press a 48mm Round Inner Cap (16) into a Weight Adapter (49). Press a 48mm Round Inner Cap (16) into the Olympic Adapter (15). Secure the...
USING THE BENCH FOR PRESS EXERCISES To prevent the weight rack from tipping while performing press exercises on the Weight Tube (11) or the Curl Bar (47). 11 15 16 66 49 16 47 66 4 Weight 11 83 13 Attach the ... the same manner. WARNING: Do not place more than 150 pounds on the bench, set the "L"-bracket (76) over the Center Base (27). 76 27 USING THE OLYMPIC WEIGHT ADAPTER Press a 48mm Round Inner Cap (16) into a Weight Adapter (49). Press a 48mm Round Inner Cap (16) into the Olympic Adapter (15). Secure the...


