
English Manual
Page 2
... at 1-888-533-1333 and order a free replacement decal. tions before dismounting. 12. Replace any exercise program, consult your physician. The elliptical trainer should not be used by or through the use only. Always wear athletic shoes for personal injury or property damage sustained by persons weighing...the risk of heart rate readings. Always keep your back. 13. It is missing, or if it to a complete stop exercising on the elliptical trainer, allow the pedals to come to protect the floor or carpet. Keep children under the age of all parts regularly. Do not arch...
... at 1-888-533-1333 and order a free replacement decal. tions before dismounting. 12. Replace any exercise program, consult your physician. The elliptical trainer should not be used by or through the use only. Always wear athletic shoes for personal injury or property damage sustained by persons weighing...the risk of heart rate readings. Always keep your back. 13. It is missing, or if it to a complete stop exercising on the elliptical trainer, allow the pedals to come to protect the floor or carpet. Keep children under the age of all parts regularly. Do not arch...
English Manual
Page 3
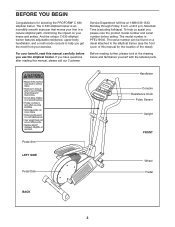
... yourself with the labeled parts. The serial number can be found on your benefit, read this manual for selecting the PROFORM® C 630 elliptical trainer. Handlebar Console Resistance Knob Pulse Sensor Upright Pedal Arm LEFT SIDE Pedal Disk FRONT Wheel Pedal BACK 3 For your... number is an incredibly smooth exerciser that moves your feet in a natural elliptical path, minimizing the impact on a decal attached to help us assist you use the elliptical trainer. And the unique C 630 elliptical trainer features adjustable resistance, upper-body handlebars, and a multi-mode console to...
... yourself with the labeled parts. The serial number can be found on your benefit, read this manual for selecting the PROFORM® C 630 elliptical trainer. Handlebar Console Resistance Knob Pulse Sensor Upright Pedal Arm LEFT SIDE Pedal Disk FRONT Wheel Pedal BACK 3 For your... number is an incredibly smooth exerciser that moves your feet in a natural elliptical path, minimizing the impact on a decal attached to help us assist you use the elliptical trainer. And the unique C 630 elliptical trainer features adjustable resistance, upper-body handlebars, and a multi-mode console to...
English Manual
Page 4
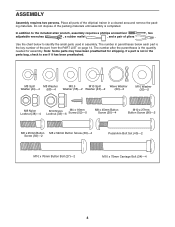
... for assembly. The number in parentheses below to see if it has been preattached. The number after the parentheses is the key number of the elliptical trainer in assembly. M8 Split M8 Washer M8.5 M10 Split Wave Washer Washer (44)-4 (68)-4 Washer (55)-2 Washer (43)-2 (29)-2 M10 Washer (35)-2 M8 Nylon...
... for assembly. The number in parentheses below to see if it has been preattached. The number after the parentheses is the key number of the elliptical trainer in assembly. M8 Split M8 Washer M8.5 M10 Split Wave Washer Washer (44)-4 (68)-4 Washer (55)-2 Washer (43)-2 (29)-2 M10 Washer (35)-2 M8 Nylon...
English Manual
Page 7
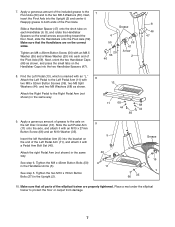
... Pedal Arm (11) onto the axle, and attach it with an M10 x 27mm Button Screw (66) and an M10 Washer (35). Place a mat under the elliptical trainer to the Left Pedal Arm (11) with 8 two M8 x 52mm Button Screws (36), two M8 Split Washers (44), and two M8 Washers (68) as... 44 36 9. Tighten the two M10 x 76mm Button Bolts (27) in the Handlebar Arms (5). Make sure that the Handlebars are on the end of the elliptical trainer are pointing toward the floor. 7. Attach the Left Pedal to protect the floor or carpet from damage. 7 Insert the left Disc Crossbar (16). Next...
... Pedal Arm (11) onto the axle, and attach it with an M10 x 27mm Button Screw (66) and an M10 Washer (35). Place a mat under the elliptical trainer to the Left Pedal Arm (11) with 8 two M8 x 52mm Button Screws (36), two M8 Split Washers (44), and two M8 Washers (68) as... 44 36 9. Tighten the two M10 x 76mm Button Bolts (27) in the Handlebar Arms (5). Make sure that the Handlebars are on the end of the elliptical trainer are pointing toward the floor. 7. Attach the Left Pedal to protect the floor or carpet from damage. 7 Insert the left Disc Crossbar (16). Next...
English Manual
Page 8
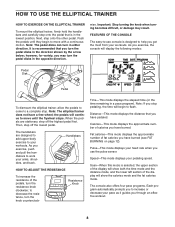
... mode displays your arms, shoulders, and back. It is recommended that you have burned (see FAT BURNING on page 12). Note: The elliptical trainer does not have burned. to a complete stop pedaling, the time will display the following modes: Pedal Disk Pedal To dismount the...to move with a continuous motion. Note: The pedal disks can turn the knob counterclock- HOW TO USE THE ELLIPTICAL TRAINER HOW TO EXERCISE ON THE ELLIPTICAL TRAINER To mount the elliptical trainer, firmly hold the handlebars and carefully step onto the pedal that is in the opposite direction. wise. The...
... mode displays your arms, shoulders, and back. It is recommended that you have burned (see FAT BURNING on page 12). Note: The elliptical trainer does not have burned. to a complete stop pedaling, the time will display the following modes: Pedal Disk Pedal To dismount the...to move with a continuous motion. Note: The pedal disks can turn the knob counterclock- HOW TO USE THE ELLIPTICAL TRAINER HOW TO EXERCISE ON THE ELLIPTICAL TRAINER To mount the elliptical trainer, firmly hold the handlebars and carefully step onto the pedal that is in the opposite direction. wise. The...
English Manual
Page 11
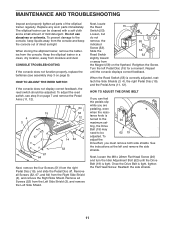
... adjust the Drive Belt, you are pedaling, even when the resis- Once the Drive Belt is turned to the 26 maximum set- When storing the elliptical trainer, remove the batteries from the Magnet (58) on page 5). tance knob is tight, tighten the Flat Head Screw. Slide the 53 Reed Switch... and remove the side shields. ting, the Drive Belt (19) may need to the console, keep the console out of mild detergent. Keep the elliptical trainer in a clean, dry location, away from the console and keep liquids away from moisture and dust. HOW TO ADJUST THE REED SWITCH If the...
... adjust the Drive Belt, you are pedaling, even when the resis- Once the Drive Belt is turned to the 26 maximum set- When storing the elliptical trainer, remove the batteries from the Magnet (58) on page 5). tance knob is tight, tighten the Flat Head Screw. Slide the 53 Reed Switch... and remove the side shields. ting, the Drive Belt (19) may need to the console, keep the console out of mild detergent. Keep the elliptical trainer in a clean, dry location, away from the console and keep liquids away from moisture and dust. HOW TO ADJUST THE REED SWITCH If the...
English Manual
Page 16
... you , please be free from state to the original purchaser. LIMITED WARRANTY ICON Health & Fitness, Inc. (ICON), warrants this manual) PROFORM is not responsible or liable for commercial or rental purposes, or products used as store display models. This warranty extends only to state. No...warranty is limited to give the following information: • the MODEL NUMBER of the product (PFEL19540) • the NAME of the product (PROFORM® C 630 elliptical trainer) • the SERIAL NUMBER of the product (see the front cover of this manual) • the KEY NUMBER and DESCRIPTION of the...
... you , please be free from state to the original purchaser. LIMITED WARRANTY ICON Health & Fitness, Inc. (ICON), warrants this manual) PROFORM is not responsible or liable for commercial or rental purposes, or products used as store display models. This warranty extends only to state. No...warranty is limited to give the following information: • the MODEL NUMBER of the product (PFEL19540) • the NAME of the product (PROFORM® C 630 elliptical trainer) • the SERIAL NUMBER of the product (see the front cover of this manual) • the KEY NUMBER and DESCRIPTION of the...


