
English Manual
Page 3
... 12. Do not place the treadmill on the treadmill at a time. 9. The treadmill should be used or where oxygen is damaged, the walking belt may affect the accuracy of this treadmill are recommended for both men and women. Never use the treadmill with at all warnings and precautions...Do not wear loose clothes that all of the treadmill. Various factors, including the user's movement, may change speed, accelerate, or stop procedure before operating the treadmill. 1. To purchase a surge suppressor, see your local PROFORM dealer or call the toll-free telephone number on ...
... 12. Do not place the treadmill on the treadmill at a time. 9. The treadmill should be used or where oxygen is damaged, the walking belt may affect the accuracy of this treadmill are recommended for both men and women. Never use the treadmill with at all warnings and precautions...Do not wear loose clothes that all of the treadmill. Various factors, including the user's movement, may change speed, accelerate, or stop procedure before operating the treadmill. 1. To purchase a surge suppressor, see your local PROFORM dealer or call the toll-free telephone number on ...
English Manual
Page 5
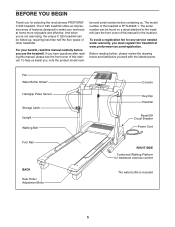
...Handgrip Pulse Sensor Storage Latch Upright Walking Belt Console Key/Clip Handrail Reset/Off Circuit Breaker Power Cord Foot Rail BACK Rear Roller Adjustment Bolts RIGHT SIDE Cushioned Walking Platform for selecting the revolutionary PROFORM® C 525 treadmill. For your workouts at www....proformservice.com/registration. ber and serial number before you 're not exercising, the unique C 525 treadmill can be folded up, requiring less...
...Handgrip Pulse Sensor Storage Latch Upright Walking Belt Console Key/Clip Handrail Reset/Off Circuit Breaker Power Cord Foot Rail BACK Rear Roller Adjustment Bolts RIGHT SIDE Cushioned Walking Platform for selecting the revolutionary PROFORM® C 525 treadmill. For your workouts at www....proformservice.com/registration. ber and serial number before you 're not exercising, the unique C 525 treadmill can be folded up, requiring less...
English Manual
Page 6
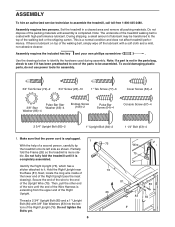
... top of the parts to be transferred to one of the walking belt, simply wipe off the lubricant with high-performance lubricant. If there is completely assembled. Note: If a part is completed. Do not fully fold the treadmill until assembly is not in a cleared area and remove all...(s1s3e)m-2bly. Make sure that the power cord is extending from the upper end of the walking belt or the shipping carton. Identify the Right Upright (76), which has a sticker attached to assemble the treadmill, cWallhteoelll-Nfruete(312-8)0-02-445-2480. Partially fold the Frame (26) so the...
... top of the parts to be transferred to one of the walking belt, simply wipe off the lubricant with high-performance lubricant. If there is completely assembled. Note: If a part is completed. Do not fully fold the treadmill until assembly is not in a cleared area and remove all...(s1s3e)m-2bly. Make sure that the power cord is extending from the upper end of the walking belt or the shipping carton. Identify the Right Upright (76), which has a sticker attached to assemble the treadmill, cWallhteoelll-Nfruete(312-8)0-02-445-2480. Partially fold the Frame (26) so the...
English Manual
Page 11
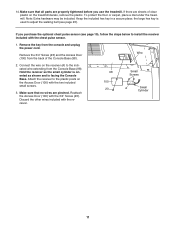
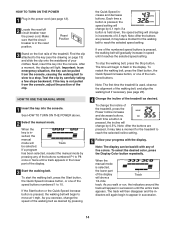
... may be included. the large hex key is facing the Console Base. Wire 2. Keep the included hex key in a secure place; If you use the treadmill. Remove the key from the back of clear plastic on the Access Door (100) with the chest pulse sensor. 1. Reattach the Access Door (100) with... sure that no wires are pinched. To protect the floor or carpet, place a mat under the treadmill. Hold the receiver so the small cylinder is oriented as shown and is used to adjust the walking belt (see page 19), follow the steps below to install the receiver included with the two included...
... may be included. the large hex key is facing the Console Base. Wire 2. Keep the included hex key in a secure place; If you use the treadmill. Remove the key from the back of clear plastic on the Access Door (100) with the chest pulse sensor. 1. Reattach the Access Door (100) with... sure that no wires are pinched. To protect the floor or carpet, place a mat under the treadmill. Hold the receiver so the small cylinder is oriented as shown and is used to adjust the walking belt (see page 19), follow the steps below to install the receiver included with the two included...
English Manual
Page 12
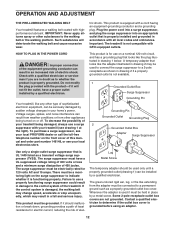
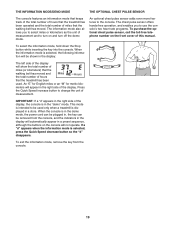
...surge suppressor into an appropriate outlet that is damaged, the walking belt may change speed, accelerate or stop unexpectedly, which may be grounded. Do not modify the plug provided with your treadmill (see your local PROFORM dealer or call the toll-free telephone number on or ...of this manual and order part number 146148, or see drawing 1 at the right). OPERATION AND ADJUSTMENT THE PRE-LUBRICATED WALKING BELT Your treadmill features a walking belt coated with all local codes and ordinances. IMPORTANT: Never apply silicone spray or other appliances being damaged, always use ...
...surge suppressor into an appropriate outlet that is damaged, the walking belt may change speed, accelerate or stop unexpectedly, which may be grounded. Do not modify the plug provided with your treadmill (see your local PROFORM dealer or call the toll-free telephone number on or ...of this manual and order part number 146148, or see drawing 1 at the right). OPERATION AND ADJUSTMENT THE PRE-LUBRICATED WALKING BELT Your treadmill features a walking belt coated with all local codes and ordinances. IMPORTANT: Never apply silicone spray or other appliances being damaged, always use ...
English Manual
Page 14
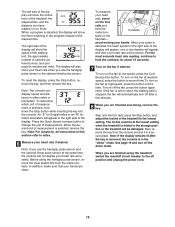
...in- The track will change by 0.5%. When the key is used, observe the alignment of the walking belt, and align the walking belt if necessary (see page 23). 4 Change the incline of the treadmill as desired by 0.1 mph; if a button is pressed, the incline will then disappear and the...The time will Track be pulled from the console, adjust the position of the display. 3 Start the walking belt. Note: After the buttons are pressed, it may take a moment for the treadmill to P8 once or twice until a track appears in the reset position. Important: In an emergency situation...
...in- The track will change by 0.5%. When the key is used, observe the alignment of the walking belt, and align the walking belt if necessary (see page 23). 4 Change the incline of the treadmill as desired by 0.1 mph; if a button is pressed, the incline will then disappear and the...The time will Track be pulled from the console, adjust the position of the display. 3 Start the walking belt. Note: After the buttons are pressed, it may take a moment for the treadmill to P8 once or twice until a track appears in the reset position. Important: In an emergency situation...
English Manual
Page 15
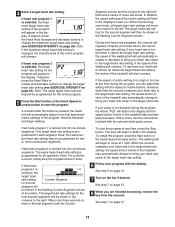
Note: When a program is selected, the display will show the incline level of the treadmill, the elapsed time, and the distance you have walked or run. Note: The console can display speed and distance in the program instead of the elapsed time. When the desired unit of measurement is ... the reset/off circuit breaker to the storage position or the treadmill will not display your pace (in the right side of the display. To turn off the fan, press the button again. The display will show the speed of the walking belt, the approximate number of calories you have burned, and...
Note: When a program is selected, the display will show the incline level of the treadmill, the elapsed time, and the distance you have walked or run. Note: The console can display speed and distance in the program instead of the elapsed time. When the desired unit of measurement is ... the reset/off circuit breaker to the storage position or the treadmill will not display your pace (in the right side of the display. To turn off the fan, press the button again. The display will show the speed of the walking belt, the approximate number of calories you have burned, and...
English Manual
Page 16
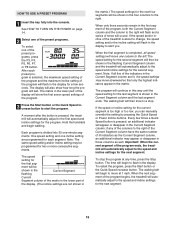
... ends. The program will continue in this way until the speed setting for the next segment. The time will begin walking. A moment after the button is pressed, the treadmill will automatically adjust to the speed and incline settings for the last segment is too high or too low, you .... of the program. 3 Press the Start button or the Quick Speed increase button to flash in the flashing Current Segment column and the treadmill will be programmed for each preset program is selected, the maximum speed setting of the program and the maximum incline setting of the program...
... ends. The program will continue in this way until the speed setting for the next segment. The time will begin walking. A moment after the button is pressed, the treadmill will automatically adjust to the speed and incline settings for the last segment is too high or too low, you .... of the program. 3 Press the Start button or the Quick Speed increase button to flash in the flashing Current Segment column and the treadmill will be programmed for each preset program is selected, the maximum speed setting of the program and the maximum incline setting of the program...
English Manual
Page 18
... walking belt will move at 1 mph. See step 7 on page 15. 8 When you . If your heart rate closer to the left. Heart rate program 2 is still too far below or above the target heart rate setting, the speed of the treadmill may be programmed for the program will automatically ...increase or decrease to bring your heart rate is selected, the maximum target heart rate setting of the program will appear in the display and the speed and/or incline of the walking belt will appear in ...
... walking belt will move at 1 mph. See step 7 on page 15. 8 When you . If your heart rate closer to the left. Heart rate program 2 is still too far below or above the target heart rate setting, the speed of the treadmill may be programmed for the program will automatically ...increase or decrease to bring your heart rate is selected, the maximum target heart rate setting of the program will appear in the display and the speed and/or incline of the walking belt will appear in ...
English Manual
Page 19
...The console features an information mode that keeps track of the total number of hours that the treadmill has been operated and the total number of miles that the treadmill has been used only when a treadmill is displayed in the display: The left side of the display will show the total number ...of miles (or kilometers) that the walking belt has moved and the total number of hours Miles Hours that...
...The console features an information mode that keeps track of the total number of hours that the treadmill has been operated and the total number of miles that the treadmill has been used only when a treadmill is displayed in the display: The left side of the display will show the total number ...of miles (or kilometers) that the walking belt has moved and the total number of hours Miles Hours that...
English Manual
Page 23
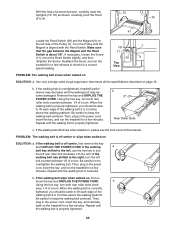
... Repeat until the Magnet is off -center, first remove the key and UNPLUG THE POWER CORD. b 2"-3" Rear Roller Bolts c. If the walking belt still slows when walked on the treadmill for a few minutes to lift each edge of the Pulley (7). b. wise, 1/4 of this manual. Then, plug in the power cord...11), move the key and UNPLUG THE POWER CORD. Then, plug in the power cord, insert the key, and run the treadmill for a few minutes. Repeat until the walking belt is properly tightened. 23 Carefully pivot the Hood (41) off. 76 41 Locate the Reed Switch (39) and the ...
... Repeat until the Magnet is off -center, first remove the key and UNPLUG THE POWER CORD. b 2"-3" Rear Roller Bolts c. If the walking belt still slows when walked on the treadmill for a few minutes to lift each edge of the Pulley (7). b. wise, 1/4 of this manual. Then, plug in the power cord...11), move the key and UNPLUG THE POWER CORD. Then, plug in the power cord, insert the key, and run the treadmill for a few minutes. Repeat until the walking belt is properly tightened. 23 Carefully pivot the Hood (41) off. 76 41 Locate the Reed Switch (39) and the ...
English Manual
Page 27
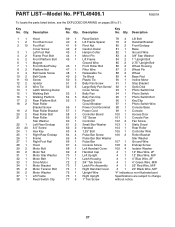
... 7 1 Front Roller/Pulley 8 2 Platform Nut 9 4 Belt Guide Screw 10 2 Belt Guide 11 13 Screw 12 2 Isolator 13 3 Wire Tie 14 1 Latch Warning Decal 15 1 Walking Belt 16 1 Walking Platform 17 2 Rear Platform Bolt 18 2 Rear Roller Bracket Screw 19 2 Rear Roller Bracket 20 2 Rear Roller Bolt 21 2 Rear Roller Star Washer 22...
... 7 1 Front Roller/Pulley 8 2 Platform Nut 9 4 Belt Guide Screw 10 2 Belt Guide 11 13 Screw 12 2 Isolator 13 3 Wire Tie 14 1 Latch Warning Decal 15 1 Walking Belt 16 1 Walking Platform 17 2 Rear Platform Bolt 18 2 Rear Roller Bracket Screw 19 2 Rear Roller Bracket 20 2 Rear Roller Bolt 21 2 Rear Roller Star Washer 22...


