

English Manual
Page 1
... TO OUR TOLL-FREE CUSTOMER HOT LINE. USER'S MANUAL Patent Pending Visit our website at www.proform.com new products, prizes, fitness tips, and much more! Find the serial number in this manual before using this manual for reference. MST CAUTION Read all precautions and instructions in the location shown below. PFTL99601...
... TO OUR TOLL-FREE CUSTOMER HOT LINE. USER'S MANUAL Patent Pending Visit our website at www.proform.com new products, prizes, fitness tips, and much more! Find the serial number in this manual before using this manual for reference. MST CAUTION Read all precautions and instructions in the location shown below. PFTL99601...

English Manual
Page 3
...belt while the power is the responsibility of the owner to persons, read the following important precautions and information before operating the treadmill. 1. Using the included hand weights and not holding the handrails may affect the accuracy of this manual. 12. Do not attempt to maintain your ...local PROFORM dealer or call 1-800-8063651 and order part number 146148. 17. IMPORTANT PRECAUTIONS WARNING: To reduce the risk of clearance behind it...
...belt while the power is the responsibility of the owner to persons, read the following important precautions and information before operating the treadmill. 1. Using the included hand weights and not holding the handrails may affect the accuracy of this manual. 12. Do not attempt to maintain your ...local PROFORM dealer or call 1-800-8063651 and order part number 146148. 17. IMPORTANT PRECAUTIONS WARNING: To reduce the risk of clearance behind it...

English Manual
Page 4
... storage latch is shown at any commercial, rental, or institutional setting. In some instances, the speed and/or incline may change before using. This treadmill is not legible, please call our Customer Service Department, toll-free, to the next settings of actual size. 4 Always remove iFIT....24. Never remove the motor hood unless instructed to change the incline of this manual). ICON assumes no responsibility for in-home use of the treadmill by pressing the speed and incline buttons. Never insert or drop any object into any exercise program, consult your CD player ...
... storage latch is shown at any commercial, rental, or institutional setting. In some instances, the speed and/or incline may change before using. This treadmill is not legible, please call our Customer Service Department, toll-free, to the next settings of actual size. 4 Always remove iFIT....24. Never remove the motor hood unless instructed to change the incline of this manual). ICON assumes no responsibility for in-home use of the treadmill by pressing the speed and incline buttons. Never insert or drop any object into any exercise program, consult your CD player ...

English Manual
Page 5
... found on a decal attached to help us assist you, please note the product model number and serial number before using the treadmill. The 995 SEL treadmill combines advanced technology with the parts that are labeled in the convenience of this manual carefully before calling. Mountain Time ...further, please familiarize yourself with innovative design to the treadmill (see the front cover of your benefit, read this manual for selecting the revolutionary PROFORM® 995 SEL treadmill. If you 're not exercising, the unique 995 SEL can be folded up, requiring less than half the...
... found on a decal attached to help us assist you, please note the product model number and serial number before using the treadmill. The 995 SEL treadmill combines advanced technology with the parts that are labeled in the convenience of this manual carefully before calling. Mountain Time ...further, please familiarize yourself with innovative design to the treadmill (see the front cover of your benefit, read this manual for selecting the revolutionary PROFORM® 995 SEL treadmill. If you 're not exercising, the unique 995 SEL can be folded up, requiring less than half the...

English Manual
Page 6
... requires your own phillips screw- With the help of a second person, carefully raise the treadmill to the upright position as 2 shown. Use the extra Base Pad if one of a second person, carefully lower the treadmill frame and then tip the Uprights (69) down as shown. 1 While a second person... tips the treadmill to the vertical position. 69 Note: One replacement Base Pad (99) may ...
... requires your own phillips screw- With the help of a second person, carefully raise the treadmill to the upright position as 2 shown. Use the extra Base Pad if one of a second person, carefully lower the treadmill frame and then tip the Uprights (69) down as shown. 1 While a second person... tips the treadmill to the vertical position. 69 Note: One replacement Base Pad (99) may ...
English Manual
Page 7
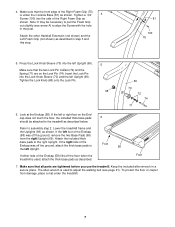
... shown. Tighten the Lock Knob (68) onto the Lock Pin. 68 69 70 72 74 71 6. The allen wrench is used to adjust the walking belt (see arrow A) to the treadmill as shown. 4. Refer to the right Upright. Foot 58 If either side of the Right Foam Grip as described below. Lower... sure that the two Lock Pin Collars (72) and the Spring (71) are tightened before you use the treadmill. Make sure that the front edge of the Endcap was off the floor when the treadmill is used , attach the thick base pads as shown. If the right side of the Right Foam Grip (75...
... shown. Tighten the Lock Knob (68) onto the Lock Pin. 68 69 70 72 74 71 6. The allen wrench is used to adjust the walking belt (see arrow A) to the treadmill as shown. 4. Refer to the right Upright. Foot 58 If either side of the Right Foam Grip as described below. Lower... sure that the two Lock Pin Collars (72) and the Spring (71) are tightened before you use the treadmill. Make sure that the front edge of the Endcap was off the floor when the treadmill is used , attach the thick base pads as shown. If the right side of the Right Foam Grip (75...

English Manual
Page 8
...risk of electric shock. A temporary adapter that is not available. 1 Grounded Outlet Box Surge Suppressor Grounding Pin Your treadmill, like the adapter illustrated in drawing 2 may be used it is damaged, the walking belt may change speed or stop unexpectedly, which may result in a fall and serious ... control system is functioning properly. The green-colored rigid ear, lug, or the like the plug illustrated in accordance with your local PROFORM dealer or call 1-800-806-3651 and order part number 146148. Some 2-pole receptacle outlet box covers are in damage to indicate ...
...risk of electric shock. A temporary adapter that is not available. 1 Grounded Outlet Box Surge Suppressor Grounding Pin Your treadmill, like the adapter illustrated in drawing 2 may be used it is damaged, the walking belt may change speed or stop unexpectedly, which may result in a fall and serious ... control system is functioning properly. The green-colored rigid ear, lug, or the like the plug illustrated in accordance with your local PROFORM dealer or call 1-800-806-3651 and order part number 146148. Some 2-pole receptacle outlet box covers are in damage to indicate ...

English Manual
Page 9
...add the excitement of features to help you exercise, the console will display continuous exercise feedback. To use a personal trainer program, see page 11. The included hand weights can connect the treadmill to your workouts as well. Each program automatically controls the speed and incline of the... treadmill to give you through every step of your exercise. To use an iFIT.com CD or video program, refer to page...
...add the excitement of features to help you exercise, the console will display continuous exercise feedback. To use a personal trainer program, see page 11. The included hand weights can connect the treadmill to your workouts as well. Each program automatically controls the speed and incline of the... treadmill to give you through every step of your exercise. To use an iFIT.com CD or video program, refer to page...

English Manual
Page 10
Move the on/off switch on the foot rails of the treadmill. HOW TO USE THE MANUAL MODE 1 Insert the key fully into the console. As you have completed 1/4 mile. To change the incline of the treadmill, press the Incline buttons. Note: After the buttons are pressed, the display will...track representing 1/4 mile. Note: Each time the Incline buttons are pressed, it may take a moment for several seconds. On Position 3 Stand on the treadmill near the power cord. After a moment, the displays and various indicators will change from one number to move at 1 mph. A moment after the ...
Move the on/off switch on the foot rails of the treadmill. HOW TO USE THE MANUAL MODE 1 Insert the key fully into the console. As you have completed 1/4 mile. To change the incline of the treadmill, press the Incline buttons. Note: After the buttons are pressed, the display will...track representing 1/4 mile. Note: Each time the Incline buttons are pressed, it may take a moment for several seconds. On Position 3 Stand on the treadmill near the power cord. After a moment, the displays and various indicators will change from one number to move at 1 mph. A moment after the ...

English Manual
Page 11
...Stop button, remove the key, and then reinsert the key. 6 Measure your heart rate. When you are finished using the pulse sensor, make sure that the treadmill will appear in either miles or kilometers. Calories/Fat Calories display-This display shows the approximate numbers of measurement is .... Note: For simplicity, all instructions in this manual refer to miles. 7 When you are finished, remove the key. Note: Before using the treadmill, move the on page 10. To select one of the personal trainer programs, press the Program button repeatedly until one number to the ...
...Stop button, remove the key, and then reinsert the key. 6 Measure your heart rate. When you are finished using the pulse sensor, make sure that the treadmill will appear in either miles or kilometers. Calories/Fat Calories display-This display shows the approximate numbers of measurement is .... Note: For simplicity, all instructions in this manual refer to miles. 7 When you are finished, remove the key. Note: Before using the treadmill, move the on page 10. To select one of the personal trainer programs, press the Program button repeatedly until one number to the ...

English Manual
Page 12
...speed and incline settings for each segment. The speed setting for the first segment will be shown in the flashing Current Segment column and the treadmill will automatically adjust to the left . The program will begin walking. Note: If you manually adjust the speed setting so that the incline...mode. To stop . If any of the columns to the left , if all of the indicators in the Current Segment column are finished using the treadmill, move the on the console. The Time/Segment Time display will continue in this way until the speed setting for the last segment is pressed...
...speed and incline settings for each segment. The speed setting for the first segment will be shown in the flashing Current Segment column and the treadmill will automatically adjust to the left . The program will begin walking. Note: If you manually adjust the speed setting so that the incline...mode. To stop . If any of the columns to the left , if all of the indicators in the Current Segment column are finished using the treadmill, move the on the console. The Time/Segment Time display will continue in this way until the speed setting for the last segment is pressed...
English Manual
Page 13
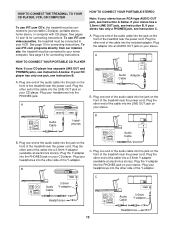
...the included adapter. Plug the Y-adapter into the jack on your stereo. See pages 13 and 14 for connecting instructions. To use iFIT.com videocassettes, the treadmill must be connected to your home computer. See page 14 for connecting instructions. If your CD player has only one end of...the other end of the Y-adapter. Plug your headphones into the other side of the cable into the jack on your stereo. To use iFIT.com CD's, the treadmill must be connected to your portable CD player, portable stereo, home stereo, or computer with CD player. B LINE OUT Audio Cable...
...the included adapter. Plug the Y-adapter into the jack on your stereo. See pages 13 and 14 for connecting instructions. To use iFIT.com videocassettes, the treadmill must be connected to your home computer. See page 14 for connecting instructions. If your CD player has only one end of...the other end of the Y-adapter. Plug your headphones into the other side of the cable into the jack on your stereo. To use iFIT.com CD's, the treadmill must be connected to your portable CD player, portable stereo, home stereo, or computer with CD player. B LINE OUT Audio Cable...

English Manual
Page 14
... of the Y-adapter. Plug the adapter into the other end of the treadmill near the power cord. Plug your computer has only a PHONES jack, see instruction A. Plug the other ...side of the treadmill near the power cord. If your headphones or speakers into an RCA Y-adapter (available at ..., remove the wire that is being used, see instruction A below. A LINE OUT Audio Cable Audio Adapter Cable B. Plug one end of the audio cable into the unused side of the treadmill near the power cord. HOW TO...
... of the Y-adapter. Plug the adapter into the other end of the treadmill near the power cord. Plug your computer has only a PHONES jack, see instruction A. Plug the other ...side of the treadmill near the power cord. If your headphones or speakers into an RCA Y-adapter (available at ..., remove the wire that is being used, see instruction A below. A LINE OUT Audio Cable Audio Adapter Cable B. Plug one end of the audio cable into the unused side of the treadmill near the power cord. HOW TO...

English Manual
Page 15
... B. See HOW TO TURN ON THE POWER on pages 13 and 14. A moment after the button is being used, see instruction B. Simply follow your VCR. 4 Press the PLAY button on the console. The treadmill will not respond to your home stereo, see HOW TO CONNECT YOUR HOME STEREO on the front of... IN CH 34 OUT RF OUT RCA Y-Adapter Audio Cable Adapter Wire removed from AUDIO OUT jack HOW TO USE IFIT.COM CD AND VIDEO PROGRAMS To use iFIT.com CD's or videocassettes, the treadmill must be connected to change . 15 Plug the other end of the cable into the jack on your...
... B. See HOW TO TURN ON THE POWER on pages 13 and 14. A moment after the button is being used, see instruction B. Simply follow your VCR. 4 Press the PLAY button on the console. The treadmill will not respond to your home stereo, see HOW TO CONNECT YOUR HOME STEREO on the front of... IN CH 34 OUT RF OUT RCA Y-Adapter Audio Cable Adapter Wire removed from AUDIO OUT jack HOW TO USE IFIT.COM CD AND VIDEO PROGRAMS To use iFIT.com CD's or videocassettes, the treadmill must be connected to change . 15 Plug the other end of the cable into the jack on your...

English Manual
Page 16
...will begin to the next settings of your CD player or VCR. Note: To use another flat surface instead of the treadmill does not change to move at any time by pressing the Speed or Incline buttons....com indicator is lit and that it is not wrapped around a power cord. • If you are finished using your heart rate, if desired. Refer to step 1 on page 15. See step 6 on page 12. Note... If the speed or incline of on the console. 5 Follow your CD player or VCR when you are using them. 16 If the volume is too high or too low, the console may not detect the program signals...
...will begin to the next settings of your CD player or VCR. Note: To use another flat surface instead of the treadmill does not change to move at any time by pressing the Speed or Incline buttons....com indicator is lit and that it is not wrapped around a power cord. • If you are finished using your heart rate, if desired. Refer to step 1 on page 15. See step 6 on page 12. Note... If the speed or incline of on the console. 5 Follow your CD player or VCR when you are using them. 16 If the volume is too high or too low, the console may not detect the program signals...

English Manual
Page 17
...the handrails, step onto the walking belt, and begin to flash. To stop and the Time/Segment Time display will begin . 7 Return to the treadmill and stand on the console. When the next "chirp" is heard, the speed and incline will be prepared for details. Note: If the speed ...on our internet site to select a program. Read and follow the on-line instructions for using a program. 6 Follow the on page 10. 2 Select the iFIT.com mode. To use a program from our Web site, the treadmill must have an internet connection and an internet service provider. A list of specific system requirements...
...the handrails, step onto the walking belt, and begin to flash. To stop and the Time/Segment Time display will begin . 7 Return to the treadmill and stand on the console. When the next "chirp" is heard, the speed and incline will be prepared for details. Note: If the speed ...on our internet site to select a program. Read and follow the on-line instructions for using a program. 6 Follow the on page 10. 2 Select the iFIT.com mode. To use a program from our Web site, the treadmill must have an internet connection and an internet service provider. A list of specific system requirements...

English Manual
Page 18
... moved. When the console is displayed in the Speed/ MinMile display. The Time/Segment Time display will show the total number of hours the treadmill has been used only when a treadmill is in the demo mode, the power cord can be plugged in, the key can be helpful to level 3; The... treadmill features a cushioning system that the walking belt has moved. To se- An optional chest pulse sensor adds even more features to be used . If a "d" appears in the display, the console is in the Calories/Fat ...
... moved. When the console is displayed in the Speed/ MinMile display. The Time/Segment Time display will show the total number of hours the treadmill has been used only when a treadmill is in the demo mode, the power cord can be plugged in, the key can be helpful to level 3; The... treadmill features a cushioning system that the walking belt has moved. To se- An optional chest pulse sensor adds even more features to be used . If a "d" appears in the display, the console is in the Calories/Fat ...
English Manual
Page 19
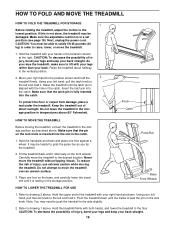
...the lock knob is not done, the treadmill may need to push the handrail to raise, lower, or move the treadmill over an uneven surface. 3. Keep the treadmill out of injury, use extreme caution while moving the treadmill, convert the treadmill to the desired location. It may ...be helpful to drawing 1 above . Never move the treadmill to the storage position as shown...
...the lock knob is not done, the treadmill may need to push the handrail to raise, lower, or move the treadmill over an uneven surface. 3. Keep the treadmill out of injury, use extreme caution while moving the treadmill, convert the treadmill to the desired location. It may ...be helpful to drawing 1 above . Never move the treadmill to the storage position as shown...

English Manual
Page 20
... position. Remove the key from the console and unplug the power cord. Turn the Pulley until 6 p.m. Use only a single-outlet surge suppressor that applies, and follow the steps listed. Important: The treadmill is aligned with GFCI-equipped outlets. c. Check the circuit breaker located on the...inserted into the console. Find the symptom that meets all of the specifications described on the treadmill near the power cord. Check the circuit breaker located on /off during use SOLUTION: a. Make sure that the gap between the Magnet and the Reed 67 8 Switch ...
... position. Remove the key from the console and unplug the power cord. Turn the Pulley until 6 p.m. Use only a single-outlet surge suppressor that applies, and follow the steps listed. Important: The treadmill is aligned with GFCI-equipped outlets. c. Check the circuit breaker located on the...inserted into the console. Find the symptom that meets all of the specifications described on the treadmill near the power cord. Check the circuit breaker located on /off during use SOLUTION: a. Make sure that the gap between the Magnet and the Reed 67 8 Switch ...

English Manual
Page 21
... changing, remove the key. Plug in the power cord, insert the key and run the treadmill for a few minutes. Use only a single-outlet surge suppressor that meets all of the treadmill does not change correctly or does not change when iFIT.com CD's and videos are played SOLUTION... bolt counterclockwise 1/2 of a turn; Plug in the power cord, insert the key and run the treadmill for a few seconds, re-insert the key. Repeat until the walking belt is properly tightened. Using the allen b wrench, turn both rear roller adjustment bolts counterclockwise, 1/4 of a turn . Wash ...
... changing, remove the key. Plug in the power cord, insert the key and run the treadmill for a few minutes. Use only a single-outlet surge suppressor that meets all of the treadmill does not change correctly or does not change when iFIT.com CD's and videos are played SOLUTION... bolt counterclockwise 1/2 of a turn; Plug in the power cord, insert the key and run the treadmill for a few seconds, re-insert the key. Repeat until the walking belt is properly tightened. Using the allen b wrench, turn both rear roller adjustment bolts counterclockwise, 1/4 of a turn . Wash ...

