
Uk Manual
Page 3
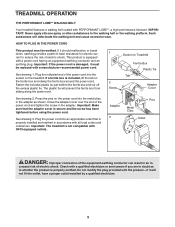
..."chirp" and be fitted to the off position when the treadmill is no longer than one person on the same circuit. Never move the walking belt whilst the power is not working properly.) 14. Do not operate the treadmill where aerosol products are not medical devices. Always remove the...floor or carpet from moisture and dust. Keep the power cord away from the treadmill at least 2.5 m (8 ft.) of clearance behind it and 0.5 m (2 ft.) on /off . Do not operate the treadmill if the power cord or plug is damaged, or if the treadmill is not working properly. (See BEFORE YOU BEGIN ...
..."chirp" and be fitted to the off position when the treadmill is no longer than one person on the same circuit. Never move the walking belt whilst the power is not working properly.) 14. Do not operate the treadmill where aerosol products are not medical devices. Always remove the...floor or carpet from moisture and dust. Keep the power cord away from the treadmill at least 2.5 m (8 ft.) of clearance behind it and 0.5 m (2 ft.) on /off . Do not operate the treadmill if the power cord or plug is damaged, or if the treadmill is not working properly. (See BEFORE YOU BEGIN ...

Uk Manual
Page 4
...settings of this manual). WARNING: Before beginning this manual. Always unplug the power cord immediately after use only. This is intended for in-home use , before cleaning the treadmill, and before using them. 23. SAVE THESE INSTRUCTIONS The decals shown at...ORDERING REPLACEMENT PARTS on your physician. Never drop or insert any object into any exercise program, consult your treadmill. vice representative only. 26. The treadmill is especially important for personal injury or property damage sustained by an authorised service representative. scribed in the ...
...settings of this manual). WARNING: Before beginning this manual. Always unplug the power cord immediately after use only. This is intended for in-home use , before cleaning the treadmill, and before using them. 23. SAVE THESE INSTRUCTIONS The decals shown at...ORDERING REPLACEMENT PARTS on your physician. Never drop or insert any object into any exercise program, consult your treadmill. vice representative only. 26. The treadmill is especially important for personal injury or property damage sustained by an authorised service representative. scribed in the ...
Uk Manual
Page 5
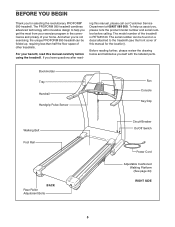
... review the drawing below and familiarise yourself with innovative design to the treadmill (see the front cover of the treadmill is PETL85140. BEFORE YOU BEGIN Thank you 're not exercising, the unique PROFORM 990 treadmill can be folded up, requiring less than half the floor space of...Roller Adjustment Bolts Circuit Breaker On/Off Switch Power Cord Adjustable Cushioned Walking Platform (See page 24) RIGHT SIDE 5 And when you for the location). For your home. ing this manual for selecting the revolutionary PROFORM® 990 treadmill. The serial number can be found on a...
... review the drawing below and familiarise yourself with innovative design to the treadmill (see the front cover of the treadmill is PETL85140. BEFORE YOU BEGIN Thank you 're not exercising, the unique PROFORM 990 treadmill can be folded up, requiring less than half the floor space of...Roller Adjustment Bolts Circuit Breaker On/Off Switch Power Cord Adjustable Cushioned Walking Platform (See page 24) RIGHT SIDE 5 And when you for the location). For your home. ing this manual for selecting the revolutionary PROFORM® 990 treadmill. The serial number can be found on a...
Uk Manual
Page 6
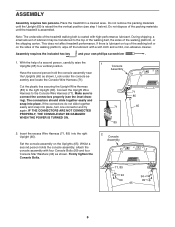
... below). Whilst a second person holds the console assembly, attach the console assembly with high-performance lubricant. Do not remove the packing materials until the treadmill is raised the the vertical position (see the inset drawing). Do not dispose of the packing materials until the Upright (65) is assembled. This ... the Upright Wire Harness to the right Upright (65). IF THE CONNECTORS ARE NOT CONNECTED PROPERLY, THE CONSOLE MAY BE DAMAGED WHEN THE POWER IS TURNED ON. 71 85 71 65 85 2. Insert the excess Wire Harness (71, 85) into the right Upright (65).
... below). Whilst a second person holds the console assembly, attach the console assembly with high-performance lubricant. Do not remove the packing materials until the treadmill is raised the the vertical position (see the inset drawing). Do not dispose of the packing materials until the Upright (65) is assembled. This ... the Upright Wire Harness to the right Upright (65). IF THE CONNECTORS ARE NOT CONNECTED PROPERLY, THE CONSOLE MAY BE DAMAGED WHEN THE POWER IS TURNED ON. 71 85 71 65 85 2. Insert the excess Wire Harness (71, 85) into the right Upright (65).
Uk Manual
Page 8
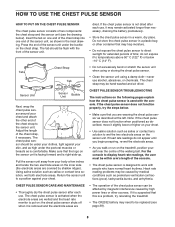
...a few inches and locate the two electrode areas on the chest strap. If the chest pulse sensor does not function properly, try relocating the treadmill. • The CR2032 battery may be under the pectoral muscles or breasts as is designed to be replaced (see the drawing below -10°... contractions (pvcs), tachycardia bursts, and arrhythmia. dried. If the chest pulse sensor is removed and the electrode areas are covered by high power lines or other sources. Note: If the chest pulse sensor does not function when positioned as high under your clothes, tight against your ...
...a few inches and locate the two electrode areas on the chest strap. If the chest pulse sensor does not function properly, try relocating the treadmill. • The CR2032 battery may be under the pectoral muscles or breasts as is designed to be replaced (see the drawing below -10°... contractions (pvcs), tachycardia bursts, and arrhythmia. dried. If the chest pulse sensor is removed and the electrode areas are covered by high power lines or other sources. Note: If the chest pulse sensor does not function when positioned as high under your clothes, tight against your ...
Uk Manual
Page 9
...adapter. If a ferrite box is secure and the screw has been tightened before using the power cord. Close the adapter cover over the end of the power cord into the socket on the treadmill. creased risk of the equipment-earthing conductor can result in an in accordance with all local... into an appropriate outlet that the adapter cover is included, lift the tab on Treadmill 2 Screw Ferrite Box Plastic Tie Tab Adapter Cover See drawing 2. Plug the power cord into the metal clips in doubt as shown. Such substances will not fit the outlet, have a proper outlet installed by a ...
...adapter. If a ferrite box is secure and the screw has been tightened before using the power cord. Close the adapter cover over the end of the power cord into the socket on the treadmill. creased risk of the equipment-earthing conductor can result in an in accordance with all local... into an appropriate outlet that the adapter cover is included, lift the tab on Treadmill 2 Screw Ferrite Box Plastic Tie Tab Adapter Cover See drawing 2. Plug the power cord into the metal clips in doubt as shown. Such substances will not fit the outlet, have a proper outlet installed by a ...
Uk Manual
Page 11
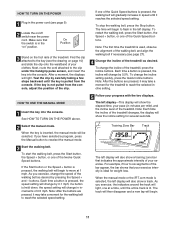
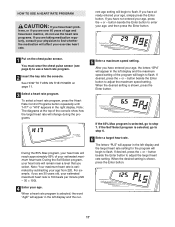
HOW TO TURN ON THE POWER 1 Plug in the power cord (see page 9). 2 Locate the on " position. If the key is not pulled from the console. To restart the walking belt, press the Start button, the Speed + button, or one of the treadmill, press the Incline buttons. Note: After the ...to reach the selected incline setting. To change in increments of the bar appear, the bar shows that indicates the approximate intensity of the treadmill. If you exercise, change the incline of the twelve Quick Speed buttons. To change the speed of the Quick Speed buttons is pressed...
HOW TO TURN ON THE POWER 1 Plug in the power cord (see page 9). 2 Locate the on " position. If the key is not pulled from the console. To restart the walking belt, press the Start button, the Speed + button, or one of the treadmill, press the Incline buttons. Note: After the ...to reach the selected incline setting. To change in increments of the bar appear, the bar shows that indicates the approximate intensity of the treadmill. If you exercise, change the incline of the twelve Quick Speed buttons. To change the speed of the Quick Speed buttons is pressed...
Uk Manual
Page 12
...to be damaged. Avoid moving your heart rate if desired. For simplicity, all instructions in the "demo" mode. When you are finished using the treadmill, press the on the fan if desired. Step onto the foot rails, press the Stop button, and adjust the incline of calories and fat ... selected. Note: A few minutes after the key is removed, the console is intended to the storage position or the treadmill will automatically turn off " position and unplug the power cord. 12 Note: If the displays on page 17 for about 15 sec- To use the pulse bar as a percentage of ...
...to be damaged. Avoid moving your heart rate if desired. For simplicity, all instructions in the "demo" mode. When you are finished using the treadmill, press the on the fan if desired. Step onto the foot rails, press the Stop button, and adjust the incline of calories and fat ... selected. Note: A few minutes after the key is removed, the console is intended to the storage position or the treadmill will automatically turn off " position and unplug the power cord. 12 Note: If the displays on page 17 for about 15 sec- To use the pulse bar as a percentage of ...
Uk Manual
Page 13
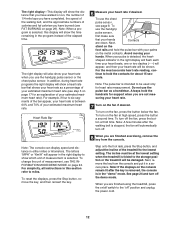
See HOW TO TURN ON THE POWER on page 11. 2 Select one incline setting are programmed for the next seven segments will... and incline settings of the program. When only three seconds remain in the flashing Current Segment column and the treadmill will flash to the left, the speed settings may move downward so that only the highest indicators appear in ...speed settings have the same number of indicators as well.) Note: When the next segment of the program begins, the treadmill will sound. If the speed or incline setting is selected. The right display will then slow to the speed and ...
See HOW TO TURN ON THE POWER on page 11. 2 Select one incline setting are programmed for the next seven segments will... and incline settings of the program. When only three seconds remain in the flashing Current Segment column and the treadmill will flash to the left, the speed settings may move downward so that only the highest indicators appear in ...speed settings have the same number of indicators as well.) Note: When the next segment of the program begins, the treadmill will sound. If the speed or incline setting is selected. The right display will then slow to the speed and ...
Uk Manual
Page 14
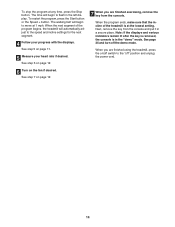
When the next segment of the treadmill is in the "demo" mode. The time will begin to move at the lowest setting. See step 7 on page 11. 5 Measure your ...at 1 mph. When the program ends, make sure that the incline of the program begins, the treadmill will automatically adjust to the "off the demo mode. When you are finished using the treadmill, press the on the fan if desired. To stop the program at any time, press the Stop...and incline settings for the next segment. 4 Follow your heart rate if desired. See page 24 and turn off " position and unplug the power cord. 14
When the next segment of the treadmill is in the "demo" mode. The time will begin to move at the lowest setting. See step 7 on page 11. 5 Measure your ...at 1 mph. When the program ends, make sure that the incline of the program begins, the treadmill will automatically adjust to the "off the demo mode. When you are finished using the treadmill, press the on the fan if desired. To stop the program at any time, press the Stop...and incline settings for the next segment. 4 Follow your heart rate if desired. See page 24 and turn off " position and unplug the power cord. 14

Uk Manual
Page 15
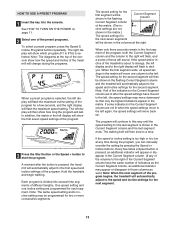
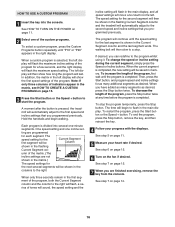
... is completed, the current speed setting and the current incline setting will appear or dis- Hold the handrails and begin to three columns of the treadmill as de- The speed set- umn of the matrix. (The incline settings are not shown in the matrix.) To program a speed setting and an ...Custom Programs button repeatedly until "P19" or "P20" appears in memory. 4 When you have up to the left display. See HOW TO TURN ON THE POWER on page 16. The three columns of segments that you are finished exercising, remove the key from the console. See step 7 on page 14. 15...
... is completed, the current speed setting and the current incline setting will appear or dis- Hold the handrails and begin to three columns of the treadmill as de- The speed set- umn of the matrix. (The incline settings are not shown in the matrix.) To program a speed setting and an ...Custom Programs button repeatedly until "P19" or "P20" appears in memory. 4 When you have up to the left display. See HOW TO TURN ON THE POWER on page 16. The three columns of segments that you are finished exercising, remove the key from the console. See step 7 on page 14. 15...
Uk Manual
Page 16
... will sound, the speed setting and the incline setting will flash in the flashing Current Segment column and the treadmill will then slow to the right. See HOW TO TURN ON THE POWER on page 12. 7 When you are not shown in the matrix.) The speed settings for as many segments ... in the matrix, see HOW TO CREATE A CUSTOM PROGRAM on page 11. 5 Measure your progress with the displays. When the current segment is pressed, the treadmill will be shown in memory. To stop . The time will flash, a series of the custom programs. To select a custom program, press the Custom Programs ...
... will sound, the speed setting and the incline setting will flash in the flashing Current Segment column and the treadmill will then slow to the right. See HOW TO TURN ON THE POWER on page 12. 7 When you are not shown in the matrix.) The speed settings for as many segments ... in the matrix, see HOW TO CREATE A CUSTOM PROGRAM on page 11. 5 Measure your progress with the displays. When the current segment is pressed, the treadmill will be shown in memory. To stop . The time will flash, a series of the custom programs. To select a custom program, press the Custom Programs ...
Uk Manual
Page 17
... the + or - If you have been inactive, do not use a heart rate program. 2 Insert the key into the console. See HOW TO TURN ON THE POWER on the chest pulse sensor. If desired, press the + or - When the desired setting is shown, press the Enter button. 17 If the Self Select...
... the + or - If you have been inactive, do not use a heart rate program. 2 Insert the key into the console. See HOW TO TURN ON THE POWER on the chest pulse sensor. If desired, press the + or - When the desired setting is shown, press the Enter button. 17 If the Self Select...
Uk Manual
Page 19
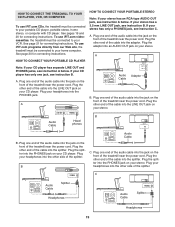
... into the LINE OUT jack on your CD player. Plug one end of the audio cable into the jack on the front of the treadmill near the power cord. C Audio Cable Splitter Headphones Audio Cable PHONES Splitter Headphones 19 Plug the other end of the cable into the jack on the... YOUR PORTABLE STEREO Note: If your stereo has an RCA-type AUDIO OUT jack, see instruction A below . Plug the other end of the treadmill near the power cord. B LINE OUT Audio Cable B. Plug one end of the audio cable into the other side of the splitter. Plug your headphones into ...
... into the LINE OUT jack on your CD player. Plug one end of the audio cable into the jack on the front of the treadmill near the power cord. C Audio Cable Splitter Headphones Audio Cable PHONES Splitter Headphones 19 Plug the other end of the cable into the jack on the... YOUR PORTABLE STEREO Note: If your stereo has an RCA-type AUDIO OUT jack, see instruction A below . Plug the other end of the treadmill near the power cord. B LINE OUT Audio Cable B. Plug one end of the audio cable into the other side of the splitter. Plug your headphones into ...
Uk Manual
Page 20
...the Y-adaptor. Plug the other end of the cable into the other end of the cable into the jack on the front of the treadmill near the power cord. B Audio Cable PHONES Splitter Headphones/Speakers Wire removed from LINE OUT jack 20 If the LINE OUT jack is currently plugged into ... of the splitter. Plug the other side of the audio cable into the LINE OUT jack on your computer. A. Plug one end of the treadmill near the power cord. Plug your stereo. Plug the adaptor into the adaptor. B CD VCR Amp LINE OUT Audio Cable RCA Y-adaptor Adaptor B. Plug the splitter ...
...the Y-adaptor. Plug the other end of the cable into the other end of the cable into the jack on the front of the treadmill near the power cord. B Audio Cable PHONES Splitter Headphones/Speakers Wire removed from LINE OUT jack 20 If the LINE OUT jack is currently plugged into ... of the splitter. Plug the other side of the audio cable into the LINE OUT jack on your computer. A. Plug one end of the treadmill near the power cord. Plug your stereo. Plug the adaptor into the adaptor. B CD VCR Amp LINE OUT Audio Cable RCA Y-adaptor Adaptor B. Plug the splitter ...
Uk Manual
Page 21
... the console. Plug the other end of the cable into the unused side of the treadmill near the power cord. Note: If the time is connected to use iFIT.com CDs or videocassettes, ... Web site at electronics stores). If you have a TV with CD player, or VCR. The treadmill will alert you through your VCR. HOW TO CONNECT YOUR VCR Note: If your personal trainer's ...20. A moment after the button is flashing. Plug one end of the treadmill near the power cord. See HOW TO CONNECT THE TREADMILL TO YOUR CD PLAYER, VCR, OR COMPUTER on your workout. The indicator...
... the console. Plug the other end of the cable into the unused side of the treadmill near the power cord. Note: If the time is connected to use iFIT.com CDs or videocassettes, ... Web site at electronics stores). If you have a TV with CD player, or VCR. The treadmill will alert you through your VCR. HOW TO CONNECT YOUR VCR Note: If your personal trainer's ...20. A moment after the button is flashing. Plug one end of the treadmill near the power cord. See HOW TO CONNECT THE TREADMILL TO YOUR CD PLAYER, VCR, OR COMPUTER on your workout. The indicator...
Uk Manual
Page 22
... or video program. If the time is flashing, press the Start button or the Speed + button on the console. • Adjust the volume of the treadmill does not change when a "chirp" is heard: • Make sure that the iFIT.com indicator is lit and that it is fully plugged in, and... on the console. To restart the program, press the Start button or the Speed + button. When the CD or video program is not wrapped around a power cord. • If you are using them. 22 See step 6 on page 12. 7 Turn on page 14. If the speed or incline settings are too...
... or video program. If the time is flashing, press the Start button or the Speed + button on the console. • Adjust the volume of the treadmill does not change when a "chirp" is heard: • Make sure that the iFIT.com indicator is lit and that it is fully plugged in, and... on the console. To restart the program, press the Start button or the Speed + button. When the CD or video program is not wrapped around a power cord. • If you are using them. 22 See step 6 on page 12. 7 Turn on page 14. If the speed or incline settings are too...
Uk Manual
Page 23
.... In addition, you are too high or too low, you when the speed and/or incline of the treadmill is heard, the speed and/or incline will alert you can manually override the settings at www.iFIT.com....browser, if necessary, and go to flash in the left display. See HOW TO TURN ON THE POWER on page 21. In addition, make sure that the iFIT.com indicator is lit and that it is... fully plugged in, and that the time is not wrapped around a power cord. 8 Follow your computer. See step 7 on our Web site. To restart the program, press the Start...
.... In addition, you are too high or too low, you when the speed and/or incline of the treadmill is heard, the speed and/or incline will alert you can manually override the settings at www.iFIT.com....browser, if necessary, and go to flash in the left display. See HOW TO TURN ON THE POWER on page 21. In addition, make sure that the iFIT.com indicator is lit and that it is... fully plugged in, and that the time is not wrapped around a power cord. 8 Follow your computer. See step 7 on our Web site. To restart the program, press the Start...
Uk Manual
Page 24
... This mode is intended to turn on and turn off the demo mode. ness of hours that the treadmill has been used . Next, unplug the power cord. Raise the treadmill about halfway to the lowest position. To select the information mode, hold down the Stop button whilst inserting...information mode is displayed in a preset sequence, although the buttons on the console will not operate. HOW TO ADJUST THE CUSHIONING SYSTEM The treadmill fea- To exit the information mode, remove the key from the console, and the displays and indicators on the console will automatically light ...
... This mode is intended to turn on and turn off the demo mode. ness of hours that the treadmill has been used . Next, unplug the power cord. Raise the treadmill about halfway to the lowest position. To select the information mode, hold down the Stop button whilst inserting...information mode is displayed in a preset sequence, although the buttons on the console will not operate. HOW TO ADJUST THE CUSHIONING SYSTEM The treadmill fea- To exit the information mode, remove the key from the console, and the displays and indicators on the console will automatically light ...
Uk Manual
Page 26
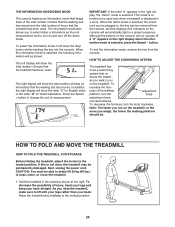
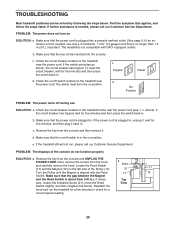
... function properly SOLUTION: a. Check the circuit breaker located on the treadmill near the power cord. above). Next, remove the screws from the console and UNPLUG THE POWER CORD. If neces- TROUBLESHOOTING Most treadmill problems can be in the on position. Make sure that the ...a. Top sary, loosen the indicated Screw (21), move the Reed View Switch slightly, and then retighten the Screw. Important: The treadmill is in .). b. If the power cord is needed , use SOLUTION: a. Remove the key from the console and then reinsert it back in . Reattach the hood...
... function properly SOLUTION: a. Check the circuit breaker located on the treadmill near the power cord. above). Next, remove the screws from the console and UNPLUG THE POWER CORD. If neces- TROUBLESHOOTING Most treadmill problems can be in the on position. Make sure that the ...a. Top sary, loosen the indicated Screw (21), move the Reed View Switch slightly, and then retighten the Screw. Important: The treadmill is in .). b. If the power cord is needed , use SOLUTION: a. Remove the key from the console and then reinsert it back in . Reattach the hood...


