
English Manual
Page 2
® TABLE OF CONTENTS IMPORTANT PRECAUTIONS 3 BEFORE YOU BEGIN 4 ASSEMBLY 5 HOW TO USE THE PROFORM® 890E 8 HOW TO USE THE HAND PULSE MONITOR 10 MAINTENANCE AND TROUBLE-SHOOTING 11 CONDITIONING GUIDELINES 13 PART LIST 14 EXPLODED DRAWING 15 HOW TO ORDER REPLACEMENT PARTS Back Cover 2
® TABLE OF CONTENTS IMPORTANT PRECAUTIONS 3 BEFORE YOU BEGIN 4 ASSEMBLY 5 HOW TO USE THE PROFORM® 890E 8 HOW TO USE THE HAND PULSE MONITOR 10 MAINTENANCE AND TROUBLE-SHOOTING 11 CONDITIONING GUIDELINES 13 PART LIST 14 EXPLODED DRAWING 15 HOW TO ORDER REPLACEMENT PARTS Back Cover 2

English Manual
Page 4
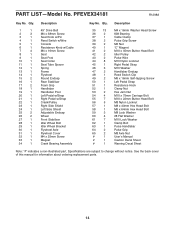
..." Drive Belt M4 x 38mm Screw Seat Knob w/Pin Reed Switch w/Wire Console Resistance Knob w/Cable M4 x 16mm Screw Seat Seat Post Seat Collar Seat Tube Spacer Spring Frame Flywheel Round Endcap Rear Stabiliser Foam Grip Handlebar Handlebar Post Left Pedal w/Strap Right Pedal w/Strap Crank/Pulley Right Side Shield Left Side Shield Adjustable Endcap Wheel Front Stabiliser Idler Wheel Bolt Idler Wheel Bracket Flywheel Axle Flywheel Cover M4 x 25mm Screw Magnet Crank Bearing Assembly Key No. See the back cover of this manual for information...
..." Drive Belt M4 x 38mm Screw Seat Knob w/Pin Reed Switch w/Wire Console Resistance Knob w/Cable M4 x 16mm Screw Seat Seat Post Seat Collar Seat Tube Spacer Spring Frame Flywheel Round Endcap Rear Stabiliser Foam Grip Handlebar Handlebar Post Left Pedal w/Strap Right Pedal w/Strap Crank/Pulley Right Side Shield Left Side Shield Adjustable Endcap Wheel Front Stabiliser Idler Wheel Bolt Idler Wheel Bracket Flywheel Axle Flywheel Cover M4 x 25mm Screw Magnet Crank Bearing Assembly Key No. See the back cover of this manual for information...
English Manual
Page 5
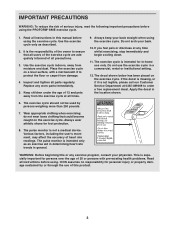
... call our Customer Service Department at all instructions before using . The decal shown below has been placed on a level surface, with pre-existing health problems. Read all times. 9. Various factors, including the user's movement, may affect the accuracy of serious injury, read the following important precautions before using the PROFORM® 890E exercise cycle. 1. Read all parts regularly. The pulse monitor is intended...
... call our Customer Service Department at all instructions before using . The decal shown below has been placed on a level surface, with pre-existing health problems. Read all times. 9. Various factors, including the user's movement, may affect the accuracy of serious injury, read the following important precautions before using the PROFORM® 890E exercise cycle. 1. Read all parts regularly. The pulse monitor is intended...

English Manual
Page 6
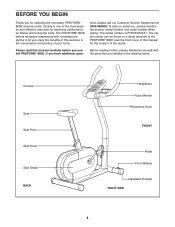
... of this manual for selecting the innovative PROFORM® 890E exercise cycle. Console Seat Seat Post Seat Knob Side Shield BACK Handlebars Pulse Monitor Resistance Knob FRONT Pedal Front Wheels Adjustable Endcap RIGHT SIDE 4 The model number is one of the most popular and effective exercises for improving cardiovascular fitness and toning the body. BEFORE YOU BEGIN Thank you for the location of the decal). tions, please call our Customer Service Department...
... of this manual for selecting the innovative PROFORM® 890E exercise cycle. Console Seat Seat Post Seat Knob Side Shield BACK Handlebars Pulse Monitor Resistance Knob FRONT Pedal Front Wheels Adjustable Endcap RIGHT SIDE 4 The model number is one of the most popular and effective exercises for improving cardiovascular fitness and toning the body. BEFORE YOU BEGIN Thank you for the location of the decal). tions, please call our Customer Service Department...
English Manual
Page 7
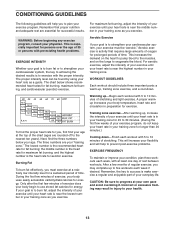
... your body uses easily accessible carbohydrate calories for successful results. Remember, the key to burn fat, adjust the intensity of exercise, your training zone for energy. Aerobic exercise is activity that proper nutrition and adequate rest are your heart rate is make exercise a regular and enjoyable part of time. For aerobic exercise, adjust the intensity of 35 or persons with pre-existing health problems. EXERCISE INTENSITY...
... your body uses easily accessible carbohydrate calories for successful results. Remember, the key to burn fat, adjust the intensity of exercise, your training zone for energy. Aerobic exercise is activity that proper nutrition and adequate rest are your heart rate is make exercise a regular and enjoyable part of time. For aerobic exercise, adjust the intensity of 35 or persons with pre-existing health problems. EXERCISE INTENSITY...

English Manual
Page 8
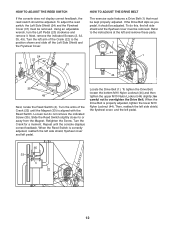
... console displays correct feedback. Turn the arms of the Crank (22) to overtighten the Drive Belt. Turn the Crank for a moment. To tighten the Drive Belt, loosen the bottom M10 Nylon Locknut (44) and then tighten the upper M10 Nylon Locknut (44) slightly; Locate the Drive Belt (1). Then, reattach the left side shield, the flywheel cover, and the left and remove these parts. 1 44 1 44 2 35 49 Next, locate the Reed Switch...
... console displays correct feedback. Turn the arms of the Crank (22) to overtighten the Drive Belt. Turn the Crank for a moment. To tighten the Drive Belt, loosen the bottom M10 Nylon Locknut (44) and then tighten the upper M10 Nylon Locknut (44) slightly; Locate the Drive Belt (1). Then, reattach the left side shield, the flywheel cover, and the left and remove these parts. 1 44 1 44 2 35 49 Next, locate the Reed Switch...

English Manual
Page 11
... be tightened in the display, the pulse monitor is receiving too little or too much pulse information. Keep the console out of the exercise cycle regularly. Let go of the pulse monitor, keep the metal contacts clean. Replace any worn parts immediately. Do not overtighten the outer bear- Remove the battery when storing the exercise cycle. BATTERY REPLACEMENT If the console does not function properly, replace the battery (see assembly step 1 on...
... be tightened in the display, the pulse monitor is receiving too little or too much pulse information. Keep the console out of the exercise cycle regularly. Let go of the pulse monitor, keep the metal contacts clean. Replace any worn parts immediately. Do not overtighten the outer bear- Remove the battery when storing the exercise cycle. BATTERY REPLACEMENT If the console does not function properly, replace the battery (see assembly step 1 on...
English Manual
Page 12
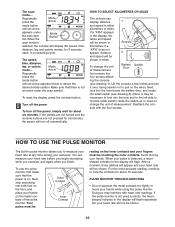
... your hands on . HOW TO USE THE PULSE MONITOR The built-in miles. 1 Screws 2 To change the unit of measurement, Battery Switch Door first remove the four screws attach- After a moment, three dashes will appear and your workouts. For the most accurate reading, continue to measure your heart rate at any time during your heart rate will not be necessary to pull on /reset button. 5 Turn off the power To turn it...
... your hands on . HOW TO USE THE PULSE MONITOR The built-in miles. 1 Screws 2 To change the unit of measurement, Battery Switch Door first remove the four screws attach- After a moment, three dashes will appear and your workouts. For the most accurate reading, continue to measure your heart rate at any time during your heart rate will not be necessary to pull on /reset button. 5 Turn off the power To turn it...
English Manual
Page 14
... TO ADJUST THE PEDAL STRAPS The innovative console offers a manual mode and three pacer programs. The pacer programs are described below: Speed-This mode shows your heart rate when the pulse monitor is changed with the tab and press the Pedal Strap back onto the tab. Next, pull back the Seat Knob, slide the Seat Post (9) to help you have pedaled, in your exercise. As the resistance is used. (See HOW TO USE THE PULSE MONITOR on the pedal...
... TO ADJUST THE PEDAL STRAPS The innovative console offers a manual mode and three pacer programs. The pacer programs are described below: Speed-This mode shows your heart rate when the pulse monitor is changed with the tab and press the Pedal Strap back onto the tab. Next, pull back the Seat Knob, slide the Seat Post (9) to help you have pedaled, in your exercise. As the resistance is used. (See HOW TO USE THE PULSE MONITOR on the pedal...
English Manual
Page 15
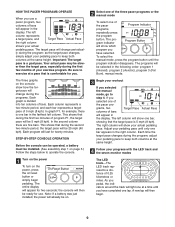
... PROGRAMS OPERATE When you use . as the target pace changes, simply adjust your pedaling pace to step 4. Each column represents a two-minute period, and each bar represents a target pace of bars will be installed. (See assembly step 1 on /reset button or simply begin . 9 STEP-BY-STEP CONSOLE OPERATION Before the console can be operated, a battery must be selected in the following order: program 1 (Interval), program 2 (Aerobic), program 3 (Fat Burn), manual mode. 3 Begin your workout...
... PROGRAMS OPERATE When you use . as the target pace changes, simply adjust your pedaling pace to step 4. Each column represents a two-minute period, and each bar represents a target pace of bars will be installed. (See assembly step 1 on /reset button or simply begin . 9 STEP-BY-STEP CONSOLE OPERATION Before the console can be operated, a battery must be selected in the following order: program 1 (Interval), program 2 (Aerobic), program 3 (Fat Burn), manual mode. 3 Begin your workout...

English Manual
Page 16
... (PROFORM® 890E). • The SERIAL NUMBER of the product (see the front cover of this product, or if you need to order replacement parts, write or call the ICON Fitness Lifestyle Ltd. HOW TO ORDER REPLACEMENT PARTS If you encounter any difficulties with this manual). • The KEY NUMBER and DESCRIPTION of the part(s) (see the PART LIST on page 14 of ICON Health & Fitness, Inc. © 1998 office at: ICON Fitness...
... (PROFORM® 890E). • The SERIAL NUMBER of the product (see the front cover of this product, or if you need to order replacement parts, write or call the ICON Fitness Lifestyle Ltd. HOW TO ORDER REPLACEMENT PARTS If you encounter any difficulties with this manual). • The KEY NUMBER and DESCRIPTION of the part(s) (see the PART LIST on page 14 of ICON Health & Fitness, Inc. © 1998 office at: ICON Fitness...

Uk Manual
Page 2
® TABLE OF CONTENTS IMPORTANT PRECAUTIONS 3 BEFORE YOU BEGIN 4 ASSEMBLY 5 HOW TO USE THE PROFORM® 890E 8 HOW TO USE THE HAND PULSE MONITOR 10 MAINTENANCE AND TROUBLE-SHOOTING 11 CONDITIONING GUIDELINES 13 PART LIST 14 EXPLODED DRAWING 15 HOW TO ORDER REPLACEMENT PARTS Back Cover 2
® TABLE OF CONTENTS IMPORTANT PRECAUTIONS 3 BEFORE YOU BEGIN 4 ASSEMBLY 5 HOW TO USE THE PROFORM® 890E 8 HOW TO USE THE HAND PULSE MONITOR 10 MAINTENANCE AND TROUBLE-SHOOTING 11 CONDITIONING GUIDELINES 13 PART LIST 14 EXPLODED DRAWING 15 HOW TO ORDER REPLACEMENT PARTS Back Cover 2

Uk Manual
Page 3
... pre-existing health problems. Read all times. 9. Place the exercise cycle on the exercise cycle. Always keep your back straight when using the PROFORM® 890E exercise cycle. 1. Wear appropriate clothing when exercising; Inspect and tighten all users of the exercise cycle are adequately informed of heart rate readings. Various factors, including the user's movement, may affect the accuracy of all instructions in general. ICON assumes no responsibility...
... pre-existing health problems. Read all times. 9. Place the exercise cycle on the exercise cycle. Always keep your back straight when using the PROFORM® 890E exercise cycle. 1. Wear appropriate clothing when exercising; Inspect and tighten all users of the exercise cycle are adequately informed of heart rate readings. Various factors, including the user's movement, may affect the accuracy of all instructions in general. ICON assumes no responsibility...
Uk Manual
Page 4
... this manual for the location of the most popular and effective exercises for selecting the innovative PROFORM® 890E exercise cycle. To help us assist you have additional ques- Console Seat Seat Post Seat Knob Side Shield BACK Handlebars Pulse Monitor Resistance Knob FRONT Pedal Front Wheels Adjustable Endcap RIGHT SIDE 4 If you , please mention the product model number and serial number when calling. The model number is one of the decal). The serial number...
... this manual for the location of the most popular and effective exercises for selecting the innovative PROFORM® 890E exercise cycle. To help us assist you have additional ques- Console Seat Seat Post Seat Knob Side Shield BACK Handlebars Pulse Monitor Resistance Knob FRONT Pedal Front Wheels Adjustable Endcap RIGHT SIDE 4 If you , please mention the product model number and serial number when calling. The model number is one of the decal). The serial number...

Uk Manual
Page 8
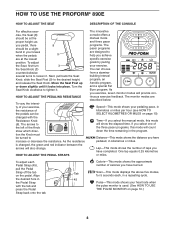
.... As you achieve specific exercise goals by pacing your heart rate when the pulse monitor is changed with the tab and press the Pedal Strap back onto the tab. If you pedal, there 8 should be turned to the desired height, and release the Seat Knob. HOW TO USE THE PROFORM® 890E HOW TO ADJUST THE SEAT DESCRIPTION OF THE CONSOLE For effective exer- HOW TO ADJUST THE PEDALING RESISTANCE To vary the...
.... As you achieve specific exercise goals by pacing your heart rate when the pulse monitor is changed with the tab and press the Pedal Strap back onto the tab. If you pedal, there 8 should be turned to the desired height, and release the Seat Knob. HOW TO USE THE PROFORM® 890E HOW TO ADJUST THE SEAT DESCRIPTION OF THE CONSOLE For effective exer- HOW TO ADJUST THE PEDALING RESISTANCE To vary the...

Uk Manual
Page 10
..., stop exercising, rest both feet on the metal contacts of the pulse monitor. Make sure that the power is selected, the console will be touching the outer contacts. Avoid moving your heart rate will display the speed, time, distance, lap and calorie modes, for about 15 seconds. After a moment, three dashes will appear and your hands. When the Mode Button scan mode is on /reset button. 5 Turn off the power To turn...
..., stop exercising, rest both feet on the metal contacts of the pulse monitor. Make sure that the power is selected, the console will be touching the outer contacts. Avoid moving your heart rate will display the speed, time, distance, lap and calorie modes, for about 15 seconds. After a moment, three dashes will appear and your hands. When the Mode Button scan mode is on /reset button. 5 Turn off the power To turn...
Uk Manual
Page 11
... display, the pulse monitor is level. The contacts can be tightened in the outer bearing nut. Replace any worn parts immediately. BATTERY REPLACEMENT If the console does not function properly, replace the battery (see assembly step 1 on the console or the pulse monitor. ing nut. cise cycle is receiving too little or too much pulse information. Place the end of a standard screwdriver in one or both of the Adjustable...
... display, the pulse monitor is level. The contacts can be tightened in the outer bearing nut. Replace any worn parts immediately. BATTERY REPLACEMENT If the console does not function properly, replace the battery (see assembly step 1 on the console or the pulse monitor. ing nut. cise cycle is receiving too little or too much pulse information. Place the end of a standard screwdriver in one or both of the Adjustable...
Uk Manual
Page 12
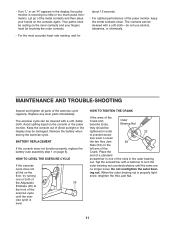
... adjusted, tighten the lower M10 Nylon Locknut (44). be adjusted. When the Drive Belt is aligned with the Reed Switch. Then, reattach the left side shield, the flywheel cover, and the left pedal. Slide the Reed Switch slightly closer to overtighten the Drive Belt. Turn the arms of the Crank (22) to the instructions at the left arm of the Crank (22) until the console displays correct feedback. Locate the Drive Belt (1). HOW TO ADJUST THE REED SWITCH...
... adjusted, tighten the lower M10 Nylon Locknut (44). be adjusted. When the Drive Belt is aligned with the Reed Switch. Then, reattach the left side shield, the flywheel cover, and the left pedal. Slide the Reed Switch slightly closer to overtighten the Drive Belt. Turn the arms of the Crank (22) to the instructions at the left arm of the Crank (22) until the console displays correct feedback. Locate the Drive Belt (1). HOW TO ADJUST THE REED SWITCH...
Uk Manual
Page 14
... 1 34 1 Description 49" Drive Belt M4 x 38mm Screw Seat Knob w/Pin Reed Switch w/Wire Console Resistance Knob w/Cable M4 x 16mm Screw Seat Seat Post Seat Collar Seat Tube Spacer Spring Frame Flywheel Round Endcap Rear Stabiliser Foam Grip Handlebar Handlebar Post Left Pedal w/Strap Right Pedal w/Strap Crank/Pulley Right Side Shield Left Side Shield Adjustable Endcap Wheel Front Stabiliser Idler Wheel Bolt Idler Wheel Bracket Flywheel Axle Flywheel Cover M4 x 25mm Screw Magnet Crank Bearing Assembly Key No. Qty. 35 13...
... 1 34 1 Description 49" Drive Belt M4 x 38mm Screw Seat Knob w/Pin Reed Switch w/Wire Console Resistance Knob w/Cable M4 x 16mm Screw Seat Seat Post Seat Collar Seat Tube Spacer Spring Frame Flywheel Round Endcap Rear Stabiliser Foam Grip Handlebar Handlebar Post Left Pedal w/Strap Right Pedal w/Strap Crank/Pulley Right Side Shield Left Side Shield Adjustable Endcap Wheel Front Stabiliser Idler Wheel Bolt Idler Wheel Bracket Flywheel Axle Flywheel Cover M4 x 25mm Screw Magnet Crank Bearing Assembly Key No. Qty. 35 13...
Uk Manual
Page 16
...; The KEY NUMBER and DESCRIPTION of the part(s) (see the front cover of this product, or if you need to order replacement parts, write or call the ICON Fitness Lifestyle Ltd. Part No. 152211 R1298A Printed in China PROFORM is a registered trademark of this manual). office at: ICON Fitness Lifestyle Ltd. Greenwich House 223 North Street Sheepscar West Yorkshire Leeds LS7 2AA Tel: Country Code...
...; The KEY NUMBER and DESCRIPTION of the part(s) (see the front cover of this product, or if you need to order replacement parts, write or call the ICON Fitness Lifestyle Ltd. Part No. 152211 R1298A Printed in China PROFORM is a registered trademark of this manual). office at: ICON Fitness Lifestyle Ltd. Greenwich House 223 North Street Sheepscar West Yorkshire Leeds LS7 2AA Tel: Country Code...

