ProForm 850 Ci Support and Manuals
Get Help and Manuals for this ProForm item

View All Support Options Below
Free ProForm 850 Ci manuals!
Problems with ProForm 850 Ci?
Ask a Question
Free ProForm 850 Ci manuals!
Problems with ProForm 850 Ci?
Ask a Question
Popular ProForm 850 Ci Manual Pages
English Manual - Page 1
TM
PRO•FORM®
Model No. If you have questions, or find there are missing or damaged parts, we are committed to you. CUSTOMER HOT LINE:
1-800...you complete customer satisfaction. Read all safety precautions and instructions in this manual before using this manual for future reference.
0 O
0
PATENT PENDING
OWNER'S MANUAL PF804030 Serial No.
TO AVOID UNNECESSARY DELAYS, PLEASE ...
English Manual - Page 2
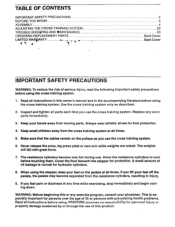
... parts immediately.
3. A small amount of this owner's manual and in injury.
9. If you use of oil leakage is especially important for foot protection.
4.
PROFORM assumes no responsibility for personal injury or property damage sustained by or through the use the cross training system. The weights will fall with pre-existing health problems. Read all Instructions...
English Manual - Page 3
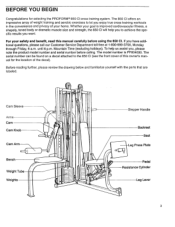
... (excluding holidays). The 850 CI offers an impressive array of weight training and aerobic exercises to achieve the specific results you , please note the product model number and serial number before using the 850 Cl. Whether your home. To help you to let you have additional questions, please call our Customer Service Department toll-free at...
English Manual - Page 4

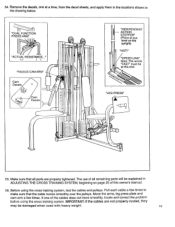
...a cleared area.
ASSEMBLY
Assembly requires two persons. Read each step and examine each drawing carefully. Make sure that all parts are oriented as shown.
16 81
14
2. Insert two 5/16' x 2 1/2" Carriage Bolts (14) up through... 2 3/4' Bolts (12) and 5/16" Nylock Nuts (1).
3.
ilar to the PART IDENTIFICATION CHART accompanying this owner's manual for help identifying the small...
English Manual - Page 5
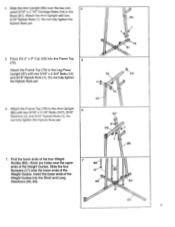
...and 5/16" Nylock Nuts (1). Do
not fully tighten the Nylock Nuts yet. Insert the lower ends of the
Weight Guides into the Frame Top
5
(79). Attach the Frame Top (79) to the Arm Upright
6
(86) with two...(4) and 5/16" Nylock Nuts (1). Slide the four
Bumpers (17) onto the lower ends of the Weight Guides. Attach the Frame Top (79) to the Leg Press Upright (87) with two
5/16" Nylock Nuts ...
English Manual - Page 6
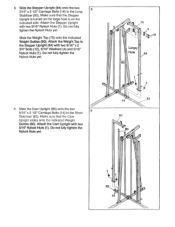
Make sure that the Cam
85
Upright slides onto the indicated Weight
Guides (80). Attach the Weight Top to the Stepper Upright (84) with two 5/16' ...Do not fully tighten the Nylock Nuts yet. Large Hole
80
14
9.
Slide the Weight Top (75) onto the indicated Weight Guides (80).
Attach the Cam Upright with two
5/16" Nylock Nuts (1). Do not fully tighten the
Nylock Nuts yet.
82 14 ...
English Manual - Page 7
... Handle with soapy water.
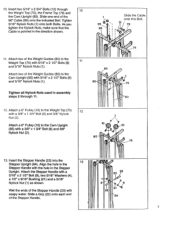
Align the hole in the Stepper
Upright. Attach two of the Weight Guides (80) to the Cam Upright (85) with 5/16" x 2 1/2" Bolts (9)
and ...1 3/4" Bolt (6) and 3/8" Nylock Nut (2).
2
10 ' • 10
1--°4
85
Z
75
13. Attach two of the Weight Guides (80) to the Weight Top (75)
12
with a
5/16" x 2 1/2" Bolt (9), two 5/16' Washers (4),
a 1/2" x...
English Manual - Page 12
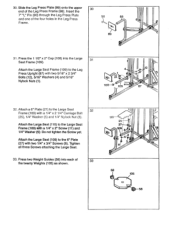
... (4) and 5/16" Nylock Nuts (1). Attach a 6" Plate (27) to the Leg Press Upright (87) with a 1/4" x 2 1/4" Carriage Bolt
(25), 1/4" Washer (5) and 1/4" Nylock Nut (3). 30.
Press two Weight Guides (58) into the Large 31 Seat Frame (109). Press the 1 1/2" x 2" Cap (108) into each of
33
the twenty Weights (105) as shown. Tighten all three...
English Manual - Page 13
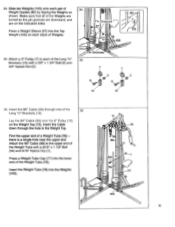
...). Press a Weight Sleeve (57) into the lower end of Weights. Pin Grooves
35
7
o
2
6
6 7 2
19
19
36. Slide ten Weights (105) onto each of
34
Weight Guides (8O) by tipping the Weights as
shown. Attach a 3' Pulley (7) to the upper end of the
36
Long "U" Brackets (19). Insert the Cable down through one...
English Manual - Page 19
... ARM'
"ACTUAL RESISTANCE..." "SPEED LINK'
Note: The words... the pulleys. Before using the cross training system.
If one at this owner's manual.
56.
I CI
I
'RADIUS CAM ARM'
Cam
Decals
0
v
moomt6®
Cam Decals
I
...the problem
before using the cross training system, test the cables and pulleys. IMPORTANT: If the cables are properly tightened. The use of all parts ...
English Manual - Page 20
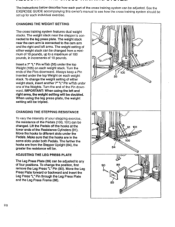
... of 10 pounds, up for each individual exercise. CHANGING THE WEIGHT SETTING
The cross training system features dual weight stacks. Insert a 7" "L" Pin wiTab (56) under the Pedals. Turn the ends of the Pin downward. The instructions below describe how each part of the cross training system can be changed from the Stepper Upright...
English Manual - Page 21
... the butterfly mode. ri---4
85
(43
"1
4,-
1
38
:
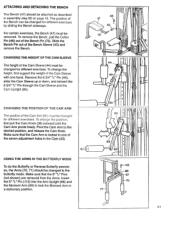
50 - For certain exercises, the Bench (47) must be changed for different exercises. To change the height, first support the weight of the Cam Sleeve with one of the Cam Arm (50) must be removed.
Make sure that the Cam Arm is locked in...
English Manual - Page 23
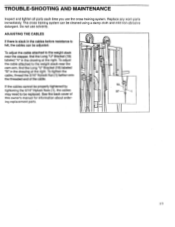
...19) labeled IA" in the cables before resistance is felt, the cables can be replaced. If the cables cannot be properly tightened by tightening the 5/16" Nylock Nuts (1),... manual for information about ordering replacement parts. B
19 97
23 TROUBLE-SHOOTING AND MAINTENANCE
Inspect and tighten all parts each time you use solvents.
See the back cover of the cable. Replace any worn parts ...
English Manual - Page 24
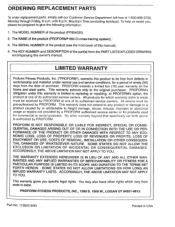
..., THE ABOVE LIMITATION MAY NOT APPLY TO YOU. ORDERING REPLACEMENT PARTS
To order replacement parts, simply call our Customer Service Department toll-free at one of the part(s) from state to state. The MODEL NUMBER of the product (PROFORM® 850 CI cross training system)..
3. This warranty extends only to replacing or repairing, at PROFORM's option, the product at 1-800-999-3756, Monday...
ProForm 850 Ci Reviews
We have not received any reviews for ProForm yet.