

English Manual
Page 1
... OUR CUSTOMER SERVICE DEPARTMENT DIRECTLY. USER'S MANUAL Visit our website at www.proform.com new products, prizes, fitness tips, and much more! CALL TOLL-FREE: 1-888-533-1333 Mon.-Fri., 6 a.m.-6 p.m. MST ON THE WEB: www.proformservice.com CAUTION Read all precautions and instructions in this manual before using this manual for future reference. Keep this equipment. Model No. PFEL5055.0 Serial No. _ Serial Number Decal QUESTIONS...
... OUR CUSTOMER SERVICE DEPARTMENT DIRECTLY. USER'S MANUAL Visit our website at www.proform.com new products, prizes, fitness tips, and much more! CALL TOLL-FREE: 1-888-533-1333 Mon.-Fri., 6 a.m.-6 p.m. MST ON THE WEB: www.proformservice.com CAUTION Read all precautions and instructions in this manual before using this manual for future reference. Keep this equipment. Model No. PFEL5055.0 Serial No. _ Serial Number Decal QUESTIONS...

English Manual
Page 2
TABLE OF CONTENTS IMPORTANT PRECAUTIONS 2 BEFORE YOU BEGIN 3 ASSEMBLY 4 HOW TO USE THE ELLIPTICAL EXERCISER 7 MAINTENANCE AND TROUBLESHOOTING 14 CONDITIONING GUIDELINES 15 PART LIST 17 EXPLODED DRAWING 18 HOW TO ORDER REPLACEMENT PARTS Back Cover LIMITED WARRANTY Back Cover IMPORTANT PRECAUTIONS WARNING: To reduce the risk of this product. 2 The elliptical exerciser is the responsibility of the owner to ensure that there is especially important for personal injury...
TABLE OF CONTENTS IMPORTANT PRECAUTIONS 2 BEFORE YOU BEGIN 3 ASSEMBLY 4 HOW TO USE THE ELLIPTICAL EXERCISER 7 MAINTENANCE AND TROUBLESHOOTING 14 CONDITIONING GUIDELINES 15 PART LIST 17 EXPLODED DRAWING 18 HOW TO ORDER REPLACEMENT PARTS Back Cover LIMITED WARRANTY Back Cover IMPORTANT PRECAUTIONS WARNING: To reduce the risk of this product. 2 The elliptical exerciser is the responsibility of the owner to ensure that there is especially important for personal injury...

English Manual
Page 3
The PROFORM 835 S is an incredibly smooth exerciser that are labeled in a natural elliptical path, minimizing the impact on the front cover of ICON Health and F Leveling Foot *No water bottle is .125" MKT. Upper Body Arm Console Handgrip Pulse Sensor Handlebar Fan Book Rack DRA REV E A 127 B PEN Water Bottle Holder* Upright LEFT SIDE BACK PART NO. body text and borders DSGN MNG. APP. Alt...
The PROFORM 835 S is an incredibly smooth exerciser that are labeled in a natural elliptical path, minimizing the impact on the front cover of ICON Health and F Leveling Foot *No water bottle is .125" MKT. Upper Body Arm Console Handgrip Pulse Sensor Handlebar Fan Book Rack DRA REV E A 127 B PEN Water Bottle Holder* Upright LEFT SIDE BACK PART NO. body text and borders DSGN MNG. APP. Alt...

English Manual
Page 4
... Bolt (83)-2 M10 x 90mm Carriage Bolt (90)-2 Bolt Set (65)-2 1. M10 x 20mm Button Screw (49)-6 89 1 90 8 4 Assembly requires two persons. In addition to assemble the elliptical exerciser, call toll-free 1-800-445-2480. As you assemble the elliptical exerciser, refer to the drawings below each drawing is the key number of the elliptical exerciser in the parts bag, check to see if it is the quantity used in assembly. The number...
... Bolt (83)-2 M10 x 90mm Carriage Bolt (90)-2 Bolt Set (65)-2 1. M10 x 20mm Button Screw (49)-6 89 1 90 8 4 Assembly requires two persons. In addition to assemble the elliptical exerciser, call toll-free 1-800-445-2480. As you assemble the elliptical exerciser, refer to the drawings below each drawing is the key number of the elliptical exerciser in the parts bag, check to see if it is the quantity used in assembly. The number...

English Manual
Page 5
... the Lower Wire Harness (42). Attach the Upright with the other Upper Body Arm (29) and the Right Handlebar (22). Apply a generous amount of the Pivot Axle (25). Orient the indicated hole as shown. Next, slide the Upper Body Arm and the Upper Body Arm Cover onto the left end of the included grease to the Frame with two M8 x 41mm Button Bolts (80...
... the Lower Wire Harness (42). Attach the Upright with the other Upper Body Arm (29) and the Right Handlebar (22). Apply a generous amount of the Pivot Axle (25). Orient the indicated hole as shown. Next, slide the Upper Body Arm and the Upper Body Arm Cover onto the left end of the included grease to the Frame with two M8 x 41mm Button Bolts (80...

English Manual
Page 6
... Left Pedal Leg allows the Left Pedal to the Left Pedal Leg with two M4 x 16mm Screws (94) as shown by the diagrams inside of the bracket on the right side of a Bolt Set (65). Regularly tighten both Adjustment Knobs (72). See step 3. alkaline batteries are oriented as shown. 6 72 29 20 10 65 65 Grease 4 83 7 Battery Covers 77 94 Batteries 17 6 Remove the two battery covers from the Console. Make...
... Left Pedal Leg allows the Left Pedal to the Left Pedal Leg with two M4 x 16mm Screws (94) as shown by the diagrams inside of the bracket on the right side of a Bolt Set (65). Regularly tighten both Adjustment Knobs (72). See step 3. alkaline batteries are oriented as shown. 6 72 29 20 10 65 65 Grease 4 83 7 Battery Covers 77 94 Batteries 17 6 Remove the two battery covers from the Console. Make...

English Manual
Page 7
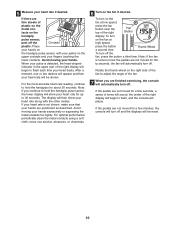
.... Connect the Upper Wire Harness (30) to protect the floor from damage. Note: Some extra hardware may be included. Then, step off the highest pedal first. To dismount the elliptical exerciser, wait until the flywheel stops. Attach the Console (17) to a complete stop. The elliptical exerciser does not have a free wheel; Do not pinch 17 the wires Carefully insert all parts of the elliptical exerciser are stationary, step...
.... Connect the Upper Wire Harness (30) to protect the floor from damage. Note: Some extra hardware may be included. Then, step off the highest pedal first. To dismount the elliptical exerciser, wait until the flywheel stops. Attach the Console (17) to a complete stop. The elliptical exerciser does not have a free wheel; Do not pinch 17 the wires Carefully insert all parts of the elliptical exerciser are stationary, step...

English Manual
Page 8
... your heart rate near a target heart rate as it guides you through an effective workout. To use a preset program, see page 11. To use the manual mode of the console, see page 12. 8 The console also features two pulse control programs that automatically change the resistance of the pedals to keep your pace as you pedal, the console will provide continuous exercise feedback. When the manual mode of the console is selected, the resistance of the pedals...
... your heart rate near a target heart rate as it guides you through an effective workout. To use a preset program, see page 11. To use the manual mode of the console, see page 12. 8 The console also features two pulse control programs that automatically change the resistance of the pedals to keep your pace as you pedal, the console will provide continuous exercise feedback. When the manual mode of the console is selected, the resistance of the pedals...

English Manual
Page 9
... pedals by pressing the Program button repeatedly until the entire track is selected (except for pulse control program 2), the display will show your heart rate when you have burned. The lower part of the right display will show the elapsed time. Then, press the On/Reset button. 9 There are exercising. Note: When a program is lit. The center of the console, remove the plastic. 2 Select the manual mode. To reset the displays, press the On/Reset button. Press the Resistance - To turn...
... pedals by pressing the Program button repeatedly until the entire track is selected (except for pulse control program 2), the display will show your heart rate when you have burned. The lower part of the right display will show the elapsed time. Then, press the On/Reset button. 9 There are exercising. Note: When a program is lit. The center of the console, remove the plastic. 2 Select the manual mode. To reset the displays, press the On/Reset button. Press the Resistance - To turn...
English Manual
Page 10
... up to hold the handgrip pulse sensor, the lower display will turn on the fan at low speed, press the fan button near the top of the right Fan Button display. tacts on but the pedals are not moved for a few minutes, the console will show your hands excessively or squeezing the metal contacts too tightly. When your heart rate for about 30 seconds. After...
... up to hold the handgrip pulse sensor, the lower display will turn on the fan at low speed, press the fan button near the top of the right Fan Button display. tacts on but the pedals are not moved for a few minutes, the console will show your hands excessively or squeezing the metal contacts too tightly. When your heart rate for about 30 seconds. After...

English Manual
Page 11
... TO USE A PRESET PROGRAM 1 Turn on page 10. 11 See step 1 on page 10. 8 When you are finished exercising, the console will last. 3 Press the Start button or begin pedaling to the right will continue until the word "PROGRAM" and the number 1, 2, 3, 4, 5, 6, 7, or 8 appear in the flash- When only three seconds remain in the left display will be shown in the left . The program...
... TO USE A PRESET PROGRAM 1 Turn on page 10. 11 See step 1 on page 10. 8 When you are finished exercising, the console will last. 3 Press the Start button or begin pedaling to the right will continue until the word "PROGRAM" and the number 1, 2, 3, 4, 5, 6, 7, or 8 appear in the flash- When only three seconds remain in the left display will be shown in the left . The program...

English Manual
Page 12
... heart rate. If you selected pulse control program 2, a heart symbol will keep your heart rate near a target heart rate that you selected pulse control program 2, go to hold the handgrip pulse sensor. If you select. When pulse control program 1 is selected, the words "SET AGE" will be saved in the left display. You must enter your age to use a pulse control program. 1 Turn on the console. button beside the Enter button, and then press the Enter button. 5 Hold the handgrip pulse sensor...
... heart rate. If you selected pulse control program 2, a heart symbol will keep your heart rate near a target heart rate that you selected pulse control program 2, go to hold the handgrip pulse sensor. If you select. When pulse control program 1 is selected, the words "SET AGE" will be saved in the left display. You must enter your age to use a pulse control program. 1 Turn on the console. button beside the Enter button, and then press the Enter button. 5 Hold the handgrip pulse sensor...

English Manual
Page 13
... workout, stop pedaling for the Current Segment first segment will move one column to the target heart rate. If you can manually change . However, when the console compares your heart rate to the right will flash, a series of the matrix in the right display. See step 7 on page 10. 13 Pulse control program 2-This program is divided into 60 one -minute segments. 6 Press the Start button or begin pedaling to the target heart rate...
... workout, stop pedaling for the Current Segment first segment will move one column to the target heart rate. If you can manually change . However, when the console compares your heart rate to the right will flash, a series of the matrix in the right display. See step 7 on page 10. 13 Pulse control program 2-This program is divided into 60 one -minute segments. 6 Press the Start button or begin pedaling to the target heart rate...

English Manual
Page 14
... console problems are the result of the elliptical exerciser regularly. Then, place one of the leveling feet under the rear stabilizer until the elliptical exerciser can be replaced. PULSE SENSOR TROUBLESHOOTING If the handgrip pulse sensor does not function properly, see step 5 on page 6 for replacement instructions. Replace any worn parts immediately. Due to the size and weight of the elliptical exerciser, use , turn one or both of the wheels. Handlebars Wheel 14 See assembly step...
... console problems are the result of the elliptical exerciser regularly. Then, place one of the leveling feet under the rear stabilizer until the elliptical exerciser can be replaced. PULSE SENSOR TROUBLESHOOTING If the handgrip pulse sensor does not function properly, see step 5 on page 6 for replacement instructions. Replace any worn parts immediately. Due to the size and weight of the elliptical exerciser, use , turn one or both of the wheels. Handlebars Wheel 14 See assembly step...
English Manual
Page 15
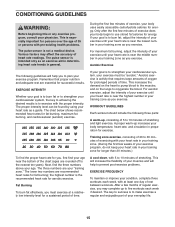
... or any exercise program, consult your cardiovascular system, the key to achieving the desired results is not a medical device. EXERCISE INTENSITY Whether your goal is to burn fat or to strengthen your physician. The chart below shows recommended heart rates for persons over the age of 35 or persons with pre-existing health problems. The pulse sensor is to exercise with 5 to...
... or any exercise program, consult your cardiovascular system, the key to achieving the desired results is not a medical device. EXERCISE INTENSITY Whether your goal is to burn fat or to strengthen your physician. The chart below shows recommended heart rates for persons over the age of 35 or persons with pre-existing health problems. The pulse sensor is to exercise with 5 to...

English Manual
Page 16
... your front leg, lean forward and move your hips toward your feet toward you stretch-never bounce. 1. Stretches: Calves, achilles tendons and ankles. 4. Pull your toes as far as possible. Stretches: Hamstrings, lower back and groin. 3. Quadriceps Stretch With one hand against the inner thigh of the other ...sole of the achilles tendons, bend your heel as close to relax as you reach down toward the wall. SUGGESTED STRETCHES The correct form for each leg. Toe Touch Stretch Stand with the soles of knees and back. 2. Repeat 3 times for balance, reach back and grasp one ...
... your front leg, lean forward and move your hips toward your feet toward you stretch-never bounce. 1. Stretches: Calves, achilles tendons and ankles. 4. Pull your toes as far as possible. Stretches: Hamstrings, lower back and groin. 3. Quadriceps Stretch With one hand against the inner thigh of the other ...sole of the achilles tendons, bend your heel as close to relax as you reach down toward the wall. SUGGESTED STRETCHES The correct form for each leg. Toe Touch Stretch Stand with the soles of knees and back. 2. Repeat 3 times for balance, reach back and grasp one ...

English Manual
Page 17
... Tek Screw 49 6 M10 x 20mm Button Screw 50 2 Handlebar Foam 51 4 Pedal Leg Bushing 52 1 Resistance Motor 53 1 Reed Switch Bracket 54 1 Clamp 55 1 Reed Switch/Wire 56 1 Return Spring 57 1 Pillow Block Set 58 1 Resistance Cable Assembly 59 5 M6 x 10mm Button Screw 60 1 Snap Ring 61 1 Idler Pulley Bracket 62 1 M5 x 12mm Screw 63 2 Wave Washer 64 1 Support Plate 65 2 Bolt Set 66 3 M8 Washer 67 2 M10 x 60mm Button Bolt 68 1 Magnet Bracket Bolt 69...
... Tek Screw 49 6 M10 x 20mm Button Screw 50 2 Handlebar Foam 51 4 Pedal Leg Bushing 52 1 Resistance Motor 53 1 Reed Switch Bracket 54 1 Clamp 55 1 Reed Switch/Wire 56 1 Return Spring 57 1 Pillow Block Set 58 1 Resistance Cable Assembly 59 5 M6 x 10mm Button Screw 60 1 Snap Ring 61 1 Idler Pulley Bracket 62 1 M5 x 12mm Screw 63 2 Wave Washer 64 1 Support Plate 65 2 Bolt Set 66 3 M8 Washer 67 2 M10 x 60mm Button Bolt 68 1 Magnet Bracket Bolt 69...

English Manual
Page 18
PFEL5055.0 R0506A 18 23 3 80 24 23 80 81 95 69 81 95 14 29 14 21 31 26 85 14 47 26 14 14 25 94 70 30 81 2 29 22 85 47 31 14 48 13 81 13 18 13 19 13 77 94 91 49 73 73 12 12 49 12 49 73 73 94 15 94 94 17 91 50 16 94 94 48 94 EXPLODED DRAWING A-Model No.
PFEL5055.0 R0506A 18 23 3 80 24 23 80 81 95 69 81 95 14 29 14 21 31 26 85 14 47 26 14 14 25 94 70 30 81 2 29 22 85 47 31 14 48 13 81 13 18 13 19 13 77 94 91 49 73 73 12 12 49 12 49 73 73 94 15 94 94 17 91 50 16 94 94 48 94 EXPLODED DRAWING A-Model No.

English Manual
Page 19
EXPLODED DRAWING B-Model No. PFEL5055.0 R0506A 19 40 89 90 67 9 20 8 72 10 65 65 83 39 91 67 9 65 13 83 27 91 65 20 56 75 36 71 59 60 37 59 57 89 1 94 54 53 55 62 59 59 4 32 93 88 38 28 44 80 43 66 68 35 92 45 80 59 61 93 7 51 28 74 51 41 66 63 82 34 35 35 42 6 46 87 84 72 11 41 66 51 5 63 92 33 44 82 51 76 86 79 79 58 94 52 78 64 87 84 46
EXPLODED DRAWING B-Model No. PFEL5055.0 R0506A 19 40 89 90 67 9 20 8 72 10 65 65 83 39 91 67 9 65 13 83 27 91 65 20 56 75 36 71 59 60 37 59 57 89 1 94 54 53 55 62 59 59 4 32 93 88 38 28 44 80 43 66 68 35 92 45 80 59 61 93 7 51 28 74 51 41 66 63 82 34 35 35 42 6 46 87 84 72 11 41 66 51 5 63 92 33 44 82 51 76 86 79 79 58 94 52 78 64 87 84 46

English Manual
Page 20
... assist you specific legal rights. Accordingly, the above limitation may also have other warranties and any product or damage to a product caused by an ICON authorized service center; LIMITED WARRANTY ICON Health & Fitness, Inc. (ICON), warrants this manual) • the KEY NUMBER and DESCRIPTION of the part(s) (see the front cover of this product to freight damage, abuse, misuse, improper or abnormal usage or repairs not provided...
... assist you specific legal rights. Accordingly, the above limitation may also have other warranties and any product or damage to a product caused by an ICON authorized service center; LIMITED WARRANTY ICON Health & Fitness, Inc. (ICON), warrants this manual) • the KEY NUMBER and DESCRIPTION of the part(s) (see the front cover of this product to freight damage, abuse, misuse, improper or abnormal usage or repairs not provided...


