

User Manual
Page 1
ELLIPTICAL EXERCISER User's Manual Serial Number Decal • Assembly • Operation • Maintenance • Part List and Drawing CAUTION Read all precautions and instructions in the space above for future reference. Keep this equipment. Model No. 831.283520 Serial No. Patent Pending Sears, Roebuck and Co., Hoffman Estates, IL 60179 Write the serial number in this manual before using this manual for reference.
ELLIPTICAL EXERCISER User's Manual Serial Number Decal • Assembly • Operation • Maintenance • Part List and Drawing CAUTION Read all precautions and instructions in the space above for future reference. Keep this equipment. Model No. 831.283520 Serial No. Patent Pending Sears, Roebuck and Co., Hoffman Estates, IL 60179 Write the serial number in this manual before using this manual for reference.

User Manual
Page 2
TABLE OF CONTENTS IMPORTANT PRECAUTIONS 3 BEFORE YOU BEGIN 4 ASSEMBLY 5 HOW TO USE THE ELLIPTICAL CROSSTRAINER 9 MAINTENANCE AND TROUBLESHOOTING 20 CONDITIONING GUIDELINES 21 PART LIST 22 EXPLODED DRAWING 23 HOW TO ORDER REPLACEMENT PARTS Back Cover FULL 90 DAY WARRANTY Back Cover 2
TABLE OF CONTENTS IMPORTANT PRECAUTIONS 3 BEFORE YOU BEGIN 4 ASSEMBLY 5 HOW TO USE THE ELLIPTICAL CROSSTRAINER 9 MAINTENANCE AND TROUBLESHOOTING 20 CONDITIONING GUIDELINES 21 PART LIST 22 EXPLODED DRAWING 23 HOW TO ORDER REPLACEMENT PARTS Back Cover FULL 90 DAY WARRANTY Back Cover 2

User Manual
Page 3
... a free replacement decal. heart rate readings. Do not use only. The decal shown below has been placed on a level surface, with pre-existing health problems. Read all precautions. Apply the decal in general. 11. Read all parts regularly. Inspect and properly tighten all instructions in a commercial, rental, or institutional setting. 4. Hold the handgrip pulse sensor or the handlebars when mounting, dismounting, or using the elliptical crosstrainer...
... a free replacement decal. heart rate readings. Do not use only. The decal shown below has been placed on a level surface, with pre-existing health problems. Read all precautions. Apply the decal in general. 11. Read all parts regularly. Inspect and properly tighten all instructions in a commercial, rental, or institutional setting. 4. Hold the handgrip pulse sensor or the handlebars when mounting, dismounting, or using the elliptical crosstrainer...

User Manual
Page 4
... PROFORM® 820 features adjustable resistance and a state-of this manual for selecting the new PROFORM® 820 CARDIO CROSSTRAINER. For your exercise. The PROFORM® 820 is an incredibly smooth exerciser that are labeled in a natural elliptical path, minimizing the impact on a decal attached to the elliptical crosstrainer (see the front cover of -theart console to help us assist you, please note the product model number and serial number before you use the elliptical crosstrainer...
... PROFORM® 820 features adjustable resistance and a state-of this manual for selecting the new PROFORM® 820 CARDIO CROSSTRAINER. For your exercise. The PROFORM® 820 is an incredibly smooth exerciser that are labeled in a natural elliptical path, minimizing the impact on a decal attached to the elliptical crosstrainer (see the front cover of -theart console to help us assist you, please note the product model number and serial number before you use the elliptical crosstrainer...

User Manual
Page 5
... . Note: Some small parts may have been pre-assembled. ASSEMBLY Assembly requires two persons. Do not dispose of the part, from the PART LIST on page 22. As you assemble the elliptical crosstrainer, use the drawings below each drawing refers to the key number of the packing materials until assembly is missing, call toll-free 1-800-999-3756. M4 x 16mm Screw (66)-4 M4 x 22mm Screw (93)-2 M8...
... . Note: Some small parts may have been pre-assembled. ASSEMBLY Assembly requires two persons. Do not dispose of the part, from the PART LIST on page 22. As you assemble the elliptical crosstrainer, use the drawings below each drawing refers to the key number of the packing materials until assembly is missing, call toll-free 1-800-999-3756. M4 x 16mm Screw (66)-4 M4 x 22mm Screw (93)-2 M8...
User Manual
Page 6
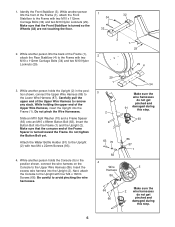
... touching the floor. 32 2. Do not pinch the Wire Harnesses. 1. Insert the Button Bolt into the Frame (1) and the Upright (2). Identify the Front Stabilizer (3). Next, attach the Console to the Frame with four M4 x 16mm Screws (66). Do not tighten the Button Bolt yet. Make sure that the concave end of the Frame (1), attach the Front 1 32 Stabilizer to remove any slack.
... touching the floor. 32 2. Do not pinch the Wire Harnesses. 1. Insert the Button Bolt into the Frame (1) and the Upright (2). Identify the Front Stabilizer (3). Next, attach the Console to the Frame with four M4 x 16mm Screws (66). Do not tighten the Button Bolt yet. Make sure that the concave end of the Frame (1), attach the Front 1 32 Stabilizer to remove any slack.
User Manual
Page 9
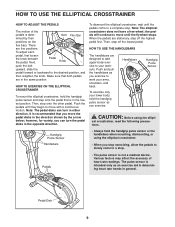
... using the elliptical crosstrainer. Handlebars • When you move the pedal disks in the lowest position. HOW TO USE THE ELLIPTICAL CROSSTRAINER HOW TO ADJUST THE PEDALS The motion of heart rate readings. To adjust each pedal, first loosen the knob beneath the pedal. HOW TO EXERCISE ON THE ELLIPTICAL CROSSTRAINER To mount the elliptical crosstrainer, hold the handgrip pulse sensor and step onto the pedal that you stop exercising, allow the pedals to slowly come to work your arms...
... using the elliptical crosstrainer. Handlebars • When you move the pedal disks in the lowest position. HOW TO USE THE ELLIPTICAL CROSSTRAINER HOW TO ADJUST THE PEDALS The motion of heart rate readings. To adjust each pedal, first loosen the knob beneath the pedal. HOW TO EXERCISE ON THE ELLIPTICAL CROSSTRAINER To mount the elliptical crosstrainer, hold the handgrip pulse sensor and step onto the pedal that you stop exercising, allow the pedals to slowly come to work your arms...
User Manual
Page 10
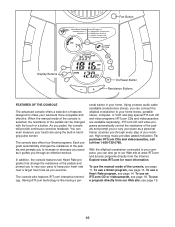
... your heart rate near a target heart rate as it guides you can even measure your heart rate using the built-in your home. When the manual mode of the console is like having a per- sonal trainer in handgrip pulse sensor. As you can be changed with the touch of a button. With the elliptical crosstrainer connected to your computer, you through every step of your workout. Fan Button Display Buttons On/Reset Button Resistance Buttons FEATURES OF THE CONSOLE The advanced console...
... your heart rate near a target heart rate as it guides you can even measure your heart rate using the built-in your home. When the manual mode of the console is like having a per- sonal trainer in handgrip pulse sensor. As you can be changed with the touch of a button. With the elliptical crosstrainer connected to your computer, you through every step of your workout. Fan Button Display Buttons On/Reset Button Resistance Buttons FEATURES OF THE CONSOLE The advanced console...

User Manual
Page 11
... bar in the upper section of the pedals by pressing the Program button repeatedly until the word SCAN reappears. The display will show the distance you have pedaled and the numbers of calories and fat calories you pedal, change the resistance of the elapsed time. Note: The console requires four 1.5V "D" batteries (see step 5 on , the manual mode will increase or decrease in the small display. 3 Begin pedaling and change...
... bar in the upper section of the pedals by pressing the Program button repeatedly until the word SCAN reappears. The display will show the distance you have pedaled and the numbers of calories and fat calories you pedal, change the resistance of the elapsed time. Note: The console requires four 1.5V "D" batteries (see step 5 on , the manual mode will increase or decrease in the small display. 3 Begin pedaling and change...
User Manual
Page 12
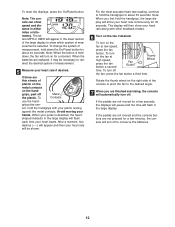
... finished exercising, the console will appear in the large display. To turn off the fan, press the fan button a third time. If there are replaced, it may be shown. Avoid moving your heart rate along with your heart rate will then show your pulse is held down the On/Reset button for 30 seconds. To turn off the plastic. To Metal Contacts use the hand- The display will...
... finished exercising, the console will appear in the large display. To turn off the fan, press the fan button a third time. If there are replaced, it may be shown. Avoid moving your heart rate along with your heart rate will then show your pulse is held down the On/Reset button for 30 seconds. To turn off the plastic. To Metal Contacts use the hand- The display will...

User Manual
Page 13
... is turned on page 12. 7 When you are finished exercising, the console will change it guides you continue pedaling after the program is programmed for the current period will automatically change if a different resistance level is completed, the displays will be slow- See step 4 on page 12. 13 To start the program. One resistance level and one arrow point- At the end of the indicator bar...
... is turned on page 12. 7 When you are finished exercising, the console will change it guides you continue pedaling after the program is programmed for the current period will automatically change if a different resistance level is completed, the displays will be slow- See step 4 on page 12. 13 To start the program. One resistance level and one arrow point- At the end of the indicator bar...

User Manual
Page 14
... manual mode will be from 220. Your actual pace may choose to use a Heart Rate program. 1 Turn on the console. buttons to enter your exercise program. The target heart rate can change the target heart rate, press the small + and - Each time you hold the handgrips continuously during a Heart Rate program; buttons below the large display if desired. Note: You can be selected. rent target heart rate. Follow the steps below the target heart rate, the number of...
... manual mode will be from 220. Your actual pace may choose to use a Heart Rate program. 1 Turn on the console. buttons to enter your exercise program. The target heart rate can change the target heart rate, press the small + and - Each time you hold the handgrips continuously during a Heart Rate program; buttons below the large display if desired. Note: You can be selected. rent target heart rate. Follow the steps below the target heart rate, the number of...

User Manual
Page 15
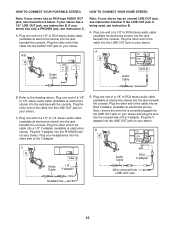
... you stop pedaling for a few seconds, the program will automatically turn off. Plug one end of the cable into the jack beneath the console. HOW TO CONNECT YOUR CD PLAYER, VCR, OR COMPUTER 6 Follow your computer. To use iFIT.com videocassettes, the elliptical crosstrainer must be connected to your CD player. A. Plug one jack, see instruction A below. A PHONES LINE OUT LINE OUT PHONES Audio Cable Headphones B. Plug the...
... you stop pedaling for a few seconds, the program will automatically turn off. Plug one end of the cable into the jack beneath the console. HOW TO CONNECT YOUR CD PLAYER, VCR, OR COMPUTER 6 Follow your computer. To use iFIT.com videocassettes, the elliptical crosstrainer must be connected to your CD player. A. Plug one jack, see instruction A below. A PHONES LINE OUT LINE OUT PHONES Audio Cable Headphones B. Plug the...
User Manual
Page 16
... side of the Y-adapter. Plug one end of a 1/8" to 1/8" stereo audio cable (available at electronics stores) into the jack beneath the console. Next, remove the wire that is being used, see instruction A below . A. Plug one end of a 1/8" to RCA stereo audio cable (available at electronics stores) into the jack beneath the console. B CD VCR Amp LINE OUT PHONES Audio Cable 1/8" Y-adapter Audio Cable RCA Y-adapter Wire removed from LINE OUT jack...
... side of the Y-adapter. Plug one end of a 1/8" to 1/8" stereo audio cable (available at electronics stores) into the jack beneath the console. Next, remove the wire that is being used, see instruction A below . A. Plug one end of a 1/8" to RCA stereo audio cable (available at electronics stores) into the jack beneath the console. B CD VCR Amp LINE OUT PHONES Audio Cable 1/8" Y-adapter Audio Cable RCA Y-adapter Wire removed from LINE OUT jack...

User Manual
Page 17
... console. Plug the other side of a 1/8" to 1/8" stereo audio cable (available at electronics stores). IN VIDEO AUDIO IN CH 34 OUT RF OUT Headphones/Speakers Audio Cable RCA Y-adapter Wire removed from AUDIO OUT jack 17 If your computer has only a PHONES jack, see instruction A. If you have a TV with a built-in VCR, see HOW TO CONNECT YOUR HOME STEREO on your VCR and plug the wire...
... console. Plug the other side of a 1/8" to 1/8" stereo audio cable (available at electronics stores). IN VIDEO AUDIO IN CH 34 OUT RF OUT Headphones/Speakers Audio Cable RCA Y-adapter Wire removed from AUDIO OUT jack 17 If your computer has only a PHONES jack, see instruction A. If you have a TV with a built-in VCR, see HOW TO CONNECT YOUR HOME STEREO on your VCR and plug the wire...

User Manual
Page 18
... 11. 2 Select the iFIT.com mode. HOW TO USE IFIT.COM CD AND VIDEO PROGRAMS To use an iFIT.com CD or video program. 1 Turn on the console. See step 1 on page 12. 18 The indicator near the iFIT.com button is lit. • Adjust the volume of the pedals and/or the target pace does not change . The program will begin guiding you are using an iFIT.com CD, insert the...
... 11. 2 Select the iFIT.com mode. HOW TO USE IFIT.COM CD AND VIDEO PROGRAMS To use an iFIT.com CD or video program. 1 Turn on the console. See step 1 on page 12. 18 The indicator near the iFIT.com button is lit. • Adjust the volume of the pedals and/or the target pace does not change . The program will begin guiding you are using an iFIT.com CD, insert the...

User Manual
Page 19
... to play iFIT.com programs directly from the internet. Each time the console is about to your computer and start the program, an on page 13). See step 5 on page 12. 10 When you start an internet connection. 4 Start your heart rate if desired. To select the iFIT.com mode, press the iFIT.com button. When you are finished exercising, the console will automatically turn off. See step 4 on , the manual mode will...
... to play iFIT.com programs directly from the internet. Each time the console is about to your computer and start the program, an on page 13). See step 5 on page 12. 10 When you start an internet connection. 4 Start your heart rate if desired. To select the iFIT.com mode, press the iFIT.com button. When you are finished exercising, the console will automatically turn off. See step 4 on , the manual mode will...

User Manual
Page 20
... replaced; HOW TO LEVEL THE ELLIPTICAL CROSSTRAINER After the elliptical crosstrainer has been moved to the location where it will be used, make sure that the ends of both of the elliptical crosstrainer regularly. MAINTENANCE AND TROUBLESHOOTING Inspect and tighten all parts of the level- most accurate heart rate reading, hold the metal contacts too tightly; Excessive movement may interfere with heart rate readings. • For the most console problems...
... replaced; HOW TO LEVEL THE ELLIPTICAL CROSSTRAINER After the elliptical crosstrainer has been moved to the location where it will be used, make sure that the ends of both of the elliptical crosstrainer regularly. MAINTENANCE AND TROUBLESHOOTING Inspect and tighten all parts of the level- most accurate heart rate reading, hold the metal contacts too tightly; Excessive movement may interfere with heart rate readings. • For the most console problems...
User Manual
Page 21
... aerobic exercise. The chart below shows recommended heart rates for longer than 20 minutes. Aerobic Exercise If your goal is near the highest number in your training zone as you , first find the three numbers above your condition, complete three workouts each week if desired. For aerobic exercise, adjust the intensity of 35 or persons with pre-existing health problems. • The pulse sensor is...
... aerobic exercise. The chart below shows recommended heart rates for longer than 20 minutes. Aerobic Exercise If your goal is near the highest number in your training zone as you , first find the three numbers above your condition, complete three workouts each week if desired. For aerobic exercise, adjust the intensity of 35 or persons with pre-existing health problems. • The pulse sensor is...

User Manual
Page 22
... x 22mm Button Bolt 90 4 Motor Washer 91 1 Water Bottle Holder 92 4 M8 Nut 93 2 M4 x 22mm Screw 94 1 M6 Large Washer # 2 Allen Wrench # 1 Grease # 1 User's Manual Note: "#" indicates a non-illustrated part. See the back cover of this manual for information about ordering replacement parts. 22 Description Key No. If a part is missing, call toll-free 1-800-999-3756. Qty. PART LIST-Model No. 831.283520 R0603A Key No. Qty. Specifications are...
... x 22mm Button Bolt 90 4 Motor Washer 91 1 Water Bottle Holder 92 4 M8 Nut 93 2 M4 x 22mm Screw 94 1 M6 Large Washer # 2 Allen Wrench # 1 Grease # 1 User's Manual Note: "#" indicates a non-illustrated part. See the back cover of this manual for information about ordering replacement parts. 22 Description Key No. If a part is missing, call toll-free 1-800-999-3756. Qty. PART LIST-Model No. 831.283520 R0603A Key No. Qty. Specifications are...

