
English Manual
Page 1
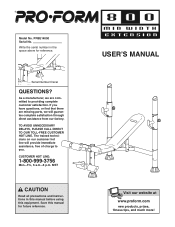
... TOLL-FREE CUSTOMER HOT LINE. CUSTOMER HOT LINE: 1-800-999-3756 Mon.ÐFri., 6 a.m.Ð6 p.m. Save this equipment. Write the serial number in this manual before using this manual for reference. The trained technicians on our customer hot line will guarantee complete satisfaction through direct assistance from our factory. USERÕS MANUAL Visit our website at www.proform.com new products, prizes, fitness...
... TOLL-FREE CUSTOMER HOT LINE. CUSTOMER HOT LINE: 1-800-999-3756 Mon.ÐFri., 6 a.m.Ð6 p.m. Save this equipment. Write the serial number in this manual before using this manual for reference. The trained technicians on our customer hot line will guarantee complete satisfaction through direct assistance from our factory. USERÕS MANUAL Visit our website at www.proform.com new products, prizes, fitness...
English Manual
Page 2
... ICON Health & Fitness, Inc. 2 Remove the Part List/Exploded Drawing before beginning assembly. WARNING ¥ Misuse of this manual. Warning Decal Placement The decal shown here has been placed on or around machine. ¥ Replace label if damaged, illegible, or removed. Table of Contents Warning Decal Placement 2 Important Precautions 3 Before You Begin 4 Part Identification Chart 5 Assembly 6 Using the Weight Bench 10 Exercise Guidelines 11 Ordering Replacement Parts Back Cover Limited Warranty Back Cover Note: A Part List...
... ICON Health & Fitness, Inc. 2 Remove the Part List/Exploded Drawing before beginning assembly. WARNING ¥ Misuse of this manual. Warning Decal Placement The decal shown here has been placed on or around machine. ¥ Replace label if damaged, illegible, or removed. Table of Contents Warning Decal Placement 2 Important Precautions 3 Before You Begin 4 Part Identification Chart 5 Assembly 6 Using the Weight Bench 10 Exercise Guidelines 11 Ordering Replacement Parts Back Cover Limited Warranty Back Cover Note: A Part List...
English Manual
Page 3
... for home use only. Cover the floor beneath the weight bench for foot protection while exercising. Inspect and tighten all instructions in this manual. 11. The weight bench is the responsibility of the owner to support a maximum of all precautions. 10. Always be sure there is designed to ensure that all users of the weight bench are adequately informed of 460 pounds, including the user, a weight bar, and weights. The weight bench is...
... for home use only. Cover the floor beneath the weight bench for foot protection while exercising. Inspect and tighten all instructions in this manual. 11. The weight bench is the responsibility of the owner to support a maximum of all precautions. 10. Always be sure there is designed to ensure that all users of the weight bench are adequately informed of 460 pounds, including the user, a weight bar, and weights. The weight bench is...
English Manual
Page 4
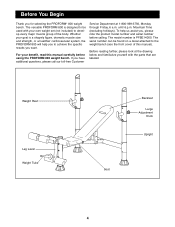
... found on a decal attached to develop every major muscle group of this manual carefully before calling. The serial number can be used with the parts that are labeled. Before You Begin Thank you , please note the product model number and serial number before using the PROFORM 800 weight bench. Mountain Time (excluding holidays). Whether your own weight set (not included) to the weight bench (see the front cover of the body.
... found on a decal attached to develop every major muscle group of this manual carefully before calling. The serial number can be used with the parts that are labeled. Before You Begin Thank you , please note the product model number and serial number before using the PROFORM 800 weight bench. Mountain Time (excluding holidays). Whether your own weight set (not included) to the weight bench (see the front cover of the body.
English Manual
Page 5
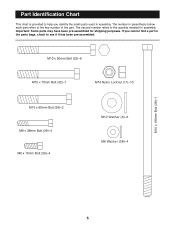
... to see if it has been pre-assembled. Important: Some parts may have been pre-assembled for assembly. If you identify the small parts used in the parts bags, check to the key number of the part. Part Identification Chart This chart is provided to the quantity needed for shipping purposes. M10 x 90mm Bolt (23)Ð6 M10 x 70mm Bolt (32)Ð1 M10 Nylon Locknut (11)Ð...
... to see if it has been pre-assembled. Important: Some parts may have been pre-assembled for assembly. If you identify the small parts used in the parts bags, check to the key number of the part. Part Identification Chart This chart is provided to the quantity needed for shipping purposes. M10 x 90mm Bolt (23)Ð6 M10 x 70mm Bolt (32)Ð1 M10 Nylon Locknut (11)Ð...
English Manual
Page 6
... the adjustment holes in the Upright (1) are oriented as grease or petroleum jelly, and soapy water will be sure that all parts are in the indicated position. Attach a Foot Plate (4) to the bottom of the weight bench in a cleared area and remove the packing materials; Do not tighten the Nylon Locknuts (11) yet. If a part is completed. ¥ Read each assembly step...
... the adjustment holes in the Upright (1) are oriented as grease or petroleum jelly, and soapy water will be sure that all parts are in the indicated position. Attach a Foot Plate (4) to the bottom of the weight bench in a cleared area and remove the packing materials; Do not tighten the Nylon Locknuts (11) yet. If a part is completed. ¥ Read each assembly step...
English Manual
Page 7
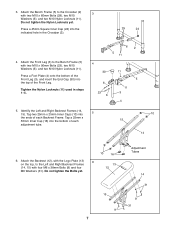
... two M10 x 90mm Bolts (23), two M10 Washers (6), and two M10 Nylon Locknuts (11). Press a 45mm Square Inner Cap (24) into the top of the Front Leg (3), and insert the End Cap (30) into the indicated hole in steps 1Ð4. 62 5 11...Attach the Front Leg (3) to the Crossbar (2) 3 with two M10 x 60mm Bolts (29), two M10 Washers (6), and two M10 Nylon Locknuts (11). 3. Tighten the Nylon Locknuts (11) used in the Crossbar (2). 29 24 4. Tap a 25mm x 50mm Inner Cap (16) into 5 the ends of each Backrest Frame. Do not tighten the Nylon Locknuts yet. Attach the Bench...
... two M10 x 90mm Bolts (23), two M10 Washers (6), and two M10 Nylon Locknuts (11). Press a 45mm Square Inner Cap (24) into the top of the Front Leg (3), and insert the End Cap (30) into the indicated hole in steps 1Ð4. 62 5 11...Attach the Front Leg (3) to the Crossbar (2) 3 with two M10 x 60mm Bolts (29), two M10 Washers (6), and two M10 Nylon Locknuts (11). 3. Tighten the Nylon Locknuts (11) used in the Crossbar (2). 29 24 4. Tap a 25mm x 50mm Inner Cap (16) into 5 the ends of each Backrest Frame. Do not tighten the Nylon Locknuts yet. Attach the Bench...
English Manual
Page 8
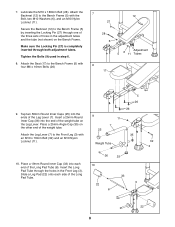
Lubricate the M10 x 180mm Bolt (28). Tighten the Bolts (9) used in the Front Leg (3). Insert a 25mm Round Inner Cap (36) into each side of the Leg Lever (7). Weight Tube 35 32 3 36 25 10. Insert the Long Pad Tube through the holes in step 6. 8. Secure the Backrest (12) to the Bench Frame (5) with the Bolt, two M10 Washers (6), and an M10 Nylon...
Lubricate the M10 x 180mm Bolt (28). Tighten the Bolts (9) used in the Front Leg (3). Insert a 25mm Round Inner Cap (36) into each side of the Leg Lever (7). Weight Tube 35 32 3 36 25 10. Insert the Long Pad Tube through the holes in step 6. 8. Secure the Backrest (12) to the Bench Frame (5) with the Bolt, two M10 Washers (6), and an M10 Nylon...

English Manual
Page 9
... are properly tightened before using the weight bench. Insert two 19mm Round Inner Caps (33) into the top and bottom of the right Upright (1). Make sure that all remaining parts will be explained in Adjusting the Weight Bench, starting on the Weight Rest and tighten it in the Leg Lever (7). Slide the Weight 12 Rest onto the right Upright (1). Pull out the Large Adjustment Knob and slide...
... are properly tightened before using the weight bench. Insert two 19mm Round Inner Caps (33) into the top and bottom of the right Upright (1). Make sure that all remaining parts will be explained in Adjusting the Weight Bench, starting on the Weight Rest and tighten it in the Leg Lever (7). Slide the Weight 12 Rest onto the right Upright (1). Pull out the Large Adjustment Knob and slide...
English Manual
Page 10
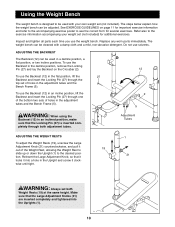
... use the Backrest (12) in an incline position, lift the Backrest and insert the Locking Pin (27) through one of the bottom two sets of the Weight Rest, allowing the Weight Rest to slide up or down the Upright (1) to see the correct form for additional exercises. Reinsert the Large Adjustment Knob, so that it locks it into the Uprights (1). 10 The weight bench...
... use the Backrest (12) in an incline position, lift the Backrest and insert the Locking Pin (27) through one of the bottom two sets of the Weight Rest, allowing the Weight Rest to slide up or down the Upright (1) to see the correct form for additional exercises. Reinsert the Large Adjustment Knob, so that it locks it into the Uprights (1). 10 The weight bench...
English Manual
Page 11
...-balanced fitness program, many sets of your exercise so that cross training is also provided, along with aerobic exercise, you can be tailored to the proper intensity level by using high amounts of weight. ¥ Weight Loss We have found that your muscles will find the locations of each repetition should be performed smoothly and without discomfort. By combining weight training with a list of...
...-balanced fitness program, many sets of your exercise so that cross training is also provided, along with aerobic exercise, you can be tailored to the proper intensity level by using high amounts of weight. ¥ Weight Loss We have found that your muscles will find the locations of each repetition should be performed smoothly and without discomfort. By combining weight training with a list of...
English Manual
Page 12
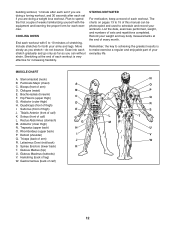
... flexibility. List the date, exercises performed, weight, and numbers of thigh) I. MUSCLE CHART A. Quadriceps (front of sets and repetitions completed. Rectus Abdominus (stomach) M. Deltoid (shoulder) II Q. Gluteus Maximus (buttocks) V. Gastrocnemius (back of arm) JJ R. Move slowly as you stretchÑdo not bounce. The charts on pages 13 to 15 of this manual can without strain. Record your weight and key body measurements...
... flexibility. List the date, exercises performed, weight, and numbers of thigh) I. MUSCLE CHART A. Quadriceps (front of sets and repetitions completed. Rectus Abdominus (stomach) M. Deltoid (shoulder) II Q. Gluteus Maximus (buttocks) V. Gastrocnemius (back of arm) JJ R. Move slowly as you stretchÑdo not bounce. The charts on pages 13 to 15 of this manual can without strain. Record your weight and key body measurements...
English Manual
Page 13
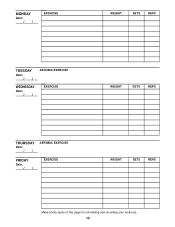
MONDAY Date: / / EXERCISE WEIGHT SETS REPS TUESDAY Date: / / AEROBIC EXERCISE WEDNESDAY Date: / / EXERCISE WEIGHT SETS REPS THURSDAY Date: / / AEROBIC EXERCISE FRIDAY Date: / / EXERCISE WEIGHT SETS REPS Make photocopies of this page for scheduling and recording your workouts. 13
MONDAY Date: / / EXERCISE WEIGHT SETS REPS TUESDAY Date: / / AEROBIC EXERCISE WEDNESDAY Date: / / EXERCISE WEIGHT SETS REPS THURSDAY Date: / / AEROBIC EXERCISE FRIDAY Date: / / EXERCISE WEIGHT SETS REPS Make photocopies of this page for scheduling and recording your workouts. 13

English Manual
Page 14
MONDAY Date: / / EXERCISE WEIGHT SETS REPS TUESDAY Date: / / AEROBIC EXERCISE WEDNESDAY Date: / / EXERCISE WEIGHT SETS REPS THURSDAY Date: / / AEROBIC EXERCISE FRIDAY Date: / / EXERCISE WEIGHT SETS REPS Make photocopies of this page for scheduling and recording your workouts. 14
MONDAY Date: / / EXERCISE WEIGHT SETS REPS TUESDAY Date: / / AEROBIC EXERCISE WEDNESDAY Date: / / EXERCISE WEIGHT SETS REPS THURSDAY Date: / / AEROBIC EXERCISE FRIDAY Date: / / EXERCISE WEIGHT SETS REPS Make photocopies of this page for scheduling and recording your workouts. 14

English Manual
Page 15
MONDAY Date: / / EXERCISE WEIGHT SETS REPS TUESDAY Date: / / AEROBIC EXERCISE WEDNESDAY Date: / / EXERCISE WEIGHT SETS REPS THURSDAY Date: / / AEROBIC EXERCISE FRIDAY Date: / / EXERCISE WEIGHT SETS REPS Make photocopies of this page for scheduling and recording your workouts. 15
MONDAY Date: / / EXERCISE WEIGHT SETS REPS TUESDAY Date: / / AEROBIC EXERCISE WEDNESDAY Date: / / EXERCISE WEIGHT SETS REPS THURSDAY Date: / / AEROBIC EXERCISE FRIDAY Date: / / EXERCISE WEIGHT SETS REPS Make photocopies of this page for scheduling and recording your workouts. 15
English Manual
Page 16
... warranties of merchantability or fitness for indirect, special or consequential damages arising out of or in China © 2000 ICON Health & Fitness, Inc. All returns must be free from defects in its authorized service centers with respect to the original purchaser. Accordingly, the above limitation may not apply to give the following information when calling: 1. The MODEL NUMBER of the product (PROFORM 800 weight bench...
... warranties of merchantability or fitness for indirect, special or consequential damages arising out of or in China © 2000 ICON Health & Fitness, Inc. All returns must be free from defects in its authorized service centers with respect to the original purchaser. Accordingly, the above limitation may not apply to give the following information when calling: 1. The MODEL NUMBER of the product (PROFORM 800 weight bench...
English Manual
Page 17
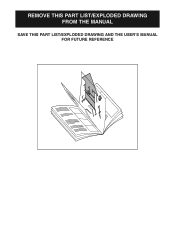
REMOVE THIS PART LIST/EXPLODED DRAWING FROM THE MANUAL SAVE THIS PART LIST/EXPLODED DRAWING AND THE USERÕS MANUAL FOR FUTURE REFERENCE 81
REMOVE THIS PART LIST/EXPLODED DRAWING FROM THE MANUAL SAVE THIS PART LIST/EXPLODED DRAWING AND THE USERÕS MANUAL FOR FUTURE REFERENCE 81
English Manual
Page 18
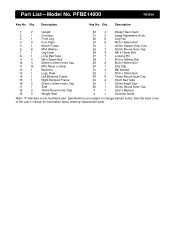
Specifications are subject to change without notice. See the back cover of the userÕs manual for information about ordering replacement parts. Qty. Description Key No. Qty. Description 1 2 Upright 2 1 Crossbar 3 1 Front Leg 4 3 Foot Plate 5 1 Bench Frame 6 6 M10 Washer 7 1 Leg Lever 8 1 Long Pad Tube 9 4 M6 x 38mm Bolt 10 4 25mm x 25mm Inner Cap 11 10 M10 Nylon Locknut 12 1 Backrest 13 1 Logo Plate 14 1 Left Backrest Frame...
Specifications are subject to change without notice. See the back cover of the userÕs manual for information about ordering replacement parts. Qty. Description Key No. Qty. Description 1 2 Upright 2 1 Crossbar 3 1 Front Leg 4 3 Foot Plate 5 1 Bench Frame 6 6 M10 Washer 7 1 Leg Lever 8 1 Long Pad Tube 9 4 M6 x 38mm Bolt 10 4 25mm x 25mm Inner Cap 11 10 M10 Nylon Locknut 12 1 Backrest 13 1 Logo Plate 14 1 Left Backrest Frame...

