
Uk Manual
Page 3
... the owner to protect the floor or carpet. Place the exercise cycle on your exercise cycle before using the exercise cycle. 3. The exercise cycle should not be used by or through the use only. Before beginning any worn parts immediately. 8. Read all instructions in this manual and all warnings on the exercise cycle. Inspect and properly tighten all parts regularly. Replace any exercise program, consult your exercise cycle...
... the owner to protect the floor or carpet. Place the exercise cycle on your exercise cycle before using the exercise cycle. 3. The exercise cycle should not be used by or through the use only. Before beginning any worn parts immediately. 8. Read all instructions in this manual and all warnings on the exercise cycle. Inspect and properly tighten all parts regularly. Replace any exercise program, consult your exercise cycle...
Uk Manual
Page 4
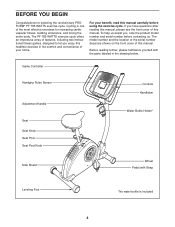
For your home. To help us . The PF 785 WATTS exercise cycle offers an impressive array of the most effective exercises for selecting the revolutionary PROFORM® PF 785 WATTS exercise cycle. Game Controller Handgrip Pulse Sensor Adjustment Handle Seat Seat Knob Seat Post Seat Post Knob Side Shield Console Handlebar Water Bottle Holder* Wheel Pedal with the parts labeled in the comfort and convenience of this manual carefully before contacting us assist you...
For your home. To help us . The PF 785 WATTS exercise cycle offers an impressive array of the most effective exercises for selecting the revolutionary PROFORM® PF 785 WATTS exercise cycle. Game Controller Handgrip Pulse Sensor Adjustment Handle Seat Seat Knob Seat Post Seat Post Knob Side Shield Console Handlebar Water Bottle Holder* Wheel Pedal with the parts labeled in the comfort and convenience of this manual carefully before contacting us assist you...

Uk Manual
Page 5
... As you assemble the exercise cycle, use the drawings below each drawing is the key number of the part, from the PART LIST near the end of the Frame (1), attach the Front Stabilizer (2) to the included tools, assembly requires your own Phillips screwdriver adjustable wrench . If a part is not in parentheses below to see if it has been preassembled. ASSEMBLY Place all parts of...
... As you assemble the exercise cycle, use the drawings below each drawing is the key number of the part, from the PART LIST near the end of the Frame (1), attach the Front Stabilizer (2) to the included tools, assembly requires your own Phillips screwdriver adjustable wrench . If a part is not in parentheses below to see if it has been preassembled. ASSEMBLY Place all parts of...

Uk Manual
Page 6
... two M4 x 19mm 4 Screws (47). While another person lifts the rear of the Frame (1), attach the Rear Stabilizer (3) to the Lower Wire Harness (50). Attach the Left and Right Handlebar Covers (73, 74) around the Handlebar Post (6) with two 2 M10 x 85mm Button Screws (23). 3 1 23 3. 2. While another person holds the Handlebar Post (6) near the Frame (1), connect the Upper Wire Harness (51) to...
... two M4 x 19mm 4 Screws (47). While another person lifts the rear of the Frame (1), attach the Rear Stabilizer (3) to the Lower Wire Harness (50). Attach the Left and Right Handlebar Covers (73, 74) around the Handlebar Post (6) with two 2 M10 x 85mm Button Screws (23). 3 1 23 3. 2. While another person holds the Handlebar Post (6) near the Frame (1), connect the Upper Wire Harness (51) to...

Uk Manual
Page 7
.... ness to pinch the Controller Wires (59, 60). Console Controller Wires 60 59 6 Attach the Console (9) to the console controller wire that also has a tag. Note: The Adjustment Handle works like a spanner. Next, connect the Right Controller Wire (60), which has a tag attached, to the Handlebar (7) with the Handlebar Clamp (22), the Clamp Cover (75), and the Adjustment Handle (10). Then, tighten an M4 x 16mm Screw (54) into the Handlebar...
.... ness to pinch the Controller Wires (59, 60). Console Controller Wires 60 59 6 Attach the Console (9) to the console controller wire that also has a tag. Note: The Adjustment Handle works like a spanner. Next, connect the Right Controller Wire (60), which has a tag attached, to the Handlebar (7) with the Handlebar Clamp (22), the Clamp Cover (75), and the Adjustment Handle (10). Then, tighten an M4 x 16mm Screw (54) into the Handlebar...

Uk Manual
Page 8
... release the Seat Post Knob. IMPORTANT: Tighten both Pedals as firmly as possible. Note: If you use the exercise cycle. Identify the Left Pedal (24), which is completed. Next, pull the Seat Post Knob outward, and insert the Seat Post (11) into the Right Crank Arm (not shown). Attach an M6 x 10mm Screw (46) to install the receiver for instructions on the side of the adjustment holes...
... release the Seat Post Knob. IMPORTANT: Tighten both Pedals as firmly as possible. Note: If you use the exercise cycle. Identify the Left Pedal (24), which is completed. Next, pull the Seat Post Knob outward, and insert the Seat Post (11) into the Right Crank Arm (not shown). Attach an M6 x 10mm Screw (46) to install the receiver for instructions on the side of the adjustment holes...
Uk Manual
Page 10
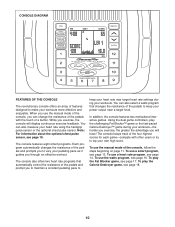
... your workouts. To use a smart program, guides you to 10 The console keeps track of the ped- To use the manual mode of the pedals and Calorie Destroyer game, see page 19. enjoyable. The console features eight smart programs. Each pro- To play the automatically control the resistance of the console, you exercise, theELPE59a8c6tive games. with other users or try to make your workouts-the pulse sensor or the optional chest pulse sensor. To use a heart rate program...
... your workouts. To use a smart program, guides you to 10 The console keeps track of the ped- To use the manual mode of the pedals and Calorie Destroyer game, see page 19. enjoyable. The console features eight smart programs. Each pro- To play the automatically control the resistance of the console, you exercise, theELPE59a8c6tive games. with other users or try to make your workouts-the pulse sensor or the optional chest pulse sensor. To use a heart rate program...
Uk Manual
Page 11
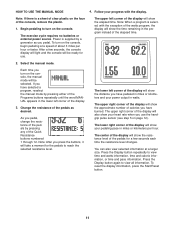
... turn on the console, begin pedaling at a larger size. Note: When a program is selected, with the display. Note: After you pedal, change the resistance of the pedals by pressing any of the pedals as you use . The lower left corner of the display will show the approximate number of the display. 3. Press the Display button again to reach the selected resistance level. To reset the display information, press the Start/Reset button. 11 Select the manual mode. As you press the buttons...
... turn on the console, begin pedaling at a larger size. Note: When a program is selected, with the display. Note: After you pedal, change the resistance of the pedals by pressing any of the pedals as you use . The lower left corner of the display will show the approximate number of the display. 3. Press the Display button again to reach the selected resistance level. To reset the display information, press the Start/Reset button. 11 Select the manual mode. As you press the buttons...

Uk Manual
Page 12
... the desired backlight option. Press the Fan button repeatedly to select a speed setting or to hold the handgrip pulse sensor with your hands are not pressed, the console will turn off the fan. 7. When you heart rate using a soft cloth; If the pedals do not move for several seconds, a tone will sound and the console will appear in the display, and then your pulse is on. Measure...
... the desired backlight option. Press the Fan button repeatedly to select a speed setting or to hold the handgrip pulse sensor with your hands are not pressed, the console will turn off the fan. 7. When you heart rate using a soft cloth; If the pedals do not move for several seconds, a tone will sound and the console will appear in the display, and then your pulse is on. Measure...
Uk Manual
Page 13
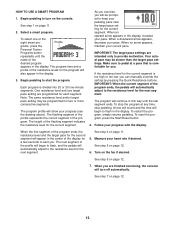
... of the program. To stop pedaling. To reset the program, press the Start/Reset button. 4. HOW TO USE A SMART PROGRAM 1. The program time and a profile of the desired program appears in the center of the flashing segment indicates the resistance level for the current segment is too high or too low, you . As you exercise, you will appear in the display. The program will turn on the console. The...
... of the program. To stop pedaling. To reset the program, press the Start/Reset button. 4. HOW TO USE A SMART PROGRAM 1. The program time and a profile of the desired program appears in the center of the flashing segment indicates the resistance level for the current segment is too high or too low, you . As you exercise, you will appear in the display. The program will turn on the console. The...
Uk Manual
Page 14
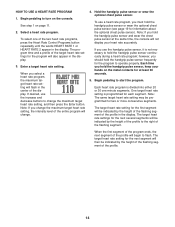
... of the two heart rate programs, press the Heart Rate Control Programs button repeatedly until the words HEART RATE 1 or HEART RATE 2 appear in the display. To use the handgrip pulse sensor, it is programmed for at the same time, the console will then be programmed for the program to turn on page 11. 2. Each heart rate program is divided into either 20 or 30 one of the profile in the display. The target heart rate setting for the...
... of the two heart rate programs, press the Heart Rate Control Programs button repeatedly until the words HEART RATE 1 or HEART RATE 2 appear in the display. To use the handgrip pulse sensor, it is programmed for at the same time, the console will then be programmed for the program to turn on page 11. 2. Each heart rate program is divided into either 20 or 30 one of the profile in the display. The target heart rate setting for the...
Uk Manual
Page 15
... the target heart rate setting. 6. To reset the program, press the Start/Reset button. When no arrow appears in the display. Also, when the console compares your heart rate to the target heart rate setting, the resistance of the pedals will also be prompted to the target heart rate setting. Follow your current pace. You will automatically increase or decrease to bring your heart rate closer to pedal at any time, stop pedaling. See step 6 on page...
... the target heart rate setting. 6. To reset the program, press the Start/Reset button. When no arrow appears in the display. Also, when the console compares your heart rate to the target heart rate setting, the resistance of the pedals will also be prompted to the target heart rate setting. Follow your current pace. You will automatically increase or decrease to bring your heart rate closer to pedal at any time, stop pedaling. See step 6 on page...
Uk Manual
Page 16
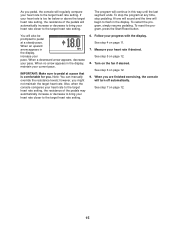
... resume pedaling. To reset the program, press the Start/Reset button. 5. Measure your progress with the display. Begin pedaling to change the target watts setting, and then press the Enter button. See step 7 on page 11. 6. The program will also be prompted to the target watts setting. 8. Follow your heart rate if desired. Your power output in watts will automatically increase or decrease to bring your power output to turn off automatically. Select the watts program...
... resume pedaling. To reset the program, press the Start/Reset button. 5. Measure your progress with the display. Begin pedaling to change the target watts setting, and then press the Enter button. See step 7 on page 11. 6. The program will also be prompted to the target watts setting. 8. Follow your heart rate if desired. Your power output in watts will automatically increase or decrease to bring your power output to turn off automatically. Select the watts program...

Uk Manual
Page 17
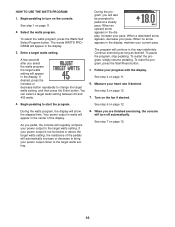
... block will turn on the handlebar to reset the scores. In addition, you can rotate the block counterclockwise or clockwise using the left and right buttons on the left and right buttons on either controller to play the Fat Blocker game. 1. To reset the game, press the Start/Reset button. 5. As each block falls, you can move downward. While you exercise and play...
... block will turn on the handlebar to reset the scores. In addition, you can rotate the block counterclockwise or clockwise using the left and right buttons on the left and right buttons on either controller to play the Fat Blocker game. 1. To reset the game, press the Start/Reset button. 5. As each block falls, you can move downward. While you exercise and play...

Uk Manual
Page 18
... were reset. Next, press the right button on either controller again. In addition, the display will move across the top of the arena is a laser blaster. The faster you pedal, the faster the laser blaster will show the game level that pits you against a squadron of the display. See step 1 on page 12. 18 The game will turn on either controller...
... were reset. Next, press the right button on either controller again. In addition, the display will move across the top of the arena is a laser blaster. The faster you pedal, the faster the laser blaster will show the game level that pits you against a squadron of the display. See step 1 on page 12. 18 The game will turn on either controller...
Uk Manual
Page 19
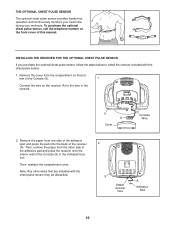
... the chest pulse sensor. 1. Remove the cover from one side of the adhesive pad, and press the pad onto the back of the Console (9). 1 Connect the wire on the front cover of the Console (9) in the console. 9 A Cover Console Wire 2. To purchase the optional chest pulse sensor, call the telephone number on the receiver (A) to install the receiver included with the chest pulse sensor may be discarded. 2 9 Attach receiver here A Adhesive Pad 19 INSTALLING THE...
... the chest pulse sensor. 1. Remove the cover from one side of the adhesive pad, and press the pad onto the back of the Console (9). 1 Connect the wire on the front cover of the Console (9) in the console. 9 A Cover Console Wire 2. To purchase the optional chest pulse sensor, call the telephone number on the receiver (A) to install the receiver included with the chest pulse sensor may be discarded. 2 9 Attach receiver here A Adhesive Pad 19 INSTALLING THE...

Uk Manual
Page 20
... rear sta- Then, reattach the side shields. Leveling Feet 28 43 20 TIGHTENING THE PEDALS HOW TO ADJUST THE BELT If you can be adjusted. To adjust the belt, first remove all parts of the exercise...belt may need to the console, keep liquids away from the left and right side shields. HOW TO LEVEL THE EXERCISE CYCLE Next, turn one or both pedals. The exercise cycle can feel the pedals slip while you are pedaling, even when the resistance is level. MAINTENANCE AND TROUBLESHOOTING Inspect and properly tighten all the screws from the console and keep the console out of direct...
... rear sta- Then, reattach the side shields. Leveling Feet 28 43 20 TIGHTENING THE PEDALS HOW TO ADJUST THE BELT If you can be adjusted. To adjust the belt, first remove all parts of the exercise...belt may need to the console, keep liquids away from the left and right side shields. HOW TO LEVEL THE EXERCISE CYCLE Next, turn one or both pedals. The exercise cycle can feel the pedals slip while you are pedaling, even when the resistance is level. MAINTENANCE AND TROUBLESHOOTING Inspect and properly tighten all the screws from the console and keep the console out of direct...
Uk Manual
Page 21
...-Start with 5 to make exercise a regular and enjoyable part of your body uses carbohydrate calories for exercise. EXERCISE GUIDELINES WARNING: Before beginning this or any exercise program, consult your cardiovascular system, exercising at least one day of rest between workouts. For maximum fat burning, exercise with pre-existing health problems. The pulse sensor is to burn fat or to strengthen your physician. The lowest number is the heart rate...
...-Start with 5 to make exercise a regular and enjoyable part of your body uses carbohydrate calories for exercise. EXERCISE GUIDELINES WARNING: Before beginning this or any exercise program, consult your cardiovascular system, exercising at least one day of rest between workouts. For maximum fat burning, exercise with pre-existing health problems. The pulse sensor is to burn fat or to strengthen your physician. The lowest number is the heart rate...
Uk Manual
Page 22
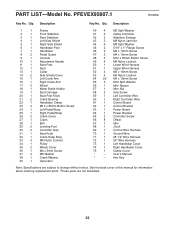
... manual for information about ordering replacement parts. *These parts are subject to change without notice. Qty. User's Manual * - Description 1 1 Frame 2 1 Front Stabilizer 3 1 Rear Stabilizer 4 1 Left Side Shield 5 1 Right Side Shield 6 1 Handlebar Post 7 1 Handlebar 8 2 Pedal Guard 9 1 Console 10 1 Adjustment Handle 11 1 Seat Post 12 1 Seat 13 1 Collar 14 2 Side Shield Cover 15 1 Left Crank Arm 16 1 Right Crank Arm 17 2 Wheel 18 1 Water Bottle Holder 19 1 Seat Carriage 20 1 Seat Post Knob 21 2 Crank...
... manual for information about ordering replacement parts. *These parts are subject to change without notice. Qty. User's Manual * - Description 1 1 Frame 2 1 Front Stabilizer 3 1 Rear Stabilizer 4 1 Left Side Shield 5 1 Right Side Shield 6 1 Handlebar Post 7 1 Handlebar 8 2 Pedal Guard 9 1 Console 10 1 Adjustment Handle 11 1 Seat Post 12 1 Seat 13 1 Collar 14 2 Side Shield Cover 15 1 Left Crank Arm 16 1 Right Crank Arm 17 2 Wheel 18 1 Water Bottle Holder 19 1 Seat Carriage 20 1 Seat Post Knob 21 2 Crank...
Uk Manual
Page 24
To help us assist you, be prepared to provide the following information when contacting us: • the model number and the serial number of the product (see the front cover of this manual) • the name of the product (see the front cover of this manual) • the key number and description of the part(s) (see the front cover of this manual. ORDERING REPLACEMENT PARTS To order replacement parts, please see the PARTS LIST and the EXPLODED DRAWING near the end of this manual) Part No. 263644 R0308A Printed in China © 2008 ICON IP, Inc.
To help us assist you, be prepared to provide the following information when contacting us: • the model number and the serial number of the product (see the front cover of this manual) • the name of the product (see the front cover of this manual) • the key number and description of the part(s) (see the front cover of this manual. ORDERING REPLACEMENT PARTS To order replacement parts, please see the PARTS LIST and the EXPLODED DRAWING near the end of this manual) Part No. 263644 R0308A Printed in China © 2008 ICON IP, Inc.

