

Uk Manual
Page 1
Serial Number Decal QUESTIONS? Customer Service Department Unit 4 Revie Road Industrial Estate Revie Road Beeston Leeds, LS118JG UK email: [email protected] CAUTION Read all precautions and instructions in this manual before using this manual for future reference. Model No. USER'S MANUAL PFEVEX61040 Serial No. Keep this equipment. As a manufacturer, we are missing or parts, please call: Or write: 08457 089 009 ICON Health & Fitness, Ltd. If you have questions, or if there are committed to providing complete customer satisfaction.
Serial Number Decal QUESTIONS? Customer Service Department Unit 4 Revie Road Industrial Estate Revie Road Beeston Leeds, LS118JG UK email: [email protected] CAUTION Read all precautions and instructions in this manual before using this manual for future reference. Model No. USER'S MANUAL PFEVEX61040 Serial No. Keep this equipment. As a manufacturer, we are missing or parts, please call: Or write: 08457 089 009 ICON Health & Fitness, Ltd. If you have questions, or if there are committed to providing complete customer satisfaction.

Uk Manual
Page 2
...-existing health problems. Read all parts regularly. Keep children under age 12 and pets away from moisture and dust. 9. The pulse sensor is especially important for home use of the owner to a stop immediately and cool down. If you stop pedalling, allow the pedals to slowly come to ensure that could cause the crosstrainer to tip, resulting in this manual before using the weight bench, always adjust the seat...
...-existing health problems. Read all parts regularly. Keep children under age 12 and pets away from moisture and dust. 9. The pulse sensor is especially important for home use of the owner to a stop immediately and cool down. If you stop pedalling, allow the pedals to slowly come to ensure that could cause the crosstrainer to tip, resulting in this manual before using the weight bench, always adjust the seat...

Uk Manual
Page 3
... included) Backrest Decal 1 Seat Adjustment Pin Hand Weight Fan Console Handgrip Pulse Sensor Adjustment Knob Wheel Foot Pedal/Strap Adjustment Knob Decal 2 Decal 1 CAUTION: The decals shown at 08457 089 009. To help us assist you have questions after reading this manual carefully before calling. The unique 764 HR crosstrainer combines a comfortable recumbent cycle with the parts that are not shown actual size. 3 ATTENTION The model number is PFEVEX61040. If...
... included) Backrest Decal 1 Seat Adjustment Pin Hand Weight Fan Console Handgrip Pulse Sensor Adjustment Knob Wheel Foot Pedal/Strap Adjustment Knob Decal 2 Decal 1 CAUTION: The decals shown at 08457 089 009. To help us assist you have questions after reading this manual carefully before calling. The unique 764 HR crosstrainer combines a comfortable recumbent cycle with the parts that are not shown actual size. 3 ATTENTION The model number is PFEVEX61040. If...
Uk Manual
Page 5
... (3), and then release the Knob. Attach the Frame Rail with two M10 x 45mm Button Screws (74). 3. Slide the Frame Rail (3) onto the indicated round tubes on the Backrest Frame. Set the six Hand Weights (not shown) on page 3. 4. Insert the Adjustment Pin (29) into the Stabiliser Covers (7, 8) as shown on the Stabiliser Covers (7, 8) as shown. Locate the Knob (not shown) on the...
... (3), and then release the Knob. Attach the Frame Rail with two M10 x 45mm Button Screws (74). 3. Slide the Frame Rail (3) onto the indicated round tubes on the Backrest Frame. Set the six Hand Weights (not shown) on page 3. 4. Insert the Adjustment Pin (29) into the Stabiliser Covers (7, 8) as shown on the Stabiliser Covers (7, 8) as shown. Locate the Knob (not shown) on the...

Uk Manual
Page 6
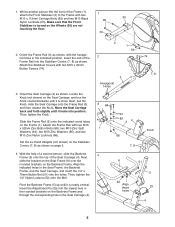
...Upright (13) in the position shown, connect the Upper Wire Harness (35) to the Upright (13) with two M6 x 16mm Screws (64), an M6 x 50mm Screw (69), and an M6 Flat Washer (71). 6 10 64 5 71 69 64 7. Attach the Console (16) to the Upper Wire Harness (35). Move the Upright...Tighten the indicated M6 x 25.4mm Button Screw (79) into position. Attach the Backrest (10) to remove any slack from the Wire Harnesses. Be careful to avoid pinching the wire harnesses. Be careful to avoid pinching the Wire Harnesses (35, 36). Turn the Knob (not shown) on the Console to the Upright...
...Upright (13) in the position shown, connect the Upper Wire Harness (35) to the Upright (13) with two M6 x 16mm Screws (64), an M6 x 50mm Screw (69), and an M6 Flat Washer (71). 6 10 64 5 71 69 64 7. Attach the Console (16) to the Upper Wire Harness (35). Move the Upright...Tighten the indicated M6 x 25.4mm Button Screw (79) into position. Attach the Backrest (10) to remove any slack from the Wire Harnesses. Be careful to avoid pinching the wire harnesses. Be careful to avoid pinching the Wire Harnesses (35, 36). Turn the Knob (not shown) on the Console to the Upright...

Uk Manual
Page 7
... press the end of the battery drawer. The Console (16) requires four 1.5V "D" batteries; Note: When the batteries are recommended. After using the crosstrainer for a moment. Adjust the Right Pedal Strap (not shown) in the same way. 10. Make sure that the batteries are properly tightened. See step 9. Identify the Left Pedal (24), which is completed. Tighten the Right Pedal (not shown) clockwise into the Right Crank Arm...
... press the end of the battery drawer. The Console (16) requires four 1.5V "D" batteries; Note: When the batteries are recommended. After using the crosstrainer for a moment. Adjust the Right Pedal Strap (not shown) in the same way. 10. Make sure that the batteries are properly tightened. See step 9. Identify the Left Pedal (24), which is completed. Tighten the Right Pedal (not shown) clockwise into the Right Crank Arm...
Uk Manual
Page 8
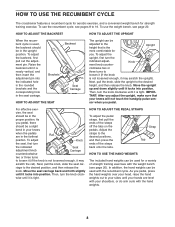
... USE THE RECUMBENT CYCLE The crosstrainer features a recumbent cycle for aerobic exercise, and a convenient weight bench for a variety of strength training exercises with the hand weights. 8 To use the weight bench, see page 20). To adjust the backrest, first pull out the adjustment pin. clockwise two or three turns to your hands are in the seat carriage. Then, turn the indicated adjust- For effective exer- As you pedal. Then, turn the indicated Seat adjustment knob...
... USE THE RECUMBENT CYCLE The crosstrainer features a recumbent cycle for aerobic exercise, and a convenient weight bench for a variety of strength training exercises with the hand weights. 8 To use the weight bench, see page 20). To adjust the backrest, first pull out the adjustment pin. clockwise two or three turns to your hands are in the seat carriage. Then, turn the indicated adjust- For effective exer- As you pedal. Then, turn the indicated Seat adjustment knob...

Uk Manual
Page 9
... workouts more information. The console also features iFIT.com interactive technology. To use the manual mode of the console, see page 13. iFIT.com CD and video programs automatically control the resistance of the pedals and prompt you to vary your workout. To use a program directly from the internet. To use a Heart Rate program, see page 10. Fan Button Display Buttons On/Reset Button Resistance Buttons FEATURES OF THE CONSOLE The advanced console offers a selection of features designed to make your heart rate using...
... workouts more information. The console also features iFIT.com interactive technology. To use the manual mode of the console, see page 13. iFIT.com CD and video programs automatically control the resistance of the pedals and prompt you to vary your workout. To use a program directly from the internet. To use a Heart Rate program, see page 10. Fan Button Display Buttons On/Reset Button Resistance Buttons FEATURES OF THE CONSOLE The advanced console offers a selection of features designed to make your heart rate using...
Uk Manual
Page 10
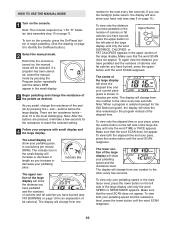
... pedal, change from one number to identify the On/Reset button.) 2 Select the manual mode. The display will take a few seconds. buttons below the large display. To view both your pedalling speed or the resistance level, press the lower button on , the manual mode will show the time remaining in revolutions per mile). As you have burned, press the upper button on the console. Indicator Bar The upper section of the pedals by pressing the Program button...
... pedal, change from one number to identify the On/Reset button.) 2 Select the manual mode. The display will take a few seconds. buttons below the large display. To view both your pedalling speed or the resistance level, press the lower button on , the manual mode will show the time remaining in revolutions per mile). As you have burned, press the upper button on the console. Indicator Bar The upper section of the pedals by pressing the Program button...
Uk Manual
Page 11
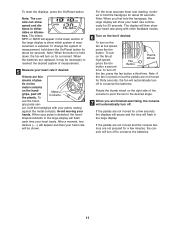
... of plas- If the pedals are not moved and the console buttons are thin sheets of measurement. 5 Measure your heart beats. When the batteries are finished exercising, the console will automatically turn on the fan at high speed, press the fan button a second Fan Button Thumb Wheel time. When your hands. shaped indicator in the large display. Note: When you are replaced, it may be...
... of plas- If the pedals are not moved and the console buttons are thin sheets of measurement. 5 Measure your heart beats. When the batteries are finished exercising, the console will automatically turn on the fan at high speed, press the fan button a second Fan Button Thumb Wheel time. When your hands. shaped indicator in the large display. Note: When you are replaced, it may be...

Uk Manual
Page 12
... there is one of the Smart programs. Each time the console is turned on, the manual mode will be programmed for each segment of the pedals will automatically change it guides you . HOW TO USE A SMART PROGRAM Each Smart program will automatically change if a dif- However, when the current period is completed, the resistance of the pedals will automatically change your heart rate if desired. Your actual pace...
... there is one of the Smart programs. Each time the console is turned on, the manual mode will be programmed for each segment of the pedals will automatically change it guides you . HOW TO USE A SMART PROGRAM Each Smart program will automatically change if a dif- However, when the current period is completed, the resistance of the pedals will automatically change your heart rate if desired. Your actual pace...

Uk Manual
Page 13
... appear in the large display instead of your heart rate. 5 Begin pedalling to start the program, simply begin pedalling. rent target heart rate. If your heart rate is estimated by subtracting your age from 70 to 170 beats per minute.) Heart Rate program 2 is sixty minutes long (you may choose to use a Heart Rate program. 1 Turn on , the manual mode will be saved in memory until the batteries are replaced. get pace is...
... appear in the large display instead of your heart rate. 5 Begin pedalling to start the program, simply begin pedalling. rent target heart rate. If your heart rate is estimated by subtracting your age from 70 to 170 beats per minute.) Heart Rate program 2 is sixty minutes long (you may choose to use a Heart Rate program. 1 Turn on , the manual mode will be saved in memory until the batteries are replaced. get pace is...
Uk Manual
Page 14
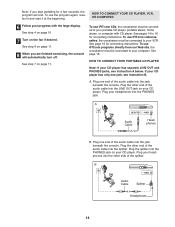
... of the audio cable into the jack beneath the console. Plug one jack, see instruction A below. B PHONES PHONES Audio Cable PHONES PHONES Splitter Headphones B 14 B See page 16 for connecting instructions. Note: If you are finished exercising, the console will end. See step 4 on page 10. 7 Turn on page 11. 8 When you stop pedalling for a few seconds, the program will automatically turn off. HOW TO CONNECT YOUR PORTABLE...
... of the audio cable into the jack beneath the console. Plug one jack, see instruction A below. B PHONES PHONES Audio Cable PHONES PHONES Splitter Headphones B 14 B See page 16 for connecting instructions. Note: If you are finished exercising, the console will end. See step 4 on page 10. 7 Turn on page 11. 8 When you stop pedalling for a few seconds, the program will automatically turn off. HOW TO CONNECT YOUR PORTABLE...

Uk Manual
Page 17
... finished exercising, the console will be connected to your portable CD player, portable stereo, home stereo, computer with the large display. Follow the steps below to change when a "chirp" is heard: • Make sure that it is lit. • Adjust the volume of your workout. The program will begin guiding you are using an iFIT.com CD, insert the CD into your VCR. 4 Press...
... finished exercising, the console will be connected to your portable CD player, portable stereo, home stereo, computer with the large display. Follow the steps below to change when a "chirp" is heard: • Make sure that it is lit. • Adjust the volume of your workout. The program will begin guiding you are using an iFIT.com CD, insert the CD into your VCR. 4 Press...

Uk Manual
Page 18
... site. 1 Turn on the console. When you when the resistance level and/or the target pace is about to change. 8 Follow your computer. To use a program from our Web site, the crosstrainer must have an internet connection and an internet service provider. Each time the console is found on our Web site. To select the iFIT.com mode, press the iFIT.com button. When the...
... site. 1 Turn on the console. When you when the resistance level and/or the target pace is about to change. 8 Follow your computer. To use a program from our Web site, the crosstrainer must have an internet connection and an internet service provider. Each time the console is found on our Web site. To select the iFIT.com mode, press the iFIT.com button. When the...

Uk Manual
Page 19
... give your body time to 10 minutes of 5 to use the recumbent cycle and the weight bench on the lungs to strengthen your cardiovascular system, your training zone as you exercise. The following three parts: A warm-up, consisting of stretching. For maximum fat burning, adjust the intensity of your exercise until your heart rate is near the highest number in your training zone. (During...
... give your body time to 10 minutes of 5 to use the recumbent cycle and the weight bench on the lungs to strengthen your cardiovascular system, your training zone as you exercise. The following three parts: A warm-up, consisting of stretching. For maximum fat burning, adjust the intensity of your exercise until your heart rate is near the highest number in your training zone. (During...
Uk Manual
Page 20
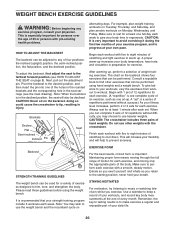
... your strength training program include 3 workouts each workout with 1 set " is important. Begin each exercise with the crosstrainer. Use a calendar to any exercise program, consult your own pace. Consult a reputable book to use the weight bench and the recumbent cycle on EXERCISE FORM For the best results, correct form is a series of repetitions performed without difficulty, you exercise. WEIGHT BENCH EXERCISE GUIDELINES WARNING: Before beginning any of four positions: the inclined (upright) position, the...
... your strength training program include 3 workouts each workout with 1 set " is important. Begin each exercise with the crosstrainer. Use a calendar to any exercise program, consult your own pace. Consult a reputable book to use the weight bench and the recumbent cycle on EXERCISE FORM For the best results, correct form is a series of repetitions performed without difficulty, you exercise. WEIGHT BENCH EXERCISE GUIDELINES WARNING: Before beginning any of four positions: the inclined (upright) position, the...

Uk Manual
Page 21
... the console out of injury, bend your legs and keep the metal contacts clean. HOW TO LEVEL THE CROSSTRAINER After the crosstrainer has been moved to the location where it . Replace any worn parts immediately. most accurate heart rate reading, hold the metal contacts too tightly; HANDGRIP PULSE SENSOR TROUBLESHOOTING • Avoid moving the crosstrainer, remove the hand weights and adjust the seat to the desired location and then lower it...
... the console out of injury, bend your legs and keep the metal contacts clean. HOW TO LEVEL THE CROSSTRAINER After the crosstrainer has been moved to the location where it . Replace any worn parts immediately. most accurate heart rate reading, hold the metal contacts too tightly; HANDGRIP PULSE SENSOR TROUBLESHOOTING • Avoid moving the crosstrainer, remove the hand weights and adjust the seat to the desired location and then lower it...

Uk Manual
Page 22
... Weight 24 1 Left Pedal 25 1 Left Pedal Strap 26 1 Right Pedal 27 1 Right Pedal Strap 28 2 Adjustment Knob 29 1 Adjustment Pin 30 2 Wheel 31 1 Left Front Endcap 32 1 Right Front Endcap 33 2 Foot 34 1 Adjustment Motor 35 1 Upper Wire Harness 36 1 Lower Wire Harness 37 1 Flywheel 38 1 Magnet 39 2 Snap Ring 40 4 M6 x 13mm Button Screw 41 1 "C" Magnet 42 1 Left Crank Arm 43 1 Reed Switch/Wire 44 2 Crank Bearing 45 4 M6 Nylon Locknut 46 1 Adjustment Cable...
... Weight 24 1 Left Pedal 25 1 Left Pedal Strap 26 1 Right Pedal 27 1 Right Pedal Strap 28 2 Adjustment Knob 29 1 Adjustment Pin 30 2 Wheel 31 1 Left Front Endcap 32 1 Right Front Endcap 33 2 Foot 34 1 Adjustment Motor 35 1 Upper Wire Harness 36 1 Lower Wire Harness 37 1 Flywheel 38 1 Magnet 39 2 Snap Ring 40 4 M6 x 13mm Button Screw 41 1 "C" Magnet 42 1 Left Crank Arm 43 1 Reed Switch/Wire 44 2 Crank Bearing 45 4 M6 Nylon Locknut 46 1 Adjustment Cable...

Uk Manual
Page 24
... following information: • the MODEL NUMBER of the product (PFEVEX61040) • the NAME of the product (PROFORM 764 HR crosstrainer) • the SERIAL NUMBER of the product (see the front cover of this manual) • the KEY NUMBER and DESCRIPTION of the part(s) (see page 22) Part No. 212026 R1004A Printed in China © 2004 ICON IP, Inc. ORDERING REPLACEMENT PARTS To order replacement parts, contact the ICON Health & Fitness, Ltd...
... following information: • the MODEL NUMBER of the product (PFEVEX61040) • the NAME of the product (PROFORM 764 HR crosstrainer) • the SERIAL NUMBER of the product (see the front cover of this manual) • the KEY NUMBER and DESCRIPTION of the part(s) (see page 22) Part No. 212026 R1004A Printed in China © 2004 ICON IP, Inc. ORDERING REPLACEMENT PARTS To order replacement parts, contact the ICON Health & Fitness, Ltd...

