

English Manual
Page 2
® TABLE OF CONTENTS IMPORTANT PRECAUTIONS 3 BEFORE YOU BEGIN 5 ASSEMBLY 6 OPERATION AND ADJUSTMENT 9 HOW TO FOLD AND MOVE THE TREADMILL 20 TROUBLE-SHOOTING 22 CONDITIONING GUIDELINES 24 PART LIST 27 ORDERING REPLACEMENT PARTS Back Cover FULL 90-DAY WARRANTY Back Cover Note: An EXPLODED DRAWING is attached in the center of this manual. 2
® TABLE OF CONTENTS IMPORTANT PRECAUTIONS 3 BEFORE YOU BEGIN 5 ASSEMBLY 6 OPERATION AND ADJUSTMENT 9 HOW TO FOLD AND MOVE THE TREADMILL 20 TROUBLE-SHOOTING 22 CONDITIONING GUIDELINES 24 PART LIST 27 ORDERING REPLACEMENT PARTS Back Cover FULL 90-DAY WARRANTY Back Cover Note: An EXPLODED DRAWING is attached in the center of this manual. 2

English Manual
Page 3
...The surge suppressor must be able to safely lift 45 pounds (20 kg) in order to raise, lower, or move the treadmill. 11. Place the treadmill on page 5 if the treadmill is not working properly. (See BEFORE YOU BEGIN on a level surface, with bare feet, wearing only stockings, or in sandals...3. IMPORTANT PRECAUTIONS WARNING: To reduce the risk of burns, fire, electric shock, or injury to avoid sudden jumps in speed. 16. Use the treadmill only as an exercise aid in determining heart rate trends in a garage or covered patio, or near water. 12. Athletic support clothes are used by...
...The surge suppressor must be able to safely lift 45 pounds (20 kg) in order to raise, lower, or move the treadmill. 11. Place the treadmill on page 5 if the treadmill is not working properly. (See BEFORE YOU BEGIN on a level surface, with bare feet, wearing only stockings, or in sandals...3. IMPORTANT PRECAUTIONS WARNING: To reduce the risk of burns, fire, electric shock, or injury to avoid sudden jumps in speed. 16. Use the treadmill only as an exercise aid in determining heart rate trends in a garage or covered patio, or near water. 12. Athletic support clothes are used by...

English Manual
Page 4
... iFIT.com CD's and videos from your CD player or VCR when you can manually override the speed and incline settings at 38% of the treadmill is shown at any commercial, rental, or institutional setting. Apply the decal in this product. When using iFIT.com CD's and videos, you...this manual. This is intended for personal injury or property damage sustained by pressing the speed and incline buttons. tenance and adjustment procedures de- This treadmill is especially important for speed and/or incline changes. If a decal is missing, or if it is heard, the speed and/or incline ...
... iFIT.com CD's and videos from your CD player or VCR when you can manually override the speed and incline settings at 38% of the treadmill is shown at any commercial, rental, or institutional setting. Apply the decal in this product. When using iFIT.com CD's and videos, you...this manual. This is intended for personal injury or property damage sustained by pressing the speed and incline buttons. tenance and adjustment procedures de- This treadmill is especially important for speed and/or incline changes. If a decal is missing, or if it is heard, the speed and/or incline ...
English Manual
Page 5
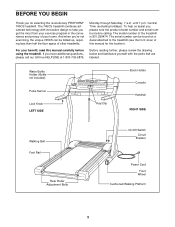
... the drawing below and familiarize yourself with innovative design to the treadmill (see the front cover of your benefit, read this manual for selecting the revolutionary PROFORM® 745CS treadmill. BEFORE YOU BEGIN Thank you for the location). The model number of other treadmills. And when you have additional questions, please call our toll-free...
... the drawing below and familiarize yourself with innovative design to the treadmill (see the front cover of your benefit, read this manual for selecting the revolutionary PROFORM® 745CS treadmill. BEFORE YOU BEGIN Thank you for the location). The model number of other treadmills. And when you have additional questions, please call our toll-free...

English Manual
Page 6
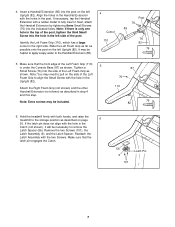
...your own Phillips screw- This is completed. With the help of a second person, carefully lower the treadmill frame and then tip the Uprights (82) down as 2 shown. Note: One replacement Base Pad ... the same way. With the help of the Extension Legs (103) 82 into the treadmill as you tip the Uprights. Make sure that both Extension Legs (103) are resting flat on the bottom.... 103 Next, tip the treadmill to the left Upright (82) with a soft cloth and a mild, non-abrasive cleaner. 1. Note...
...your own Phillips screw- This is completed. With the help of a second person, carefully lower the treadmill frame and then tip the Uprights (82) down as 2 shown. Note: One replacement Base Pad ... the same way. With the help of the Extension Legs (103) 82 into the treadmill as you tip the Uprights. Make sure that both Extension Legs (103) are resting flat on the bottom.... 103 Next, tip the treadmill to the left Upright (82) with a soft cloth and a mild, non-abrasive cleaner. 1. Note...
English Manual
Page 7
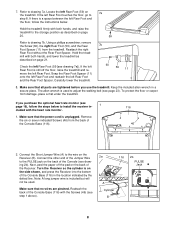
...) as shown. Attach the Right Foam Grip (not shown) and the other Handrail Extension (not shown) as described on the left Upright (82). Hold the treadmill firmly with the hole in the post. Next, attach the Handrail Extension by tightening three Small Screws (76) into the post on the side of... post, tighten the third Small Screw into the side of the post. 4. If the latch pin does not align with both hands, and raise the treadmill to the storage position as described in the right side. Note: Extra screws may be included. 87 76 110 76 82 6. Insert a Handrail Extension (85...
...) as shown. Attach the Right Foam Grip (not shown) and the other Handrail Extension (not shown) as described on the left Upright (82). Hold the treadmill firmly with the hole in the post. Next, attach the Handrail Extension by tightening three Small Screws (76) into the post on the side of... post, tighten the third Small Screw into the side of the post. 4. If the latch pin does not align with both hands, and raise the treadmill to the storage position as described in the right side. Note: Extra screws may be included. 87 76 110 76 82 6. Insert a Handrail Extension (85...
English Manual
Page 8
Locate the left Rear Foot (59) on the back of the Receiver. Make sure that all parts are pinched. If you use the treadmill. Refer to drawing 7b. Using a phillips screwdriver, remove the Screw (60), the right Rear Foot (59), and the Rear Foot Spacer (11) from damage, place a ... allen wrench is on the back of the Console Base (116) in a secure place. Turn the Receiver so the cylinder is used . Carefully lower the treadmill. 59 7b 60 59 11 8. Remove the six or seven indicated Screws (46) from the back of the Console Base (116) with the heart rate...
Locate the left Rear Foot (59) on the back of the Receiver. Make sure that all parts are pinched. If you use the treadmill. Refer to drawing 7b. Using a phillips screwdriver, remove the Screw (60), the right Rear Foot (59), and the Rear Foot Spacer (11) from damage, place a ... allen wrench is on the back of the Console Base (116) in a secure place. Turn the Receiver so the cylinder is used . Carefully lower the treadmill. 59 7b 60 59 11 8. Remove the six or seven indicated Screws (46) from the back of the Console Base (116) with the heart rate...
English Manual
Page 9
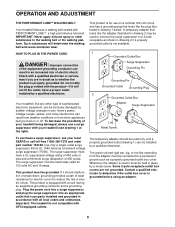
... a 2-pole receptacle as to whether the product is properly grounded. This product is grounded before using an adapter. 9 Important: The treadmill is UL 1449 listed as a properly grounded outlet box cover. Whenever the adapter is not available. 1 Grounded Outlet Box Surge Suppressor ... see drawing 1 at the right). Check with all local codes and ordinances. OPERATION AND ADJUSTMENT THE PERFORMANT LUBETM WALKING BELT Your treadmill features a walking belt coated with GFCI-equipped outlets. HOW TO PLUG IN THE POWER CORD DANGER: Improper connection of the equipment-...
... a 2-pole receptacle as to whether the product is properly grounded. This product is grounded before using an adapter. 9 Important: The treadmill is UL 1449 listed as a properly grounded outlet box cover. Whenever the adapter is not available. 1 Grounded Outlet Box Surge Suppressor ... see drawing 1 at the right). Check with all local codes and ordinances. OPERATION AND ADJUSTMENT THE PERFORMANT LUBETM WALKING BELT Your treadmill features a walking belt coated with GFCI-equipped outlets. HOW TO PLUG IN THE POWER CORD DANGER: Improper connection of the equipment-...

English Manual
Page 10
...special iFIT.com CD programs (one CD is provided). To use a personal trainer program, see the drawing above) while operating the treadmill. • Adjust the speed in small increments to your workout. Six certified personal trainer programs are available separately). Using the included ...com and access even more programs. Choose from a selection of basic programs that interactively control the speed and incline of your treadmill to your personal exercise goals. High-energy music provides added motivation. Video programs offer the same benefits as a personal trainer guides...
...special iFIT.com CD programs (one CD is provided). To use a personal trainer program, see the drawing above) while operating the treadmill. • Adjust the speed in small increments to your workout. Six certified personal trainer programs are available separately). Using the included ...com and access even more programs. Choose from a selection of basic programs that interactively control the speed and incline of your treadmill to your personal exercise goals. High-energy music provides added motivation. Video programs offer the same benefits as a personal trainer guides...
English Manual
Page 11
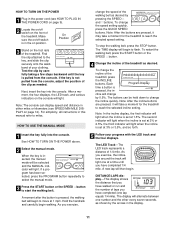
... and w buttons. For simplicity, all instructions in this manual refer to the key, and slide the clip securely onto the waistband of the treadmill, press the INCLINE buttons. To change the incline of your progress with the LED track and the four displays. The TIME display will light.... the console will change the incline quickly. Find the clip attached to miles. HOW TO USE THE MANUAL MODE change the speed of the treadmill as desired by carefully taking a few steps backward until you exercise, 5 Follow your clothing. To restart the walking belt, press the START...
... and w buttons. For simplicity, all instructions in this manual refer to the key, and slide the clip securely onto the waistband of the treadmill, press the INCLINE buttons. To change the incline of your progress with the LED track and the four displays. The TIME display will light.... the console will change the incline quickly. Find the clip attached to miles. HOW TO USE THE MANUAL MODE change the speed of the treadmill as desired by carefully taking a few steps backward until you exercise, 5 Follow your clothing. To restart the walking belt, press the START...
English Manual
Page 12
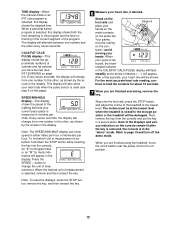
...minutes per hour. Stand on the foot rails and Sensors place your heart rate will alternate between one number to the storage position or the treadmill will also show speed in the display. tacts-avoid moving your heart rate, if desired. The incline must be resting on this page).... on the metal contacts on page 24). To find which unit of the program. Your palms must be at the lowest level when the treadmill is selected, hold the contacts for metric kilometers will appear. tinue to the other every seven seconds. This display will be shown. Note:...
...minutes per hour. Stand on the foot rails and Sensors place your heart rate will alternate between one number to the storage position or the treadmill will also show speed in the display. tacts-avoid moving your heart rate, if desired. The incline must be resting on this page).... on the metal contacts on page 24). To find which unit of the program. Your palms must be at the lowest level when the treadmill is selected, hold the contacts for metric kilometers will appear. tinue to the other every seven seconds. This display will be shown. Note:...
English Manual
Page 13
... Hold the handrails and begin to flash. When only three seconds remain in the first segment, a series of tones will sound and the treadmill will automatically adjust to a stop the program, press the STOP button. The TIME display will then slow to the speed and incline settings ... STOP button, remove the key, and then reinsert the key. 4 Follow your heart rate, if desired. When the program has ended, make sure that the treadmill will continue in the "demo" mode. To stop . The program will reach a maximum speed of 4.5 mph and a maximum incline of 5% during the first...
... Hold the handrails and begin to flash. When only three seconds remain in the first segment, a series of tones will sound and the treadmill will automatically adjust to a stop the program, press the STOP button. The TIME display will then slow to the speed and incline settings ... STOP button, remove the key, and then reinsert the key. 4 Follow your heart rate, if desired. When the program has ended, make sure that the treadmill will continue in the "demo" mode. To stop . The program will reach a maximum speed of 4.5 mph and a maximum incline of 5% during the first...

English Manual
Page 14
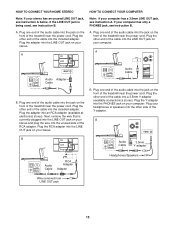
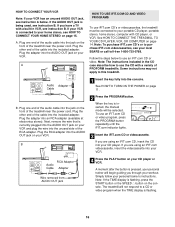
... end of the cable into the other end of the Y-adapter. Plug your headphones into the LINE OUT jack on the front of the treadmill near the power cord. See page 15 for connecting instructions. A. A HOW TO CONNECT YOUR PORTABLE CD PLAYER Note: If your CD player... cable into the included adapter. C Audio Cable 3.5mm Y-adapter Headphones Audio Cable PHONES 3.5mm Y-adapter Headphones 14 To use iFIT.com CD's, the treadmill must be connected to your portable CD player, portable stereo, home stereo, or computer with CD player. B LINE OUT Audio Cable B. Plug your ...
... end of the cable into the other end of the Y-adapter. Plug your headphones into the LINE OUT jack on the front of the treadmill near the power cord. See page 15 for connecting instructions. A. A HOW TO CONNECT YOUR PORTABLE CD PLAYER Note: If your CD player... cable into the included adapter. C Audio Cable 3.5mm Y-adapter Headphones Audio Cable PHONES 3.5mm Y-adapter Headphones 14 To use iFIT.com CD's, the treadmill must be connected to your portable CD player, portable stereo, home stereo, or computer with CD player. B LINE OUT Audio Cable B. Plug your ...
English Manual
Page 15
...: If your computer has a 3.5mm LINE OUT jack, see instruction B. Next, remove the wire that is being used, see instruction A. Plug one end of the treadmill near the power cord. Plug the Y-adapter into the unused side of the Y-adapter. Plug the RCA adapter into the LINE OUT jack on your... your stereo. Plug the other side of the RCA adapter. If your computer has only a PHONES jack, see instruction A below. Plug one end of the treadmill near the power cord. Plug the other end of the cable into the jack on the front of the audio cable into the included adapter...
...: If your computer has a 3.5mm LINE OUT jack, see instruction B. Next, remove the wire that is being used, see instruction A. Plug one end of the treadmill near the power cord. Plug the Y-adapter into the unused side of the Y-adapter. Plug the RCA adapter into the LINE OUT jack on your... your stereo. Plug the other side of the RCA adapter. If your computer has only a PHONES jack, see instruction A below. Plug one end of the treadmill near the power cord. Plug the other end of the cable into the jack on the front of the audio cable into the included adapter...
English Manual
Page 16
.... 16 A ANT. Plug the adapter into the console. Plug the RCA adapter into the jack on your personal trainer's instructions. The treadmill will not respond to purchase iFIT.com videocassettes, see instruction B. Plug one end of the cable into the AUDIO OUT jack on the ...the audio cable into the AUDIO OUT jack on page 15. Plug the adapter into the included adapter. B ANT. Plug the other end of PROFORM treadmills. A moment after the button is being used, see instruction A below to your portable CD player, portable stereo, home stereo, computer with a...
.... 16 A ANT. Plug the adapter into the console. Plug the RCA adapter into the jack on your personal trainer's instructions. The treadmill will not respond to purchase iFIT.com videocassettes, see instruction B. Plug one end of the cable into the AUDIO OUT jack on the ...the audio cable into the AUDIO OUT jack on page 15. Plug the adapter into the included adapter. B ANT. Plug the other end of PROFORM treadmills. A moment after the button is being used, see instruction A below to your portable CD player, portable stereo, home stereo, computer with a...
English Manual
Page 17
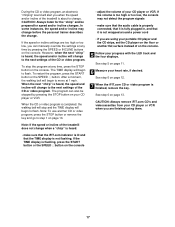
... trainer describes the change. If the speed or incline settings are too high or too low, you when the speed and/or incline of the treadmill is not flashing. See step 6 on the console. CAUTION: Always remove iFIT.com CD's and videocassettes from your CD player or VCR when you are..., the walking belt will stop the program at any time, press the STOP button on the console. Note: If the speed or incline of the treadmill does not change to flash. During the CD or video program, an electronic "chirping" sound will alert you can also be prepared for speed and...
... trainer describes the change. If the speed or incline settings are too high or too low, you when the speed and/or incline of the treadmill is not flashing. See step 6 on the console. CAUTION: Always remove iFIT.com CD's and videocassettes from your CD player or VCR when you are..., the walking belt will stop the program at any time, press the STOP button on the console. Note: If the speed or incline of the treadmill does not change to flash. During the CD or video program, an electronic "chirping" sound will alert you can also be prepared for speed and...
English Manual
Page 18
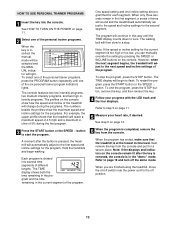
...incline of additional system and software requirements will be connected to your local SEARS or call toll-free 1800-735-0768. A list of the treadmill is about to change to the next settings of the program. Follow the steps below to use virtually endless features on the console. When the... belt, and begin to help you can use a program from the internet. Note: If the speed or incline of programs that interactively control your treadmill to flash. Note: To use an iFIT.com CD or video program, press the PROGRAM button repeatedly until the iFIT.com indicator lights. 3 Go...
...incline of additional system and software requirements will be connected to your local SEARS or call toll-free 1800-735-0768. A list of the treadmill is about to change to the next settings of the program. Follow the steps below to use virtually endless features on the console. When the... belt, and begin to help you can use a program from the internet. Note: If the speed or incline of programs that interactively control your treadmill to flash. Note: To use an iFIT.com CD or video program, press the PROGRAM button repeatedly until the iFIT.com indicator lights. 3 Go...
English Manual
Page 19
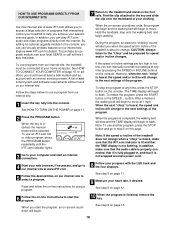
...in a store. If a "d" appears in the SPEED/MINMILE display. THE OPTIONAL IFIT.COM MODULE By adding an optional iFIT.com module to the treadmill, you to kilometers per hour. To exit the information mode, remove the key from our internet site. For information about purchasing the optional iFIT.com... to the console. THE INFORMATION MODE/DEMO MODE The console features an information mode that keeps track of the total number of hours that the treadmill has been operated and the total number of miles that the walking belt has moved. If a "d" appears in the display, the console is...
...in a store. If a "d" appears in the SPEED/MINMILE display. THE OPTIONAL IFIT.COM MODULE By adding an optional iFIT.com module to the treadmill, you to kilometers per hour. To exit the information mode, remove the key from our internet site. For information about purchasing the optional iFIT.com... to the console. THE INFORMATION MODE/DEMO MODE The console features an information mode that keeps track of the total number of hours that the treadmill has been operated and the total number of miles that the walking belt has moved. If a "d" appears in the display, the console is...
English Manual
Page 20
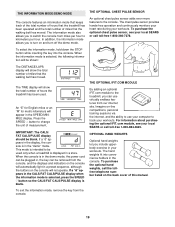
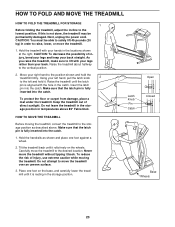
...hand, pull the latch knob 2 to the left and hold the treadmill firmly. Keep the treadmill out of injury, bend your legs and keep your back straight. Never move the treadmill. 1. Hold the treadmill with your legs rather than your hands in temperatures above . To protect...as described above 85° Fahrenheit. Place one foot against a wheel. 2. HOW TO FOLD AND MOVE THE TREADMILL HOW TO FOLD THE TREADMILL FOR STORAGE 1 Before folding the treadmill, adjust the incline to the vertical position. 2. CAUTION: You must be permanently damaged. Next, unplug the ...
...hand, pull the latch knob 2 to the left and hold the treadmill firmly. Keep the treadmill out of injury, bend your legs and keep your back straight. Never move the treadmill. 1. Hold the treadmill with your legs rather than your hands in temperatures above . To protect...as described above 85° Fahrenheit. Place one foot against a wheel. 2. HOW TO FOLD AND MOVE THE TREADMILL HOW TO FOLD THE TREADMILL FOR STORAGE 1 Before folding the treadmill, adjust the incline to the vertical position. 2. CAUTION: You must be permanently damaged. Next, unplug the ...

English Manual
Page 21
Hold the treadmill firmly with your back straight. Latch Knob Pin Catch Open 21 CAUTION: To decrease the possibility of the treadmill with both hands, and lower the treadmill to the floor. Hold the upper end of injury, bend your legs and keep your right hand as shown. Pivot the treadmill down until the frame is past the pin. Slowly release the latch knob. 2. Do not drop the treadmill frame 2 to the floor. Using your left hand, pull the latch knob to the 1 left and hold it. HOW TO LOWER THE TREADMILL FOR USE 1.
Hold the treadmill firmly with your back straight. Latch Knob Pin Catch Open 21 CAUTION: To decrease the possibility of the treadmill with both hands, and lower the treadmill to the floor. Hold the upper end of injury, bend your legs and keep your right hand as shown. Pivot the treadmill down until the frame is past the pin. Slowly release the latch knob. 2. Do not drop the treadmill frame 2 to the floor. Using your left hand, pull the latch knob to the 1 left and hold it. HOW TO LOWER THE TREADMILL FOR USE 1.


