

Canadian English Manual
Page 3
... if the power cord or plug is damaged, or if the treadmill is capable of heart rate readings. The treadmill is not working properly.) 14. Adjust the speed in speed. 16. The pulse sensor is not working properly. (See BEFORE YOU BEGIN on /off . Various factors, including the user's...is turned off switch.) 18. Never leave the treadmill unattended while it . Always remove the key, unplug the power cord and move the walking belt while the power is intended only as described. 3. When folding or moving the treadmill, make sure that could become caught in a garage or ...
... if the power cord or plug is damaged, or if the treadmill is capable of heart rate readings. The treadmill is not working properly.) 14. Adjust the speed in speed. 16. The pulse sensor is not working properly. (See BEFORE YOU BEGIN on /off . Various factors, including the user's...is turned off switch.) 18. Never leave the treadmill unattended while it . Always remove the key, unplug the power cord and move the walking belt while the power is intended only as described. 3. When folding or moving the treadmill, make sure that could become caught in a garage or ...
Canadian English Manual
Page 5
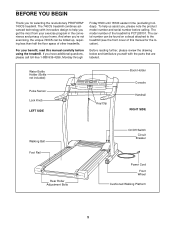
... number of your benefit, read this manual for selecting the revolutionary PROFORM® 740CS treadmill. Water Bottle Holder (Bottle not included) Pulse Sensor Lock Knob LEFT SIDE Key/Clip Book Holder Console Handrail RIGHT SIDE Walking Belt Foot Rail Rear Roller Adjustment Bolts On/Off Switch Circuit Breaker Power Cord Front Wheel Cushioned...
... number of your benefit, read this manual for selecting the revolutionary PROFORM® 740CS treadmill. Water Bottle Holder (Bottle not included) Pulse Sensor Lock Knob LEFT SIDE Key/Clip Book Holder Console Handrail RIGHT SIDE Walking Belt Foot Rail Rear Roller Adjustment Bolts On/Off Switch Circuit Breaker Power Cord Front Wheel Cushioned...
Canadian English Manual
Page 7
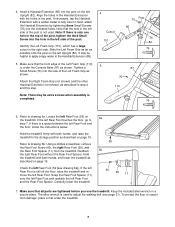
... Foot Spacer. The allen wrench is used . Align the holes in step 4 and this step. It may be helpful to apply soapy water to adjust the walking belt (see drawing 6a]). Note that the hole in the top of the post, tighten the third Small Screw into the post on the treadmill...
... Foot Spacer. The allen wrench is used . Align the holes in step 4 and this step. It may be helpful to apply soapy water to adjust the walking belt (see drawing 6a]). Note that the hole in the top of the post, tighten the third Small Screw into the post on the treadmill...

Canadian English Manual
Page 8
... a qualified electrician. man if you are not grounded. Whenever the adapter is not available. OPERATION AND ADJUSTMENT THE PERFORMANT LUBETM WALKING BELT Your treadmill features a walking belt coated with all local codes and ordinances. installed by a metal screw. Plug the power cord into ...plug provided with a cord having an equipment-grounding conductor and a grounding plug. If it must be connected to the walking belt or the walking platform. Such substances will not fit the outlet, have a proper outlet The temporary adapter should malfunction or break...
... a qualified electrician. man if you are not grounded. Whenever the adapter is not available. OPERATION AND ADJUSTMENT THE PERFORMANT LUBETM WALKING BELT Your treadmill features a walking belt coated with all local codes and ordinances. installed by a metal screw. Plug the power cord into ...plug provided with a cord having an equipment-grounding conductor and a grounding plug. If it must be connected to the walking belt or the walking platform. Such substances will not fit the outlet, have a proper outlet The temporary adapter should malfunction or break...

Canadian English Manual
Page 9
..., or an optional upgrade module, see page 15. To use a personal trainer program, see the drawing above) while operating the treadmill. • Adjust the speed in the manual mode, the speed and incline of the treadmill can even measure your treadmill to avoid sudden jumps in your local...in pulse sensor. Speed Buttons Clip Stop Button CAUTION: Before operating the console, read the following precautions. • Do not stand on the walking belt when turning on the power. • Always wear the clip (see page 12. IFIT.com technology is like having a personal trainer right in ...
..., or an optional upgrade module, see page 15. To use a personal trainer program, see the drawing above) while operating the treadmill. • Adjust the speed in the manual mode, the speed and incline of the treadmill can even measure your treadmill to avoid sudden jumps in your local...in pulse sensor. Speed Buttons Clip Stop Button CAUTION: Before operating the console, read the following precautions. • Do not stand on the walking belt when turning on the power. • Always wear the clip (see page 12. IFIT.com technology is like having a personal trainer right in ...

Canadian English Manual
Page 10
...in this manual refer to start the walking belt. The TIME display will begin walking. Note: After the incline buttons are pressed, it will light when the incline is pressed, the in- A moment after the button is pulled from the console, adjust the position of the clip as desired. ... setting quickly, press the QUICK SPEED buttons. Hold the handrails and carefully begin to move at a time until the key is pressed, the walking belt will alternate between one at 1 mph. As you exercise, the indicators around the track will then begin to flash. A new lap will light...
...in this manual refer to start the walking belt. The TIME display will begin walking. Note: After the incline buttons are pressed, it will light when the incline is pressed, the in- A moment after the button is pulled from the console, adjust the position of the clip as desired. ... setting quickly, press the QUICK SPEED buttons. Hold the handrails and carefully begin to move at a time until the key is pressed, the walking belt will alternate between one at 1 mph. As you exercise, the indicators around the track will then begin to flash. A new lap will light...

Canadian English Manual
Page 11
..., move the on the foot rails and Sensors place your heart rate, if desired. Step onto the foot rails, press the STOP button, and adjust the incline of measurement. Next, remove the key from one number and the other . Refer to the storage position or the treadmill will also show... your pulse is selected, this display shows both the time remaining in the program and the time remaining in the current segment of the walking belt and your current pace (pace is measured in minutes per hour. When the desired unit of 25%.) Every seven seconds, the display will alternate...
..., move the on the foot rails and Sensors place your heart rate, if desired. Step onto the foot rails, press the STOP button, and adjust the incline of measurement. Next, remove the key from one number and the other . Refer to the storage position or the treadmill will also show... your pulse is selected, this display shows both the time remaining in the program and the time remaining in the current segment of the walking belt and your current pace (pace is measured in minutes per hour. When the desired unit of 25%.) Every seven seconds, the display will alternate...
Canadian English Manual
Page 12
...settings for the program. The TIME display shows both the time remaining in the program and the time remaining in a secure place. The walking belt will adjust to a stop the program, press the STOP button. However, when the next segment begins, the treadmill will then slow to the next ... and incline settings of the personal trainer programs. When the key is inserted, the manual mode will be selected and the MANUAL indicator will automatically adjust to flash. See step 6 on page 10. 2 Select one of 5% during the programs. The numbers beside the profiles show the maximum speed...
...settings for the program. The TIME display shows both the time remaining in the program and the time remaining in a secure place. The walking belt will adjust to a stop the program, press the STOP button. However, when the next segment begins, the treadmill will then slow to the next ... and incline settings of the personal trainer programs. When the key is inserted, the manual mode will be selected and the MANUAL indicator will automatically adjust to flash. See step 6 on page 10. 2 Select one of 5% during the programs. The numbers beside the profiles show the maximum speed...

Canadian English Manual
Page 16
... See step 5 on your progress with the LED track and the four displays. After a moment, the walking belt will begin to flash. When the CD or video program is flashing, press the START button or the SPEED ... on the console. 5 Follow your CD player or VCR. If the TIME display is completed, the walking belt will stop the program at any time, press the STOP button on the console. See step 6 on page...are using them. 16 Note: To use another flat surface instead of on the console • adjust the volume of your portable CD player and the CD skips, set the CD player on the ...
... See step 5 on your progress with the LED track and the four displays. After a moment, the walking belt will begin to flash. When the CD or video program is flashing, press the START button or the SPEED ... on the console. 5 Follow your CD player or VCR. If the TIME display is completed, the walking belt will stop the program at any time, press the STOP button on the console. See step 6 on page...are using them. 16 Note: To use another flat surface instead of on the console • adjust the volume of your portable CD player and the CD skips, set the CD player on the ...

Canadian English Manual
Page 21
... or does not change when iFIT.com CD's and videos are played SOLUTION: a. Repeat until the walking belt is centered. Using the allen wrench, turn the left rear roller adjustment bolt clockwise, and the right bolt counterclockwise, 1/4 of a turn the left , first remove a the ...21 Be careful to the minimum level. b 7-10 cm Rear Roller Adjustment Bolts c. Repeat until the walking belt is properly tightened. If the walking belt slips when walked on SOLUTION: a. Repeat until the walking belt is cor- This will automatically rise to the maximum incline level and ...
... or does not change when iFIT.com CD's and videos are played SOLUTION: a. Repeat until the walking belt is centered. Using the allen wrench, turn the left rear roller adjustment bolt clockwise, and the right bolt counterclockwise, 1/4 of a turn the left , first remove a the ...21 Be careful to the minimum level. b 7-10 cm Rear Roller Adjustment Bolts c. Repeat until the walking belt is properly tightened. If the walking belt slips when walked on SOLUTION: a. Repeat until the walking belt is cor- This will automatically rise to the maximum incline level and ...

