
English Manual
Page 3
...manual and order part number 146148, or see your local PROFORM dealer or call the tollfree telephone number on page 9. Always hold the handrails while using the treadmill. 16. Do not use . (See the drawing on page 24 if the treadmill is fully closed. 20. Use only a single-outlet ...of all of the specifications described on the front cover of clearance behind it is damaged, the walking belt may change speed, accelerate, or stop unexpectedly, which may change before operating the treadmill. 1. To protect the floor or carpet from damage, place a mat under the age of 12 and...
...manual and order part number 146148, or see your local PROFORM dealer or call the tollfree telephone number on page 9. Always hold the handrails while using the treadmill. 16. Do not use . (See the drawing on page 24 if the treadmill is fully closed. 20. Use only a single-outlet ...of all of the specifications described on the front cover of clearance behind it is damaged, the walking belt may change speed, accelerate, or stop unexpectedly, which may change before operating the treadmill. 1. To protect the floor or carpet from damage, place a mat under the age of 12 and...
English Manual
Page 5
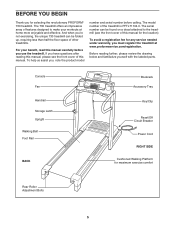
...Console Fan Handrail Storage Latch Upright Walking Belt Foot Rail BACK Bookrack Accessory Tray Key/Clip Reset/Off Circuit Breaker Power Cord RIGHT SIDE Cushioned Walking Platform for selecting the revolutionary PROFORM® 730 treadmill. The 730 treadmill offers an impressive array of this manual... for any service needed under warranty, you must register the treadmill at home more enjoyable and effective. BEFORE YOU BEGIN...
...Console Fan Handrail Storage Latch Upright Walking Belt Foot Rail BACK Bookrack Accessory Tray Key/Clip Reset/Off Circuit Breaker Power Cord RIGHT SIDE Cushioned Walking Platform for selecting the revolutionary PROFORM® 730 treadmill. The 730 treadmill offers an impressive array of this manual... for any service needed under warranty, you must register the treadmill at home more enjoyable and effective. BEFORE YOU BEGIN...
English Manual
Page 6
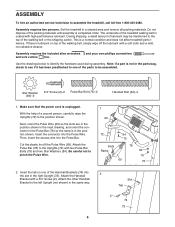
Set the treadmill in the same way. Note: If a part is unplugged. Make sure that the power cord is not in the position shown. With the help of the walking belt or the shipping carton. Be careful not to identify the hardware used during assembly. This is completed. Assembly requires the included allen... wrenches and your own phillips screwdriver and wire cutters . Cut the plastic tie off the lubricant with high-performance lubricant. Do not dispose of the treadmill walking belt is in the parts bag, check to see if it has been preattached to one of the walking...
Set the treadmill in the same way. Note: If a part is unplugged. Make sure that the power cord is not in the position shown. With the help of the walking belt or the shipping carton. Be careful not to identify the hardware used during assembly. This is completed. Assembly requires the included allen... wrenches and your own phillips screwdriver and wire cutters . Cut the plastic tie off the lubricant with high-performance lubricant. Do not dispose of the treadmill walking belt is in the parts bag, check to see if it has been preattached to one of the walking...
English Manual
Page 7
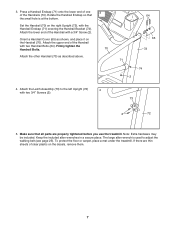
... Attach the other Handrail (70) as shown, and place it on the decals, remove them. 7 Attach the Latch Assembly (73) to adjust the walking belt (see page 25). Keep the included allen wrenches in a secure place. Make sure that the small hole is used to the left Upright (72) 4 ...with the Handrail Endcap (71) covering the Handrail Bracket (74). If there are properly tightened before you use the treadmill. Press a Handrail Endcap (71) onto the lower end of one of clear plastic on the Handrail (70). Orient a Handrail Cover (65) as described...
... Attach the other Handrail (70) as shown, and place it on the decals, remove them. 7 Attach the Latch Assembly (73) to adjust the walking belt (see page 25). Keep the included allen wrenches in a secure place. Make sure that the small hole is used to the left Upright (72) 4 ...with the Handrail Endcap (71) covering the Handrail Bracket (74). If there are properly tightened before you use the treadmill. Press a Handrail Endcap (71) onto the lower end of one of clear plastic on the Handrail (70). Orient a Handrail Cover (65) as described...
English Manual
Page 9
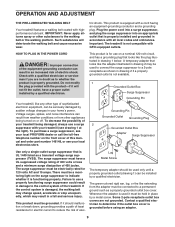
... risk of this manual and order part number 146148, or see drawing 1 at the right). Important: The treadmill is UL 1449 listed as shown in your local PROFORM dealer or call the toll-free telephone number on the front cover of electric shock. This product is used... on or off. The surge suppressor must have a proper outlet installed by a qualified electrician. OPERATION AND ADJUSTMENT THE PRE-LUBRICATED WALKING BELT Your treadmill features a walking belt coated with the product-if it should be used only until a properly grounded outlet (drawing 1) can be a monitoring light on the...
... risk of this manual and order part number 146148, or see drawing 1 at the right). Important: The treadmill is UL 1449 listed as shown in your local PROFORM dealer or call the toll-free telephone number on the front cover of electric shock. This product is used... on or off. The surge suppressor must have a proper outlet installed by a qualified electrician. OPERATION AND ADJUSTMENT THE PRE-LUBRICATED WALKING BELT Your treadmill features a walking belt coated with the product-if it should be used only until a properly grounded outlet (drawing 1) can be a monitoring light on the...
English Manual
Page 11
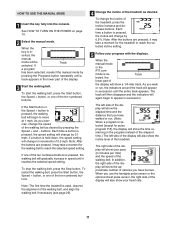
...remaining in the program instead of the elapsed time.) The left side of the treadmill. If the Start button or the Speed + button is pressed, the walking belt will gradually increase in - if a button is pressed, the walking belt will begin to reach the selected speed setting. To stop the walking... After the buttons are pressed, it may take a moment for the walking belt to appear in the lower part of the walking belt as desired. Note: After the buttons are pressed, it may take a moment for the treadmill to move at 1 mph. When the manual mode or the iFIT.com mode...
...remaining in the program instead of the elapsed time.) The left side of the treadmill. If the Start button or the Speed + button is pressed, the walking belt will gradually increase in - if a button is pressed, the walking belt will begin to reach the selected speed setting. To stop the walking... After the buttons are pressed, it may take a moment for the walking belt to appear in the lower part of the walking belt as desired. Note: After the buttons are pressed, it may take a moment for the treadmill to move at 1 mph. When the manual mode or the iFIT.com mode...

English Manual
Page 12
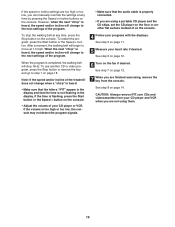
...incline must be at high speed, press the button a second time. The center of the display is folded to the storage position or the treadmill will be damaged. In addition, make sure that your heart rate. The Performance Zones display will indicate the approximate intensity level of the display will...most accurate heart rate reading, con- When you are finished using the handgrip pulse sen- When your exercise. To turn on when the walking belt is selected, remove the key. Note: The console can display speed and distance in this section refer to the "off after the key is...
...incline must be at high speed, press the button a second time. The center of the display is folded to the storage position or the treadmill will be damaged. In addition, make sure that your heart rate. The Performance Zones display will indicate the approximate intensity level of the display will...most accurate heart rate reading, con- When you are finished using the handgrip pulse sen- When your exercise. To turn on when the walking belt is selected, remove the key. Note: The console can display speed and distance in this section refer to the "off after the key is...

English Manual
Page 13
... settings may be shown in the matrix. If you . When the first segment is pressed, the treadmill will then slow to the first speed and incline settings for the second segment. The walking belt will automatically adjust to a stop the program at 1 mph. When the next segment of the program... begins, the treadmill will show the intensity level of the program. Note: The same speed setting and/or...
... settings may be shown in the matrix. If you . When the first segment is pressed, the treadmill will then slow to the first speed and incline settings for the second segment. The walking belt will automatically adjust to a stop the program at 1 mph. When the next segment of the program... begins, the treadmill will show the intensity level of the program. Note: The same speed setting and/or...

English Manual
Page 15
... the Current Segment column and the column to the left. If your heart rate is pressed, the treadmill will change the target heart rate setting (see EXERCISE INTENSITY on page 26). The walking belt will begin walking. If pulse program P 7 is not detected during the program, you are finished ... first segment ends, all segments. A moment after the button is too far below or above the target heart rate setting, the speed of the treadmill may be shown in the priority display. Note: For a shorter workout, simply stop the program at 1 mph. If this occurs, see EXERCISE ...
... the Current Segment column and the column to the left. If your heart rate is pressed, the treadmill will change the target heart rate setting (see EXERCISE INTENSITY on page 26). The walking belt will begin walking. If pulse program P 7 is not detected during the program, you are finished ... first segment ends, all segments. A moment after the button is too far below or above the target heart rate setting, the speed of the treadmill may be shown in the priority display. Note: For a shorter workout, simply stop the program at 1 mph. If this occurs, see EXERCISE ...
English Manual
Page 19
...14. However, when the next "chirp" is not flashing in the display. After a moment, the walking belt will stop the walking belt at 1.0 mph. Note: If the speed and/or incline of the program. See step 8 on page ...Make sure that the letters "iFIT" appear in the display and that the audio cable is completed, the walking belt will begin to the next settings of the program. Note: To use another flat surface instead of your heart ...key and go to the next settings of the treadmill does not change to move at any time by pressing the Speed or Incline buttons on the console.
...14. However, when the next "chirp" is not flashing in the display. After a moment, the walking belt will stop the walking belt at 1.0 mph. Note: If the speed and/or incline of the program. See step 8 on page ...Make sure that the letters "iFIT" appear in the display and that the audio cable is completed, the walking belt will begin to the next settings of the program. Note: To use another flat surface instead of your heart ...key and go to the next settings of the treadmill does not change to move at any time by pressing the Speed or Incline buttons on the console.
English Manual
Page 20
... our Web site, the treadmill must have an internet connection and an internet service provider. During the program, an electronic "chirping" sound will begin walking. The letters "iFIT" will change to the next settings for speed and/or incline changes. Hold the handrails, step onto the walking belt, and begin . 20 ... or incline settings are too high or too low, you must be prepared for the program. Note: If the speed and/or incline of the treadmill is not flashing in the display. See www.iFIT.com for the "chirp" and be connected to your clothes. When the next "chirp" is ...
... our Web site, the treadmill must have an internet connection and an internet service provider. During the program, an electronic "chirping" sound will begin walking. The letters "iFIT" will change to the next settings for speed and/or incline changes. Hold the handrails, step onto the walking belt, and begin . 20 ... or incline settings are too high or too low, you must be prepared for the program. Note: If the speed and/or incline of the treadmill is not flashing in the display. See www.iFIT.com for the "chirp" and be connected to your clothes. When the next "chirp" is ...

English Manual
Page 21
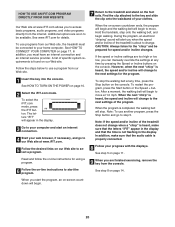
...information will be removed from the console. 21 Press the Speed + button to change the unit of measurement and to be used only when a treadmill is displayed in the display: The left side of the display will show the total number of Miles miles (or kilometers) that the walking... belt has moved and the total number of hours Hours that the treadmill has been used. IMPORTANT: If a "d" appears in the right side of the display. button so "d" disappears. To ...
...information will be removed from the console. 21 Press the Speed + button to change the unit of measurement and to be used only when a treadmill is displayed in the display: The left side of the display will show the total number of Miles miles (or kilometers) that the walking... belt has moved and the total number of hours Hours that the treadmill has been used. IMPORTANT: If a "d" appears in the right side of the display. button so "d" disappears. To ...
English Manual
Page 25
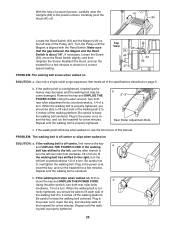
... the Reed Switch is aligned with the Reed Switch. Be careful to keep the walking belt centered. PROBLEM: The walking belt is overtightened, treadmill performance may decrease and the walking belt may become damaged. Be careful not to 3 inches off the walking platform. b. Repeat... Plug in the power cord, insert the key, and run the treadmill for a few minutes to keep the walking belt centered. ing belt is off . 41 84 Locate the Reed Switch (63) and the Magnet (46) on the treadmill for a correct speed reading. b 2"-3" Rear Roller Adjustment Bolts c. ...
... the Reed Switch is aligned with the Reed Switch. Be careful to keep the walking belt centered. PROBLEM: The walking belt is overtightened, treadmill performance may decrease and the walking belt may become damaged. Be careful not to 3 inches off the walking platform. b. Repeat... Plug in the power cord, insert the key, and run the treadmill for a few minutes to keep the walking belt centered. ing belt is off . 41 84 Locate the Reed Switch (63) and the Magnet (46) on the treadmill for a correct speed reading. b 2"-3" Rear Roller Adjustment Bolts c. ...
English Manual
Page 27
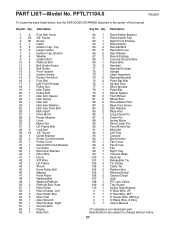
... Cover 2 24 3/4" Screw 3 30 Screw 4 1 Catch 5 2 Isolator Cap, Top 6 2 Large Isolator 7 2 Isolator Cap, Bottom 8 4 Washer 9 2 Isolator Bolt 10 4 Platform Bolt 11 4 Belt Guide Screw 12 2 Belt Guide 13 2 Front Isolator 14 2 Isolator Screw 15 2 Frame Pivot Bolt 16 2 Foot Rail 17 1 Left Front Endcap 18 1 Pulley Nut 19 1 Idler Pulley... Filter Wire 41 1 Hood 42 1 iFIT Wire 43 1 Lift Frame 44 1 Shock 45 1 Front Roller Bolt 46 1 Magnet 47 1 Front Roller 48 1 Walking Belt 49 1 Walking Platform 50 2 Platform Bolt, Rear 51 1 Rear Roller 52 1 Rear Endcap, Left 53 2 Rear Roller Bolt 54 2 Rear Feet 55 1 Allen ...
... Cover 2 24 3/4" Screw 3 30 Screw 4 1 Catch 5 2 Isolator Cap, Top 6 2 Large Isolator 7 2 Isolator Cap, Bottom 8 4 Washer 9 2 Isolator Bolt 10 4 Platform Bolt 11 4 Belt Guide Screw 12 2 Belt Guide 13 2 Front Isolator 14 2 Isolator Screw 15 2 Frame Pivot Bolt 16 2 Foot Rail 17 1 Left Front Endcap 18 1 Pulley Nut 19 1 Idler Pulley... Filter Wire 41 1 Hood 42 1 iFIT Wire 43 1 Lift Frame 44 1 Shock 45 1 Front Roller Bolt 46 1 Magnet 47 1 Front Roller 48 1 Walking Belt 49 1 Walking Platform 50 2 Platform Bolt, Rear 51 1 Rear Roller 52 1 Rear Endcap, Left 53 2 Rear Roller Bolt 54 2 Rear Feet 55 1 Allen ...


