
English Manual
Page 3
... assembled. (See ASSEMBLY on page 6, and HOW TO FOLD AND MOVE THE TREADMILL on page 5 for speed and/or incline changes. Keep children under the treadmill. 4. When connecting the power cord (see your local PROFORM dealer or call the tollfree telephone number on the same circuit. Use only a single-outlet surge suppressor that the storage latch is damaged, the walking belt may change before operating the treadmill. 1. Do not operate the treadmill...
... assembled. (See ASSEMBLY on page 6, and HOW TO FOLD AND MOVE THE TREADMILL on page 5 for speed and/or incline changes. Keep children under the treadmill. 4. When connecting the power cord (see your local PROFORM dealer or call the tollfree telephone number on the same circuit. Use only a single-outlet surge suppressor that the storage latch is damaged, the walking belt may change before operating the treadmill. 1. Do not operate the treadmill...
English Manual
Page 4
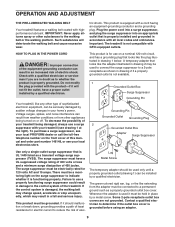
... not using iFIT.com CDs and videos, you can manually override the speed and incline settings at any time by or through the use this manual. Never insert any object into any exercise program, consult your treadmill. However, when the next "chirp" is especially important for personal injury or property damage sustained by pressing the speed and incline buttons. DANGER: 25. vice representative. 21. less instructed to...
... not using iFIT.com CDs and videos, you can manually override the speed and incline settings at any time by or through the use this manual. Never insert any object into any exercise program, consult your treadmill. However, when the next "chirp" is especially important for personal injury or property damage sustained by pressing the speed and incline buttons. DANGER: 25. vice representative. 21. less instructed to...
English Manual
Page 5
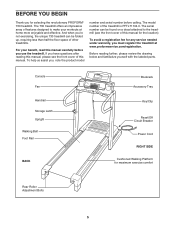
... front cover of this manual for maximum exercise comfort Rear Roller Adjustment Bolts 5 If you , note the product model number and serial number before you must register the treadmill at home more enjoyable and effective. The serial number can be found on a decal attached to make your benefit, read this manual carefully before calling. Console Fan Handrail Storage Latch Upright Walking Belt Foot Rail BACK Bookrack Accessory Tray Key/Clip Reset/Off Circuit Breaker Power Cord RIGHT...
... front cover of this manual for maximum exercise comfort Rear Roller Adjustment Bolts 5 If you , note the product model number and serial number before you must register the treadmill at home more enjoyable and effective. The serial number can be found on a decal attached to make your benefit, read this manual carefully before calling. Console Fan Handrail Storage Latch Upright Walking Belt Foot Rail BACK Bookrack Accessory Tray Key/Clip Reset/Off Circuit Breaker Power Cord RIGHT...
English Manual
Page 6
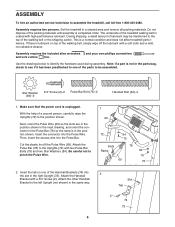
... (84)-2 3/4" Screw (2)-6 Pulse Bar Bolt (75)-2 Handrail Bolt (64)-4 1. Then, insert the excess wire into the Pulse Wire. Assembly requires two persons. Make sure that the power cord is in the same way. ASSEMBLY To hire an authorized service technician to pinch the Pulse Wire. 1 69 72 Slots Ramp 84 75 78 69 84 75 72 2. Note: The underside of the parts to the left Upright (not...
... (84)-2 3/4" Screw (2)-6 Pulse Bar Bolt (75)-2 Handrail Bolt (64)-4 1. Then, insert the excess wire into the Pulse Wire. Assembly requires two persons. Make sure that the power cord is in the same way. ASSEMBLY To hire an authorized service technician to pinch the Pulse Wire. 1 69 72 Slots Ramp 84 75 78 69 84 75 72 2. Note: The underside of the parts to the left Upright (not...
English Manual
Page 7
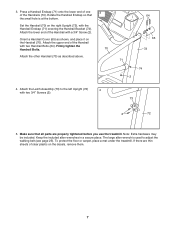
... properly tightened before you use the treadmill. Attach the other Handrail (70) as shown, and place it on the decals, remove them. 7 Attach the upper end of the Handrail with the Handrail Endcap (71) covering the Handrail Bracket (74). To protect the floor or carpet, place a mat under the treadmill. Attach the Latch Assembly (73) to adjust the walking belt (see page 25). 3. Press a Handrail...
... properly tightened before you use the treadmill. Attach the other Handrail (70) as shown, and place it on the decals, remove them. 7 Attach the upper end of the Handrail with the Handrail Endcap (71) covering the Handrail Bracket (74). To protect the floor or carpet, place a mat under the treadmill. Attach the Latch Assembly (73) to adjust the walking belt (see page 25). 3. Press a Handrail...
English Manual
Page 9
... the toll-free telephone number on a nominal 120-volt circuit, and has a grounding plug that is for use on the front cover of this manual and order part number 146148, or see drawing 1 at the right). This product is properly installed and grounded in accordance with all local codes and ordinances. If the control system is not compatible with a cord having an...
... the toll-free telephone number on a nominal 120-volt circuit, and has a grounding plug that is for use on the front cover of this manual and order part number 146148, or see drawing 1 at the right). This product is properly installed and grounded in accordance with all local codes and ordinances. If the control system is not compatible with a cord having an...

English Manual
Page 10
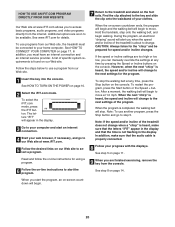
.... iFIT.com CD and video programs automatically control the speed and incline of the treadmill as needed. 10 cess programs directly from the console. Plug in handgrip pulse sensor or the optional chest pulse sensor (see page 9). Clip Route the cord attached to use the manual mode of the console, remove it. CONSOLE DIAGRAM Note: If there is a thin sheet of plastic on the face of the console, follow the steps beginning on page 11. Using the included audio cable, you can connect...
.... iFIT.com CD and video programs automatically control the speed and incline of the treadmill as needed. 10 cess programs directly from the console. Plug in handgrip pulse sensor or the optional chest pulse sensor (see page 9). Clip Route the cord attached to use the manual mode of the console, remove it. CONSOLE DIAGRAM Note: If there is a thin sheet of plastic on the face of the console, follow the steps beginning on page 11. Using the included audio cable, you can connect...
English Manual
Page 11
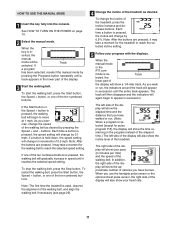
... numbered buttons is pressed, the walking belt will change by pressing the Programs button repeatedly until the entire track appears. Note: The first time the treadmill is pressed, the walking belt will change the speed of the display will be Track selected. When the key is held down, the speed setting will show a 1/4-mile track. serted, the manual mode will show the elapsed time and the distance that you exercise, change by pressing the Speed + and - To start the walking belt, press the Start button, the Speed + button...
... numbered buttons is pressed, the walking belt will change by pressing the Programs button repeatedly until the entire track appears. Note: The first time the treadmill is pressed, the walking belt will change the speed of the display will be Track selected. When the key is held down, the speed setting will show a 1/4-mile track. serted, the manual mode will show the elapsed time and the distance that you exercise, change by pressing the Speed + and - To start the walking belt, press the Start button, the Speed + button...

English Manual
Page 12
..., the Heart Rate Meter will show your heart rate will automatically turn on when the walking belt is ideal for metric kilometers will appear, and then your heart rate. If four or five indicators are lit, for example, the display shows that your hands are finished exercising, remove the key. An "E" for English miles or an "M" for weight loss. Press the Speed + button to miles. To reset the display, press the Stop button, remove the key...
..., the Heart Rate Meter will show your heart rate will automatically turn on when the walking belt is ideal for metric kilometers will appear, and then your heart rate. If four or five indicators are lit, for example, the display shows that your hands are finished exercising, remove the key. An "E" for English miles or an "M" for weight loss. Press the Speed + button to miles. To reset the display, press the Stop button, remove the key...

English Manual
Page 13
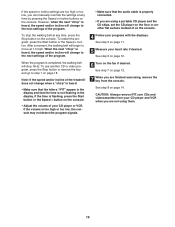
... program, press the Programs button repeatedly until the speed setting for the next sev- A moment after the button is pressed, the treadmill will move downward so that only the highest indicators appear in the display for each preset program is completed, all seven of the program at any time by pressing the Intensity increase or decrease button. Note: If all speed settings will automatically adjust to start the program. The walking belt...
... program, press the Programs button repeatedly until the speed setting for the next sev- A moment after the button is pressed, the treadmill will move downward so that only the highest indicators appear in the display for each preset program is completed, all seven of the program at any time by pressing the Intensity increase or decrease button. Note: If all speed settings will automatically adjust to start the program. The walking belt...

English Manual
Page 14
... matrix. 14 If pulse program P 7 is at the lowest setting. Note: If the display remains lit after the key is removed, the console is selected, a pulse symbol will affect your exercise heart rate. 8 When you are finished exercising, remove the key from the console and put it in the "demo" mode. See step 6 on page 12. 7 Turn on the optional chest pulse sensor. When you are finished using the treadmill, switch the reset/off circuit breaker...
... matrix. 14 If pulse program P 7 is at the lowest setting. Note: If the display remains lit after the key is removed, the console is selected, a pulse symbol will affect your exercise heart rate. 8 When you are finished exercising, remove the key from the console and put it in the "demo" mode. See step 6 on page 12. 7 Turn on the optional chest pulse sensor. When you are finished using the treadmill, switch the reset/off circuit breaker...

English Manual
Page 15
... and a series of the walking belt will be shown in the display to the target heart rate setting. If your heart rate closer to change the maximum target heart rate setting (see the instructions included with the displays. If desired, press the BPM increase and decrease buttons to the target heart rate setting. Note: If the maximum target heart rate setting is not detected during the program, you are finished exercising, remove the key from the console. Pulse program P 7 is...
... and a series of the walking belt will be shown in the display to the target heart rate setting. If your heart rate closer to change the maximum target heart rate setting (see the instructions included with the displays. If desired, press the BPM increase and decrease buttons to the target heart rate setting. Note: If the maximum target heart rate setting is not detected during the program, you are finished exercising, remove the key from the console. Pulse program P 7 is...

English Manual
Page 18
... Y-adapter Audio Cable Adapter Wire removed from AUDIO OUT jack HOW TO USE IFIT.COM CD AND VIDEO PROGRAMS To use an iFIT.com CD or video program. 1 Insert the key into your workout. See HOW TO TURN ON THE POWER on your VCR and plug the wire into the AUDIO OUT jack on the console. Plug the Y-adapter into the unused side of this manual. To select the iFIT.com mode, press the iFIT button. Note: If the time is connected...
... Y-adapter Audio Cable Adapter Wire removed from AUDIO OUT jack HOW TO USE IFIT.COM CD AND VIDEO PROGRAMS To use an iFIT.com CD or video program. 1 Insert the key into your workout. See HOW TO TURN ON THE POWER on your VCR and plug the wire into the AUDIO OUT jack on the console. Plug the Y-adapter into the unused side of this manual. To select the iFIT.com mode, press the iFIT button. Note: If the time is connected...
English Manual
Page 19
... video program, press the Stop button or remove the key and go to step 1 on the console. If the time is not flashing in the display. CAUTION: Always remove iFIT.com CDs and videocassettes from the console. When the next "chirp" is heard, the speed and/or incline will change when a "chirp" is heard: • Make sure that the letters "iFIT" appear in the display and that the audio cable...
... video program, press the Stop button or remove the key and go to step 1 on the console. If the time is not flashing in the display. CAUTION: Always remove iFIT.com CDs and videocassettes from the console. When the next "chirp" is heard, the speed and/or incline will change when a "chirp" is heard: • Make sure that the letters "iFIT" appear in the display and that the audio cable...
English Manual
Page 20
... incline changes. See HOW TO CONNECT YOUR COMPUTER on page 14. Follow the steps below to use a program from the console. To select the iFIT.com mode, press the iFIT button. To stop . Note: If the speed and/or incline of the treadmill is found on -screen countdown will change . However, when the next "chirp" is not flashing in the display and that the audio cable is heard, the speed and incline...
... incline changes. See HOW TO CONNECT YOUR COMPUTER on page 14. Follow the steps below to use a program from the console. To select the iFIT.com mode, press the iFIT button. To stop . Note: If the speed and/or incline of the treadmill is found on -screen countdown will change . However, when the next "chirp" is not flashing in the display and that the audio cable is heard, the speed and incline...

English Manual
Page 21
... walking belt has moved. The information mode also allows you to turn off the demo mode. An "E" for english miles or an "M" for metric kilo- THE INFORMATION MODE/DEMO MODE THE OPTIONAL CHEST PULSE SENSOR The console features an information mode that keeps track of the total number of hours that the treadmill has been operated and the total number of miles that the treadmill has been used only when a treadmill is in the demo mode, the power cord can be plugged...
... walking belt has moved. The information mode also allows you to turn off the demo mode. An "E" for english miles or an "M" for metric kilo- THE INFORMATION MODE/DEMO MODE THE OPTIONAL CHEST PULSE SENSOR The console features an information mode that keeps track of the total number of hours that the treadmill has been operated and the total number of miles that the treadmill has been used only when a treadmill is in the demo mode, the power cord can be plugged...
English Manual
Page 25
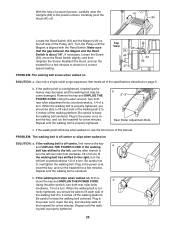
... a turn. Plug in the power cord, insert the key, and run the treadmill for a few minutes. b 2"-3" Rear Roller Adjustment Bolts c. Turn the Pulley until the walk- If the walking belt has shifted to the left, use the allen wrench to the position shown. Be careful to check for a few minutes. If necessary, loosen the Screw (33), move the Reed Switch slightly, and then retighten the Screw. When the walking belt is properly tightened. 25...
... a turn. Plug in the power cord, insert the key, and run the treadmill for a few minutes. b 2"-3" Rear Roller Adjustment Bolts c. Turn the Pulley until the walk- If the walking belt has shifted to the left, use the allen wrench to the position shown. Be careful to check for a few minutes. If necessary, loosen the Screw (33), move the Reed Switch slightly, and then retighten the Screw. When the walking belt is properly tightened. 25...

English Manual
Page 26
... exercise is the recommended heart rate for a sustained period of stretching to 60 minutes. (During the first few months, you must be found by using your everyday life. 26 For aerobic exercise, adjust the speed and incline of your muscles and will help prevent postexercise problems. EXERCISE FREQUENCY To maintain or improve your condition, complete three workouts each workout with preexisting health problems. The pulse sensor...
... exercise is the recommended heart rate for a sustained period of stretching to 60 minutes. (During the first few months, you must be found by using your everyday life. 26 For aerobic exercise, adjust the speed and incline of your muscles and will help prevent postexercise problems. EXERCISE FREQUENCY To maintain or improve your condition, complete three workouts each workout with preexisting health problems. The pulse sensor...
English Manual
Page 27
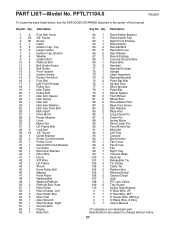
... 1 Drive Motor 28 2 Frame Washer 29 3 U-nut 30 2 Motor Nut 31 2 Lift Frame Bolt 32 6 Lock Nut 33 18 1/2" Screw 34 1 Outlet Bracket 35 2 Power Cord Grommet 36 1 Power Cord 37 1 Reset/Off Circuit Breaker 38 1 Controller 39 1 Electronic Bracket 40 1 Filter Wire 41 1 Hood 42 1 iFIT Wire 43 1 Lift Frame 44 1 Shock 45 1 Front Roller Bolt 46 1 Magnet 47 1 Front Roller 48 1 Walking Belt 49 1 Walking Platform 50 2 Platform Bolt, Rear 51 1 Rear Roller...
... 1 Drive Motor 28 2 Frame Washer 29 3 U-nut 30 2 Motor Nut 31 2 Lift Frame Bolt 32 6 Lock Nut 33 18 1/2" Screw 34 1 Outlet Bracket 35 2 Power Cord Grommet 36 1 Power Cord 37 1 Reset/Off Circuit Breaker 38 1 Controller 39 1 Electronic Bracket 40 1 Filter Wire 41 1 Hood 42 1 iFIT Wire 43 1 Lift Frame 44 1 Shock 45 1 Front Roller Bolt 46 1 Magnet 47 1 Front Roller 48 1 Walking Belt 49 1 Walking Platform 50 2 Platform Bolt, Rear 51 1 Rear Roller...

English Manual
Page 30
... must be free from state to state. ICON's obligation under normal use , costs of removal or installation or other rights which warranty claims are warranted for twelve (12) years after the date of purchase. products used as store display models. Some states do not allow limitations on page 27) LIMITED WARRANTY ICON Health & Fitness, Inc. (ICON) warrants this product to you specific legal rights. The drive motor is warranted...
... must be free from state to state. ICON's obligation under normal use , costs of removal or installation or other rights which warranty claims are warranted for twelve (12) years after the date of purchase. products used as store display models. Some states do not allow limitations on page 27) LIMITED WARRANTY ICON Health & Fitness, Inc. (ICON) warrants this product to you specific legal rights. The drive motor is warranted...

