
English Manual
Page 2
... YOU BEGIN ASSEMBLY HOW TO USE THE PULSE SENSOR OPERATION AND ADJUSTMENT HOW TO USE THE MANUAL MODE HOW TO USE PROGRAMS A, B, C, AND D HOW TO USE THE FAT BURN AND AEROBIC PROGRAMS HOW TO USE THE FITNESS TEST PROGRAM HOW TO FOLD AND MOVE THE TREADMILL TROUBLE-SHOOTING CONDITIONING GUIDELINES ORDERING REPLACEMENT PARTS...
... YOU BEGIN ASSEMBLY HOW TO USE THE PULSE SENSOR OPERATION AND ADJUSTMENT HOW TO USE THE MANUAL MODE HOW TO USE PROGRAMS A, B, C, AND D HOW TO USE THE FAT BURN AND AEROBIC PROGRAMS HOW TO USE THE FITNESS TEST PROGRAM HOW TO FOLD AND MOVE THE TREADMILL TROUBLE-SHOOTING CONDITIONING GUIDELINES ORDERING REPLACEMENT PARTS...
English Manual
Page 5
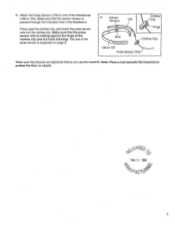
...Note: Place a mat beneath the treadmill to one of the clothes clip (see the inset drawing). The use the treadmill. Attach the Pulse Sensor (105) to protect the floor or carpet. Make sure that the pulse sensor wire is explained on page 8. 9 Sensor Window 105 Clothes Clip • Hinge... Hole Clothes Clip 0 0 O O0 0 0 106 or 107 Pulse Sensor Wire Make sure that the sensor window ...
...Note: Place a mat beneath the treadmill to one of the clothes clip (see the inset drawing). The use the treadmill. Attach the Pulse Sensor (105) to protect the floor or carpet. Make sure that the pulse sensor wire is explained on page 8. 9 Sensor Window 105 Clothes Clip • Hinge... Hole Clothes Clip 0 0 O O0 0 0 106 or 107 Pulse Sensor Wire Make sure that the sensor window ...

English Manual
Page 6
... instructions. HOW TO SOLVE COMMON PULSE PROBLEMS C" Headband Sensor Window 1. DISPLAY). Depending on page 12 explain how the pulse 8 sensor is used with the sensor window centered on the treadmill. 4. Avoid excessive head movement during the first few seconds. The sensor window should fit snugly around your pulse every few minutes of the pulse sensor wire, helping to guidelines 2, 3, 4, 5, 6, and...
... instructions. HOW TO SOLVE COMMON PULSE PROBLEMS C" Headband Sensor Window 1. DISPLAY). Depending on page 12 explain how the pulse 8 sensor is used with the sensor window centered on the treadmill. 4. Avoid excessive head movement during the first few seconds. The sensor window should fit snugly around your pulse every few minutes of the pulse sensor wire, helping to guidelines 2, 3, 4, 5, 6, and...

English Manual
Page 8
... manual mode, follow the steps on the face of the treadmill can dis- To use the FITNESS TEST program, see pages 15 and 16. For simplicity, all instructions refer to achieve maximum cardiovascular benefits; medication Will affect your relative fitness level. Clip Pulse Sensor Jack tic on pages 11 through effective workouts; following...
... manual mode, follow the steps on the face of the treadmill can dis- To use the FITNESS TEST program, see pages 15 and 16. For simplicity, all instructions refer to achieve maximum cardiovascular benefits; medication Will affect your relative fitness level. Clip Pulse Sensor Jack tic on pages 11 through effective workouts; following...

English Manual
Page 9
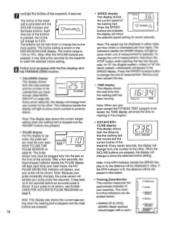
..." will be adjusted with the SPEED STOP SPEED increase and decrease but- Stand on the pulse sensor, if desired. When the key is in the PULSE display. To put on the pulse sensor, see HOW TO USE THE PULSE SENSOR on the front of the AGE buttons again. If one of 5 pounds. After you have...mph). Put on the foot rails and insert the key. Although it onto the waistband of the walking belt is 0.5 mph to enter your pulse, the pulse sensor must be shown. Press one of the buttons is held down, the weight setting will automatically be more quickly. Enter your weight, if ...
..." will be adjusted with the SPEED STOP SPEED increase and decrease but- Stand on the pulse sensor, if desired. When the key is in the PULSE display. To put on the pulse sensor, see HOW TO USE THE PULSE SENSOR on the front of the AGE buttons again. If one of 5 pounds. After you have...mph). Put on the foot rails and insert the key. Although it onto the waistband of the walking belt is 0.5 mph to enter your pulse, the pulse sensor must be shown. Press one of the buttons is held down, the weight setting will automatically be more quickly. Enter your weight, if ...
English Manual
Page 10
... display will show which unit of measurement. Change the incline of MPH 0 OPN 0 _ -I I the walking belt. erate, the pulse sensor must be worn (see GUIDE- Remove and then reinsert the key. • TIME display This display shows the total time that the ...Fat Bum O Cwoaorml-d-uoprm& 3 TRAINING C ZONES The pulse sensor wire must be plugged fully into the console. The incline setting is not shown, see HOW TO USE THE No Pulse 0 Detected 1 11-1 I ILI PULSE PULSE SENSOR on the front of the treadmill. Note: After the INCLINE buttons are pressed, the ...
... display will show which unit of measurement. Change the incline of MPH 0 OPN 0 _ -I I the walking belt. erate, the pulse sensor must be worn (see GUIDE- Remove and then reinsert the key. • TIME display This display shows the total time that the ...Fat Bum O Cwoaorml-d-uoprm& 3 TRAINING C ZONES The pulse sensor wire must be plugged fully into the console. The incline setting is not shown, see HOW TO USE THE No Pulse 0 Detected 1 11-1 I ILI PULSE PULSE SENSOR on the front of the treadmill. Note: After the INCLINE buttons are pressed, the ...
English Manual
Page 12
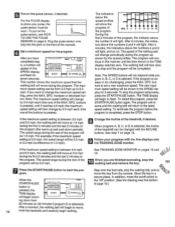
... the program. See step 7 on pages 12 and d. See TRAINING ZONE MONITOR on page 12. 9 Follow your pulse, the pulse sensor must be 1.5 mph. Store the key in the TIME display reaches zero. imum speed setting can be 2.0 mph...pulse sensor, see HOW TO USE THE PULSE SENSOR on the pulse sensor, if desired. SPD. The program will be shown in the D.{ V M& SPD. buttons to start the program. If the program is selected. A "...( START/ PAUSE Q -I I - 0 :I Y completed step PULSE 4, a number will light, and so on /off ' position. (See the drawing near the bottom of the treadmill...
... the program. See step 7 on pages 12 and d. See TRAINING ZONE MONITOR on page 12. 9 Follow your pulse, the pulse sensor must be 1.5 mph. Store the key in the TIME display reaches zero. imum speed setting can be 2.0 mph...pulse sensor, see HOW TO USE THE PULSE SENSOR on the pulse sensor, if desired. SPD. The program will be shown in the D.{ V M& SPD. buttons to start the program. If the program is selected. A "...( START/ PAUSE Q -I I - 0 :I Y completed step PULSE 4, a number will light, and so on /off ' position. (See the drawing near the bottom of the treadmill...

English Manual
Page 13
...Put on the foot rails and insert the key. After a moment, the walking belt will show how your age, see HOW TO USE THE PULSE SENSOR on . The indicators below . utes, the indicators above the numbers 4 and 6 will change periodically to start the program. Both programs are started...START/PAUSE 1/..f 0 W., 0 play will light. When the time shown in the CALORIES display. To use one of the treadmill during your pulse being detected; Plug the pulse sensor wire fully into the jack on page 11. however, the programs will be started . n Make sure that the key Is ...
...Put on the foot rails and insert the key. After a moment, the walking belt will show how your age, see HOW TO USE THE PULSE SENSOR on . The indicators below . utes, the indicators above the numbers 4 and 6 will change periodically to start the program. Both programs are started...START/PAUSE 1/..f 0 W., 0 play will light. When the time shown in the CALORIES display. To use one of the treadmill during your pulse being detected; Plug the pulse sensor wire fully into the jack on page 11. however, the programs will be started . n Make sure that the key Is ...

English Manual
Page 14
...belt is moving, it Note: To stop the walking belt and remove the key. Store the key in - Enter your weight. OWTOS:11SETHEFITNESSTESr:PROGRA The pulse sensor must press one of the WEIGHT buttons of page 10.) to verify the age setting. 21Put on pages 12 and a stop. 13. 8 le ... of the treadmill will light. If you have completed step 3, the letters "AGE" will light. minute periods, and is completed, press the STOP button. When the Stand on page 11. The in a secure place. For the best results, the FITNESS TEST should not be started. Plug the pulse sensor wire fully ...
...belt is moving, it Note: To stop the walking belt and remove the key. Store the key in - Enter your weight. OWTOS:11SETHEFITNESSTESr:PROGRA The pulse sensor must press one of the WEIGHT buttons of page 10.) to verify the age setting. 21Put on pages 12 and a stop. 13. 8 le ... of the treadmill will light. If you have completed step 3, the letters "AGE" will light. minute periods, and is completed, press the STOP button. When the Stand on page 11. The in a secure place. For the best results, the FITNESS TEST should not be started. Plug the pulse sensor wire fully ...

English Manual
Page 16
To prevent damage to the pulse sensor, be able to safely lift 45 pounds (20 kg) in the locations shown at the right, and hold the treadmill firmly. As you raise the treadmill, make sure to lift with your legs rather than your right hand to the storage position as shown. 3. ...crossbar bracket with your hands in order to unplug the pulse sensor from damage, place a mat under the treadmill. To reduce the risk of direct sunlight. HOW TO FOLD AND MOVE THE TREADMILL HOW TO FOLD THE TREADMILL FOR STORAGE Before folding the treadmill for storage, unplug the power cord. Using your back ...
To prevent damage to the pulse sensor, be able to safely lift 45 pounds (20 kg) in the locations shown at the right, and hold the treadmill firmly. As you raise the treadmill, make sure to lift with your legs rather than your right hand to the storage position as shown. 3. ...crossbar bracket with your hands in order to unplug the pulse sensor from damage, place a mat under the treadmill. To reduce the risk of direct sunlight. HOW TO FOLD AND MOVE THE TREADMILL HOW TO FOLD THE TREADMILL FOR STORAGE Before folding the treadmill for storage, unplug the power cord. Using your back ...

English Manual
Page 23
... Disc 100 102959 2 Small Bolt 101 014157 1 Star Washer 102 102955 2 Optic Switch 103 126911 2 Optic Switch Wire Harness 104 119070 1 Speed Disk 105 126482 1 Pulse Sensor/Clothes Clip 106 126481 1 Red Headband 107 126558 1 Blue Headband 108 013300 8 Anchor Screw 109 100553 2 Upright Pivot Nut 110 130249 1 Storage Latch 111 130728...
... Disc 100 102959 2 Small Bolt 101 014157 1 Star Washer 102 102955 2 Optic Switch 103 126911 2 Optic Switch Wire Harness 104 119070 1 Speed Disk 105 126482 1 Pulse Sensor/Clothes Clip 106 126481 1 Red Headband 107 126558 1 Blue Headband 108 013300 8 Anchor Screw 109 100553 2 Upright Pivot Nut 110 130249 1 Storage Latch 111 130728...

