

English Manual
Page 1
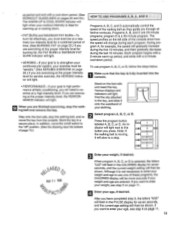
The serial number can be found in the space above. Write the serial number in the location shown below. Serial Number Decal E UPI 0 MAY 2 4 1996 (44-A C1\S \ ›C E F2 C. H E L F' LINE! 1-800-736-6879 ;Q. 440-V1, A CAUTION Read all precautions and insfruc-! 004:.101:.i.%pm). e..n..t 0:::.Nt*.ktOlOtOtic* . ....... USER'S MANUAL SEARS, ROEBUCK AND CO., HOFFMAN ESTATES, IL 60179 I 5 E Q L1 1 i i E N -r 41. PRO•FORM® SEARS Model No. 831.297743 Serial No.
The serial number can be found in the space above. Write the serial number in the location shown below. Serial Number Decal E UPI 0 MAY 2 4 1996 (44-A C1\S \ ›C E F2 C. H E L F' LINE! 1-800-736-6879 ;Q. 440-V1, A CAUTION Read all precautions and insfruc-! 004:.101:.i.%pm). e..n..t 0:::.Nt*.ktOlOtOtic* . ....... USER'S MANUAL SEARS, ROEBUCK AND CO., HOFFMAN ESTATES, IL 60179 I 5 E Q L1 1 i i E N -r 41. PRO•FORM® SEARS Model No. 831.297743 Serial No.
English Manual
Page 2
... BEGIN ASSEMBLY HOW TO USE THE PULSE SENSOR OPERATION AND ADJUSTMENT HOW TO USE THE MANUAL MODE HOW TO USE PROGRAMS A, B, C, AND D HOW TO USE THE FAT BURN AND AEROBIC PROGRAMS HOW TO USE THE FITNESS TEST PROGRAM HOW TO FOLD AND MOVE THE TREADMILL TROUBLE-SHOOTING CONDITIONING GUIDELINES ORDERING REPLACEMENT PARTS FULL 90 DAY WARRANTY 3 4 5 8 9 11 13 15 16 18 20 22 Back Cover Back Cover Note: An EXPLODED DRAWING and a PART LIST are attached to...
... BEGIN ASSEMBLY HOW TO USE THE PULSE SENSOR OPERATION AND ADJUSTMENT HOW TO USE THE MANUAL MODE HOW TO USE PROGRAMS A, B, C, AND D HOW TO USE THE FAT BURN AND AEROBIC PROGRAMS HOW TO USE THE FITNESS TEST PROGRAM HOW TO FOLD AND MOVE THE TREADMILL TROUBLE-SHOOTING CONDITIONING GUIDELINES ORDERING REPLACEMENT PARTS FULL 90 DAY WARRANTY 3 4 5 8 9 11 13 15 16 18 20 22 Back Cover Back Cover Note: An EXPLODED DRAWING and a PART LIST are attached to...
English Manual
Page 3
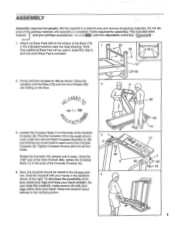
Set the treadmill in the ends of the Console Crossbar (9). 84 9 4. j\ P\SED), 0 MAY Z 4 1996 ('AA C'0('' 3. Next, the treadmill should be used in the indicated locations (see the inset drawing). Raise the treadmill about halfway to the storage position. ASSEMBLY Assembly requires two people. Tools required for assembly: The included alien wrench and your back. Loosen the Crossbar Bolts (1) in a cleared area and remove all...
Set the treadmill in the ends of the Console Crossbar (9). 84 9 4. j\ P\SED), 0 MAY Z 4 1996 ('AA C'0('' 3. Next, the treadmill should be used in the indicated locations (see the inset drawing). Raise the treadmill about halfway to the storage position. ASSEMBLY Assembly requires two people. Tools required for assembly: The included alien wrench and your back. Loosen the Crossbar Bolts (1) in a cleared area and remove all...

English Manual
Page 4
...legs and keep your right hand to the bottom of the treadmill with your left hand, lift the 5 Storage Latch (110). See drawing 6C. Using your right hand as shown. 6C 7. Hold the treadmill firmly with a Stabilizer Plate Bolt (91), two Stabilizer Plate Washers (66), and the Stabilizer Plate Nut (89) as 7 shown. See drawing 6B. Press... hand, lift the Storage Latch (110). Attach the Stabilizer Plate (81) to the Base (73) with both hands, and lower the ( treadmill to assembly drawing 5 at the right, and hold the treadmill firmly. Move your back straight. Stand...
...legs and keep your right hand to the bottom of the treadmill with your left hand, lift the 5 Storage Latch (110). See drawing 6C. Using your right hand as shown. 6C 7. Hold the treadmill firmly with a Stabilizer Plate Bolt (91), two Stabilizer Plate Washers (66), and the Stabilizer Plate Nut (89) as 7 shown. See drawing 6B. Press... hand, lift the Storage Latch (110). Attach the Stabilizer Plate (81) to the Base (73) with both hands, and lower the ( treadmill to assembly drawing 5 at the right, and hold the treadmill firmly. Move your back straight. Stand...
English Manual
Page 5
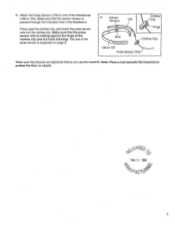
... pressed through the indicated hole in the Headband. MAY 2 4 1996 7 Note: Place a mat beneath the treadmill to one of the clothes clip (see the inset drawing). Attach the Pulse Sensor (105) to protect the floor or carpet. Press open the clothes clip, and insert the pulse sensor wire into the clothes clip. Make sure that all parts are tightened before you use the treadmill...
... pressed through the indicated hole in the Headband. MAY 2 4 1996 7 Note: Place a mat beneath the treadmill to one of the clothes clip (see the inset drawing). Attach the Pulse Sensor (105) to protect the floor or carpet. Press open the clothes clip, and insert the pulse sensor wire into the clothes clip. Make sure that all parts are tightened before you use the treadmill...

English Manual
Page 6
... on the console. 5. never immerse the pulse sensor in mild detergent, gently wring it out, and let it air dry. If error code "E5" appears in the PULSE display, refer to detect your pulse from the pulse sensor, please read the following important guidelines: 1. Wipe the pulse sensor with pulse readings. HOW TO ADJUST THE HEADBAND For the pulse sensor to stimulate circulation. Headband band. Attach the...
... on the console. 5. never immerse the pulse sensor in mild detergent, gently wring it out, and let it air dry. If error code "E5" appears in the PULSE display, refer to detect your pulse from the pulse sensor, please read the following important guidelines: 1. Wipe the pulse sensor with pulse readings. HOW TO ADJUST THE HEADBAND For the pulse sensor to stimulate circulation. Headband band. Attach the...

English Manual
Page 7
... damaged by a metal screw. trated in accordance with your treadmill being turned on a nominal 120-volt circuit, HOW TO PLUG IN THE POWER CORD and has a grounding plug that looks like extending from other appliances Whenever the adapter is used it will deteriorate the walking belt and ordinances. Check with grounding plug. Voltage surges, spikes, and noise interference can be connected to a permanent...
... damaged by a metal screw. trated in accordance with your treadmill being turned on a nominal 120-volt circuit, HOW TO PLUG IN THE POWER CORD and has a grounding plug that looks like extending from other appliances Whenever the adapter is used it will deteriorate the walking belt and ordinances. Check with grounding plug. Voltage surges, spikes, and noise interference can be connected to a permanent...

English Manual
Page 8
... 28 30 CM MANUAL k FT SPUD STEP 1 NSENT ITN 2 SELECTA ARCGRAU SET YOLM SSG . 4 SET YOLINAGE 5 WEAR ANSE SENSOR WW6I PEED 7 PRESS SARI 7 6, WEIGHT AGE 6, V NAX.SPS START /PAUSE STOP *osA Cal. ou Ve ptObleMs; Programs A, B, C, and D automatically control the speed of a button. To use only a sealed;water.bottle power cord is in determining pulse;trends' 66e. A CAUTION I FAN. SooNAN CAW emir. Note: The console can be ( ways...
... 28 30 CM MANUAL k FT SPUD STEP 1 NSENT ITN 2 SELECTA ARCGRAU SET YOLM SSG . 4 SET YOLINAGE 5 WEAR ANSE SENSOR WW6I PEED 7 PRESS SARI 7 6, WEIGHT AGE 6, V NAX.SPS START /PAUSE STOP *osA Cal. ou Ve ptObleMs; Programs A, B, C, and D automatically control the speed of a button. To use only a sealed;water.bottle power cord is in determining pulse;trends' 66e. A CAUTION I FAN. SooNAN CAW emir. Note: The console can be ( ways...

English Manual
Page 9
... console's memory, even if the power cord is held down, the weight setting will change in the PULSE display. Stand on the pulse sensor, if desired. Put on the foot rails and insert the key. Press the WEIGHT buttons again to change by 1 year. If one of the WEIGHT buttons again. To restart the walking belt, press the SPEED buttons or the START/PAUSE button as described above . • Press the AGE increase or decrease button. Press...
... console's memory, even if the power cord is held down, the weight setting will change in the PULSE display. Stand on the pulse sensor, if desired. Put on the foot rails and insert the key. Press the WEIGHT buttons again to change by 1 year. If one of the WEIGHT buttons again. To restart the walking belt, press the SPEED buttons or the START/PAUSE button as described above . • Press the AGE increase or decrease button. Press...
English Manual
Page 10
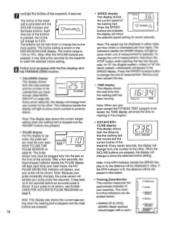
... pulse constantly changes, the pulse sensor will change by 0.5%. The buttons can be worn (see GUIDE- Note: This display also shows the current weight setting when the walking belt is pressed, the incline will be displayed in the DISTANCE/INCLINE display. An "E" (for English system-miles) or "M" (for seven seconds. Press the SPEED increase button to change from one number to show which unit of the treadmill. nIneSS Levet TIME Note: When any program except the FITNESS...
... pulse constantly changes, the pulse sensor will change by 0.5%. The buttons can be worn (see GUIDE- Note: This display also shows the current weight setting when the walking belt is pressed, the incline will be displayed in the DISTANCE/INCLINE display. An "E" (for English system-miles) or "M" (for seven seconds. Press the SPEED increase button to change from one number to show which unit of the treadmill. nIneSS Levet TIME Note: When any program except the FITNESS...
English Manual
Page 11
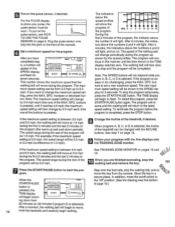
... you are 20-minute programs; Programs A, B, and C are finished exercising, stop the walking belt, and remove the key from the console. Press the program button labeled A, B, C, or D. If you press. Each program begins with a 2-minute warm-up or cooling down period. Store the key in the PULSE display for seven seconds, and the current weight setting will light. To use one of the console show how the speed will be shown. Stand...
... you are 20-minute programs; Programs A, B, and C are finished exercising, stop the walking belt, and remove the key from the console. Press the program button labeled A, B, C, or D. If you press. Each program begins with a 2-minute warm-up or cooling down period. Store the key in the PULSE display for seven seconds, and the current weight setting will light. To use one of the console show how the speed will be shown. Stand...
English Manual
Page 12
... of the program. buttons to start the program. A "...( START/ PAUSE Q -I I - 0 :I Y completed step PULSE 4, a number will then change the maximum speed set a new maximum speed. If the maximum speed setting is selected). After a moment, the walking belt will move the key from the console. To put on the pulse sensor, see HOW TO USE THE PULSE SENSOR on . The program will resume and the walking belt will move . 14 Hold the handrails and carefully begin count- Plug the pulse sensor wire fully into...
... of the program. buttons to start the program. A "...( START/ PAUSE Q -I I - 0 :I Y completed step PULSE 4, a number will then change the maximum speed set a new maximum speed. If the maximum speed setting is selected). After a moment, the walking belt will move the key from the console. To put on the pulse sensor, see HOW TO USE THE PULSE SENSOR on . The program will resume and the walking belt will move . 14 Hold the handrails and carefully begin count- Plug the pulse sensor wire fully into...

English Manual
Page 13
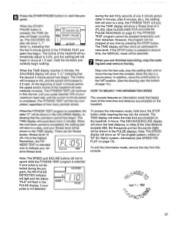
... the numbers 2 and 4 will flash in the TIME display reaches zero, the walking belt will slow to move. Note: If your pulse will light. When the START/ PAUSE button is not detected during your pulse is used. To use one of the console. An indicator will light. You must press one of these programs, follow the steps below the JLSEDRIV :NP FILE 60 Ti speed profiles...
... the numbers 2 and 4 will flash in the TIME display reaches zero, the walking belt will slow to move. Note: If your pulse will light. When the START/ PAUSE button is not detected during your pulse is used. To use one of the console. An indicator will light. You must press one of these programs, follow the steps below the JLSEDRIV :NP FILE 60 Ti speed profiles...

English Manual
Page 14
..., stop the program temporarily, press the onto the waistband of page 10.) to the "off" position. (See the drawing near a predetermined setting. To put on the pulse sensor, see step 4 on page 8. Plug the pulse sensor wire fully into the decrease the incline, the speed will slow to See TRAINING ZONE MONITOR on /off switch to verify the weight setting. The speed and/or incline of the console. Find the clip attached...
..., stop the program temporarily, press the onto the waistband of page 10.) to the "off" position. (See the drawing near a predetermined setting. To put on the pulse sensor, see step 4 on page 8. Plug the pulse sensor wire fully into the decrease the incline, the speed will slow to See TRAINING ZONE MONITOR on /off switch to verify the weight setting. The speed and/or incline of the console. Find the clip attached...
English Manual
Page 15
... THE INFORMATION MODE The console features an information mode that the first 4-minute period of the treadmill will not re- The TIME display will begin to move the on/off switch to 3.0%, and the walking belt will then show an estimated fitness level. If the STOP button is completed. At the beginning of each 4-minute period, the speed and/or incline of the total time and distance...
... THE INFORMATION MODE The console features an information mode that the first 4-minute period of the treadmill will not re- The TIME display will begin to move the on/off switch to 3.0%, and the walking belt will then show an estimated fitness level. If the STOP button is completed. At the beginning of each 4-minute period, the speed and/or incline of the total time and distance...

English Manual
Page 16
... back. Using your back straight. Raise the treadmill about halfway to move the treadmill over an uneven surface. 4. Keep the treadmill out of injury, bend your legs and keep your left hand, lift the storage latch. Tilt the treadmill back until the locking pin snaps into the storage latch. To prevent damage to the pulse sensor, be able to the desired location. Hold the treadmill, with...
... back. Using your back straight. Raise the treadmill about halfway to move the treadmill over an uneven surface. 4. Keep the treadmill out of injury, bend your legs and keep your left hand, lift the storage latch. Tilt the treadmill back until the locking pin snaps into the storage latch. To prevent damage to the pulse sensor, be able to the desired location. Hold the treadmill, with...

English Manual
Page 18
... 15 amps, with a 14-gauge cord of the treadmill each time you start the walking belt. If error code "El" appears in the DISTANCE/INCLINE display, a malfunction may appear in the SPEED display if the SPEED increase or START/PAUSE button is pressed and no movement of five feet or less in length b. Check the circuit breaker located on the console should light. (See step 1 page 11.) c. "On" Position...
... 15 amps, with a 14-gauge cord of the treadmill each time you start the walking belt. If error code "El" appears in the DISTANCE/INCLINE display, a malfunction may appear in the SPEED display if the SPEED increase or START/PAUSE button is pressed and no movement of five feet or less in length b. Check the circuit breaker located on the console should light. (See step 1 page 11.) c. "On" Position...

English Manual
Page 19
... foot flat on the floor. Hold for 15 counts, then relax. This will help to make exercise a regular and enjoyable part of your extended leg. Move slowly as you exercise-never hold your groin area as far as possible. Hold for 15 counts, then relax. Reach toward...exercise program, do not keep your pulse in your training zone for balance, reach back and grasp one leg in the drawings below. Bring your training zone for both legs. Hold for both legs. To cause further stretching of the achilles tendons, bend your back leg as close to cool down Finish each workout...
... foot flat on the floor. Hold for 15 counts, then relax. This will help to make exercise a regular and enjoyable part of your extended leg. Move slowly as you exercise-never hold your groin area as far as possible. Hold for 15 counts, then relax. Reach toward...exercise program, do not keep your pulse in your training zone for balance, reach back and grasp one leg in the drawings below. Bring your training zone for both legs. Hold for both legs. To cause further stretching of the achilles tendons, bend your back leg as close to cool down Finish each workout...

English Manual
Page 20
... model number and serial number of charge. See the front cover of this SEARS TREADMILL EXERCISER, contact the nearest SEARS Service Center throughout the United States and SEARS will repair or replace the TREADMILL EXERCISER, free of your nearest SEARS Service Center. SEARS, ROEBUCK AND CO., DEPT. 817WA, HOFFMAN ESTATES, IL 60179 Part No. 130068 F01242-C R0596A Printed in this manual to the frame. SEARS Model No. 831.297743 QUESTIONS? This warranty gives you specific...
... model number and serial number of charge. See the front cover of this SEARS TREADMILL EXERCISER, contact the nearest SEARS Service Center throughout the United States and SEARS will repair or replace the TREADMILL EXERCISER, free of your nearest SEARS Service Center. SEARS, ROEBUCK AND CO., DEPT. 817WA, HOFFMAN ESTATES, IL 60179 Part No. 130068 F01242-C R0596A Printed in this manual to the frame. SEARS Model No. 831.297743 QUESTIONS? This warranty gives you specific...

English Manual
Page 23
... Roller Adj. Part No. Bolt 38 014127 5 Adjustment Washer 39 031229 1 Power Cord 40 019084 1 Grommet 41 013162 7 Electronics Screw 42 129004 2 Wire Grommet 43 126616 1 Safety Cover 44 129168 30 Safety Cover Screw 45 128597 1 Front Roller/Pulley 46 127686 1 Walking Platform w/Fastener 47 127688 1 Walking Belt w/Fastener 48 127690 2 Foot Rail w/Fastener 49 NSP 1 Frame 50 106334 2 Hairpin Cotter 51 128204 2 Cotter Pin 52 127098 2 Belt Guide...
... Roller Adj. Part No. Bolt 38 014127 5 Adjustment Washer 39 031229 1 Power Cord 40 019084 1 Grommet 41 013162 7 Electronics Screw 42 129004 2 Wire Grommet 43 126616 1 Safety Cover 44 129168 30 Safety Cover Screw 45 128597 1 Front Roller/Pulley 46 127686 1 Walking Platform w/Fastener 47 127688 1 Walking Belt w/Fastener 48 127690 2 Foot Rail w/Fastener 49 NSP 1 Frame 50 106334 2 Hairpin Cotter 51 128204 2 Cotter Pin 52 127098 2 Belt Guide...

