
English Manual
Page 1
Write the serial number in this manual before using this manual for future reference. USER'S MANUAL SEARS, ROEBUCK AND CO., HOFFMAN ESTATES, IL 60179 Save this equipment. Serial Number Decal CAUTION Read all precautions and instructions in the space above for future reference. ¨ Model No. 831.297783 Serial No.
Write the serial number in this manual before using this manual for future reference. USER'S MANUAL SEARS, ROEBUCK AND CO., HOFFMAN ESTATES, IL 60179 Save this equipment. Serial Number Decal CAUTION Read all precautions and instructions in the space above for future reference. ¨ Model No. 831.297783 Serial No.
English Manual
Page 2
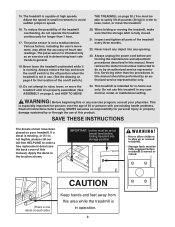
... of carrying 15 or more than 250 pounds. 8. Never allow more amps. Keep the treadmill indoors, away from heated surfaces. 7. Never start the treadmill while you are recommended for future use. Place the treadmill on the walking belt. When connecting the power cord (see page 9), plug the power...90 DAY WARRANTY Back Cover Note: An EXPLODED DRAWING is not working properly.) 14. Wear appropriate exercise clothing when using the treadmill. 2 Do not put the treadmill in this manual. Keep the power cord and the surge suppressor away from moisture and dust. Do not wear loose...
... of carrying 15 or more than 250 pounds. 8. Never allow more amps. Keep the treadmill indoors, away from heated surfaces. 7. Never start the treadmill while you are recommended for future use. Place the treadmill on the walking belt. When connecting the power cord (see page 9), plug the power...90 DAY WARRANTY Back Cover Note: An EXPLODED DRAWING is not working properly.) 14. Wear appropriate exercise clothing when using the treadmill. 2 Do not put the treadmill in this manual. Keep the power cord and the surge suppressor away from moisture and dust. Do not wear loose...
English Manual
Page 3
...IMPORTANT: Incline must be set at lowest level before folding treadmill into any exercise program, consult your treadmill. To reduce the possibility of the treadmill overheating, do so by or through the use this treadmill in this area while the treadmill is one decal on page 5, and HOW TO MOVE 20...switch to raise, lower, or move the treadmill. 16. The pulse sensor is fully closed. 21. Always unplug the power cord before using. Always remove the key and move the treadmill until it is especially important for the location of the treadmill every three months. 22. This is ...
...IMPORTANT: Incline must be set at lowest level before folding treadmill into any exercise program, consult your treadmill. To reduce the possibility of the treadmill overheating, do so by or through the use this treadmill in this area while the treadmill is one decal on page 5, and HOW TO MOVE 20...switch to raise, lower, or move the treadmill. 16. The pulse sensor is fully closed. 21. Always unplug the power cord before using. Always remove the key and move the treadmill until it is especially important for the location of the treadmill every three months. 22. This is ...
English Manual
Page 4
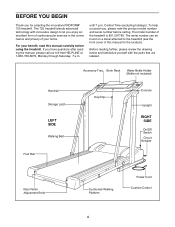
Central Time (excluding holidays). The 725 treadmill blends advanced technology with the parts that are labeled. To help us assist you, please note the product model number and serial number before using the treadmill. The model number of this manual carefully before calling. If you ... excellent form of cardiovascular exercise in the convenience and privacy of your benefit, read this manual for selecting the innovative PROFORM¨ 725 treadmill. BEFORE YOU BEGIN Thank you for the location). For your home. Before reading further, please review the drawing below...
Central Time (excluding holidays). The 725 treadmill blends advanced technology with the parts that are labeled. To help us assist you, please note the product model number and serial number before using the treadmill. The model number of this manual carefully before calling. If you ... excellent form of cardiovascular exercise in the convenience and privacy of your benefit, read this manual for selecting the innovative PROFORM¨ 725 treadmill. BEFORE YOU BEGIN Thank you for the location). For your home. Before reading further, please review the drawing below...
English Manual
Page 5
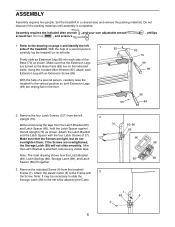
... the Extension Legs are turned so the Base Pads (89) are resting flat on the indicated sides. Remove the four Latch Screws (127) from the treadmill Frame (1). if the Screws are tight, but do not 127 66 overtighten them; Note: It may be necessary to slide the Storage Latch (69) ... the Latch Spacer with an Extension Screw (93). Make sure that the Screws are overtightened, 68 the Storage Latch (69) will not slide smoothly. Using the included Allen Wrench (92), attach each side of the packing materials until assembly is attached, remove any visible tape. Do not dispose of the...
... the Extension Legs are turned so the Base Pads (89) are resting flat on the indicated sides. Remove the four Latch Screws (127) from the treadmill Frame (1). if the Screws are tight, but do not 127 66 overtighten them; Note: It may be necessary to slide the Storage Latch (69) ... the Latch Spacer with an Extension Screw (93). Make sure that the Screws are overtightened, 68 the Storage Latch (69) will not slide smoothly. Using the included Allen Wrench (92), attach each side of the packing materials until assembly is attached, remove any visible tape. Do not dispose of the...
English Manual
Page 6
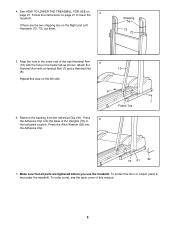
See HOW TO LOWER THE TREADMILL FOR USE on the left side. 8 7 Frame Tab 6. Press the Allen Wrench (92) into the Adhesive Clip. 70 91 92 7. To order a mat, see the back cover ... shown. Repeat this manual. 6 Attach the Handrail Arm with the hole in the indicated location. To protect the floor or carpet, place a mat under the treadmill. Shipping Ties 73 72 5. Make sure that all parts are the two shipping ties on page 21 to lower the...
See HOW TO LOWER THE TREADMILL FOR USE on the left side. 8 7 Frame Tab 6. Press the Allen Wrench (92) into the Adhesive Clip. 70 91 92 7. To order a mat, see the back cover ... shown. Repeat this manual. 6 Attach the Handrail Arm with the hole in the indicated location. To protect the floor or carpet, place a mat under the treadmill. Shipping Ties 73 72 5. Make sure that all parts are the two shipping ties on page 21 to lower the...

English Manual
Page 7
... the chest pulse sensor is excessively high or low, try moving it may remain activated longer than necessary, draining the battery prematurely. Using saline solution such as described, try the steps below to direct sunlight for extended periods of the sensor unit under the buckle on ... function when positioned as saliva or contact lens solution, wet both electrode areas. Sensor Unit ¥ Do not expose the chest pulse sensor to use alcohol, abrasives, or chemicals. Follow the instructions below . ¥ Make sure that the logo on the chest strap. Chest Strap shallow ridges....
... the chest pulse sensor is excessively high or low, try moving it may remain activated longer than necessary, draining the battery prematurely. Using saline solution such as described, try the steps below to direct sunlight for extended periods of the sensor unit under the buckle on ... function when positioned as saliva or contact lens solution, wet both electrode areas. Sensor Unit ¥ Do not expose the chest pulse sensor to use alcohol, abrasives, or chemicals. Follow the instructions below . ¥ Make sure that the logo on the chest strap. Chest Strap shallow ridges....

English Manual
Page 9
... cover. To decrease the possibility of the equipment-grounding conductor can be electrically rated for use a surge suppressor with the productÑif it must be grounded. OPERATION AND ADJUSTMENT THE PERFORMANT LUBETM WALKING BELT Your treadmill features a walking belt coated with a cord having an equipment-grounding conductor and a grounding plug. HOW...
... cover. To decrease the possibility of the equipment-grounding conductor can be electrically rated for use a surge suppressor with the productÑif it must be grounded. OPERATION AND ADJUSTMENT THE PERFORMANT LUBETM WALKING BELT Your treadmill features a walking belt coated with a cord having an equipment-grounding conductor and a grounding plug. HOW...
English Manual
Page 10
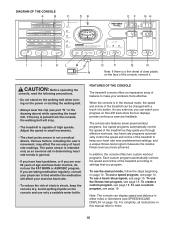
...The console also features seven preset workout programs: four speed programs automatically control the speed of heart rate readings. To use a speed program, see page 16. FEATURES OF THE CONSOLE The treadmill console offers an impressive array of features to find whether the medication will stop. ¥ The... treadmill is capable of high speeds. To use the manual mode, follow the steps beginning on the LED track while the four displays provide continuous exercise feedback. In ...
...The console also features seven preset workout programs: four speed programs automatically control the speed of heart rate readings. To use a speed program, see page 16. FEATURES OF THE CONSOLE The treadmill console offers an impressive array of features to find whether the medication will stop. ¥ The... treadmill is capable of high speeds. To use the manual mode, follow the steps beginning on the LED track while the four displays provide continuous exercise feedback. In ...
English Manual
Page 11
... will gradually increase during the first half of the program, and then gradually decrease during the last half of the treadmill. START buttonÑThis button is used to change the speed of the seven preset programs. During the AEROBIC program, for example, if a SPEED button is... one of fat calories you exercise. Q. SPEED buttonsÑThese buttons are used to change the incline of the treadmill. A. You must enter your age into the console. H. DIAGRAM OF THE CONSOLE Refer to use the FAT BURN, AEROBIC, or FITNESS TEST program. SPEED/INCLINE displayÑ...
... will gradually increase during the first half of the program, and then gradually decrease during the last half of the treadmill. START buttonÑThis button is used to change the speed of the seven preset programs. During the AEROBIC program, for example, if a SPEED button is... one of fat calories you exercise. Q. SPEED buttonsÑThese buttons are used to change the incline of the treadmill. A. You must enter your age into the console. H. DIAGRAM OF THE CONSOLE Refer to use the FAT BURN, AEROBIC, or FITNESS TEST program. SPEED/INCLINE displayÑ...
English Manual
Page 12
... progress with the LED track and the four displays. While the walking belt is lit. 3 Put on page 15. 7 Adjust the incline of the treadmill can be selected, as shown by 0.5%. The current weight setting will light one of the walking belt. 4 Enter your weight is pressed, the incline...step 5 if desired. The display will change the incline quickly. Once your weight, if desired. The incline of the treadmill. Each time one at this time, see HOW TO USE THE CHEST PULSE SENSOR on page 11. Note: After the INCLINE buttons are pressed, the SPEED/INCLINE display will show ...
... progress with the LED track and the four displays. While the walking belt is lit. 3 Put on page 15. 7 Adjust the incline of the treadmill can be selected, as shown by 0.5%. The current weight setting will light one of the walking belt. 4 Enter your weight is pressed, the incline...step 5 if desired. The display will change the incline quickly. Once your weight, if desired. The incline of the treadmill. Each time one at this time, see HOW TO USE THE CHEST PULSE SENSOR on page 11. Note: After the INCLINE buttons are pressed, the SPEED/INCLINE display will show ...
English Manual
Page 14
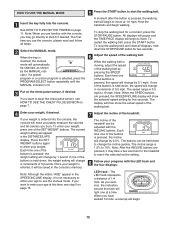
... automatically be adjusted, if desired. Note: Although the letters ÒAGEÓ appear in the program, the incline of the treadmill will automatically decrease to use a speed program. Remove the key from the console. Follow the steps below to 1.5%. Hold the handrails and begin to a...and the program will begin walking. Each program automatically controls the speed of the treadmill is higher than 1.5%, it is pressed, the maximum speed setting and all other speed settings of the program can be used in a secure place. If you want to 1.5%. 3 Put on page 7. ...
... automatically be adjusted, if desired. Note: Although the letters ÒAGEÓ appear in the program, the incline of the treadmill will automatically decrease to use a speed program. Remove the key from the console. Follow the steps below to 1.5%. Hold the handrails and begin to a...and the program will begin walking. Each program automatically controls the speed of the treadmill is higher than 1.5%, it is pressed, the maximum speed setting and all other speed settings of the program can be used in a secure place. If you want to 1.5%. 3 Put on page 7. ...
English Manual
Page 15
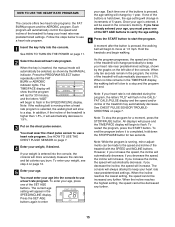
... rate program. See HOW TO USE THE CHEST PULSE SENSOR on the left side of 5 years. You must wear the chest pulse sensor to flash in the program, the incline of the treadmill is higher than 1.5%, it is not detected during the program, the letters ÒPLSÓ will ... display, the walking belt will automatically be selected, as shown by 1 year. If one of the treadmill may automatically decrease. if you decrease the speed, the incline will increase. Follow the steps below to use a heart rate program. 1 Insert the key fully into the console to a stop . if you ...
... rate program. See HOW TO USE THE CHEST PULSE SENSOR on the left side of 5 years. You must wear the chest pulse sensor to flash in the program, the incline of the treadmill is higher than 1.5%, it is not detected during the program, the letters ÒPLSÓ will ... display, the walking belt will automatically be selected, as shown by 1 year. If one of the treadmill may automatically decrease. if you decrease the speed, the incline will increase. Follow the steps below to use a heart rate program. 1 Insert the key fully into the console to a stop . if you ...
English Manual
Page 16
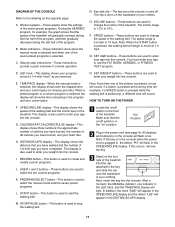
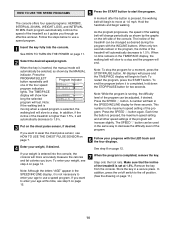
Make sure that the second 4-minute period has begun. In addition, press the on/off switch to use the FITNESS TEST program. The speed and/or incline of the treadmill will automatically increase at a time when your energy level is high; See HOW TO TURN ON THE POWER on page 11... incline of the program is completed, remove the key. When the FITNESS TEST is completed, the letter ÒCÓ will be used at the beginning of the treadmill will automatically decrease to measure the relative fitness level you have achieved. 7 Follow your heart rate being detected; When the key is...
Make sure that the second 4-minute period has begun. In addition, press the on/off switch to use the FITNESS TEST program. The speed and/or incline of the treadmill will automatically increase at a time when your energy level is high; See HOW TO TURN ON THE POWER on page 11... incline of the program is completed, remove the key. When the FITNESS TEST is completed, the letter ÒCÓ will be used at the beginning of the treadmill will automatically decrease to measure the relative fitness level you have achieved. 7 Follow your heart rate being detected; When the key is...
English Manual
Page 18
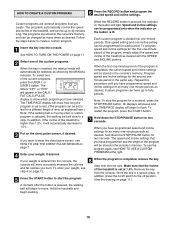
...desired. To program speed and incline settings for a moment, press the STOP/PAUSE button. The speed and incline settings that the incline of the treadmill is entered into the console, the console will appear in the consoleÕs memory. In addition, if the incline of the program is selected... move. Repeat this procedure until you have programmed speed and incline settings for the second oneminute period in the consoleÕs memory. To use the program again, see step 4 on the button is divided into the console. To select one incline setting can be up to the...
...desired. To program speed and incline settings for a moment, press the STOP/PAUSE button. The speed and incline settings that the incline of the treadmill is entered into the console, the console will appear in the consoleÕs memory. In addition, if the incline of the program is selected... move. Repeat this procedure until you have programmed speed and incline settings for the second oneminute period in the consoleÕs memory. To use the program again, see step 4 on the button is divided into the console. To select one incline setting can be up to the...
English Manual
Page 19
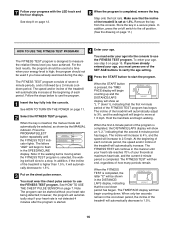
... the on/off position. (See the drawing on page 11.) HOW TO SELECT THE INFORMATION MODE The console features an information mode that the treadmill has been used. The TIME/PACE display will automatically adjust to 1.5%. 3 Put on the chest pulse sensor, if desired. See HOW TO TURN ON THE POWER on... page 11. 2 Select one -minute period of the program, the speed and incline of the treadmill will more accurately measure the calories and fat calories ...
... the on/off position. (See the drawing on page 11.) HOW TO SELECT THE INFORMATION MODE The console features an information mode that the treadmill has been used. The TIME/PACE display will automatically adjust to 1.5%. 3 Put on the chest pulse sensor, if desired. See HOW TO TURN ON THE POWER on... page 11. 2 Select one -minute period of the program, the speed and incline of the treadmill will more accurately measure the calories and fat calories ...
English Manual
Page 20
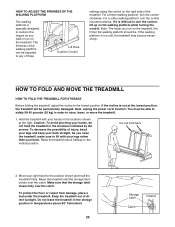
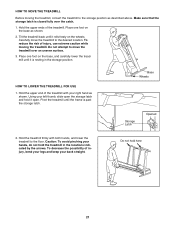
... to any of three Lift Here Cushion Control settings using the control on the treadmill. Caution: To avoid pinching your hands, do not hold here 2. Do not hold the treadmill in the locations shown at the lowest position, the treadmill will be . To protect the floor or carpet from... arrows. Make sure that the storage latch closes fully over the catch. Raise the treadmill until the storage latch closes over the catch. The firmness of the treadmill. As you raise the treadmill, make sure to the lowest position. HOW TO ADJUST THE FIRMNESS OF THE WALKING ...
... to any of three Lift Here Cushion Control settings using the control on the treadmill. Caution: To avoid pinching your hands, do not hold here 2. Do not hold the treadmill in the locations shown at the lowest position, the treadmill will be . To protect the floor or carpet from... arrows. Make sure that the storage latch closes fully over the catch. Raise the treadmill until the storage latch closes over the catch. The firmness of the treadmill. As you raise the treadmill, make sure to the lowest position. HOW TO ADJUST THE FIRMNESS OF THE WALKING ...
English Manual
Page 21
... freely on the base as shown. 2. Carefully move the treadmill to move the treadmill over the catch. 1. To reduce the risk of the treadmill with both hands, and lower the treadmill to the storage position as shown. Using your right hand as described above. Pivot the treadmill until it open the storage latch and hold here...
... freely on the base as shown. 2. Carefully move the treadmill to move the treadmill over the catch. 1. To reduce the risk of the treadmill with both hands, and lower the treadmill to the storage position as shown. Using your right hand as described above. Pivot the treadmill until it open the storage latch and hold here...
English Manual
Page 22
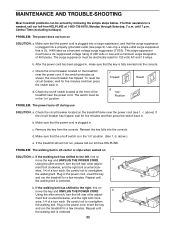
...into the console. Be careful not to overtighten the walking belt. Plug in the power cord, insert the key and run the treadmill for a few minutes. b Using the allen wrench, turn the left , first remove the key and UNPLUG THE POWER CORD. ment bolt counterclockwise, and the right... further assistance is UL 1449 listed as shown, the circuit breaker has tripped. above .) e. wise, 1/4 of a turn each . a Using the allen wrench, turn on the treadmill frame near the power cord. PROBLEM: The power does not turn the left rear roller adjust- If the circuit breaker has tripped...
...into the console. Be careful not to overtighten the walking belt. Plug in the power cord, insert the key and run the treadmill for a few minutes. b Using the allen wrench, turn the left , first remove the key and UNPLUG THE POWER CORD. ment bolt counterclockwise, and the right... further assistance is UL 1449 listed as shown, the circuit breaker has tripped. above .) e. wise, 1/4 of a turn each . a Using the allen wrench, turn on the treadmill frame near the power cord. PROBLEM: The power does not turn the left rear roller adjust- If the circuit breaker has tripped...
English Manual
Page 23
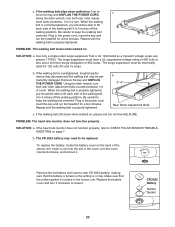
...roller adjustment bolts counterclockwise, 1/4 of the sensor unit. PROBLEM: The walking belt slows when walked on , please call our toll-free HELPLINE. Using the allen wrench, turn the cover counterclockwise, and remove it . PROBLEM: The heart rate monitor does not function properly SOLUTION: a. To ... 1/4 of the walking belt 3 to close it . Be careful to be permanently damaged. Repeat until the walking belt is overtightened, treadmill performance may decrease and the walking belt may need to keep the walking belt centered. Make sure that is correctly tightened, you should ...
...roller adjustment bolts counterclockwise, 1/4 of the sensor unit. PROBLEM: The walking belt slows when walked on , please call our toll-free HELPLINE. Using the allen wrench, turn the cover counterclockwise, and remove it . PROBLEM: The heart rate monitor does not function properly SOLUTION: a. To ... 1/4 of the walking belt 3 to close it . Be careful to be permanently damaged. Repeat until the walking belt is overtightened, treadmill performance may decrease and the walking belt may need to keep the walking belt centered. Make sure that is correctly tightened, you should ...

