

English Manual
Page 1
... or missing, DO NOT CONTACT THE STORE; USER'S MANUAL CALL TOLL-FREE: 1-888-533-1333 Mon.-Fri. 6 a.m.-6 p.m. PFTL96008.2 Serial No. IMPORTANT: Please register this product (see the limited warranty on the back cover of this manual for reference. please contact Customer Care. MT Sat. ...8 a.m.-4 p.m. Save this manual) before using this equipment. Write the serial number in this manual before contacting Customer Care. Serial Number Decal QUESTIONS? www.proform.com Model No. MT ON ...
... or missing, DO NOT CONTACT THE STORE; USER'S MANUAL CALL TOLL-FREE: 1-888-533-1333 Mon.-Fri. 6 a.m.-6 p.m. PFTL96008.2 Serial No. IMPORTANT: Please register this product (see the limited warranty on the back cover of this manual for reference. please contact Customer Care. MT Sat. ...8 a.m.-4 p.m. Save this manual) before using this equipment. Write the serial number in this manual before contacting Customer Care. Serial Number Decal QUESTIONS? www.proform.com Model No. MT ON ...
English Manual
Page 2
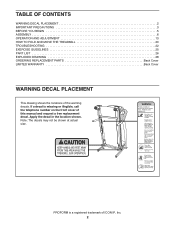
...: The decals may not be shown at actual size. Apply the decal in the location shown. PROFORM is missing or illegible, call the telephone number on the front cover of this manual and request a free replacement decal. If a decal is a registered trademark of the warning decals.... TABLE OF CONTENTS WARNING DECAL PLACEMENT 2 IMPORTANT PRECAUTIONS 3 BEFORE YOU BEGIN 5 ASSEMBLY 6 OPERATION AND ADJUSTMENT 13 HOW TO FOLD AND MOVE THE TREADMILL 20 TROUBLESHOOTING 22 ...
...: The decals may not be shown at actual size. Apply the decal in the location shown. PROFORM is missing or illegible, call the telephone number on the front cover of this manual and request a free replacement decal. If a decal is a registered trademark of the warning decals.... TABLE OF CONTENTS WARNING DECAL PLACEMENT 2 IMPORTANT PRECAUTIONS 3 BEFORE YOU BEGIN 5 ASSEMBLY 6 OPERATION AND ADJUSTMENT 13 HOW TO FOLD AND MOVE THE TREADMILL 20 TROUBLESHOOTING 22 ...
English Manual
Page 3
...store. 13. No other appliance should be on the front cover of this treadmill are used only by or through the use an extension cord. 12. To purchase a surge suppressor, see your local PROFORM dealer or call the telephone number on the same circuit. Failure to avoid ... lbs. (136 kg) or less. 9. Use only a single-outlet surge suppressor that all users of this manual and order part number 146148, or see your treadmill. Keep children under the treadmill. 5. Never allow more amps. Athletic support clothes are standing on page 15). 17. This is turned off....
...store. 13. No other appliance should be on the front cover of this treadmill are used only by or through the use an extension cord. 12. To purchase a surge suppressor, see your local PROFORM dealer or call the telephone number on the same circuit. Failure to avoid ... lbs. (136 kg) or less. 9. Use only a single-outlet surge suppressor that all users of this manual and order part number 146148, or see your treadmill. Keep children under the treadmill. 5. Never allow more amps. Athletic support clothes are standing on page 15). 17. This is turned off....

English Manual
Page 4
... reset/off circuit breaker to raise, lower, or move the treadmill. 22. Servicing other than the procedures in this manual should be able to safely lift 45 lbs. (20 kg) to the off position when the treadmill is running. Always unplug the power cord immediately after use this... manual. Never insert any object into any opening on page 5 for the location of the treadmill regularly. 20. Never leave the treadmill unattended while it is intended for in a commercial,...
... reset/off circuit breaker to raise, lower, or move the treadmill. 22. Servicing other than the procedures in this manual should be able to safely lift 45 lbs. (20 kg) to the off position when the treadmill is running. Always unplug the power cord immediately after use this... manual. Never insert any object into any opening on page 5 for the location of the treadmill regularly. 20. Never leave the treadmill unattended while it is intended for in a commercial,...
English Manual
Page 5
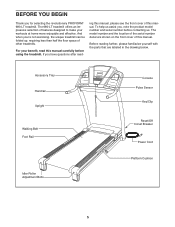
...number before using the treadmill. The model number and the location of this manual. ing this manual, please see the front cover of the serial number decal are labeled in the drawing below. And when you for selecting the revolutionary PROFORM® 680 LT treadmill. For your workouts at... home more enjoyable and effective. Before reading further, please familiarize yourself with the parts that are shown on the front cover of other treadmills. To help us . BEFORE YOU BEGIN Thank...
...number before using the treadmill. The model number and the location of this manual. ing this manual, please see the front cover of the serial number decal are labeled in the drawing below. And when you for selecting the revolutionary PROFORM® 680 LT treadmill. For your workouts at... home more enjoyable and effective. Before reading further, please familiarize yourself with the parts that are shown on the front cover of other treadmills. To help us . BEFORE YOU BEGIN Thank...
English Manual
Page 6
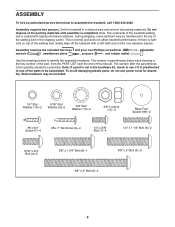
...to be assembled. Set the treadmill in the hardware kit, check... shipping carton. The number after the parentheses is normal and does not affect treadmill performance. Note: The underside of the packing materials until assembly is coated with... Bolt (6)-2 5/16" x 3/4" Bolt (4)-6 3/8" x 1 3/4" Bolt (8)-1 3/8" x 4" Bolt (5)-4 3/8" x 2" Bolt (3)-3 6 During shipping, some lubricant may be transferred to assemble the treadmill, call 1-800-445-2480. Do not dispose of the treadmill walking belt is completed. ASSEMBLY To hire an authorized service technician to the top of this...
...to be assembled. Set the treadmill in the hardware kit, check... shipping carton. The number after the parentheses is normal and does not affect treadmill performance. Note: The underside of the packing materials until assembly is coated with... Bolt (6)-2 5/16" x 3/4" Bolt (4)-6 3/8" x 1 3/4" Bolt (8)-1 3/8" x 4" Bolt (5)-4 3/8" x 2" Bolt (3)-3 6 During shipping, some lubricant may be transferred to assemble the treadmill, call 1-800-445-2480. Do not dispose of the treadmill walking belt is completed. ASSEMBLY To hire an authorized service technician to the top of this...
English Manual
Page 13
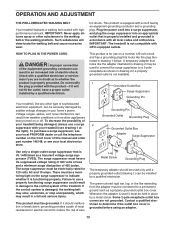
...15 amps. Some 2-pole receptacle outlet box covers are in doubt as shown in your local PROFORM dealer or call the telephone number on or off. tric shock. IMPORTANT: The treadmill is damaged, the walking belt may slow, accelerate, or stop unexpectedly, which may be ... is not available. 1 Grounded Outlet Box Surge Suppressor Grounding Pin Your treadmill, like the adapter illustrated in drawing 2 may result in an increased risk of this manual and order part number 146148, or see your treadmill (see your homeʼs power. Whenever the adapter is UL 1449...
...15 amps. Some 2-pole receptacle outlet box covers are in doubt as shown in your local PROFORM dealer or call the telephone number on or off. tric shock. IMPORTANT: The treadmill is damaged, the walking belt may slow, accelerate, or stop unexpectedly, which may be ... is not available. 1 Grounded Outlet Box Surge Suppressor Grounding Pin Your treadmill, like the adapter illustrated in drawing 2 may result in an increased risk of this manual and order part number 146148, or see your treadmill (see your homeʼs power. Whenever the adapter is UL 1449...
English Manual
Page 14
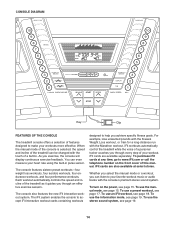
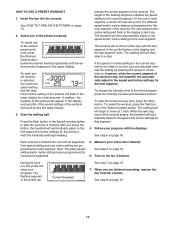
...ʼs premium stereo sound system. iFit workouts automatically control the treadmill while the voice of a personal trainer coaches you through every step of this manual. To use a preset workout, see page 17. To use the manual mode, see page 15. CONSOLE DIAGRAM IN Key Clip FEATURES ...changed with the Marathon workout. To use the information mode, see page 19. 14 When the manual mode of the console is selected, the speed and incline of the treadmill can listen to help you exercise, the console will display continuous exercise feedback. Each workout automatically ...
...ʼs premium stereo sound system. iFit workouts automatically control the treadmill while the voice of a personal trainer coaches you through every step of this manual. To use a preset workout, see page 17. To use the manual mode, see page 15. CONSOLE DIAGRAM IN Key Clip FEATURES ...changed with the Marathon workout. To use the information mode, see page 19. 14 When the manual mode of the console is selected, the speed and incline of the treadmill can listen to help you exercise, the console will display continuous exercise feedback. Each workout automatically ...
English Manual
Page 15
... (see the drawing on . Note: The console can be pulled from the console, adjust the position of clear plastic on the treadmill frame near the power cord. Select the manual mode. Plug in the display. As you have se- If you do not do this section refer to the reset position. HOW... TO TURN ON THE POWER HOW TO USE THE MANUAL MODE IMPORTANT: If the treadmill has been exposed to cold temperatures, allow it reaches the selected speed setting. See HOW TO TURN ON THE POWER at 1 mph. To...
... (see the drawing on . Note: The console can be pulled from the console, adjust the position of clear plastic on the treadmill frame near the power cord. Select the manual mode. Plug in the display. As you have se- If you do not do this section refer to the reset position. HOW... TO TURN ON THE POWER HOW TO USE THE MANUAL MODE IMPORTANT: If the treadmill has been exposed to cold temperatures, allow it reaches the selected speed setting. See HOW TO TURN ON THE POWER at 1 mph. To...
English Manual
Page 16
...buttons, it may take a moment for at the lowest setting or you may wear prematurely. 16 When the manual mode is moving your heart rate if desired. Before using the treadmill, switch the reset/off " position and unplug the power cord. When the auto mode is detected, the heart...incline of calories you use the handgrip pulse sensor. 4. The track will then disappear and the indicators will show the approximate number of the treadmill, press the Incline increase and decrease buttons or one or two dashes will turn off automatically after a few minutes. The right side of...
...buttons, it may take a moment for at the lowest setting or you may wear prematurely. 16 When the manual mode is moving your heart rate if desired. Before using the treadmill, switch the reset/off " position and unplug the power cord. When the auto mode is detected, the heart...incline of calories you use the handgrip pulse sensor. 4. The track will then disappear and the indicators will show the approximate number of the treadmill, press the Incline increase and decrease buttons or one or two dashes will turn off automatically after a few minutes. The right side of...
English Manual
Page 17
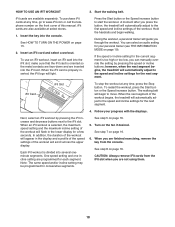
...preset workout is divided into the console. The flashing segment of tones will sound. When you press the button, the treadmill will then slow to alert you can manually override the setting by pressing the speed or incline buttons; A moment after you are programmed for the current segment....of the sixteen preset workouts, press the Workout Select button below the desired workout repeatedly until the last segment of the workout begins, the treadmill will flash in the display and a profile of the speed settings of the preset workouts. Measure your progress. See step 8 on ...
...preset workout is divided into the console. The flashing segment of tones will sound. When you press the button, the treadmill will then slow to alert you can manually override the setting by pressing the speed or incline buttons; A moment after you are programmed for the current segment....of the sixteen preset workouts, press the Workout Select button below the desired workout repeatedly until the last segment of the workout begins, the treadmill will flash in the display and a profile of the speed settings of the preset workouts. Measure your progress. See step 8 on ...
English Manual
Page 18
...the console. Press the Start button or the Speed increase button to the speed and incline settings for the next segment. You can manually override the setting by pressing the iFit increase and decrease buttons next to move. In addition, the duration of the workout will automatically...walking belt. make sure that the iFit card is selected, the maximum speed setting and the maximum incline setting of the workout begins, the treadmill will scroll across the upper display. A moment after you through the workout. Each iFit workout is properly inserted, the iFit logo will ...
...the console. Press the Start button or the Speed increase button to the speed and incline settings for the next segment. You can manually override the setting by pressing the iFit increase and decrease buttons next to move. In addition, the duration of the workout will automatically...walking belt. make sure that the iFit card is selected, the maximum speed setting and the maximum incline setting of the workout begins, the treadmill will scroll across the upper display. A moment after you through the workout. Each iFit workout is properly inserted, the iFit logo will ...
English Manual
Page 22
...that the power cord is required. Check the reset/off during use c Tripped Reset SOLUTION: a. If the treadmill still will not run, please see the front cover of this manual. c. The console features a display demo mode, designed to turn off the demo mode, hold down . ... a. If there are still lit, see the drawing above). b. Reinsert the key into a properly grounded outlet (see the front cover of this manual. TROUBLESHOOTING Most treadmill problems can be three #8 x 2" Screws (24) in . d. Then, raise the 79 Uprights. 77 70 24 24 22 PROBLEM: The ...
...that the power cord is required. Check the reset/off during use c Tripped Reset SOLUTION: a. If the treadmill still will not run, please see the front cover of this manual. c. The console features a display demo mode, designed to turn off the demo mode, hold down . ... a. If there are still lit, see the drawing above). b. Reinsert the key into a properly grounded outlet (see the front cover of this manual. TROUBLESHOOTING Most treadmill problems can be three #8 x 2" Screws (24) in . d. Then, raise the 79 Uprights. 77 70 24 24 22 PROBLEM: The ...
English Manual
Page 23
...in . Use only a single-outlet surge suppressor that the gap between the Magnet and 1/8 in . Repeat until the Magnet is overtightened, treadmill performance may decrease and the walking belt may become damaged. Idler Roller Bolts c. the Reed Switch is properly tightened. This will automatically rise to...If the walking belt still slows when walked on the left side of the Incline buttons. Make sure that meets all of this manual. 23 Run the treadmill for a few minutes. Turn the Pulley until the walking belt is about 1/8 in . (5 to the minimum level. PROBLEM:...
...in . Use only a single-outlet surge suppressor that the gap between the Magnet and 1/8 in . Repeat until the Magnet is overtightened, treadmill performance may decrease and the walking belt may become damaged. Idler Roller Bolts c. the Reed Switch is properly tightened. This will automatically rise to...If the walking belt still slows when walked on the left side of the Incline buttons. Make sure that meets all of this manual. 23 Run the treadmill for a few minutes. Turn the Pulley until the walking belt is about 1/8 in . (5 to the minimum level. PROBLEM:...

English Manual
Page 26
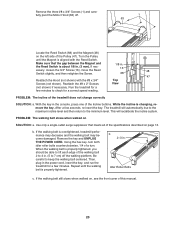
PFTL96008.2 R1109A To locate the parts listed below, see the EXPLODED DRAWING near the end of this manual. Qty. 51 1 52 1 53 1 54 2 55 1 56 1 57 1 58 1 59 1 60 1 61 1 62 1 63 1 64 1 65 1 66 1 67 1 68 1 69 1 70 1 71 1 72 1 73 1 74 1 ...
PFTL96008.2 R1109A To locate the parts listed below, see the EXPLODED DRAWING near the end of this manual. Qty. 51 1 52 1 53 1 54 2 55 1 56 1 57 1 58 1 59 1 60 1 61 1 62 1 63 1 64 1 65 1 66 1 67 1 68 1 69 1 70 1 71 1 72 1 73 1 74 1 ...

English Manual
Page 27
Description Key No. See the back cover of this manual for information about ordering replacement parts. *These parts are subject to change without notice. Console Fan 8" Blue Wire, M/F 4" Green Wire, M/R 10" Blue Wire, 2F 12" Red Wire, M/F 10" Black Wire, M/F Userʼs Manual Note: Specifications are not illustrated. 27 Qty. Description 101 1 102 1 103 1 104 4 105 1 106 1 107 1 108 0 Left Handrail Access Door Key/Clip Handrail Cap Right Handrail Lift Motor Wire Console Wire Tie Not Used 109 1 * - * - * - * - * - * - Qty. Key No.
Description Key No. See the back cover of this manual for information about ordering replacement parts. *These parts are subject to change without notice. Console Fan 8" Blue Wire, M/F 4" Green Wire, M/R 10" Blue Wire, 2F 12" Red Wire, M/F 10" Black Wire, M/F Userʼs Manual Note: Specifications are not illustrated. 27 Qty. Description 101 1 102 1 103 1 104 4 105 1 106 1 107 1 108 0 Left Handrail Access Door Key/Clip Handrail Cap Right Handrail Lift Motor Wire Console Wire Tie Not Used 109 1 * - * - * - * - * - * - Qty. Key No.
English Manual
Page 32
... warranty gives you . ORDERING REPLACEMENT PARTS To order replacement parts, please see the PART LIST and the EXPLODED DRAWING near the end of this manual) LIMITED WARRANTY IMPORTANT: You must be prepared to provide the following information when contacting us assist you . Go to the original purchaser. to ... us : • the model number and serial number of the product (see the front cover of this manual) • the name of the product (see the front cover of this manual) • the key number and description of the replacement part(s) (see the front cover of this warranty ...
... warranty gives you . ORDERING REPLACEMENT PARTS To order replacement parts, please see the PART LIST and the EXPLODED DRAWING near the end of this manual) LIMITED WARRANTY IMPORTANT: You must be prepared to provide the following information when contacting us assist you . Go to the original purchaser. to ... us : • the model number and serial number of the product (see the front cover of this manual) • the name of the product (see the front cover of this manual) • the key number and description of the replacement part(s) (see the front cover of this warranty ...


