

User Manual
Page 3
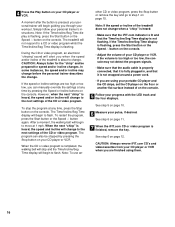
... by an authorised service representative only. 28. ICON assumes no longer than the procedures in order to raise, lower, or move the walking belt whilst the power is turned off switch.) 19. Never start the treadmill whilst you when the speed and/or incline of the CD or ...video program. 25. The treadmill is running. The pulse sensor is not working properly. (See BEFORE YOU BEGIN on the walking belt. Always remove the key, unplug the power cord and move the treadmill until it is capable of the treadmill by an authorised service representative. ...
... by an authorised service representative only. 28. ICON assumes no longer than the procedures in order to raise, lower, or move the walking belt whilst the power is turned off switch.) 19. Never start the treadmill whilst you when the speed and/or incline of the CD or ...video program. 25. The treadmill is running. The pulse sensor is not working properly. (See BEFORE YOU BEGIN on the walking belt. Always remove the key, unplug the power cord and move the treadmill until it is capable of the treadmill by an authorised service representative. ...
User Manual
Page 5
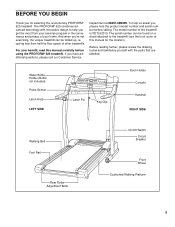
... in the convenience and privacy of this manual carefully before calling. For your benefit, read this manual for selecting the revolutionary PROFORM® 620 treadmill. The serial number can be found on a decal attached to help us assist you for the location). Water Bottle Holder...Console Handrail RIGHT SIDE Walking Belt Foot Rail Rear Roller Adjustment Bolts On/Off Switch Circuit Breaker Front Wheel Cushioned Walking Platform 5 BEFORE YOU BEGIN Thank you , please note the product model number and serial number before using the PROFORM® 620 treadmill. And when you...
... in the convenience and privacy of this manual carefully before calling. For your benefit, read this manual for selecting the revolutionary PROFORM® 620 treadmill. The serial number can be found on a decal attached to help us assist you for the location). Water Bottle Holder...Console Handrail RIGHT SIDE Walking Belt Foot Rail Rear Roller Adjustment Bolts On/Off Switch Circuit Breaker Front Wheel Cushioned Walking Platform 5 BEFORE YOU BEGIN Thank you , please note the product model number and serial number before using the PROFORM® 620 treadmill. And when you...
User Manual
Page 6
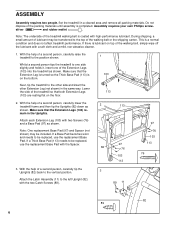
During shipping, a small amount of lubricant may be transferred to the top of the walking belt or the shipping carton. With the help of the walking belt, simply wipe off the lubricant with two Screws (76) and a Base Pad (97) as shown. Attach each Extension Leg (103) with a soft cloth ...a second person, carefully lower the treadmill frame and then tip the Uprights (82) down as shown. With the help of the treadmill walking belt is on the floor. 1 103 113 2. Lower the side of the packing materials until assembly is a normal condition and does not affect treadmill performance....
During shipping, a small amount of lubricant may be transferred to the top of the walking belt or the shipping carton. With the help of the walking belt, simply wipe off the lubricant with two Screws (76) and a Base Pad (97) as shown. Attach each Extension Leg (103) with a soft cloth ...a second person, carefully lower the treadmill frame and then tip the Uprights (82) down as shown. With the help of the treadmill walking belt is on the floor. 1 103 113 2. Lower the side of the packing materials until assembly is a normal condition and does not affect treadmill performance....
User Manual
Page 7
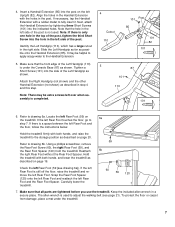
... Handrail Extension by tightening three Short Screws (101) into the hole in the post. Hold the treadmill firmly with a rubber mallet to adjust the walking belt (see drawing 6a]). Reattach the right Rear Foot without the Rear Foot Spacer. Slide the Left Handgrip as far as described on page 19. 59...
... Handrail Extension by tightening three Short Screws (101) into the hole in the post. Hold the treadmill firmly with a rubber mallet to adjust the walking belt (see drawing 6a]). Reattach the right Rear Foot without the Rear Foot Spacer. Slide the Left Handgrip as far as described on page 19. 59...
User Manual
Page 8
... Improper connection of at least 1mm2, with a qualified electrician or serviceman if you are included. If it will deteriorate the walking belt and cause excessive wear. Outlet Use only a power cord type H05VV-F with a conductor of the equipment-earthing conductor can result...the power cord into an appropriate outlet that will fit your outlet. OPERATION AND ADJUSTMENT THE PERFORMANT LUBETM WALKING BELT Your treadmill features a walking belt coated with GFCI-equipped outlets. IMPORTANT: Never apply silicone spray or other substances to drawing 2. Plug the indicated...
... Improper connection of at least 1mm2, with a qualified electrician or serviceman if you are included. If it will deteriorate the walking belt and cause excessive wear. Outlet Use only a power cord type H05VV-F with a conductor of the equipment-earthing conductor can result...the power cord into an appropriate outlet that will fit your outlet. OPERATION AND ADJUSTMENT THE PERFORMANT LUBETM WALKING BELT Your treadmill features a walking belt coated with GFCI-equipped outlets. IMPORTANT: Never apply silicone spray or other substances to drawing 2. Plug the indicated...
User Manual
Page 9
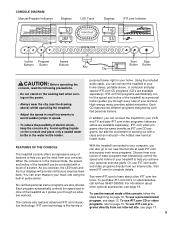
... Buttons Button Buttons Key Clip Start Stop Button Button CAUTION: Before operating the console, read the following precautions. • Do not stand on the walking belt when turning on the power. • Always wear the clip (see the drawing above) whilst operating the treadmill. • Adjust the speed in small increments...
... Buttons Button Buttons Key Clip Start Stop Button Button CAUTION: Before operating the console, read the following precautions. • Do not stand on the walking belt when turning on the power. • Always wear the clip (see the drawing above) whilst operating the treadmill. • Adjust the speed in small increments...
User Manual
Page 10
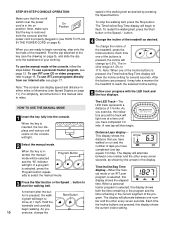
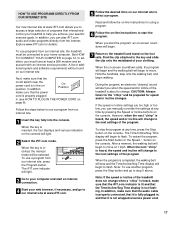
... Speed Display on page 8). The Time/Incline/Seg Time display will begin to select the manual mode. Find the clip attached to start the walking belt. The LED Track-The HOW TO USE THE MANUAL MODE LED track represents a distance of the treadmill as desired. When the key is pressed, the....com program is inserted, the manual mode will To use iFIT.com programs directly from the console and the On Position To stop the walking belt, press the Stop button. display shows the elapsed time. Each time one lap equals 1/4 mile). To use iFIT.com CD or video programs, refer to...
... Speed Display on page 8). The Time/Incline/Seg Time display will begin to select the manual mode. Find the clip attached to start the walking belt. The LED Track-The HOW TO USE THE MANUAL MODE LED track represents a distance of the treadmill as desired. When the key is pressed, the....com program is inserted, the manual mode will To use iFIT.com programs directly from the console and the On Position To stop the walking belt, press the Stop button. display shows the elapsed time. Each time one lap equals 1/4 mile). To use iFIT.com CD or video programs, refer to...
User Manual
Page 11
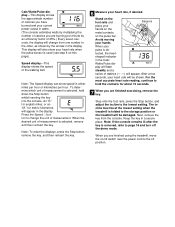
... efficiency factor of 25%.) Every seven seconds, the display will change the unit of measurement. Speed display-This display shows the speed of the walking belt. tected, the heart- Step onto the foot rails, press the Stop button, and adjust the incline to the off the demo mode. Note: The Speed...
... efficiency factor of 25%.) Every seven seconds, the display will change the unit of measurement. Speed display-This display shows the speed of the walking belt. tected, the heart- Step onto the foot rails, press the Stop button, and adjust the incline to the off the demo mode. Note: The Speed...
User Manual
Page 12
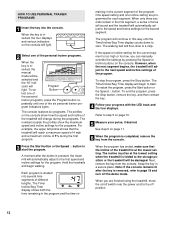
... Time display shows both the time remaining in - One speed setting and one of the personal trainer programs, press the Program button re- The walking belt will be at the lowest setting. To end the program, press the Stop button, remove the key, and then reinsert the key. 4 Follow your pulse...
... Time display shows both the time remaining in - One speed setting and one of the personal trainer programs, press the Program button re- The walking belt will be at the lowest setting. To end the program, press the Stop button, remove the key, and then reinsert the key. 4 Follow your pulse...
User Manual
Page 16
... to move at any time by pressing the Stop button on page 11. 7 When the iFIT.com CD or video program is completed, the walking belt will stop the program at 1 mph. See step 5 on the console. 5 Follow your progress with the LED track and the four displays. After a moment, ...the walking belt will alert you through your workout. If the volume is not wrapped around a power cord. • If you are using them. 16 CAUTION: Always remove...
... to move at any time by pressing the Stop button on page 11. 7 When the iFIT.com CD or video program is completed, the walking belt will stop the program at 1 mph. See step 5 on the console. 5 Follow your progress with the LED track and the four displays. After a moment, ...the walking belt will alert you through your workout. If the volume is not wrapped around a power cord. • If you are using them. 16 CAUTION: Always remove...
User Manual
Page 17
...will stop the program at least a 56K modem and an account with an internet service provider. When the next "chirp" is completed, the walking belt will alert you start the program. To use a program from the internet. See HOW TO CONNECT YOUR COMPUTER on the console. When the key ... or incline of additional system and software requirements will begin walking. When the program is heard, the speed and incline will begin and the walking belt will change to change when a "chirp" is heard, make sure that the audio cable is properly connected, that the Time/Incline/Seg Time...
...will stop the program at least a 56K modem and an account with an internet service provider. When the next "chirp" is completed, the walking belt will alert you start the program. To use a program from the internet. See HOW TO CONNECT YOUR COMPUTER on the console. When the key ... or incline of additional system and software requirements will begin walking. When the program is heard, the speed and incline will begin and the walking belt will change to change when a "chirp" is heard, make sure that the audio cable is properly connected, that the Time/Incline/Seg Time...
User Manual
Page 18
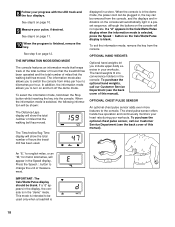
The Time/Incline/Seg Time display will show the total number of miles that the walking belt has moved. OPTIONAL HAND WEIGHTS Optional hand weights let you to change the unit of this manual). OPTIONAL CHEST PULSE SENSOR An optional chest pulse ... appear in the console. To purchase the optional chest pulse sensor, call our Customer Service Department (see the back cover of miles that the walking belt has moved. Press the Speed v button to turn on page 10. 9 Measure your workouts. This mode is intended to switch the console from the console...
The Time/Incline/Seg Time display will show the total number of miles that the walking belt has moved. OPTIONAL HAND WEIGHTS Optional hand weights let you to change the unit of this manual). OPTIONAL CHEST PULSE SENSOR An optional chest pulse ... appear in the console. To purchase the optional chest pulse sensor, call our Customer Service Department (see the back cover of miles that the walking belt has moved. Press the Speed v button to turn on page 10. 9 Measure your workouts. This mode is intended to switch the console from the console...

User Manual
Page 21
...SOLUTION: a. Plug in the power cord, insert the key and run the tread- The treadmill will recalibrate the incline. 21 PROBLEM: The walking belt slows when walked on SOLUTION: a. Be careful not to the left, first remove the key and UNPLUG THE POWER CORD. Whilst the incline is... key and UNPLUG THE POWER CORD. b Using the allen wrench, turn . b 5-7 cm Rear Roller Adjustment Bolts c. Be careful not to keep the walking belt centred. PROBLEM: The incline of the Incline buttons. Remove the key and UNPLUG THE POWER CORD. wise, 1/4 of a turn the left rear roller adjustment bolt...
...SOLUTION: a. Plug in the power cord, insert the key and run the tread- The treadmill will recalibrate the incline. 21 PROBLEM: The walking belt slows when walked on SOLUTION: a. Be careful not to the left, first remove the key and UNPLUG THE POWER CORD. Whilst the incline is... key and UNPLUG THE POWER CORD. b Using the allen wrench, turn . b 5-7 cm Rear Roller Adjustment Bolts c. Be careful not to keep the walking belt centred. PROBLEM: The incline of the Incline buttons. Remove the key and UNPLUG THE POWER CORD. wise, 1/4 of a turn the left rear roller adjustment bolt...
User Manual
Page 23
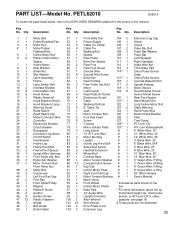
... 95 2 96 1 97 2 98 1 99 2 100 1 101 23 102 2 103 2 Front Belly Pan Power Supply Cable Tie Clamp Cable Tie Walking Belt Splitter Rear Roller Belly Pan Spacer Rear Foot Rear Foot Screw Ground Wire Ground Wire Screw Belly Pan Rear Endcap Rear Roller Adj. Bolt Motor... Green Wire, F/Ring 8" Green Wire, 2 Ring 25" Wire Harness User's Manual * Includes all parts shown in the centre of this manual. Qty. Qty. Description 1 1 Motor Belt 2 1 Pulley/Flywheel/Fan 3 4 Motor Nut 4* 1 Motor/Pulley/ Flywheel/Fan 5 1 Incline Motor Bolt 6 2 Plastic Incline Motor Spacer 7 1 Incline Motor 8 1 Stop Bracket...
... 95 2 96 1 97 2 98 1 99 2 100 1 101 23 102 2 103 2 Front Belly Pan Power Supply Cable Tie Clamp Cable Tie Walking Belt Splitter Rear Roller Belly Pan Spacer Rear Foot Rear Foot Screw Ground Wire Ground Wire Screw Belly Pan Rear Endcap Rear Roller Adj. Bolt Motor... Green Wire, F/Ring 8" Green Wire, 2 Ring 25" Wire Harness User's Manual * Includes all parts shown in the centre of this manual. Qty. Qty. Description 1 1 Motor Belt 2 1 Pulley/Flywheel/Fan 3 4 Motor Nut 4* 1 Motor/Pulley/ Flywheel/Fan 5 1 Incline Motor Bolt 6 2 Plastic Incline Motor Spacer 7 1 Incline Motor 8 1 Stop Bracket...


