

User Manual
Page 1
... KEY NUMBER OF THE PART(S) (see the PART LIST on page 23 and the EXPLODED DRAWING attached in USA © 2000 ICON Health & Fitness, Inc. PETL61591 Serial No. Save this equipment. office, or write: ICON Health & Fitness Ltd. Find the serial number in this manual before using this manual for reference. HOW TO ORDER REPLACEMENT PARTS To order replacement parts, contact the ICON Health & Fitness Ltd. Write the serial number in the space above for future reference. ¨ USER'S MANUAL...
... KEY NUMBER OF THE PART(S) (see the PART LIST on page 23 and the EXPLODED DRAWING attached in USA © 2000 ICON Health & Fitness, Inc. PETL61591 Serial No. Save this equipment. office, or write: ICON Health & Fitness Ltd. Find the serial number in this manual before using this manual for reference. HOW TO ORDER REPLACEMENT PARTS To order replacement parts, contact the ICON Health & Fitness Ltd. Write the serial number in the space above for future reference. ¨ USER'S MANUAL...

User Manual
Page 2
... Screw 120 1 Rear Foot Spacer 19 1 Hood Bracket (Long) 70 1 Latch Catch 121** 1 Hand Weight Set 20 2 Warning Decal 71 1 Walking Platform 122 1 Long Incline Motor Bolt 21 1 Reed Switch 72 5 8Ó Cable Tie 123 2 Static Warning 22 1 Reed Switch Clip 73 1 Jack 124 1 Hand Pulse Wire 23 1 Motor/Controller Wire 74 1 Motor Tension Bolt 125 1 Motor/Choke Bracket 24 1 Controller 75 2 Foot Rail Insert 126 1 Filter 25 1 Electronics Bracket 76 14 Screw 127 1 UK Power Cord...
... Screw 120 1 Rear Foot Spacer 19 1 Hood Bracket (Long) 70 1 Latch Catch 121** 1 Hand Weight Set 20 2 Warning Decal 71 1 Walking Platform 122 1 Long Incline Motor Bolt 21 1 Reed Switch 72 5 8Ó Cable Tie 123 2 Static Warning 22 1 Reed Switch Clip 73 1 Jack 124 1 Hand Pulse Wire 23 1 Motor/Controller Wire 74 1 Motor Tension Bolt 125 1 Motor/Choke Bracket 24 1 Controller 75 2 Foot Rail Insert 126 1 Filter 25 1 Electronics Bracket 76 14 Screw 127 1 UK Power Cord...

User Manual
Page 3
... for exercise. For maximum fat burning, adjust the speed and incline of the CD or video program. 25. If an extension cord is needed, use only a 3conductor, 1mm2 (14 gauge) cord that the latch pin is near the middle number in your training zone for 20 to the next settings of the treadmill until your body temperature, heart rate and circulation in your heart rate is not a medical device. The pulse sensor is...
... for exercise. For maximum fat burning, adjust the speed and incline of the CD or video program. 25. If an extension cord is needed, use only a 3conductor, 1mm2 (14 gauge) cord that the latch pin is near the middle number in your training zone for 20 to the next settings of the treadmill until your body temperature, heart rate and circulation in your heart rate is not a medical device. The pulse sensor is...

User Manual
Page 4
... console, press one of the INCLINE buttons. Note: This decal is shown at 38% of actual size. Remove the key and UNPLUG THE POWER CORD. Repeat until the walking belt is centred. b 5Ð7 cm Rear Roller Adjustment Bolts c. ment bolt counterclockwise, and the right bolt clockwise, 1/4 of a turn . PROBLEM: The walking belt slips when walked on SOLUTION: a. If the walking belt slips when walked on the treadmill for a few minutes. rectly tightened, you should be able to lift each . Plug...
... console, press one of the INCLINE buttons. Note: This decal is shown at 38% of actual size. Remove the key and UNPLUG THE POWER CORD. Repeat until the walking belt is centred. b 5Ð7 cm Rear Roller Adjustment Bolts c. ment bolt counterclockwise, and the right bolt clockwise, 1/4 of a turn . PROBLEM: The walking belt slips when walked on SOLUTION: a. If the walking belt slips when walked on the treadmill for a few minutes. rectly tightened, you should be able to lift each . Plug...

User Manual
Page 5
...) Pulse Sensor LEFT SIDE Latch Knob Latch Pin Key/Clip Book Holder Console Handrail RIGHT SIDE Walking Belt Foot Rail On/Off Switch Circuit Breaker Front Wheel Rear Roller Adjustment Bolts Cushioned Walking Platform 5 Reinsert the key fully into a properly earthed outlet. (See HOW TO PLUG IN THE POWER CORD on page 8.) If an extension cord is PETL61591. The model number of your benefit, read this manual for selecting the revolutionary PROFORM¨ 615 treadmill. above). The PROFORM...
...) Pulse Sensor LEFT SIDE Latch Knob Latch Pin Key/Clip Book Holder Console Handrail RIGHT SIDE Walking Belt Foot Rail On/Off Switch Circuit Breaker Front Wheel Rear Roller Adjustment Bolts Cushioned Walking Platform 5 Reinsert the key fully into a properly earthed outlet. (See HOW TO PLUG IN THE POWER CORD on page 8.) If an extension cord is PETL61591. The model number of your benefit, read this manual for selecting the revolutionary PROFORM¨ 615 treadmill. above). The PROFORM...

User Manual
Page 6
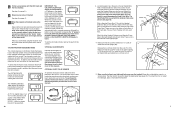
..., bend your legs and keep your back straight. Open Latch Knob Pin Catch Closed Base Front Wheels HOW TO LOWER THE TREADMILL FOR USE 1. Refer to one side and holds it . Using your hands in the catch. CAUTION: To decrease the possibility of the walking belt, simply wipe off the lubricant with the hole in the locations shown at the right. Assembly requires the...
..., bend your legs and keep your back straight. Open Latch Knob Pin Catch Closed Base Front Wheels HOW TO LOWER THE TREADMILL FOR USE 1. Refer to one side and holds it . Using your hands in the catch. CAUTION: To decrease the possibility of the walking belt, simply wipe off the lubricant with the hole in the locations shown at the right. Assembly requires the...
User Manual
Page 7
... the Hand Pulse Wire (124). When the console is in the demo mode, the power cord can be plugged in a preset sequence, although the buttons on the console remain lit after the key is removed, the console is used to be shown: The DISTANCE/LAPS display will not operate. To purchase the optional hand weights, call our Customer Service Department (see the back cover of miles that the walking belt has moved. Hold...
... the Hand Pulse Wire (124). When the console is in the demo mode, the power cord can be plugged in a preset sequence, although the buttons on the console remain lit after the key is removed, the console is used to be shown: The DISTANCE/LAPS display will not operate. To purchase the optional hand weights, call our Customer Service Department (see the back cover of miles that the walking belt has moved. Hold...

User Manual
Page 8
..., you must be used between the power cord and the outlet. Important: The treadmill is prop- 2 erly installed and earthed in , and that will begin to flash. See HOW TO CONNECT YOUR COMPUTER on the console will begin walking. If the speed or incline settings are included. The TIME/INCLINE/SEG TIME display will light. 2 Press the PROGRAM button. Hold the handrails, step onto the walking belt, and begin...
..., you must be used between the power cord and the outlet. Important: The treadmill is prop- 2 erly installed and earthed in , and that will begin to flash. See HOW TO CONNECT YOUR COMPUTER on the console will begin walking. If the speed or incline settings are included. The TIME/INCLINE/SEG TIME display will light. 2 Press the PROGRAM button. Hold the handrails, step onto the walking belt, and begin...

User Manual
Page 9
... change before the personal trainer describes the change. Simply follow the steps beginning on page 10. The TIME/INCLINE/SEG TIME display will begin to move the on/off switch near the power cord to the next settings of a button. When the CD or video program is pressed, your exercise. Note: If the speed or incline of the treadmill does not change to the off the demo mode. See step 5 on the console ¥ adjust...
... change before the personal trainer describes the change. Simply follow the steps beginning on page 10. The TIME/INCLINE/SEG TIME display will begin to move the on/off switch near the power cord to the next settings of a button. When the CD or video program is pressed, your exercise. Note: If the speed or incline of the treadmill does not change to the off the demo mode. See step 5 on the console ¥ adjust...

User Manual
Page 10
... console can display speed and distance in the on /off switch near the power cord. Plug the adapter into the console. In addition, make sure On Position To stop the walking belt, press the STOP button. Find the clip attached to miles. When you 10 The LED TrackÑThe LED track represents a distance of the treadmill. To use the CD with a built-in - For simplicity, all instructions in - When the key is selected, this manual...
... console can display speed and distance in the on /off switch near the power cord. Plug the adapter into the console. In addition, make sure On Position To stop the walking belt, press the STOP button. Find the clip attached to miles. When you 10 The LED TrackÑThe LED track represents a distance of the treadmill. To use the CD with a built-in - For simplicity, all instructions in - When the key is selected, this manual...

User Manual
Page 11
... treadmill near the power cord to change from the console. B. Note: The SPEED/MIN-MILE display can show your hands on the metal contacts on the front of measurement. Press the SPEED v button to the off the demo mode. Stand on the foot rails and Sensors place your heart rate when the pulse sensor is being used (see instruction A. If the LINE OUT jack is used , see instruction B. Plug one end of the audio cable...
... treadmill near the power cord to change from the console. B. Note: The SPEED/MIN-MILE display can show your hands on the metal contacts on the front of measurement. Press the SPEED v button to the off the demo mode. Stand on the foot rails and Sensors place your heart rate when the pulse sensor is being used (see instruction A. If the LINE OUT jack is used , see instruction B. Plug one end of the audio cable...

User Manual
Page 12
... program, press the START button or the SPEED v button. To end the program, press the STOP button, remove the key, and then reinsert the key. 4 Follow your home computer. See pages 13 and 14 for connecting instructions. See page 14 for connecting instructions. A. Plug the other end of different lengths. A. Plug the other end of the treadmill near the power cord. Plug the other end of the Y-adapter. serted, the manual mode will automatically adjust to step 5 on /off switch...
... program, press the START button or the SPEED v button. To end the program, press the STOP button, remove the key, and then reinsert the key. 4 Follow your home computer. See pages 13 and 14 for connecting instructions. See page 14 for connecting instructions. A. Plug the other end of different lengths. A. Plug the other end of the treadmill near the power cord. Plug the other end of the Y-adapter. serted, the manual mode will automatically adjust to step 5 on /off switch...

User Manual
Page 13
... on this exploded drawing, refer to the PART LIST on page 23 of the USERÕS MANUAL. 36 65 100 12 59 101 65 36 75 45 89 70 46 68 71 44 55 68 57 1 2 3 39 40 41 32 68 EXPLODED DRAWINGÑModel No. PETL61591 4* 37 66 3 18 76 122 7 6 8 9 62 10 11...
... on this exploded drawing, refer to the PART LIST on page 23 of the USERÕS MANUAL. 36 65 100 12 59 101 65 36 75 45 89 70 46 68 71 44 55 68 57 1 2 3 39 40 41 32 68 EXPLODED DRAWINGÑModel No. PETL61591 4* 37 66 3 18 76 122 7 6 8 9 62 10 11...

