

Canadian English Manual
Page 2
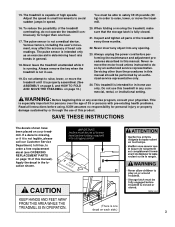
...PRECAUTIONS WARNING: To reduce the risk of burns, fire, electric shock, or injury to ensure that all warnings and precautions. 2. Use the treadmill only as described in this manual. ing that blocks air openings. When connecting the power cord (see HOW TO PLUG IN THE POWER CORD...less in length. TABLE OF CONTENTS IMPORTANT PRECAUTIONS 2 BEFORE YOU BEGIN 4 ASSEMBLY 5 OPERATION AND ADJUSTMENT 7 HOW TO FOLD AND MOVE THE TREADMILL 10 MAINTENANCE AND TROUBLE-SHOOTING 12 CONDITIONING GUIDELINES 14 PART LIST 16 CUSTOMER RECORD 18 ORDERING REPLACEMENT PARTS 19 LIMITED WARRANTY 20 Note: An ...
...PRECAUTIONS WARNING: To reduce the risk of burns, fire, electric shock, or injury to ensure that all warnings and precautions. 2. Use the treadmill only as described in this manual. ing that blocks air openings. When connecting the power cord (see HOW TO PLUG IN THE POWER CORD...less in length. TABLE OF CONTENTS IMPORTANT PRECAUTIONS 2 BEFORE YOU BEGIN 4 ASSEMBLY 5 OPERATION AND ADJUSTMENT 7 HOW TO FOLD AND MOVE THE TREADMILL 10 MAINTENANCE AND TROUBLE-SHOOTING 12 CONDITIONING GUIDELINES 14 PART LIST 16 CUSTOMER RECORD 18 ORDERING REPLACEMENT PARTS 19 LIMITED WARRANTY 20 Note: An ...
Canadian English Manual
Page 3
...decals shown have been placed on page 19 of this manual). Adjust the speed in small increments to raise, lower, or move the treadmill until it is one hour. 17. Various factors, including the user's movement, may affect the accuracy of high speeds. Never remove ...an authorized service representative. 15. The pulse sensor is properly assembled. (See ASSEMBLY on page 5, and HOW TO FOLD AND MOVE THE TREADMILL on each side.) 3 Inspect and tighten all instructions before performing the maintenance and adjustment procedures described in use only. ICON assumes no ...
...decals shown have been placed on page 19 of this manual). Adjust the speed in small increments to raise, lower, or move the treadmill until it is one hour. 17. Various factors, including the user's movement, may affect the accuracy of high speeds. Never remove ...an authorized service representative. 15. The pulse sensor is properly assembled. (See ASSEMBLY on page 5, and HOW TO FOLD AND MOVE THE TREADMILL on each side.) 3 Inspect and tighten all instructions before performing the maintenance and adjustment procedures described in use only. ICON assumes no ...
Canadian English Manual
Page 4
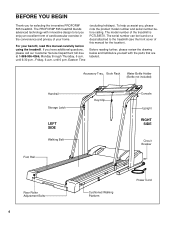
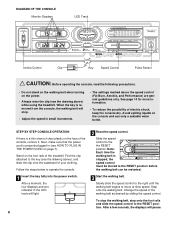
...manual carefully before calling. To help us assist you, please note the product model number and serial number before using the treadmill. Accessory Tray Book Rack Water Bottle Holder (Bottle not included) Handrail Storage Latch LEFT SIDE Walking Belt Foot Rail Key...form of cardiovascular exercise in the convenience and privacy of your benefit, read this manual for selecting the innovative PROFORM® 595 treadmill. until 6 p.m. The PROFORM® 595 treadmill blends advanced technology with the parts that are labeled. BEFORE YOU BEGIN Thank you for the location). For ...
...manual carefully before calling. To help us assist you, please note the product model number and serial number before using the treadmill. Accessory Tray Book Rack Water Bottle Holder (Bottle not included) Handrail Storage Latch LEFT SIDE Walking Belt Foot Rail Key...form of cardiovascular exercise in the convenience and privacy of your benefit, read this manual for selecting the innovative PROFORM® 595 treadmill. until 6 p.m. The PROFORM® 595 treadmill blends advanced technology with the parts that are labeled. BEFORE YOU BEGIN Thank you for the location). For ...

Canadian English Manual
Page 5
...own adjustable wrench phillips screwdriver . , and 1. With the help of a second person, 92 carefully lay the treadmill on page 4 and identify the left 1 side of a second person, carefully raise the treadmill to the drawing on its left Upright (70) as shown. Note: It may be necessary to slide the ... 70 99 89 99 93 89 2. if the Screws are tight, but do not 109 66 overtighten them; With the help of the treadmill. Using the included Allen Wrench (92), attach each side of the packing materials until assembly is still visible. Without removing the tape from the...
...own adjustable wrench phillips screwdriver . , and 1. With the help of a second person, 92 carefully lay the treadmill on page 4 and identify the left 1 side of a second person, carefully raise the treadmill to the drawing on its left Upright (70) as shown. Note: It may be necessary to slide the ... 70 99 89 99 93 89 2. if the Screws are tight, but do not 109 66 overtighten them; With the help of the treadmill. Using the included Allen Wrench (92), attach each side of the packing materials until assembly is still visible. Without removing the tape from the...
Canadian English Manual
Page 6
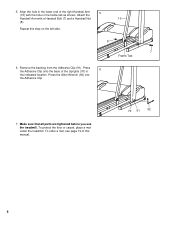
To order a mat, see page 19 of this step on the left side. 8 7 Frame Tab 6. To protect the floor or carpet, place a mat under the treadmill. Press 6 the Adhesive Clip onto the base of the right Handrail Arm 5 (10) with a Handrail Bolt (7) and a Handrail Nut 10 (8). Repeat this manual. 70 91 ... the frame tab as shown. Press the Allen Wrench (92) into the Adhesive Clip. 7. Make sure that all parts are tightened before you use the treadmill. Attach the Handrail Arm with the hole in the indicated location. 5.
To order a mat, see page 19 of this step on the left side. 8 7 Frame Tab 6. To protect the floor or carpet, place a mat under the treadmill. Press 6 the Adhesive Clip onto the base of the right Handrail Arm 5 (10) with a Handrail Bolt (7) and a Handrail Nut 10 (8). Repeat this manual. 70 91 ... the frame tab as shown. Press the Allen Wrench (92) into the Adhesive Clip. 7. Make sure that all parts are tightened before you use the treadmill. Attach the Handrail Arm with the hole in the indicated location. 5.
Canadian English Manual
Page 7
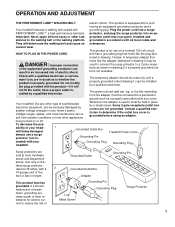
... length. This product is not available. propriate outlet that looks like any other sub- cessive wear. trated in accordance with your treadmill. Some 2-pole receptacle outlet box covers are sold at 15 amps, with a qualified electrician or serviceman if you are in doubt...grounding plug that looks like extending from other appliances Whenever the adapter is grounded before using an adapter. Grounded Outlet Box Grounding Pin Treadmill Power Cord cluded) with all local codes and They will The temporary adapter should malfunction or break down, grounding provides a path...
... length. This product is not available. propriate outlet that looks like any other sub- cessive wear. trated in accordance with your treadmill. Some 2-pole receptacle outlet box covers are sold at 15 amps, with a qualified electrician or serviceman if you are in doubt...grounding plug that looks like extending from other appliances Whenever the adapter is grounded before using an adapter. Grounded Outlet Box Grounding Pin Treadmill Power Cord cluded) with all local codes and They will The temporary adapter should malfunction or break down, grounding provides a path...
Canadian English Manual
Page 8
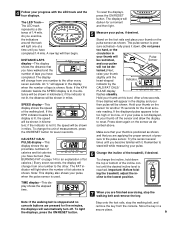
Avoid spilling liquids on the face of the treadmill. Slowly slide the speed control to the right until the walking belt begins to the RESET position before the walking belt can be restarted. 1 Insert ..., the displays will light. 3 Start the walking belt. Note: Each time the walking belt is properly plugged in (see the drawing above) while using the treadmill. Change the speed of electric shock, keep the console dry. Next, make sure that the power cord is stopped, the speed control must be moved...
Avoid spilling liquids on the face of the treadmill. Slowly slide the speed control to the right until the walking belt begins to the RESET position before the walking belt can be restarted. 1 Insert ..., the displays will light. 3 Start the walking belt. Note: Each time the walking belt is properly plugged in (see the drawing above) while using the treadmill. Change the speed of electric shock, keep the console dry. Next, make sure that the power cord is stopped, the speed control must be moved...
Canadian English Manual
Page 9
... your pulse is positioned as shown, and that you have completed. Try the sensor several times until you have walked and the number of the treadmill, if desired. To light the displays, press the ON/RESET button. Note: If the KPH indicator beside the SPEED display is not lit, the ... . Press down again on the pulse sensor as de- Make sure that your thumb is not displayed, lift your thumb off . Important: Before folding the treadmill, adjust the incline to stand still while measuring your pulse. 6 Change the incline of laps you become familiar with the LED track and the four...
... your pulse is positioned as shown, and that you have completed. Try the sensor several times until you have walked and the number of the treadmill, if desired. To light the displays, press the ON/RESET button. Note: If the KPH indicator beside the SPEED display is not lit, the ... . Press down again on the pulse sensor as de- Make sure that your thumb is not displayed, lift your thumb off . Important: Before folding the treadmill, adjust the incline to stand still while measuring your pulse. 6 Change the incline of laps you become familiar with the LED track and the four...
Canadian English Manual
Page 10
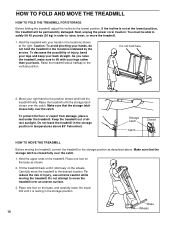
... your right hand to the lowest position. To reduce the risk of injury, bend your legs and keep your hands, do not hold the treadmill in the locations indicated by the arrows. Base Wheels 10 Caution: To avoid pinching your back straight. To decrease the possibility of injury, use... sure to the desired location. Make sure that the storage latch is not at the right. Do not hold here 2. Keep the treadmill out of the treadmill. Place one foot on the base as described above 85° Fahrenheit. Do not attempt to the vertical position. Storage Latch Catch ...
... your right hand to the lowest position. To reduce the risk of injury, bend your legs and keep your hands, do not hold the treadmill in the locations indicated by the arrows. Base Wheels 10 Caution: To avoid pinching your back straight. To decrease the possibility of injury, use... sure to the desired location. Make sure that the storage latch is not at the right. Do not hold here 2. Keep the treadmill out of the treadmill. Place one foot on the base as described above 85° Fahrenheit. Do not attempt to the vertical position. Storage Latch Catch ...
Canadian English Manual
Page 11
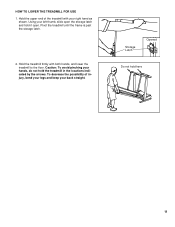
Pivot the treadmill until the frame is past the storage latch. 2. Hold the treadmill firmly with your left thumb, slide open the storage latch and hold it open. Hold the upper end of injury, bend your legs and keep your hands, do not hold here 11 Caution: To avoid pinching your back straight. Storage Latch Opened Do not hold the treadmill in the locations indicated by the arrows. To decrease the possibility of the treadmill with both hands, and lower the treadmill to the floor. HOW TO LOWER THE TREADMILL FOR USE 1. Using your right hand as shown.
Pivot the treadmill until the frame is past the storage latch. 2. Hold the treadmill firmly with your left thumb, slide open the storage latch and hold it open. Hold the upper end of injury, bend your legs and keep your hands, do not hold here 11 Caution: To avoid pinching your back straight. Storage Latch Opened Do not hold the treadmill in the locations indicated by the arrows. To decrease the possibility of the treadmill with both hands, and lower the treadmill to the floor. HOW TO LOWER THE TREADMILL FOR USE 1. Using your right hand as shown.
Canadian English Manual
Page 12
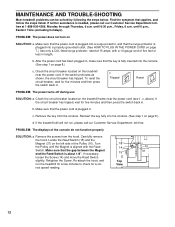
...Service Department, toll-free. If the switch protrudes as shown, the circuit breaker has tripped. Check the circuit breaker located on the treadmill frame near the power cord. c. above). If the circuit breaker has tripped, wait for five minutes and then press the switch ... move the Reed Switch slightly. until 6 p.m., Eastern Time (excluding holidays). b. Reinsert the key fully into the console. (See step 1 on the treadmill near the power cord (see 1. c Tripped Reset PROBLEM: The power turns off during use SOLUTION: a. Remove the screws from the console. PROBLEM:...
...Service Department, toll-free. If the switch protrudes as shown, the circuit breaker has tripped. Check the circuit breaker located on the treadmill frame near the power cord. c. above). If the circuit breaker has tripped, wait for five minutes and then press the switch ... move the Reed Switch slightly. until 6 p.m., Eastern Time (excluding holidays). b. Reinsert the key fully into the console. (See step 1 on the treadmill near the power cord (see 1. c Tripped Reset PROBLEM: The power turns off during use SOLUTION: a. Remove the screws from the console. PROBLEM:...
Canadian English Manual
Page 13
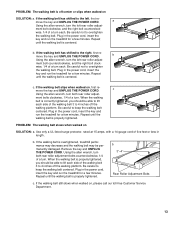
... when walked on , first remove the key and UNPLUG THE POWER CORD. c. Plug in the power cord, insert the key and run the treadmill for a few minutes. Repeat until the walking belt is centered. If the walking belt is properly tightened. Plug in the power cord, insert ...the key and run the treadmill for a few minutes. Be careful not to keep the walking belt centered. If the walking belt has shifted to the left, first re-...
... when walked on , first remove the key and UNPLUG THE POWER CORD. c. Plug in the power cord, insert the key and run the treadmill for a few minutes. Repeat until the walking belt is centered. If the walking belt is properly tightened. Plug in the power cord, insert ...the key and run the treadmill for a few minutes. Be careful not to keep the walking belt centered. If the walking belt has shifted to the left, first re-...
Canadian English Manual
Page 14
...especially important for exercise. The proper intensity level can be "aerobic." The chart below shows recommended heart rates for a sustained period of the treadmill until your heart rate is not a medical device. This will increase the flexibility of your muscles and will help you to plan your ...maintain the proper intensity level (see page 8). It may complete up increases your age. Aerobic exercise is near the low end of the treadmill. It may also be helpful to set the speed control on the console to FAT BURN to help you , first find the three ...
...especially important for exercise. The proper intensity level can be "aerobic." The chart below shows recommended heart rates for a sustained period of the treadmill until your heart rate is not a medical device. This will increase the flexibility of your muscles and will help you to plan your ...maintain the proper intensity level (see page 8). It may complete up increases your age. Aerobic exercise is near the low end of the treadmill. It may also be helpful to set the speed control on the console to FAT BURN to help you , first find the three ...

Canadian English Manual
Page 19
... replacement parts, call our Customer Service Department toll-free at 1-888-936-4266, Monday through Thursday 6 a.m. If possible, place the treadmill near your telephone for easy reference when calling. ICON of this manual). • The KEY NUMBER AND DESCRIPTION OF THE PART(S) (... prepared to give the following information: • The MODEL NUMBER OF THE PRODUCT (PCTL58570). • The NAME OF THE PRODUCT (PROFORM® 595 treadmill). • The SERIAL NUMBER OF THE PRODUCT (see the front cover of this manual). until 6 p.m., Eastern Time (excluding holidays). until 6:...
... replacement parts, call our Customer Service Department toll-free at 1-888-936-4266, Monday through Thursday 6 a.m. If possible, place the treadmill near your telephone for easy reference when calling. ICON of this manual). • The KEY NUMBER AND DESCRIPTION OF THE PART(S) (... prepared to give the following information: • The MODEL NUMBER OF THE PRODUCT (PCTL58570). • The NAME OF THE PRODUCT (PROFORM® 595 treadmill). • The SERIAL NUMBER OF THE PRODUCT (see the front cover of this manual). until 6 p.m., Eastern Time (excluding holidays). until 6:...

Canadian English Manual
Page 20
... you read regularly? ❏ Sports ❏ Fitness ❏ Motoring ❏ Business ❏ Computer ❏ General 12) Do you own? ❏ Bicycle ❏ Exercise Cycle ❏ Treadmill ❏ Home Gym ❏ Weight Bench ❏ Stepper ❏ Cardio Glide ❏ Other 11) Which type of magazines do not allow limitations on your equipment...
... you read regularly? ❏ Sports ❏ Fitness ❏ Motoring ❏ Business ❏ Computer ❏ General 12) Do you own? ❏ Bicycle ❏ Exercise Cycle ❏ Treadmill ❏ Home Gym ❏ Weight Bench ❏ Stepper ❏ Cardio Glide ❏ Other 11) Which type of magazines do not allow limitations on your equipment...


