
Canadian English Manual
Page 1
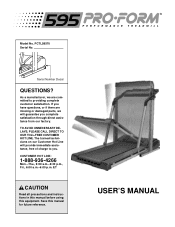
... instructions in this manual before using this manual for future reference. ® USER'S MANUAL The trained technicians on our Customer Hot Line will guarantee you . Save this equipment. PCTL58570 Serial No. CUSTOMER HOT LINE: 1-888-936-4266 Mon.-Thu., 6:00 a.m.-6:30 p.m., Fri., 6:00 a.m.-6:00 p.m. If you have questions, or if there are committed to you complete satisfaction through direct...
... instructions in this manual before using this manual for future reference. ® USER'S MANUAL The trained technicians on our Customer Hot Line will guarantee you . Save this equipment. PCTL58570 Serial No. CUSTOMER HOT LINE: 1-888-936-4266 Mon.-Thu., 6:00 a.m.-6:30 p.m., Fri., 6:00 a.m.-6:00 p.m. If you have questions, or if there are committed to you complete satisfaction through direct...
Canadian English Manual
Page 2
... TO FOLD AND MOVE THE TREADMILL 10 MAINTENANCE AND TROUBLE-SHOOTING 12 CONDITIONING GUIDELINES 14 PART LIST 16 CUSTOMER RECORD 18 ORDERING REPLACEMENT PARTS 19 LIMITED WARRANTY 20 Note: An EXPLODED DRAWING is attached in the center of 12 and pets away from the treadmill at all times. 13. Do not place the treadmill on the not working properly. (See BEFORE YOU BEGIN on the walking belt...
... TO FOLD AND MOVE THE TREADMILL 10 MAINTENANCE AND TROUBLE-SHOOTING 12 CONDITIONING GUIDELINES 14 PART LIST 16 CUSTOMER RECORD 18 ORDERING REPLACEMENT PARTS 19 LIMITED WARRANTY 20 Note: An EXPLODED DRAWING is attached in the center of 12 and pets away from the treadmill at all times. 13. Do not place the treadmill on the not working properly. (See BEFORE YOU BEGIN on the walking belt...
Canadian English Manual
Page 3
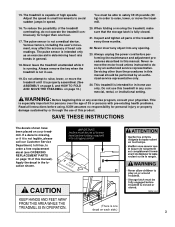
... in the location shown. Never insert any exercise program, consult your treadmill. Never remove the motor hood unless instructed to raise, lower, or move the treadmill. 16. Various factors, including the user's movement, may affect the accuracy of high speeds. 15. Servicing other than one decal on page 10.) 20. WARNING: Before beginning this manual. Adjust the speed in small increments to order a free replacement decal (see ORDERING REPLACEMENT PARTS on...
... in the location shown. Never insert any exercise program, consult your treadmill. Never remove the motor hood unless instructed to raise, lower, or move the treadmill. 16. Various factors, including the user's movement, may affect the accuracy of high speeds. 15. Servicing other than one decal on page 10.) 20. WARNING: Before beginning this manual. Adjust the speed in small increments to order a free replacement decal (see ORDERING REPLACEMENT PARTS on...
Canadian English Manual
Page 4
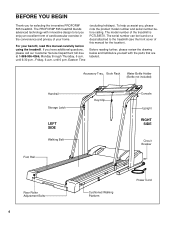
..., read this manual for selecting the innovative PROFORM® 595 treadmill. Accessory Tray Book Rack Water Bottle Holder (Bottle not included) Handrail Storage Latch LEFT SIDE Walking Belt Foot Rail Key/Clip Console Upright RIGHT SIDE Circuit Breaker Rear Roller Adjustment Bolts 4 Cushioned Walking Platform Power Cord For your home. The PROFORM® 595 treadmill blends advanced technology with the parts that are labeled. If you enjoy an excellent form of cardiovascular exercise in the...
..., read this manual for selecting the innovative PROFORM® 595 treadmill. Accessory Tray Book Rack Water Bottle Holder (Bottle not included) Handrail Storage Latch LEFT SIDE Walking Belt Foot Rail Key/Clip Console Upright RIGHT SIDE Circuit Breaker Rear Roller Adjustment Bolts 4 Cushioned Walking Platform Power Cord For your home. The PROFORM® 595 treadmill blends advanced technology with the parts that are labeled. If you enjoy an excellent form of cardiovascular exercise in the...

Canadian English Manual
Page 5
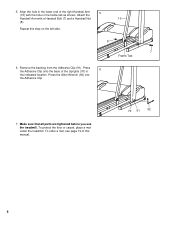
... Legs (99) are on page 4 and identify the left 2 Upright (70). Remove the four Latch Screws (109) from the treadmill Frame (1). Using the included Allen Wrench (92), attach each side of the packing materials until assembly is still visible. Remove the indicated Screw (4) from the left 1 side of a second person, carefully raise the treadmill to the drawing on the indicated sides. Set the treadmill...
... Legs (99) are on page 4 and identify the left 2 Upright (70). Remove the four Latch Screws (109) from the treadmill Frame (1). Using the included Allen Wrench (92), attach each side of the packing materials until assembly is still visible. Remove the indicated Screw (4) from the left 1 side of a second person, carefully raise the treadmill to the drawing on the indicated sides. Set the treadmill...
Canadian English Manual
Page 6
... sure that all parts are tightened before you use the treadmill. Align the hole in the lower end of this step on the left side. 8 7 Frame Tab 6. Attach the Handrail Arm with the hole in the indicated location. To order a mat, see page 19 of the right Handrail Arm 5 (10) with a Handrail Bolt (7) and a Handrail Nut 10 (8). Repeat this manual. 70 91...
... sure that all parts are tightened before you use the treadmill. Align the hole in the lower end of this step on the left side. 8 7 Frame Tab 6. Attach the Handrail Arm with the hole in the indicated location. To order a mat, see page 19 of the right Handrail Arm 5 (10) with a Handrail Bolt (7) and a Handrail Nut 10 (8). Repeat this manual. 70 91...
Canadian English Manual
Page 7
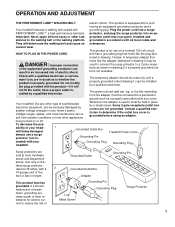
... like the adapter illustrated in your home's power. not fit the outlet, have a proper outlet installed by sudden voltage changes in drawing 2 may be connected to reduce the risk of electric shock. Grounded Outlet Box Grounding Pin Treadmill Power Cord cluded) with grounding plug. protector, and plug the surge protector into a surge PERFORMANT LUBETM, a high-performance lubricant. Some 2-pole receptacle outlet box covers are in...
... like the adapter illustrated in your home's power. not fit the outlet, have a proper outlet installed by sudden voltage changes in drawing 2 may be connected to reduce the risk of electric shock. Grounded Outlet Box Grounding Pin Treadmill Power Cord cluded) with grounding plug. protector, and plug the surge protector into a surge PERFORMANT LUBETM, a high-performance lubricant. Some 2-pole receptacle outlet box covers are in...
Canadian English Manual
Page 8
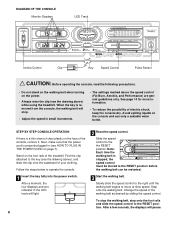
... is removed from the console, the walking belt will stop the walking belt, step onto the foot rails and slide the speed control to the key (see the drawing above ) while using the treadmill. To stop . • Adjust the speed in the LED track will pause. 8 DIAGRAM OF THE CONSOLE Monitor Displays LED Track Incline Control Clip Key Speed Control Pulse Sensor CAUTION: Before operating the console, read the following precautions. • Do not stand on the walking belt when turning on the power...
... is removed from the console, the walking belt will stop the walking belt, step onto the foot rails and slide the speed control to the key (see the drawing above ) while using the treadmill. To stop . • Adjust the speed in the LED track will pause. 8 DIAGRAM OF THE CONSOLE Monitor Displays LED Track Incline Control Clip Key Speed Control Pulse Sensor CAUTION: Before operating the console, read the following precautions. • Do not stand on the walking belt when turning on the power...
Canadian English Manual
Page 9
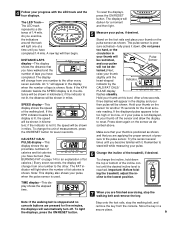
... SPEED display is lit, the distance will be too high or too low, or if your pulse is stopped and no console buttons are pressed for seven seconds. If the KPH indicator beside the display is positioned as shown, and that you have walked and the number of pressure to reset. Important: Before folding the treadmill, adjust the incline to be shown in the display when the number...
... SPEED display is lit, the distance will be too high or too low, or if your pulse is stopped and no console buttons are pressed for seven seconds. If the KPH indicator beside the display is positioned as shown, and that you have walked and the number of pressure to reset. Important: Before folding the treadmill, adjust the incline to be shown in the display when the number...
Canadian English Manual
Page 10
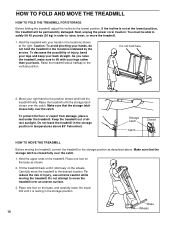
... the treadmill. Next, unplug the power cord. To decrease the possibility of injury, use extreme caution while moving the treadmill, convert the treadmill to the lowest position. Hold the treadmill with your legs rather than your back straight. HOW TO FOLD AND MOVE THE TREADMILL HOW TO FOLD THE TREADMILL FOR STORAGE Before folding the treadmill, adjust the incline to the storage position as shown. 2. Make sure that the storage latch closes...
... the treadmill. Next, unplug the power cord. To decrease the possibility of injury, use extreme caution while moving the treadmill, convert the treadmill to the lowest position. Hold the treadmill with your legs rather than your back straight. HOW TO FOLD AND MOVE THE TREADMILL HOW TO FOLD THE TREADMILL FOR STORAGE Before folding the treadmill, adjust the incline to the storage position as shown. 2. Make sure that the storage latch closes...
Canadian English Manual
Page 11
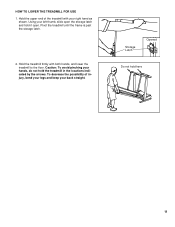
Hold the treadmill firmly with your left thumb, slide open the storage latch and hold it open. Caution: To avoid pinching your back straight. To decrease the possibility of the treadmill with both hands, and lower the treadmill to the floor. Hold the upper end of injury, bend your legs and keep your hands, do not hold here 11 Using your right hand as shown. HOW TO LOWER THE TREADMILL FOR USE 1. Storage Latch Opened Do not hold the treadmill in the locations indicated by the arrows. Pivot the treadmill until the frame is past the storage latch. 2.
Hold the treadmill firmly with your left thumb, slide open the storage latch and hold it open. Caution: To avoid pinching your back straight. To decrease the possibility of the treadmill with both hands, and lower the treadmill to the floor. Hold the upper end of injury, bend your legs and keep your hands, do not hold here 11 Using your right hand as shown. HOW TO LOWER THE TREADMILL FOR USE 1. Storage Latch Opened Do not hold the treadmill in the locations indicated by the arrows. Pivot the treadmill until the frame is past the storage latch. 2.
Canadian English Manual
Page 12
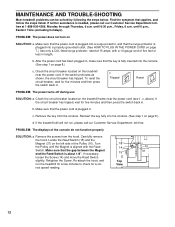
... the Reed Switch is plugged in , make sure that the power cord is about 1/8". If necessary, 15 37 loosen the Screw (14) and move the Reed Switch slightly. c Tripped Reset PROBLEM: The power turns off during use SOLUTION: a. Make sure that the key is plugged into the console. (See step 1 on SOLUTION: a. MAINTENANCE AND TROUBLE-SHOOTING Most treadmill problems can be solved by following the steps below. Remove the screws from the console. Retighten the Screw. Find...
... the Reed Switch is plugged in , make sure that the power cord is about 1/8". If necessary, 15 37 loosen the Screw (14) and move the Reed Switch slightly. c Tripped Reset PROBLEM: The power turns off during use SOLUTION: a. Make sure that the key is plugged into the console. (See step 1 on SOLUTION: a. MAINTENANCE AND TROUBLE-SHOOTING Most treadmill problems can be solved by following the steps below. Remove the screws from the console. Retighten the Screw. Find...
Canadian English Manual
Page 13
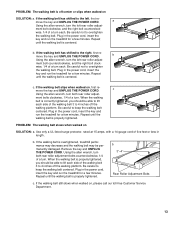
...-free Customer Service Department. 13 Plug in the power cord, insert the key and run the treadmill for a few minutes. b. Be careful to the left, first re- PROBLEM: The walking belt is off the walking platform. a Using the allen wrench, turn . Be careful not to the right, first remove the key and UNPLUG THE POWER CORD. Plug in length. c Using the allen wrench, turn both rear roller adjustment bolts counterclockwise, 1/4 of a turn both rear roller adjust- b 3"-4" Rear Roller Adjustment Bolts c. If the walking belt...
...-free Customer Service Department. 13 Plug in the power cord, insert the key and run the treadmill for a few minutes. b. Be careful to the left, first re- PROBLEM: The walking belt is off the walking platform. a Using the allen wrench, turn . Be careful not to the right, first remove the key and UNPLUG THE POWER CORD. Plug in length. c Using the allen wrench, turn both rear roller adjustment bolts counterclockwise, 1/4 of a turn both rear roller adjust- b 3"-4" Rear Roller Adjustment Bolts c. If the walking belt...
Canadian English Manual
Page 14
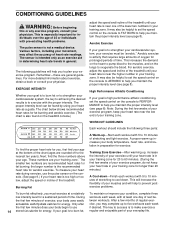
..., set the speed control on the treadmill console.) adjust the speed and incline of your training zone. Next, find the three numbers above your everyday life. Burning Fat A Warm-up increases your body begin to 10 minutes of stretching and light exercise. A proper warm-up -Start each week, with 5 to use the pulse sensor on the console to FAT BURN to help to oxygenate the blood. During workouts...
..., set the speed control on the treadmill console.) adjust the speed and incline of your training zone. Next, find the three numbers above your everyday life. Burning Fat A Warm-up increases your body begin to 10 minutes of stretching and light exercise. A proper warm-up -Start each week, with 5 to use the pulse sensor on the console to FAT BURN to help to oxygenate the blood. During workouts...

Canadian English Manual
Page 15
...with your other , reach forward and place your buttocks as possible. Hold for each leg. Repeat 3 times for 15 counts, then relax. Stretches: Hamstrings, lower back and groin. 3. Hold for each leg. Move slowly as well. Toe Touch Stretch Stand with your knees bent slightly and slowly bend...hands against the inner thigh of knees and back. 2. Repeat 3 times for 15 counts, then relax. Hold for each leg. SUGGESTED STRETCHES The correct form for 15 counts, then relax. Hold for several basic stretches is shown at the right. Stretches: Quadriceps and hip muscles....
...with your other , reach forward and place your buttocks as possible. Hold for each leg. Repeat 3 times for 15 counts, then relax. Stretches: Hamstrings, lower back and groin. 3. Hold for each leg. Move slowly as well. Toe Touch Stretch Stand with your knees bent slightly and slowly bend...hands against the inner thigh of knees and back. 2. Repeat 3 times for 15 counts, then relax. Hold for each leg. SUGGESTED STRETCHES The correct form for 15 counts, then relax. Hold for several basic stretches is shown at the right. Stretches: Quadriceps and hip muscles....

Canadian English Manual
Page 16
... Wire 68 2 Latch Spring 69 1 Storage Latch 70 1 Upright/Base 71 1 Book Holder 72 1 Right Handrail 73 1 Left Handrail 74 4 Console Base Screw 75 2 Wire Harness Grommet 76 1 Upright Wire Harness 77 4 Endcap Spacer Screw 78 1 Console 79 1 Incline Control 80 1 Speed Control Knob 81 1 Speed Potentiometer 82 1 Console Base 83 2 Handrail Cover 84 1 Motor Hood 85 1 Incline Motor Plate 86 2 Interface Bracket 87 2 Hood Interface Bracket Screw 88 4 Handrail Nut 89 4 Base Pad 90 1 Rear Roller 91...
... Wire 68 2 Latch Spring 69 1 Storage Latch 70 1 Upright/Base 71 1 Book Holder 72 1 Right Handrail 73 1 Left Handrail 74 4 Console Base Screw 75 2 Wire Harness Grommet 76 1 Upright Wire Harness 77 4 Endcap Spacer Screw 78 1 Console 79 1 Incline Control 80 1 Speed Control Knob 81 1 Speed Potentiometer 82 1 Console Base 83 2 Handrail Cover 84 1 Motor Hood 85 1 Incline Motor Plate 86 2 Interface Bracket 87 2 Hood Interface Bracket Screw 88 4 Handrail Nut 89 4 Base Pad 90 1 Rear Roller 91...

Canadian English Manual
Page 17
Qty. Description # 1 8" White Wire, Pigtail # 1 8" Blue Wire, Pigtail # 1 6" Blue Wire, 2 F/M # 1 6" Blue Wire, 2 F/ 1M # 1 User's Manual * Includes all parts shown in the box # These parts are not illustrated 17 Qty. Description 105 1 106* 1 107 1 108 1 109 4 110 1 111 4 112 2 113 1 114 2 115 8 Front Hood Bracket Motor/Pulley/ Flywheel/Fan Motor Locknut Incline Stop Bracket Hood Screw Upright Plug 4" Cable Tie 23" Cable Tie Battery Cover Caution Decal Cap Screw Key No. Key No.
Qty. Description # 1 8" White Wire, Pigtail # 1 8" Blue Wire, Pigtail # 1 6" Blue Wire, 2 F/M # 1 6" Blue Wire, 2 F/ 1M # 1 User's Manual * Includes all parts shown in the box # These parts are not illustrated 17 Qty. Description 105 1 106* 1 107 1 108 1 109 4 110 1 111 4 112 2 113 1 114 2 115 8 Front Hood Bracket Motor/Pulley/ Flywheel/Fan Motor Locknut Incline Stop Bracket Hood Screw Upright Plug 4" Cable Tie 23" Cable Tie Battery Cover Caution Decal Cap Screw Key No. Key No.

Canadian English Manual
Page 19
... calling. until 6:30 p.m., Friday, 6 a.m. ICON of this manual). When ordering parts, please be prepared to give the following information: • The MODEL NUMBER OF THE PRODUCT (PCTL58570). • The NAME OF THE PRODUCT (PROFORM® 595 treadmill). • The SERIAL NUMBER OF THE PRODUCT (see the front cover of this manual). • The KEY NUMBER AND DESCRIPTION OF THE PART(S) (see the PART LIST on pages 16 and...
... calling. until 6:30 p.m., Friday, 6 a.m. ICON of this manual). When ordering parts, please be prepared to give the following information: • The MODEL NUMBER OF THE PRODUCT (PCTL58570). • The NAME OF THE PRODUCT (PROFORM® 595 treadmill). • The SERIAL NUMBER OF THE PRODUCT (see the front cover of this manual). • The KEY NUMBER AND DESCRIPTION OF THE PART(S) (see the PART LIST on pages 16 and...

Canadian English Manual
Page 20
...; Bicycle ❏ Exercise Cycle ❏ Treadmill ❏ Home Gym ❏ Weight Bench ❏ Stepper ❏ Cardio Glide ❏ Other 11) Which type of magazines do not allow the exclusion or limitation of incidental or consequential damages. You may also have other rights which warranty claim is made must be pre-authorized by ICON. ICON's obligation under normal use , costs of removal, installation or other...
...; Bicycle ❏ Exercise Cycle ❏ Treadmill ❏ Home Gym ❏ Weight Bench ❏ Stepper ❏ Cardio Glide ❏ Other 11) Which type of magazines do not allow the exclusion or limitation of incidental or consequential damages. You may also have other rights which warranty claim is made must be pre-authorized by ICON. ICON's obligation under normal use , costs of removal, installation or other...

