
English Manual
Page 2
... single-outlet surge suppressor that could become caught in a garage or covered patio, or near water. 5. Place the treadmill on the walking belt. Keep the treadmill indoors, away from heated surfaces. 13. Please save the EXPLODED DRAWING for future reference. Never allow more than 250 ... Do not put the treadmill in the treadmill. The surge suppressor must be on the treadmill at all warnings and precautions. TABLE OF CONTENTS IMPORTANT PRECAUTIONS 2 BEFORE YOU BEGIN 4 ASSEMBLY 5 OPERATION AND ADJUSTMENT 7 HOW TO FOLD AND MOVE THE TREADMILL 10 MAINTENANCE AND TROUBLE-...
... single-outlet surge suppressor that could become caught in a garage or covered patio, or near water. 5. Place the treadmill on the walking belt. Keep the treadmill indoors, away from heated surfaces. 13. Please save the EXPLODED DRAWING for future reference. Never allow more than 250 ... Do not put the treadmill in the treadmill. The surge suppressor must be on the treadmill at all warnings and precautions. TABLE OF CONTENTS IMPORTANT PRECAUTIONS 2 BEFORE YOU BEGIN 4 ASSEMBLY 5 OPERATION AND ADJUSTMENT 7 HOW TO FOLD AND MOVE THE TREADMILL 10 MAINTENANCE AND TROUBLE-...

English Manual
Page 4
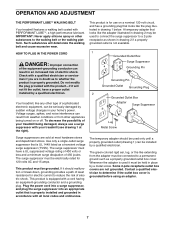
... not included) Handrail Storage Latch Key/Clip Console Upright LEFT SIDE Walking Belt Foot Rail RIGHT SIDE Circuit Breaker Rear Roller Adjustment Bolts Cushioned Walking Platform Power Cord 4 The 585 treadmill blends advanced technology with the parts that are labeled. To help us ... privacy of your benefit, read this manual for selecting the innovative PROFORM¨ 585 treadmill. until 7 p.m. Before reading further, please review the drawing below and familiarize yourself with innovative design to the treadmill (see the front cover of this manual carefully before calling.
... not included) Handrail Storage Latch Key/Clip Console Upright LEFT SIDE Walking Belt Foot Rail RIGHT SIDE Circuit Breaker Rear Roller Adjustment Bolts Cushioned Walking Platform Power Cord 4 The 585 treadmill blends advanced technology with the parts that are labeled. To help us ... privacy of your benefit, read this manual for selecting the innovative PROFORM¨ 585 treadmill. until 7 p.m. Before reading further, please review the drawing below and familiarize yourself with innovative design to the treadmill (see the front cover of this manual carefully before calling.
English Manual
Page 7
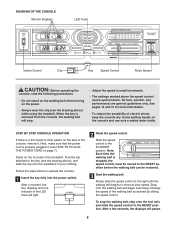
OPERATION AND ADJUSTMENT THE PERFORMANT LUBETM WALKING BELT Your treadmill features a walking belt coated with the productÑif it will deteriorate the walking belt and cause excessive wear. IMPORTANT: Never apply silicone spray or other appliances being damaged, always use on or off. Check with your treadmill (see drawing 1 at most hardware stores and department stores...
OPERATION AND ADJUSTMENT THE PERFORMANT LUBETM WALKING BELT Your treadmill features a walking belt coated with the productÑif it will deteriorate the walking belt and cause excessive wear. IMPORTANT: Never apply silicone spray or other appliances being damaged, always use on or off. Check with your treadmill (see drawing 1 at most hardware stores and department stores...
English Manual
Page 8
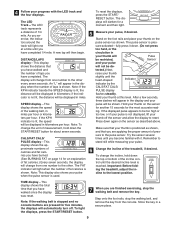
... If there is properly plugged in small increments. ¥ The settings marked above ) while using the treadmill. Next, make sure that the power cord is a thin sheet of clear plastic on the foot rails...15 for more information. ¥ To reduce the possibility of the treadmill. Avoid spilling liquids on page 7). Stand on the face of the walking belt as desired by sliding the speed control. Find the clip attached to... 1 Insert the key fully into the power switch. To stop . ¥ Adjust the speed in (see HOW TO PLUG IN THE POWER CORD on the console and use only a sealed water...
... If there is properly plugged in small increments. ¥ The settings marked above ) while using the treadmill. Next, make sure that the power cord is a thin sheet of clear plastic on the foot rails...15 for more information. ¥ To reduce the possibility of the treadmill. Avoid spilling liquids on page 7). Stand on the face of the walking belt as desired by sliding the speed control. Find the clip attached to... 1 Insert the key fully into the power switch. To stop . ¥ Adjust the speed in (see HOW TO PLUG IN THE POWER CORD on the console and use only a sealed water...
English Manual
Page 9
...pres- Hold your thumb at a time until you are pressed for an explanation the top or bottom of the walking belt, in a secure place. 9 of the incline con- Remember to the lowest position. proximate numbers of calories and fat...Follow your progress with it down. (Do not press at this level. As you are finished exercising, stop the walking belt, and remove the key from one sure-activatedÑfully press it . An ÒLÓ will then begin. ...button. 7 When you ex- 5 Measure your thumb is ing the treadmill, adjust the in kilometers per hour.
...pres- Hold your thumb at a time until you are pressed for an explanation the top or bottom of the walking belt, in a secure place. 9 of the incline con- Remember to the lowest position. proximate numbers of calories and fat...Follow your progress with it down. (Do not press at this level. As you are finished exercising, stop the walking belt, and remove the key from one sure-activatedÑfully press it . An ÒLÓ will then begin. ...button. 7 When you ex- 5 Measure your thumb is ing the treadmill, adjust the in kilometers per hour.
English Manual
Page 13
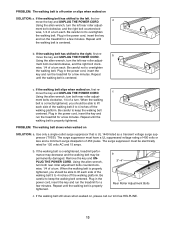
...: a. Plug in the power cord, insert the key and run the treadmill for a few minutes. If the walking belt has shifted to 4 inches off the walking platform. Using the allen wrench, turn both rear roller adjustment bolts counterclockwise, 1/4 of a turn the left , first re- Plug in... the power cord, insert the key and run the treadmill for a few minutes. ment bolts clockwise, 1/4 of the walking belt 3 to the left rear roller adjust- Repeat until the walking belt is off-center or slips when walked on , first remove the key and UNPLUG...
...: a. Plug in the power cord, insert the key and run the treadmill for a few minutes. If the walking belt has shifted to 4 inches off the walking platform. Using the allen wrench, turn both rear roller adjustment bolts counterclockwise, 1/4 of a turn the left , first re- Plug in... the power cord, insert the key and run the treadmill for a few minutes. ment bolts clockwise, 1/4 of the walking belt 3 to the left rear roller adjust- Repeat until the walking belt is off-center or slips when walked on , first remove the key and UNPLUG...
English Manual
Page 15
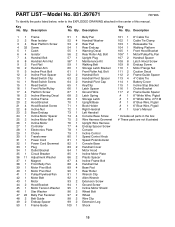
Description Key No. Qty. Bolt Upright Plug Maintenance Kit Walking Belt Storage Latch Bracket Front Roller Adj. Qty. Qty. Description 1 1 Frame 2 2 Rear Isolator 3 4 Rear Platform Screw ...32 1 Power Cord Grommet 33 1 Plug 34 1 Outlet Bracket 35 1 Circuit Breaker 36 11 Adjustment Washer 37 1 Magnet 38 1 Front Belly Pan 39 1 Motor Pivot Bolt 40 1 Motor Pivot Nut 41 1 Pulley/...Flywheel/Fan 42 1 Motor Belt 43 1 Motor 44 2 Hood Bracket 45 1 Motor Tension Washer 46 1 Star Washer 47 22 Belly Pan Fastener 48 2 Belt Guide 49 2 Endcap Spacer 50 1 Frame Guide 51 1 52 4...
Description Key No. Qty. Bolt Upright Plug Maintenance Kit Walking Belt Storage Latch Bracket Front Roller Adj. Qty. Qty. Description 1 1 Frame 2 2 Rear Isolator 3 4 Rear Platform Screw ...32 1 Power Cord Grommet 33 1 Plug 34 1 Outlet Bracket 35 1 Circuit Breaker 36 11 Adjustment Washer 37 1 Magnet 38 1 Front Belly Pan 39 1 Motor Pivot Bolt 40 1 Motor Pivot Nut 41 1 Pulley/...Flywheel/Fan 42 1 Motor Belt 43 1 Motor 44 2 Hood Bracket 45 1 Motor Tension Washer 46 1 Star Washer 47 22 Belly Pan Fastener 48 2 Belt Guide 49 2 Endcap Spacer 50 1 Frame Guide 51 1 52 4...


